Thingiverse

Dutch Windmill by Tinkerman
by Thingiverse
Last crawled date: 2 years, 12 months ago
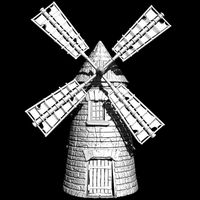
Dutch Windmill
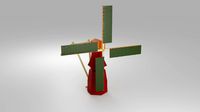
This Dutch windmill has been designed in such a way that it can be 3D printed on an FDM 3D printer without the use of support material. Only the 6 RAILING parts need a small support pillar on one of the ends.
The BLADE parts can be printed flat and can easily be set at an angle afterwards if printed in PLA. Just hold them in 40°C water and you will be able to bend them gently.
The windmill is designed to be motorized using the following 12V DC motor that you can buy at Conrad or Aliexpress etc.
Conrad link for DC motor:
https://www.conrad.nl/nl/modelcraft-rb350200-0a101r-transmissiemotor-12-v-1200-227579.html?sc.ref=Product%20Details
NOTE: This DC motor can be dimmed using a PWM dimmer, but this will reduce the motors life significantly! When using a 1:200 transmission the rotation speed of the windmill will be very realistic when running on 12V.
Once you have printed all the parts it will be very obvious how they will fit together, but if you have any questions, just let me know.
The CAP that has the DC motor inside can be assembled using M3 bolts, in order to be able to do maintenance on the motor.
You could add some LEDs to light up the inside of the windmill.
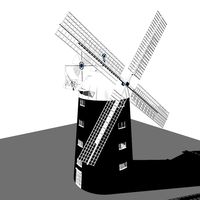
Dimensions:
Height (body): 400 mm
Total height with blades pointing up: 540 mm
Total blade span: 420 mm.
Width (footprint): 181 mm
Platform width: 276 mm (CR-10 max).
Steppermotor Upgrade 2018-4-17
I have upgraded the windmill with a NEMA17 steppermotor instead of the geared motor that is hard to get in some parts of the world and that has a very limited lifespan.
When using a steppermotor, controlled by an Arduino UNO all kinds of nice control options come available. Furthermore, when using 64 microsteps the steppermotor runs very smooth and silently, much more silent then the geared motor.
The included Arduino program (RANDOM_WINDMILL_17-4-2018.ino) lets the windmill run for random timespans (varying from 5 to 30 minutes) at various speeds (from fast to very slow). Then it pauses for a short while (varying from 10 to 40 seconds) with the blades in the upright position (according to regulations / tradition) before it resumes it's next run. All movements use acceleration / deceleration for a smooth and realistic running windmill.
New parts:
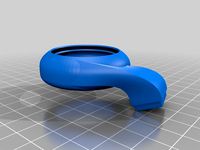
The steppermotor can be mounted using a newly created part called " ADAPTER FOR NEMA17 STEPPERMOTOR.STL". This part will fit a NEMA17 motor (of almost any length) inside the CAP, using the existing holes in the front of the CAP, so even if you have already build your windmill using a geared motor, you can still upgrade it with a stepper motor.
When you 3D print this part out of flexible material such as Polymaker Polyflex, this adapter part will act as a vibration damper and will make the assembly with the steppermotor very quite, almost silent.
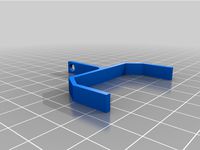
I have also included a new "BLADE GRIPPER FOR NEMA17.STL" for the 5 mm axle of the NEMA 17 steppermotor.
Bill of materials:
NEMA 17 stepper motor with 200 steps / rev (0.8°/step - approx. 4kg.cm Torque)
Power supply 12V - 1A
Power supply 5V - 1A (you might want to use a combi 12V + 5V power supply or a 12V
power supply with a step down converter to avoid two power supplies)
Arduino UNO (a lesser board would result in slower / jerky rotations)
MAKEBLOCK 2H microstep driver (cheap, easy, flexible and safe in use - suitable for a
wide range of current and microstep settings) or similar.
DIPswitch settings on the MAKEBLOCK 2H microstep driver:
SW1 = ON
SW2 = ON
SW3 = ON
SW4 = ON
SW5 = ON
SW6 = OFF
SW7 = OFF
DIP switch explanation: (0.44 A current (SW1-3) | half current at pause (SW4) | 64 microsteps (SW5-7))
NOTE: Almost any stepperdriver that can to be controlled with DIR and STEP (PULSE) signals from the Arduino, can be used for this purpose, (because we run at 440 mA),
although the cheaper ones (such as the Polulu A4988 and the TI DRV8825 used in 3D printer boards), will not be capable of doing 64 microsteps which I recommend for a smoothly running windmill.
Hooking things up electrically:
All electrical connections are very straightforward.
Just hook up the steppermotor to the MAKEBLOCK H2 stepperdriver A+A-B+B- ports;
Adjust all DIP switches (see above) on the H2 driver;
Connect 12V to the DC+ and GND to the DC- on the H2 driver (WARNING: Do not switch polarity or the H2 driver will die!).
Next:
Connect Digital OUT port 2 on the Arduino UNO to the DIR input of the H2 driver.
Connect Digital OUT port 3 on the Arduino UNO to the STEP input of the H2 driver.
Finally:
Connect the Vin input of the Arduino UNO to the +5V of the powersupply and the GND of the Arduino UNO to the GND (or COM) of the powersupply.
Alternatively you could also use just a 12V powersupply (not a combi-powersupply that outputs 12V and 5V DC) and connect 12V to the jack power input plug on the Arduino (7-12V input).
The 80mm cooling fan is optional (but advisable when putting everything inside the windmill) and can be connected to the 12V DC on the powersupply directly (very silent!).
Upload of "SOLID MODEL FOR SLA parts (2018-8-12)
I have included a special SOLID MODEL version of the entire windmill, consisting of only 5 parts that are specially redesigned for those who want to print this windmill on an SLA / DLP printer. All parts are amoung the thing files and have prefix "SOLID MODEL FOR SLA - "
All parts are now still in their original scale, so for most SLA printers you will have to scale them down. Currently the height of the part called "SOLIDMODEL FOR SLA - BODY.STL" is 320 mm, so you now know how much to scale the model down in order to make it in your own size.
Happy milling!
Tinkerman
This Dutch windmill has been designed in such a way that it can be 3D printed on an FDM 3D printer without the use of support material. Only the 6 RAILING parts need a small support pillar on one of the ends.
The BLADE parts can be printed flat and can easily be set at an angle afterwards if printed in PLA. Just hold them in 40°C water and you will be able to bend them gently.
The windmill is designed to be motorized using the following 12V DC motor that you can buy at Conrad or Aliexpress etc.
Conrad link for DC motor:
https://www.conrad.nl/nl/modelcraft-rb350200-0a101r-transmissiemotor-12-v-1200-227579.html?sc.ref=Product%20Details
NOTE: This DC motor can be dimmed using a PWM dimmer, but this will reduce the motors life significantly! When using a 1:200 transmission the rotation speed of the windmill will be very realistic when running on 12V.
Once you have printed all the parts it will be very obvious how they will fit together, but if you have any questions, just let me know.
The CAP that has the DC motor inside can be assembled using M3 bolts, in order to be able to do maintenance on the motor.
You could add some LEDs to light up the inside of the windmill.
Dimensions:
Height (body): 400 mm
Total height with blades pointing up: 540 mm
Total blade span: 420 mm.
Width (footprint): 181 mm
Platform width: 276 mm (CR-10 max).
Steppermotor Upgrade 2018-4-17
I have upgraded the windmill with a NEMA17 steppermotor instead of the geared motor that is hard to get in some parts of the world and that has a very limited lifespan.
When using a steppermotor, controlled by an Arduino UNO all kinds of nice control options come available. Furthermore, when using 64 microsteps the steppermotor runs very smooth and silently, much more silent then the geared motor.
The included Arduino program (RANDOM_WINDMILL_17-4-2018.ino) lets the windmill run for random timespans (varying from 5 to 30 minutes) at various speeds (from fast to very slow). Then it pauses for a short while (varying from 10 to 40 seconds) with the blades in the upright position (according to regulations / tradition) before it resumes it's next run. All movements use acceleration / deceleration for a smooth and realistic running windmill.
New parts:
The steppermotor can be mounted using a newly created part called " ADAPTER FOR NEMA17 STEPPERMOTOR.STL". This part will fit a NEMA17 motor (of almost any length) inside the CAP, using the existing holes in the front of the CAP, so even if you have already build your windmill using a geared motor, you can still upgrade it with a stepper motor.
When you 3D print this part out of flexible material such as Polymaker Polyflex, this adapter part will act as a vibration damper and will make the assembly with the steppermotor very quite, almost silent.
I have also included a new "BLADE GRIPPER FOR NEMA17.STL" for the 5 mm axle of the NEMA 17 steppermotor.
Bill of materials:
NEMA 17 stepper motor with 200 steps / rev (0.8°/step - approx. 4kg.cm Torque)
Power supply 12V - 1A
Power supply 5V - 1A (you might want to use a combi 12V + 5V power supply or a 12V
power supply with a step down converter to avoid two power supplies)
Arduino UNO (a lesser board would result in slower / jerky rotations)
MAKEBLOCK 2H microstep driver (cheap, easy, flexible and safe in use - suitable for a
wide range of current and microstep settings) or similar.
DIPswitch settings on the MAKEBLOCK 2H microstep driver:
SW1 = ON
SW2 = ON
SW3 = ON
SW4 = ON
SW5 = ON
SW6 = OFF
SW7 = OFF
DIP switch explanation: (0.44 A current (SW1-3) | half current at pause (SW4) | 64 microsteps (SW5-7))
NOTE: Almost any stepperdriver that can to be controlled with DIR and STEP (PULSE) signals from the Arduino, can be used for this purpose, (because we run at 440 mA),
although the cheaper ones (such as the Polulu A4988 and the TI DRV8825 used in 3D printer boards), will not be capable of doing 64 microsteps which I recommend for a smoothly running windmill.
Hooking things up electrically:
All electrical connections are very straightforward.
Just hook up the steppermotor to the MAKEBLOCK H2 stepperdriver A+A-B+B- ports;
Adjust all DIP switches (see above) on the H2 driver;
Connect 12V to the DC+ and GND to the DC- on the H2 driver (WARNING: Do not switch polarity or the H2 driver will die!).
Next:
Connect Digital OUT port 2 on the Arduino UNO to the DIR input of the H2 driver.
Connect Digital OUT port 3 on the Arduino UNO to the STEP input of the H2 driver.
Finally:
Connect the Vin input of the Arduino UNO to the +5V of the powersupply and the GND of the Arduino UNO to the GND (or COM) of the powersupply.
Alternatively you could also use just a 12V powersupply (not a combi-powersupply that outputs 12V and 5V DC) and connect 12V to the jack power input plug on the Arduino (7-12V input).
The 80mm cooling fan is optional (but advisable when putting everything inside the windmill) and can be connected to the 12V DC on the powersupply directly (very silent!).
Upload of "SOLID MODEL FOR SLA parts (2018-8-12)
I have included a special SOLID MODEL version of the entire windmill, consisting of only 5 parts that are specially redesigned for those who want to print this windmill on an SLA / DLP printer. All parts are amoung the thing files and have prefix "SOLID MODEL FOR SLA - "
All parts are now still in their original scale, so for most SLA printers you will have to scale them down. Currently the height of the part called "SOLIDMODEL FOR SLA - BODY.STL" is 320 mm, so you now know how much to scale the model down in order to make it in your own size.
Happy milling!
Tinkerman
Similar models
grabcad
free

DC-DC converter 12v-5v 3A
...ter 12v-5v 3a
grabcad
these are the cheap "automotive" dc-dc converters you buy on ebay.
used on some arduino projects
thingiverse
free

Stepper Motor Slider by GUTO_Graber_i3
...dc 12v or 5v and a driver;
use lubricant if you want;
2 allen m4;
1 end stop switch;
arduino code to example .ino in thing files!
thingiverse
free

Roaming Robot by lynce9956
...5v dc 4-phase 5-wire + uln2003 driver board
range finder: hc-sr04
microcontroller: arduino uno
https://youtu.be/n5mby3c59hc
grabcad
free

TB6600 Stepper motor driver by taitran
... output 4a peak current, which is enough for the most of stepper motors. the stepper driver supports speed and direction control.
grabcad
free

TB6600 stepper motor driver by prodes
... output 4a peak current, which is enough for the most of stepper motors. the stepper driver supports speed and direction control.
grabcad
free

TB6600 Stepper motor driver by Tdesign
... output 4a peak current, which is enough for the most of stepper motors. the stepper driver supports speed and direction control.
grabcad
free

TB6600 Stepper motor driver by Taitran Technic
... output 4a peak current, which is enough for the most of stepper motors. the stepper driver supports speed and direction control.
grabcad
free

TB6600 stepper motor driver by proma
... output 4a peak current, which is enough for the most of stepper motors. the stepper driver supports speed and direction control.
grabcad
free

2PH64011A Motor Driver - Comp. with 28BYJ - 48 5V DC
...2ph64011a motor driver - comp. with 28byj - 48 5v dc
grabcad
2ph64011a motor driver - comp. with 28byj - 48 5v dc
thingiverse
free
ski chairlift by rekkel
...n detector on a seperate arduino to move the motors smooth.
if you want the schema's and the sketchs. let me know.
have fun!!
Tinkerman
thingiverse
free

Gargoyle by Tinkerman
...use of supports is advised but the model will print 90% correct without supports (see example in gold)
happy printing!
tinkerman.
thingiverse
free
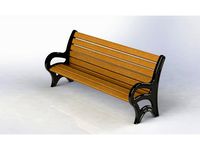
Outdoor bench by Tinkerman
...ood) and 1 piece of the bench side (l + r) each and press (or glue) the pieces together. that's it!
happy printing,
tinkerman
thingiverse
free

Fireplace by Tinkerman
...ut 3d flickering leds inside the flames and to color the lower part of the flames black (wood blocks).
happy printing!
tinkerman
thingiverse
free

Dollhouse vase by Tinkerman
...nsparant pet and it turned out pretty silvery,
in spite of my infill setting of 100%. can anyone achieve a more transparant look?
thingiverse
free

Dollhouse picture frame (cartoon style) by Tinkerman
...dollhouse picture frame (cartoon style) by tinkerman
thingiverse
dollhouse picture frame approx. 9x7 cm
thingiverse
free

Kyocera Stadium by Tinkerman
...nt settings:
pla: hotend 220°c - bed - 45°c
speed: 70 mm/s
layer height: 0.3 mm
nozzle diameter: 0.6 mm
happy printing,
tinkerman
thingiverse
free

Dollhouse classic table by Tinkerman
...20 cm long, 16 cm wide and approx. 10cm high and was specially designed for a knitted doll and her accessories that my wife made.
thingiverse
free

Medieval Cauldron by Tinkerman
...e of the pot reaches an angle of approx. 55 degrees a flat bottom comes in to top it off using bridging.
happy cooking!
tinkerman
thingiverse
free

Market Stall by Tinkerman
...glue), but almost any other glue will do fine too.
the current scale of these models is approx. 1:15.
happy printing!
tinkerman
thingiverse
free
Omnidirectional Fanduct for Tinkerman's E3D Titan Aero Bracket (with Vulcano hot-end) for the CR-10 by Tinkerman
...he non-volcano hot-end. filename: fanduct titan aero - non-volcano (65 mm diameter).stl
happy bridging and be cool!
tinkerman.
Windmill
3d_export
$20

windmill
...windmill
3dexport
windmill
3d_export
$9
windmill
...windmill
3dexport
windmill.
3d_export
$5

Windmill
...windmill
3dexport
windmill
turbosquid
$30
Windmill
...bosquid
royalty free 3d model windmill for download as blend on turbosquid: 3d models for games, architecture, videos. (1698533)
3d_ocean
$9
Windmill
... number of polygons – 1794 • number of vertices – 1833 • separate meshes for blades, tower, motor area etc. • size approx. 260ft.
3d_export
$20
dutch windmill
...dutch windmill
3dexport
there is a simple windmill for game development.
turbosquid
$10

windmill
...free 3d model windmill for download as max, obj, fbx, and dae on turbosquid: 3d models for games, architecture, videos. (1495270)
turbosquid
$40

windmill
... available on turbo squid, the world's leading provider of digital 3d models for visualization, films, television, and games.
turbosquid
$30
Windmill
... available on turbo squid, the world's leading provider of digital 3d models for visualization, films, television, and games.
turbosquid
$25

Windmill
... available on turbo squid, the world's leading provider of digital 3d models for visualization, films, television, and games.
Dutch
turbosquid
$20

Dutch Windmill
... dutch windmill for download as blend, fbx, dae, obj, and stl on turbosquid: 3d models for games, architecture, videos. (1687819)
turbosquid
free

Dutch Food
... available on turbo squid, the world's leading provider of digital 3d models for visualization, films, television, and games.
3d_export
$65

dutch town
...dutch town
3dexport
simple rendering of the scene file
3d_export
$65

dutch town
...dutch town
3dexport
simple rendering of the scene file
3d_export
$65

dutch town
...dutch town
3dexport
simple rendering of the scene file
3d_export
$20
dutch windmill
...dutch windmill
3dexport
there is a simple windmill for game development.
3ddd
$1

Dutch Summer - The BUX
...ельной компании dutch summer. официальное название пуфика — the bux. горшок для пуфика сделан из пластмасы, а сам кактус из кожи.
3ddd
$1
Dutch Industrial Console
... lugarno
умывальник от компании restoration hardware
со смесителем lugarno 8" widespread faucet
turbosquid
free

Dutch Mail Box
... available on turbo squid, the world's leading provider of digital 3d models for visualization, films, television, and games.
3d_export
$99

Dutch YPR765 3D Model
... army police marechaussee personnel carrier apc acav apc tank military army war combat
dutch ypr765 3d model squir 21283 3dexport