Thingiverse
Duplicator 4 Active Cooling (40mm x 20mm Blower) by calvintam
by Thingiverse
Last crawled date: 3 years ago
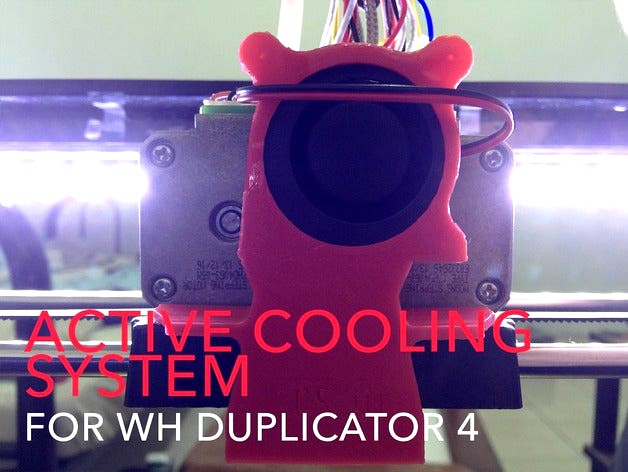
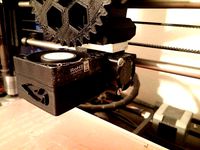
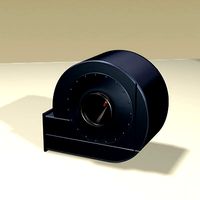
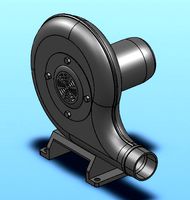
This Active Cooling System is made for the Wanhao Duplicator 4 series and Flashforge. This variation is made to fit blower type fans that is 40mm big (24V), 20mm thick, although 10mm thickness would probably work too.
UPDATE! (V2)
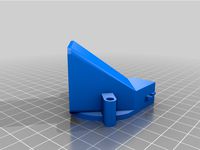
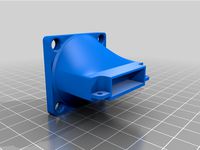
Hey guys, if you have downloaded the previous duct, please redownload V2. I noticed there's some problems with the fan position being too high that it hits the casing when the extruder is being homed. This has been corrected in V2, it now sits below the case with a certain gap space. Also I have changed the fan bracket to the bottom, so now there's no need to print supports for it. Notice that the 3 holes on the screws mount are significantly smaller than the fan's screw holes, this is intentional. Use woodscrews (Screws with sharp ends) and screw it into the screw mounts to securely fasten the fan. Also I have redesigned the entire vent so that fan sits comfortably on top of it. Overall, this design is vastly superior to the first version.
Why Active Cooling?
Most of the time when it comes to insufficient heat, the solution is simple, increase the temp (bed/nozzle), wall up the printer sides so retain heat. However while increasing heat could help with bed adhesion and extrusion, plastic also needs time to cool to properly layer and bridge. If you spot areas in your print where lines are drooping or bowling upwards, your plastic isn't cool enough.
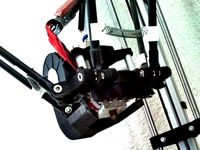
Active Cooling Helps
Active Cooling enables the plastic to cool down much quicker enabling bridging longer distances possible. Also when printing at higher speeds, active cooling enables layers to harden before the next layer is printed. Without Active Cooling, your nozzle could press against the previous still molten layer, thus causing it to bowl up and ruin the print.
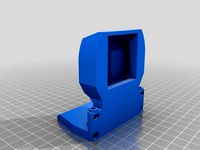
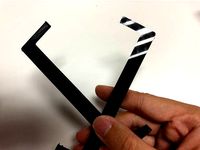
Wiring the Active Cooling 3rd Fan
There's a tutorial on how to wire the fan in the 5th image panel, however this is just a suggestion. I added this because other active cooling projects did not detail much on this, and I had to find it out for myself. As for why this is a suggestion, this method is just tapping off power from the motherboard fan to power your AC fan. This means it is always on, regardless of printer states. This is sufficient for active cooling, but you might want to embark further into transferring the wires to the extra fan port, enabling you to control the fan using gcode.
Printing Settings
Without ACS, it's better to print with supports. I went with 0.2mm with 30% infill.
UPDATE! (V2)
Hey guys, if you have downloaded the previous duct, please redownload V2. I noticed there's some problems with the fan position being too high that it hits the casing when the extruder is being homed. This has been corrected in V2, it now sits below the case with a certain gap space. Also I have changed the fan bracket to the bottom, so now there's no need to print supports for it. Notice that the 3 holes on the screws mount are significantly smaller than the fan's screw holes, this is intentional. Use woodscrews (Screws with sharp ends) and screw it into the screw mounts to securely fasten the fan. Also I have redesigned the entire vent so that fan sits comfortably on top of it. Overall, this design is vastly superior to the first version.
Why Active Cooling?
Most of the time when it comes to insufficient heat, the solution is simple, increase the temp (bed/nozzle), wall up the printer sides so retain heat. However while increasing heat could help with bed adhesion and extrusion, plastic also needs time to cool to properly layer and bridge. If you spot areas in your print where lines are drooping or bowling upwards, your plastic isn't cool enough.
Active Cooling Helps
Active Cooling enables the plastic to cool down much quicker enabling bridging longer distances possible. Also when printing at higher speeds, active cooling enables layers to harden before the next layer is printed. Without Active Cooling, your nozzle could press against the previous still molten layer, thus causing it to bowl up and ruin the print.
Wiring the Active Cooling 3rd Fan
There's a tutorial on how to wire the fan in the 5th image panel, however this is just a suggestion. I added this because other active cooling projects did not detail much on this, and I had to find it out for myself. As for why this is a suggestion, this method is just tapping off power from the motherboard fan to power your AC fan. This means it is always on, regardless of printer states. This is sufficient for active cooling, but you might want to embark further into transferring the wires to the extra fan port, enabling you to control the fan using gcode.
Printing Settings
Without ACS, it's better to print with supports. I went with 0.2mm with 30% infill.
Similar models
thingiverse
free
Rear active cooling duct with 40mm fan and LED lighting (Duplicator 4 dual) by CyberMosfet
...- the 10mm fan stuck out by 1mm.
changes to the temporary support of the blower outlet ridge - it curled upward while printing.
thingiverse
free

Hypercube Dual 5015 Blower 40mm Hotend for E3D V6 by maxstier
...stic and further away from the heat block/nozzle/thermistor which should help maintain steady temperatures when the fans kick on.
thingiverse
free

High performance cooling assembly by Gascat
...it from pla and used it to print at nozzle temperatures as high as 245-250c and it survived the print without noticeable damage).
thingiverse
free
Delta Printer Nozzle Fan/Blower Lüfter by Tadoxx
...delta printer nozzle fan/blower lüfter by tadoxx
thingiverse
fan for cooling the printobject with a blower fan (40mm)
thingiverse
free
Flash Forge Creator Pro - active cooling fan holder by vindolin
... fan cable to the unpopulated fet6 connector on the mightyboard.
especially pla print quality is much improved with a nozzle fan!
thingiverse
free

40mm Aperture Top Fan Cover for CR-10 Fang Blower by SteveGibbs
...a cover for the top 40mm x 20mm fan on the "fang" blower cooler, printer, shroud, thing... it's pretty cool... yeah
thingiverse
free
Prusa Nozzle Mk2 Cooling Shroud with 40mm & 20mm fan mounts. by Haroo
...d an equivalent model i made my own! added a simple 40 mm fan mount with a slot aimed at the tip of the nozzle for print cooling.
thingiverse
free

Titan Aero FanDuct - theUGLY by BogdanKecman
...tancer" ... also the white pieces on the part blower fan are also just a fat tpu washers i printed as screws are too long :)
thingiverse
free
50mm part fan conversion by mechracer84
...hould fit your existing cooling nozzles and mounting hardware. the 40mm fan is mounted to the duct using 2mm coarse thread screws
thingiverse
free
bullseye blower to 40mm noctua silent fan conversion bolt in place by passion4paint
...ts in place where the blower fan was using the blower fan screws then just mount your noctua fan to the top and wire in as needed
Calvintam
thingiverse
free

Slurp Logo Collectable by calvintam
...ud point of sales system that runs on the ipad. since our logo is so rad, why the heck not make it a collectable? we love models!
thingiverse
free

Chromecast Audio by calvintam
...m of the model, so i have added a new file with the object split in half, this way you can print two copies and glue em together.
thingiverse
free
Mod T - Lockbars STL by calvintam
...rint modt lockbars on any 3d printers, i printed mine on an ultimaker 2, which gives it a mirror like finish with better quality.
thingiverse
free

Rubber Band Gun (3DPrintDay) by calvintam
...est rbg you will ever assemble from thingiverse.
see how it is modelled and created : https://www.youtube.com/watch?v=ga96fyhvgte
thingiverse
free

Easel Watch Stand (EWS-01) by calvintam
...the style department when it comes to charging your apple watch with the ews-01.
print without supports with 0.2mm layer height.
thingiverse
free

Desk Multi-Item Organizer (DMIO-01) by calvintam
...needs (no promises).
**this accessory is designed to match the accessories (ews-01 & fws-01).
print without supports, 0.2mm.
thingiverse
free

Secret Hitler Board Game Enhanced by calvintam
...oject.
feedbacks
feedbacks are welcome, do let me know in the comments, and as always please leave your makes if you print these.
thingiverse
free

Framed Watch Stand (FWS-01) by calvintam
...01 is placed on.
print with supports at 0.2mm. this design is not for commercial use, please contact the author for more details.
thingiverse
free

Ultimaker Bowden Fixer (BFX-01) by calvintam
...s helps me and the others to see if there are areas to improve on the design, as well as to show how it have helped your printer.
thingiverse
free

Practically Invisible Front Cover (for UM2+/Extended) by calvintam
...t helps people with measurements for their printers. the measurements provided by me is only applicable for ultimaker 2 printers.
Duplicator
turbosquid
$10

duplicate
...
turbosquid
royalty free 3d model duplicate for download as on turbosquid: 3d models for games, architecture, videos. (1566034)
turbosquid
$20

Wonderful duplicate kids room
...ul duplicate kids room for download as skp, 3ds, fbx, and obj on turbosquid: 3d models for games, architecture, videos. (1609462)
archive3d
free

Copier 3D Model
...hine duplicating machine
copier n160808 - 3d model (*.gsm+*.3ds) for interior 3d visualization.
3d_export
$30
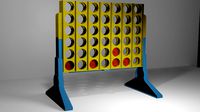
connect four set
...ate objects that can be disassembled. includes one red and one black checker which can be duplicated to the standard 42 checkers.
3ddd
$1
Черепица
...del
- put it in your scene and duplicate
- level of detail can be edited
- open with 3ds max 2010-2013 or import in your program.
3d_export
$27

Dividing Cell / Ovule 3D Model
...al microbe blob ovum fiction science ovule duplication divide dividing
dividing cell / ovule 3d model duchampmodels 9691 3dexport
3d_ocean
$16

Folding Chair
...tubing. designed to be good low poly at a distance and mesh smooth pretty well and light weight for duplicating a lot. package...
3d_export
$8
wooden fence
... one post separate so the fence can be duplicated and extended. created in blender 3.0 file format fbx with texture painted maps.
3d_export
$8
wooden fence
... one post separate so the fence can be duplicated and extended. created in blender 3.0 file format fbx with texture painted maps.
3d_ocean
$2

DNA Strands Of 5 Types
... strands that can be multiplied and can be made long chains by duplicating them and can be easily applied materials and textures.
Blower
3d_export
$5
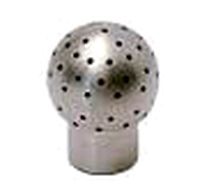
ball blower
...ball blower
3dexport
ball blower
3d_export
$10

engine blower assambly
...engine blower assambly
3dexport
engine blower assambly
3d_export
$5
air pipe blower
...air pipe blower
3dexport
air pipe blower
3d_export
$5
air hand blower
...air hand blower
3dexport
air hand blower
3d_export
$5
Blower Boom 3D Model
...blower boom 3d model
3dexport
boom blower
blower boom 3d model bkl1989 63079 3dexport
turbosquid
$44
blower-dxf
... available on turbo squid, the world's leading provider of digital 3d models for visualization, films, television, and games.
turbosquid
$39

Old Blower
...l old blower for download as ma, max, gltf, fbx, obj, and stl on turbosquid: 3d models for games, architecture, videos. (1638848)
3d_export
$7
zy series centrifugal blower
...zy series centrifugal blower
3dexport
zy series centrifugal blower
3d_export
$5
root blower compressor
...oot blower compressor
3dexport
you will get both .stl and .sldprt format of root blower compressor from here at very cheap rate.
turbosquid
$5
V8 engine with blower
... available on turbo squid, the world's leading provider of digital 3d models for visualization, films, television, and games.
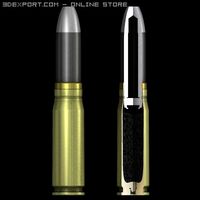
40Mm
turbosquid
$10

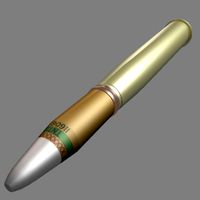
40MM Bullet
... available on turbo squid, the world's leading provider of digital 3d models for visualization, films, television, and games.
turbosquid
$49
40mm Vickers-Terni
... free 3d model 40mm vickers-terni for download as lwo and obj on turbosquid: 3d models for games, architecture, videos. (1260063)
turbosquid
$3
40mm grenade M9XX
...y free 3d model 40mm grenade m9xx for download as obj and fbx on turbosquid: 3d models for games, architecture, videos. (1408150)
turbosquid
$3

40mm grenade M3XX
...y free 3d model 40mm grenade m3xx for download as obj and fbx on turbosquid: 3d models for games, architecture, videos. (1408145)
turbosquid
$3
40mm grenade M1XX
...y free 3d model 40mm grenade m1xx for download as obj and fbx on turbosquid: 3d models for games, architecture, videos. (1408144)
turbosquid
$8

40mm Smith & Wesson
... available on turbo squid, the world's leading provider of digital 3d models for visualization, films, television, and games.
turbosquid
free
Free 40mm grenade M433
...e 3d model free 40mm grenade m433 for download as obj and fbx on turbosquid: 3d models for games, architecture, videos. (1404768)
turbosquid
$98

40mm 6G30 grenade launcher
... available on turbo squid, the world's leading provider of digital 3d models for visualization, films, television, and games.
turbosquid
$10

Famas G2 M203 40mm.
... available on turbo squid, the world's leading provider of digital 3d models for visualization, films, television, and games.
turbosquid
free
40mm Bofors TNT-11606
... available on turbo squid, the world's leading provider of digital 3d models for visualization, films, television, and games.
20Mm
3d_export
$20
german 20mm flak
...german 20mm flak
3dexport
german 20mm flak
turbosquid
$58
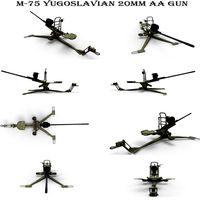
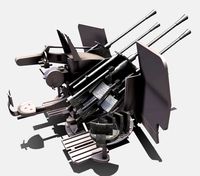
M-75 20mm AA
...squid
royalty free 3d model m-75 20mm aa for download as obj on turbosquid: 3d models for games, architecture, videos. (1174302)
turbosquid
$5

Drill Bit Set 6mm to 20mm
...ill bit set 6mm to 20mm for download as stl, sldpr, and sldas on turbosquid: 3d models for games, architecture, videos. (1257104)
turbosquid
free

Oerlikon 20mm anti-aircraft gun
...mm anti-aircraft gun for download as lwo, obj, fbx, and blend on turbosquid: 3d models for games, architecture, videos. (1430549)
turbosquid
free

20mm Flak 38 Flakveirling (Simple)
... available on turbo squid, the world's leading provider of digital 3d models for visualization, films, television, and games.
turbosquid
$7

Ammo Box WWII US Military 20mm MK3
...mmo box wwii us military 20mm mk3 for download as max and obj on turbosquid: 3d models for games, architecture, videos. (1360607)
cg_studio
$35

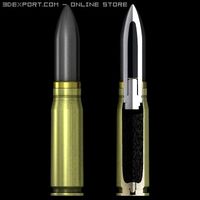
German 20mm MG151/20 Sprgr cartridge with cutaway3d model
...j - german 20mm mg151/20 sprgr cartridge with cutaway 3d model, royalty free license available, instant download after purchase.
cg_studio
$35

German 20mm MG151/20 Pzgr cartridge with cutaway3d model
...obj - german 20mm mg151/20 pzgr cartridge with cutaway 3d model, royalty free license available, instant download after purchase.
3d_export
$35
German 20mm MG15120 cartridge with cutaway 3D Model
...ammunition munition granate panzer airforce luftwaffe
german 20mm mg15120 cartridge with cutaway 3d model emeral_d 21635 3dexport
3d_export
$35
German 20mm MG 15120 cartridge with cutaway 3D Model
...mmunition munition granate panzer airforce luftwaffe
german 20mm mg 15120 cartridge with cutaway 3d model emeral_d 21633 3dexport
Active
3ddd
$1

Active
...active
3ddd
стул
офисный стул active
3ddd
$1

Умывальник ACTIVE
...смеситель activeihttp://www.idealstandard.ru/product-details/active-umyvalnik-64-sm-1-otverstie-pod-smesitel/t0547.html
3ddd
$1

CILEK SL ACTIVE
...cilek sl active
3ddd
cilek
cilek active (sl active white) sla-1304 кровать «selen»
3ddd
$1

Cilek SL ACTIVE
...k sl active
3ddd
cilek , стеллаж
cilek active (sl active white) 1501-sla стеллаж «hayal»
turbosquid
$30
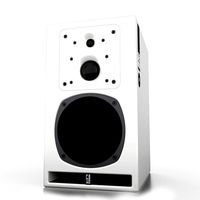
Active Speakers
...odel active speakers for download as blend, dae, fbx, and obj on turbosquid: 3d models for games, architecture, videos. (1713003)
turbosquid
$3
seizure activity
... available on turbo squid, the world's leading provider of digital 3d models for visualization, films, television, and games.
3ddd
$1

CILEK SL ACTIVE
...cilek sl active
3ddd
cilek
шкаф фирмы cilek из коллекции sl active white
3ddd
$1
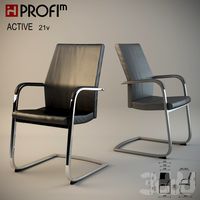
PROFIM active 21v
...dd
profim , стул
кресло "profim"
модель "active 21v"
материал: кожа
3ddd
$1

PROFIM active 11sl
..., кресло
офисное кресло "profim"
модель "active 11sl"
материал: кожа
turbosquid
$19

chilren activity table
...ree 3d model activity table for download as max, fbx, and obj on turbosquid: 3d models for games, architecture, videos. (1643610)
Cooling
3d_export
$5

cool penguin
...cool penguin
3dexport
cool penguin
turbosquid
$1
cooling
... available on turbo squid, the world's leading provider of digital 3d models for visualization, films, television, and games.
3d_export
$26
cooling tower
...ers.<br>model with full detail in real size. all nodes and bolted connections are built. it was designed for nuclear power.
3ddd
$1

Mantra Cool
...14 версиях и obj-файл, а также материал для включенного и для выключенного светильника. turbosmooth/meshsmooth при необходимости.
3d_export
$5
cool electric guitar
...cool electric guitar
3dexport
cool electric guitar
turbosquid
$5

Cooling glass
...quid
royalty free 3d model cooling glass for download as obj on turbosquid: 3d models for games, architecture, videos. (1193829)
turbosquid
$30

CPU Cooling
...royalty free 3d model cpu cooling for download as max and fbx on turbosquid: 3d models for games, architecture, videos. (1386263)
turbosquid
$5

Cool CLoud
...
royalty free 3d model cool cloud for download as ma and obj on turbosquid: 3d models for games, architecture, videos. (1572300)
3d_export
$5
table cooling fan
...table cooling fan
3dexport
table cooling fan made of black plastic. individual small size cooling fan for office desk.
turbosquid
$29

cooling tower
... model cooling tower for download as obj, fbx, blend, and dae on turbosquid: 3d models for games, architecture, videos. (1396294)
4
turbosquid
$9

Office Chair 4-4
... available on turbo squid, the world's leading provider of digital 3d models for visualization, films, television, and games.
3d_export
$5

doors- 4
...doors- 4
3dexport
doors 4
3d_export
$5

hinge 4
...hinge 4
3dexport
hinge 4
3ddd
$1

Штора №4
...штора №4
3ddd
штора №4
3d_export
free

playstation 4
...playstation 4
3dexport
playstation 4
turbosquid
$1

re 4-4 electric locomotive
... free 3d model re 4 4 electric locomotive for download as obj on turbosquid: 3d models for games, architecture, videos. (1707845)
3ddd
$1

nexus 4
...nexus 4
3ddd
lg , телефон
nexus 4
3ddd
$1

4 Poufs
...4 poufs
3ddd
пуф
4 soft poufs
turbosquid
$12

Calligraphic Digit 4 Number 4
...hic digit 4 number 4 for download as max, obj, fbx, and blend on turbosquid: 3d models for games, architecture, videos. (1389332)
3ddd
$1

Dauphin 4+
...dauphin 4+
3ddd
кресло
dauphin 4+ конференц кресло