Thingiverse
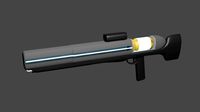
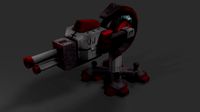
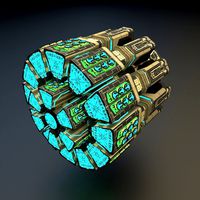
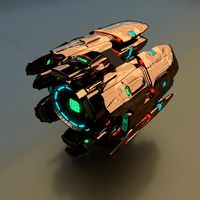
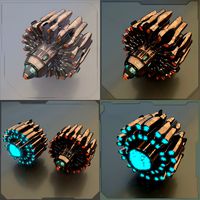
Duet Laser Filament Sensor For Direct Drive E3DV6 by Jadoglio
by Thingiverse
Last crawled date: 3 years, 3 months ago
This is a remix of the device at the following URL:https://www.thingiverse.com/thing:4341389#Print%20Settings
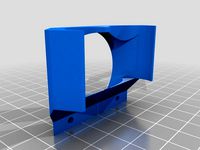
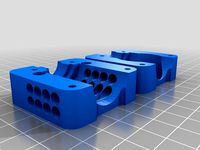
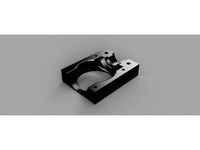
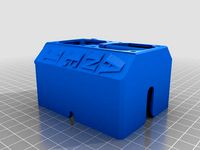
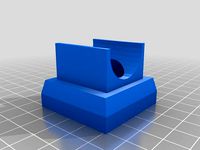
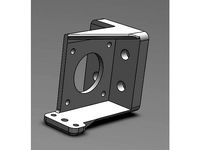
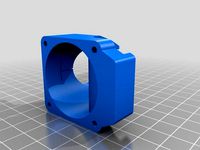
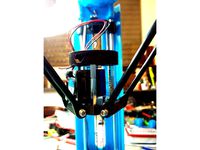
This is significantly different on the outside versus the original model. I needed to change the shape so I could mount this directly on top of my Basaraba mounted Direct Drive extruder and E3D V6 hot end. The device mounts on a base I designed for another filament monitor. (https://www.thingiverse.com/thing:4563159).
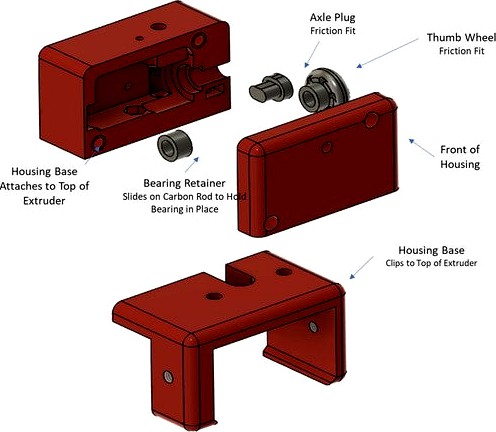
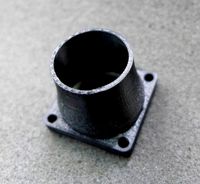
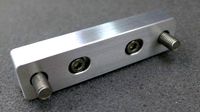
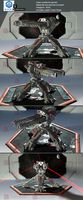
The inside is very similar using most of the original design. I removed the tension spring system because I could not get GT2 springs with long enough legs to make it work. I replaced it with an axle that can move slightly in a slot. I then added tension adjuster screws that are inserted from the back that allow the user to change the tension between the grooved pulley and the drive gear. I also added a external axle drive wheel to help with filament feeding if needed and it also allows you to monitor the movement of the drive gear and filament to make sure it is moving as it should. I also removed the Bowden tube connector and resized the hole so I could just insert a piece of Bowden tube in it with a friction fit. Then I added a hole to view the LED's on the monitor without the need for the clear filament. Last I added a collar on the gear shaft to minimize and movement of the shaft and a plug to hold in the grooved bearing shaft.
To see how internal parts fit together follow link above to original design. All STL and STEP files are included for further modification.
RepRap Firmware configuration I use:
M591 D0 P5 S1 C"E0_Stop" R0:550 E3.0
D = Duet3D laser sensor for extruder drive 0
C = Connected to endstop input E0_Stop (E0) (C"E0_Stop")
R = Tolerance 0 to 550% (R0:550)
still need to calibrate this, you will also have to do that for your setup
E = 3mm comparison length (E3.0)
S = Monitoring enabled (S1)
Bill of Material: (Mostly plagiarized from original design)
Laser filament monitor or clonehttps://smile.amazon.com/gp/product/B081MVR76N/ref=ppx_yo_dt_b_asin_title_o01_s00?ie=UTF8&psc=1
5 mm diameter Carbon fiber rodhttps://www.amazon.com/gp/product/B07LCK19D5/ref=ppx_yo_dt_b_asin_title_o01_s00?ie=UTF8&th=1
U604 U groove deep groove ball bearing 4x12x4mmhttps://smile.amazon.com/gp/product/B07VRK86SP/ref=ppx_yo_dt_b_asin_title_o01_s00?ie=UTF8&psc=1
2 x MR95ZZ bearinghttps://www.aliexpress.com/item/32815201066.html?spm=a2g0o.productlist.0.0.423f3f86R7CXux&algo_pvid=e599ffa7-d854-4ef0-8640-a19ce0d67ccf&algo_expid=e599ffa7-d854-4ef0-8640-a19ce0d67ccf-0&btsid=0ab6f82315899601547247037e2962&ws_ab_test=searchweb0_0,searchweb201602_,searchweb201603_
1x Extruder pulley 36 teethhttps://www.amazon.com/gp/product/B07P5Z2G9Z/ref=ppx_yo_dt_b_asin_title_o00_s00?ie=UTF8&psc=1
1 x 4mm L=20mm steel rod
(I used a 1 5/16" drill bit and cut 20mm off the shank with my dremel))
Fasteners
2 x M3 L = 25mm screw To mount case halves together
2 x M3 L= 12mm Screw for mounting Monitor to Base
2 x M3 Nuts to attach base
2 x M3 insert brass nut for connecting front and back covers
2 x M2 L = 4mm screw for plastic for mounting monitor
2 x M3 L=8mm screw for adjusting pulley/gear tension
This is significantly different on the outside versus the original model. I needed to change the shape so I could mount this directly on top of my Basaraba mounted Direct Drive extruder and E3D V6 hot end. The device mounts on a base I designed for another filament monitor. (https://www.thingiverse.com/thing:4563159).
The inside is very similar using most of the original design. I removed the tension spring system because I could not get GT2 springs with long enough legs to make it work. I replaced it with an axle that can move slightly in a slot. I then added tension adjuster screws that are inserted from the back that allow the user to change the tension between the grooved pulley and the drive gear. I also added a external axle drive wheel to help with filament feeding if needed and it also allows you to monitor the movement of the drive gear and filament to make sure it is moving as it should. I also removed the Bowden tube connector and resized the hole so I could just insert a piece of Bowden tube in it with a friction fit. Then I added a hole to view the LED's on the monitor without the need for the clear filament. Last I added a collar on the gear shaft to minimize and movement of the shaft and a plug to hold in the grooved bearing shaft.
To see how internal parts fit together follow link above to original design. All STL and STEP files are included for further modification.
RepRap Firmware configuration I use:
M591 D0 P5 S1 C"E0_Stop" R0:550 E3.0
D = Duet3D laser sensor for extruder drive 0
C = Connected to endstop input E0_Stop (E0) (C"E0_Stop")
R = Tolerance 0 to 550% (R0:550)
still need to calibrate this, you will also have to do that for your setup
E = 3mm comparison length (E3.0)
S = Monitoring enabled (S1)
Bill of Material: (Mostly plagiarized from original design)
Laser filament monitor or clonehttps://smile.amazon.com/gp/product/B081MVR76N/ref=ppx_yo_dt_b_asin_title_o01_s00?ie=UTF8&psc=1
5 mm diameter Carbon fiber rodhttps://www.amazon.com/gp/product/B07LCK19D5/ref=ppx_yo_dt_b_asin_title_o01_s00?ie=UTF8&th=1
U604 U groove deep groove ball bearing 4x12x4mmhttps://smile.amazon.com/gp/product/B07VRK86SP/ref=ppx_yo_dt_b_asin_title_o01_s00?ie=UTF8&psc=1
2 x MR95ZZ bearinghttps://www.aliexpress.com/item/32815201066.html?spm=a2g0o.productlist.0.0.423f3f86R7CXux&algo_pvid=e599ffa7-d854-4ef0-8640-a19ce0d67ccf&algo_expid=e599ffa7-d854-4ef0-8640-a19ce0d67ccf-0&btsid=0ab6f82315899601547247037e2962&ws_ab_test=searchweb0_0,searchweb201602_,searchweb201603_
1x Extruder pulley 36 teethhttps://www.amazon.com/gp/product/B07P5Z2G9Z/ref=ppx_yo_dt_b_asin_title_o00_s00?ie=UTF8&psc=1
1 x 4mm L=20mm steel rod
(I used a 1 5/16" drill bit and cut 20mm off the shank with my dremel))
Fasteners
2 x M3 L = 25mm screw To mount case halves together
2 x M3 L= 12mm Screw for mounting Monitor to Base
2 x M3 Nuts to attach base
2 x M3 insert brass nut for connecting front and back covers
2 x M2 L = 4mm screw for plastic for mounting monitor
2 x M3 L=8mm screw for adjusting pulley/gear tension
Similar models
thingiverse
free

Ender 3 Voltage Regualtion box with switch
...3_s00?ie=utf8&psc=1
jst-xh: https://www.amazon.com/gp/product/b07x9mj8g2/ref=ppx_yo_dt_b_asin_title_o04_s02?ie=utf8&psc=1
thingiverse
free
diamondLife Guitar Hanger Faceplate
...title_o02_s00?ie=utf8&psc=1
https://www.amazon.com/gp/product/b00lt1nyru/ref=ppx_yo_dt_b_asin_title_o01_s00?ie=utf8&psc=1
thingiverse
free
FNAF BonBon animatronic puppet by XMASBAD
...title_o04_s02?ie=utf8&psc=1
https://www.amazon.com/gp/product/b06xcrsd3t/ref=ppx_yo_dt_b_asin_title_o01_s00?ie=utf8&psc=1
thingiverse
free

Turntable
...amp;psc=1
m3 screws m3x6 or m3x8https://www.amazon.com/gp/product/b07twz7x38/ref=ppx_yo_dt_b_asin_title_o03_s00?ie=utf8&psc=1
thingiverse
free

UV-Lampe MK1
...s00?ie=utf8&psc=1
step-up-booster:https://www.amazon.de/gp/product/b01e086qz0/ref=oh_aui_detailpage_o04_s00?ie=utf8&psc=1
thingiverse
free

UV-Lampe MK2
...s00?ie=utf8&psc=1
step-up-booster:https://www.amazon.de/gp/product/b01e086qz0/ref=oh_aui_detailpage_o04_s00?ie=utf8&psc=1
thingiverse
free

Enceinte bluetooth
...s://www.amazon.fr/gp/product/b07jqmf3kk/ref=ppx_yo_dt_b_asin_title_o02_s00?ie=utf8&psc=1
use a 18650 battery for alimentation
thingiverse
free

Glotzkowsky MK1 by Scorch1262
...=oh_aui_detailpage_o00_s00?ie=utf8&psc=1
prozessor: microchip pic 18f1330
"reifen": gummibänder (ca: ø100mm x 10mm)
thingiverse
free

Filament Runout Sensor Side Mount for Creality,Tivo
...amazon.com/gp/product/b07n2gqhqt/ref=ppx_yo_dt_b_asin_title_o02_s00?ie=utf8&psc=1
you will need a few m3 screws and m3 t nuts
thingiverse
free

Z Axis Lead Screw Modification by Digger60
...
lead screw 8mm, 4 start, 500mm (2): https://www.amazon.com/gp/product/b018kfhtt6/ref=oh_aui_detailpage_o06_s00?ie=utf8&psc=1

Duet
turbosquid
$10

Duet
... available on turbo squid, the world's leading provider of digital 3d models for visualization, films, television, and games.
3ddd
$1
Orgadoor / Duet
...door , дверь
фабрика: orgadoor
коллекция: organic
модель: duet
сайт: www.orgadoor.com.ua
turbosquid
$47

Duet rally car
...uid
royalty free 3d model duet rally car for download as fbx on turbosquid: 3d models for games, architecture, videos. (1501869)
turbosquid
$39

Duet solid white
...d
royalty free 3d model duet solid white for download as fbx on turbosquid: 3d models for games, architecture, videos. (1236356)
turbosquid
free

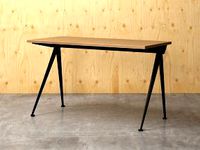
Bench with a table Duet
...del bench with a table duet for download as max, obj, and fbx on turbosquid: 3d models for games, architecture, videos. (1655855)
turbosquid
$13

chandelier Lussole Loft Duet
...
royalty free 3d model lussole loft duet for download as 3ds on turbosquid: 3d models for games, architecture, videos. (1180567)
turbosquid
$60

Duet classic car silver
...lty free 3d model duet classic car silver for download as fbx on turbosquid: 3d models for games, architecture, videos. (1489252)
turbosquid
$50

Duet classic car black
...alty free 3d model duet classic car black for download as fbx on turbosquid: 3d models for games, architecture, videos. (1490723)
turbosquid
$49

Duet car white and red
...alty free 3d model duet car white and red for download as fbx on turbosquid: 3d models for games, architecture, videos. (1486820)
turbosquid
$30

Bloom Upholstered Duet Lounge Chair
...model bloom upholstered duet lounge chair for download as max on turbosquid: 3d models for games, architecture, videos. (1503906)
E3Dv6
thingiverse
free
Dualfan for e3dv6 by CaJI9I
...dualfan for e3dv6 by caji9i
thingiverse
this fan for dual extruder e3dv6. spacing between nozzle 24 mm
thingiverse
free
e3dv6 mount remix by mokash770
...e3dv6 mount remix by mokash770
thingiverse
e3dv6 mount with bigger holes repired
thingiverse
free
E3Dv6 Bowden Clamp by x20011
...e3dv6 bowden clamp by x20011
thingiverse
this is a e3dv6 hotend clamp with an additional 40x40mm fan mount.
thingiverse
free
E3DV6 by makermitch69
...e3dv6 by makermitch69
thingiverse
this includes a custom cover for the anet a8 with a place for 4 leds
thingiverse
free
e3dv6 gran caudal 40mm by jj25000
...e3dv6 gran caudal 40mm by jj25000
thingiverse
e3dv6 ventilador 40x40
thingiverse
free
support e3dv6 + titan + bltouch by nikos1234
...support e3dv6 + titan + bltouch by nikos1234
thingiverse
support e3dv6 + titan + bltouch
thingiverse
free
E3dV6 fan 4040 by andreascarpelli
...040 by andreascarpelli
thingiverse
this is a design to have a single fan on a e3dv6 that fit a 4cm fan for extruder and hot end
thingiverse
free

e3dv6 fan duct by Snorkis
...r this e3dv6 mount https://www.thingiverse.com/thing:2790694?fbclid=iwar19pbsfb39c7m0kvpxb-f_wh3i_uoxl43d5ghoedarbmfezc-vwr01nnia
thingiverse
free

E3Dv6 mount for Renkforce RF500 by Timon_Suhk
...e3dv6 mount for renkforce rf500 by timon_suhk
thingiverse
two piece mount for e3dv6 on renkforce rf500.
thingiverse
free
E3Dv6 for 101 Hero by electrokill
...electrokill
thingiverse
wip
heres a mount for an e3dv6 for a 101 hero
other customizations follow so here is only the first part
Sensor
3d_export
free

parking sensor
...parking sensor
3dexport
car parking sensor
turbosquid
$1

Sensor
... available on turbo squid, the world's leading provider of digital 3d models for visualization, films, television, and games.
3d_export
$5

Smoke sensor
...port
smoke sensor, can be an impressive element for your projects. easy to use, realistic image, low polygon, quality materials.
3d_export
$5

Air Quality Sensor v1
...air quality sensor v1
3dexport
air quality sensor v1
3d_export
$15

float sensor
...e up render. - all parts and materials are logically named. other formats ================= - collada (.dae) - autodesk fbx - obj
turbosquid
$26

Wind sensor C
...free 3d model wind sensor c for download as 3ds, obj, and fbx on turbosquid: 3d models for games, architecture, videos. (1328943)
turbosquid
$26

Wind sensor B
...free 3d model wind sensor b for download as 3ds, obj, and fbx on turbosquid: 3d models for games, architecture, videos. (1328168)
3d_export
$5

ultrasound sensor
...ivers convert ultrasound into electrical signals, and transceivers can both transmit and receive ultrasound. export in: -obj -fbx
3ddd
free

Вытяжка Shindo pallada sensor
... вытяжка
вытяжка shindo pallada sensor. в двух размерах - 600 и 900. текстуры в комплекте.
turbosquid
$52

Wind sensor A B C
...
royalty free 3d model wind sensor a b c for download as fbx on turbosquid: 3d models for games, architecture, videos. (1408406)
Laser
3d_export
$5
laser
...laser
3dexport
a 3d laser
3d_export
free
cnc 3dp laser nozzle for 2w laser opt lasers
...logy that gave birth to cutting and engraving laser heads this laser nozzle was designed for, read the article in the link below:
3d_export
free
cnc laser mount opt lasers
...eive the engraving and cutting laser heads this cnc machine laser mount was designed for, read the article on the following page:
turbosquid
$20

Laser
... available on turbo squid, the world's leading provider of digital 3d models for visualization, films, television, and games.
turbosquid
$15
Laser
... available on turbo squid, the world's leading provider of digital 3d models for visualization, films, television, and games.
turbosquid
$3
Laser
... available on turbo squid, the world's leading provider of digital 3d models for visualization, films, television, and games.
3d_export
$5

laser sword
...laser sword
3dexport
it is a blue laser sword with a metal frame
3d_ocean
$19
Laser Turret
...be used in any sf type of game, especially in tower defense games. - laser turret: 3025 polygons - props: 270 polygons - textu...
3d_export
free
workbee cnc laser mount for opt lasers
...the specifications of engraving and cutting laser heads this mount was designed for, please take a look at the following website:
3d_export
free

shapeoko cnc laser mount for opt lasers
...ind out the opportunities that adding a cutting and engraving laser head to your cnc can bring, take a look at the website below:
Direct
design_connected
free
Compas Direction
...compas direction
designconnected
free 3d model of compas direction by vitra designed by prouvé, jean.
design_connected
$18
Direction Pivotant
...direction pivotant
designconnected
vitra direction pivotant computer generated 3d model. designed by prouvé, jean.
turbosquid
$6
not direct the front
...oyalty free 3d model not direct the front for download as max on turbosquid: 3d models for games, architecture, videos. (1213034)
turbosquid
$10

Rails Direct
... available on turbo squid, the world's leading provider of digital 3d models for visualization, films, television, and games.
3d_export
$5

Picto toilet directions
...lude 3d files next to rhino6: x3dv, step, igus, obj and stl. double-sided, flipping changes the gender directions to the toilets.
3ddd
$1
fauteuli direction
...d
chair , vitra , fauteuli
fauteuli vitra chair
design_connected
$18

Fauteuil Direction, 1951
...fauteuil direction, 1951
designconnected
vitra fauteuil direction, 1951 computer generated 3d model. designed by prouvé, jean.
3d_export
$5
Directional tactile 3D Model
...tactile 3d model
3dexport
directional tactile braille tile flooring interior
directional tactile 3d model renob000 71068 3dexport
turbosquid
$26

Radio direction finder A
...ty free 3d model radio direction finder a for download as fbx on turbosquid: 3d models for games, architecture, videos. (1212490)
turbosquid
$7

Wooden direction signage
...ty free 3d model wooden direction signage for download as max on turbosquid: 3d models for games, architecture, videos. (1453747)
Drive
turbosquid
$90
Drive
...turbosquid
royalty free 3d model drive for download as blend on turbosquid: 3d models for games, architecture, videos. (1654393)
3d_export
$10

cycloidal drive
...cycloidal drive
3dexport
cycloidal drive
3d_ocean
$5

Flash Drive
...h drive included : – materials – scene ( lighs / room ) – .c4d + .obj for any questions please feel free to contact me thank you.
3d_ocean
$5

Usb drive
...s shaders and a lighting setup. it also has a small animation of it going in and out. i saved it out as both a .blend file and...
3d_ocean
$5

Pen Drive
...est computer drive game model good low poly new pen pen drive textured unwrapped uv very low poly
a very beautiful low poly model
3d_ocean
$10

External hard drive
... is a detailed model of a trekstor external hard drive. you can easily modify the label on the top. simply edit the text objects.
turbosquid
$60

Star Drive
...squid
royalty free 3d model star drive for download as blend on turbosquid: 3d models for games, architecture, videos. (1254314)
turbosquid
$50
Star Drive
...squid
royalty free 3d model star drive for download as blend on turbosquid: 3d models for games, architecture, videos. (1263524)
turbosquid
$45

Star Drive
...squid
royalty free 3d model star drive for download as blend on turbosquid: 3d models for games, architecture, videos. (1287060)
turbosquid
$40
Star Drive
...squid
royalty free 3d model star drive for download as blend on turbosquid: 3d models for games, architecture, videos. (1261902)
Filament
3ddd
$1

Filament Cage
...filament cage
3ddd
лофт , filament cage
модель бра, делалась по фото!
turbosquid
$3

FILAMENT COUNTER
...d
royalty free 3d model filament counter for download as stl on turbosquid: 3d models for games, architecture, videos. (1563049)
3d_export
$5

Filament lamp 3D Model
...filament lamp 3d model
3dexport
filament lamp 3d model kevin 54161 3dexport
3d_export
$5

Filament bulb candle 3D Model
...filament bulb candle 3d model
3dexport
filament bulb-candle
filament bulb candle 3d model kevin 54163 3dexport
3d_export
$5

Filament led light bulb
...filament led light bulb
3dexport
realistic 3d model of filament light bulb with v-ray materials.
3d_export
$5

Filament led light bulb
...filament led light bulb
3dexport
realistic 3d model of filament light bulb with v-ray materials.
3d_export
$5

Filament led light bulb
...filament led light bulb
3dexport
realistic 3d model of filament light bulb with v-ray materials.
3d_export
$5

Filament led light bulb
...filament led light bulb
3dexport
realistic 3d model of filament light bulb with v-ray materials.
3d_export
$5

Filament led light bulb
...filament led light bulb
3dexport
realistic 3d model of filament light bulb with v-ray materials.
3ddd
$1

Factory filament metal shade
...factory filament metal shade
3ddd
restoration hardware
restoration hardware. 20th c. factory filament metal shade.