Thingiverse

Dual Z Mount for Anycubic Mega Zero by 1CM69
by Thingiverse
Last crawled date: 3 years, 1 month ago
I got inspiration from: https://www.thingiverse.com/thing:3796938
and thought that this was a extremely clean and simple answer to adding a second Z stepper & leadscrew to my Anycubic Mega Zero 2.
Having tried many other designs to attempt this upgrade/mod, each failing for some reason, this too did not work out for me.
I know, it's specifically for the Ender 3 & I am using a Mega Zero, so no surprise that it does not work but I have no idea why before now I didn't see the problem when using these Ender 3 designed mounts with my Mega Zero, even if I'd mirrored the model in CURA (as the Mega Zero's X gantry is opposite to the Ender's).
Most of these type of printer all look the same or very similar and I took that for granted, fool me, however it turns out that the hole centres between the top & bottom wheels running on the Z axis of the Ender is 72mm, on the Mega Zero this is 70mm.
Obvious to me now that this is why all the previous Ender 3 mounts caused a certain amount of binding when attempting to implement the dual z axis mod on my Mega Zero.
With all that said I decided that I needed to design a mount to properly mod my Mega Zero for a dual Z axis setup.
My design contains a number of parts:
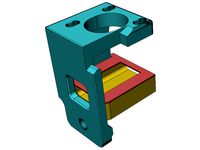
Leadscrew_Mount_[PART-A] - this is the main carrier and is attached to the front side of the left hand X gantry carriage via the wheel screws.
This means that it is not necessary to move the PSU from it's OE fixings on the Mega Zero 2.
Leadscrew_Mount_[PART-B][16mm] & Leadscrew_Mount_[PART-B][18mm] - basically the same part but while designing this I found that there are a couple of different rectangular leadscrew nuts, either 16mm or 18mm centres between the fixing screw holes.
Print whichever one suits the leadscrew nut you have.
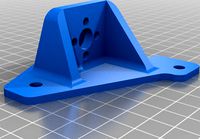
Stepper_Mount - this is the mount that attaches the second Z stepper to the outside of the printers frame.
Z_Align_Block - these are optional but do aid with alignment (sync) of the Z axis, you'll need to print 2 of these.
My print settings are as follows:
All parts except the Z Align Blocks - LH 0.12mm 100% Infill in PETG
Z Align Blocks - LH 0.2mm 100% Infill in PLA
NO Supports required.
I chose to use 100% infill for added strength & 0.12mm LH for the majority of the parts for fit & finish.
Hardware used as follows:
PART-A to X carriage - 2x M5x35mm machine screws hex button head + thin washers & use existing M5 nyloc nuts.
PART-B to PART-A - 2x M3x20mm machine screws hex button head & 2x M3 nuts. Plus optional solvent to weld parts together.
Leadscrew nut to PART-B - 2 x M3x15mm machine screws hex button head & 2x M3 nuts if required (some leadscrew nuts are threaded).
Stepper Mount to frame - 2x M5x16mm machine screw hex button head & 2x M5 T-Nuts.
Stepper Motor to Stepper Mount - 4x M3x8mm machine screws & thin washers.
Z Align Blocks to frame - 2x M3x20mm machine screws & thin washers & 2x M3 T-Nuts each.
The Stepper Mount allows for some alignment to get the leadscrew running as true as possible.
I decided against using or designing leadscrew stabilizers as there is talk that the ends of the leadscrews need to be free & not transfer any wobble to the printers frame.
For Z axis sync with a dual axis setup I followed this YouTube video:
https://youtu.be/U_RiwMSG9rE
but I used fixed blocks (Z Align Blocks) on the inside of the Z axis frame on my printer & placed a starting GCODE in CURA as well as adding a Custom Menu option in Marlin.
In CURA:
; ALIGN DUAL Z
M117 Homing Z ...
G1 Z0 ;move Z to min endstops
M117 Homing X/Y ...
G28 X0 Y0 ;move X/Y to min endstops
G28 Z0
G1 Z200 ;MAX HEIGHT
G28 Z0 ;move Z to min endstops
M117 Z Axis Synced
; END OF ALIGN DUAL Z
In Marlin - Configuration_adv.h:
'#define CUSTOM_USER_MENUS'
'#define USER_DESC_1 "Align Z Axis"'
'#define USER_GCODE_1 "G1 Z0\nG28\nG1 Z200\nG28 Z0\nM117 Z Axis Synced"'
'CHANGE Z200 TO YOUR OWN REQUIREMENTS AFTER FOLLOWING VIDEO ABOVE'
Hopefully this all makes sense & I have included everything required.
Thanks for looking.
p.s. wise to perform a new bed level after fitting this mod & running the 'Align Z Axis' option.
and thought that this was a extremely clean and simple answer to adding a second Z stepper & leadscrew to my Anycubic Mega Zero 2.
Having tried many other designs to attempt this upgrade/mod, each failing for some reason, this too did not work out for me.
I know, it's specifically for the Ender 3 & I am using a Mega Zero, so no surprise that it does not work but I have no idea why before now I didn't see the problem when using these Ender 3 designed mounts with my Mega Zero, even if I'd mirrored the model in CURA (as the Mega Zero's X gantry is opposite to the Ender's).
Most of these type of printer all look the same or very similar and I took that for granted, fool me, however it turns out that the hole centres between the top & bottom wheels running on the Z axis of the Ender is 72mm, on the Mega Zero this is 70mm.
Obvious to me now that this is why all the previous Ender 3 mounts caused a certain amount of binding when attempting to implement the dual z axis mod on my Mega Zero.
With all that said I decided that I needed to design a mount to properly mod my Mega Zero for a dual Z axis setup.
My design contains a number of parts:
Leadscrew_Mount_[PART-A] - this is the main carrier and is attached to the front side of the left hand X gantry carriage via the wheel screws.
This means that it is not necessary to move the PSU from it's OE fixings on the Mega Zero 2.
Leadscrew_Mount_[PART-B][16mm] & Leadscrew_Mount_[PART-B][18mm] - basically the same part but while designing this I found that there are a couple of different rectangular leadscrew nuts, either 16mm or 18mm centres between the fixing screw holes.
Print whichever one suits the leadscrew nut you have.
Stepper_Mount - this is the mount that attaches the second Z stepper to the outside of the printers frame.
Z_Align_Block - these are optional but do aid with alignment (sync) of the Z axis, you'll need to print 2 of these.
My print settings are as follows:
All parts except the Z Align Blocks - LH 0.12mm 100% Infill in PETG
Z Align Blocks - LH 0.2mm 100% Infill in PLA
NO Supports required.
I chose to use 100% infill for added strength & 0.12mm LH for the majority of the parts for fit & finish.
Hardware used as follows:
PART-A to X carriage - 2x M5x35mm machine screws hex button head + thin washers & use existing M5 nyloc nuts.
PART-B to PART-A - 2x M3x20mm machine screws hex button head & 2x M3 nuts. Plus optional solvent to weld parts together.
Leadscrew nut to PART-B - 2 x M3x15mm machine screws hex button head & 2x M3 nuts if required (some leadscrew nuts are threaded).
Stepper Mount to frame - 2x M5x16mm machine screw hex button head & 2x M5 T-Nuts.
Stepper Motor to Stepper Mount - 4x M3x8mm machine screws & thin washers.
Z Align Blocks to frame - 2x M3x20mm machine screws & thin washers & 2x M3 T-Nuts each.
The Stepper Mount allows for some alignment to get the leadscrew running as true as possible.
I decided against using or designing leadscrew stabilizers as there is talk that the ends of the leadscrews need to be free & not transfer any wobble to the printers frame.
For Z axis sync with a dual axis setup I followed this YouTube video:
https://youtu.be/U_RiwMSG9rE
but I used fixed blocks (Z Align Blocks) on the inside of the Z axis frame on my printer & placed a starting GCODE in CURA as well as adding a Custom Menu option in Marlin.
In CURA:
; ALIGN DUAL Z
M117 Homing Z ...
G1 Z0 ;move Z to min endstops
M117 Homing X/Y ...
G28 X0 Y0 ;move X/Y to min endstops
G28 Z0
G1 Z200 ;MAX HEIGHT
G28 Z0 ;move Z to min endstops
M117 Z Axis Synced
; END OF ALIGN DUAL Z
In Marlin - Configuration_adv.h:
'#define CUSTOM_USER_MENUS'
'#define USER_DESC_1 "Align Z Axis"'
'#define USER_GCODE_1 "G1 Z0\nG28\nG1 Z200\nG28 Z0\nM117 Z Axis Synced"'
'CHANGE Z200 TO YOUR OWN REQUIREMENTS AFTER FOLLOWING VIDEO ABOVE'
Hopefully this all makes sense & I have included everything required.
Thanks for looking.
p.s. wise to perform a new bed level after fitting this mod & running the 'Align Z Axis' option.
Similar models
thingiverse
free

Z axis Adjustment blocks by Honkytime
...
thingiverse
made for the ender 3
110mm tall adjustment blocks for setting z axis height on dual stepper motor z axis leadscrews
thingiverse
free

Ender 3 / Dual Z Drive / Collision Alignment by BIueberry
...berry
thingiverse
z spacer for dual collision of the inner rollers for aligning and syncing dual stepper motors of the ender 3.
thingiverse
free

Ender3 ACME Anti-Backlash Nut Block Mount by approx_eng
...acme anti-backlash nut blocks on the ender 3 or similar instead of the more normal brass nuts. with the...
thingiverse
free
Ender 3 Adjustable Z Stepper Mount up to 48mm steppers by Its_3d_Willy
...0mm/60 tooth pulleys, any size will work
1x timing belt (from 696mm to ~800mm, i use 752mm)
m3 mounting hardware and t slot nuts.
thingiverse
free

Anycubic Mega Zero Stepper Motor Mount for Flexible Z Couplers by djos_1475
...crews:
1st stepper motor:
2x 20mm m4 screws
2x 16mm m3 screws
2nd stepper motor:
2x 12mm m4 screws
2x m4 t-nuts
2x 16mm m3 screws
thingiverse
free

Ender 3 / Pro / V2 Dual Z axis motor mount with T-nut by Flapstaart
...mount
2x m3x8 for stepper motor at the far end of the mount
printed using 0.2mm layer height and a 0.6mm nozzle without supports.
thingiverse
free

Ender 3 Pro Z Stepper Bracket by KyleRL
...end drilling and tapping the frame for the best connection. sans that, use t nuts and rest the stepper motor on the bottom frame.
thingiverse
free

Creality Ender-3 Z-Axis Alignment Correction by RonaldWalters
...iage bracket corrects the problem.
the stl file is for a 0.3mm thick paper shim as shown being used.
https://youtu.be/xnznd_fimky
thingiverse
free

Z axis Leadscrew to leadscrew coupler (8mm to 5mm) with 0.14mm clearence
...adscrew to leadscrew coupler (8mm to 5mm) with 0.14mm clearence
thingiverse
extra parts required:
2x m3 nuts
2x m3 screws (8mm+)
thingiverse
free

Ender 3 Dual Z axis - No Z loss, stock mounting hardware, anti backlash nut compatible by Its_3d_Willy
...0mm/60 tooth pulleys, any size will work
1x timing belt (from 696mm to ~800mm, i use 752mm)
m3 mounting hardware and t slot nuts.
1Cm69
thingiverse
free

LDR Sensor Enclosure by 1CM69
...lu pla from aliexpress.
the dropdown box does not have my exact printer but it is:
anycubic mega zero 2
hotend @ 190°c
bed @ 60°c
thingiverse
free

AnyCubic Mega Zero 2 Y Carriage Cover by 1CM69
...omplements these v slot covers: http://www.thingiverse.com/thing:3396601
cover @ 0.2mm lh
badge @ 0.12mm lh
no supports req'd
thingiverse
free

Right Hand Slimcase Extrusion Standoff - Xtra Fixings by 1CM69
...nt.
0.2mm lh.
have included the freecad file, (excuse the mess, i am no professional), incase anyone wishes to alter this model.
thingiverse
free

BTT UPS 24V V1.0 Case by 1CM69
...d to have the cables entering from the front of your printer, mine exit at the back and i have my enclosure mounted under my bed.
thingiverse
free

608-2RSH Bearing Fitment Test by 1CM69
...m id
middle: 22.25mm od & 8.25mm id
right: 22.5mm od & 8.5mm id
i printed at 0.2mm layer height with 10% infill using pla
thingiverse
free
Anycubic Mega Zero 2nd Z Leadscrew Mount by 1CM69
...& will cause binding, i know, i've been there done that.
designed for 0.2mm lh
i use 100% fill for strength & use pla
thingiverse
free

Raspberry Pi Zero W Enclosure c/w Logo by 1CM69
...one but i print on a glass plate with a few coats of pva brushed on & dried with a hairdryer for adhesion.
hotend is at 190°c
thingiverse
free

BTT Smart Filament Detection Module Mount by 1CM69
... necessary to move the stepper pinion ever so slightly further up the shaft too, this is easily done by loosening the grub screw.
thingiverse
free

DJI Mini 2 & Mavic Air 2/2s RC iPhone Holder by 1CM69
...d files in case anyone wants to edit their own version.
print models in the orientation of these files, no supports are required.
Anycubic
thingiverse
free

anycubic filament holder
...anycubic filament holder
thingiverse
anycubic filament holder
thingiverse
free

Cableholder Anycubic Mega
...cableholder anycubic mega
thingiverse
cableholder anycubic mega
thingiverse
free

AnyCubic Toolholder by WildManPrinting
...anycubic toolholder by wildmanprinting
thingiverse
anycubic i3 mega toolholder that clips on the side of the spool a-frame.
thingiverse
free

AnyCubic Funnel by phana007
...anycubic funnel by phana007
thingiverse
funnel for anycubic resin and also a reducer for a normal soda bottle.
thingiverse
free

Anycubic Kossel PID calibration
...ir mount:
kossel raspberry camera ir mount
extruder pid calibration.
simple extruder temperature calibration of your 3d printer.
thingiverse
free

anycubic mega i3
...anycubic mega i3
thingiverse
anycubic i3 mega/mega s led 30mm 10-14v 6500k
thingiverse
free

Handle for anycubic by cruiser7
...handle for anycubic by cruiser7
thingiverse
its easier to handle the cover of the anycubic mono x and wash&care
thingiverse
free

anycubic predator Printbed by Lihyon
...anycubic predator printbed by lihyon
thingiverse
anycubic predator printbed
thingiverse
free

Anycubic Predator Triggers by marcelcountry
...anycubic predator triggers by marcelcountry
thingiverse
anycubic predator triggers
thingiverse
free

support anycubic cable by sarpdental
...support anycubic cable by sarpdental
thingiverse
support anycubic cable
Mega
3ddd
$1

BoConcept / Mega
...boconcept / mega
3ddd
boconcept
boconcept mega
3ddd
free

Angelo - Mega shoin
... mega shoin , shoin
angelo - mega shoin - 3dmax 2008
3ddd
$1
Комод MEGA
...вана по фото с учетом реальных размеров.
стек не сколапсен, есть возможность регулировки уровня сглаживания.
текстуры в архиве.
3ddd
$1
Hulsta / Mega-design
...hulsta / mega-design
3ddd
hulsta
hulsta mega-design
design_connected
$18

Tolomeo Mega
...
photo-realistic 3d models of the tolomeo mega floor lamps from artemide for 3d architectural and interior design presentations.
turbosquid
$119

Mega Soldier
... free 3d model mega soldier for download as obj, c4d, and fbx on turbosquid: 3d models for games, architecture, videos. (1148568)
turbosquid
$100
Mega Yacht
... free 3d model mega yacht for download as obj, fbx, and blend on turbosquid: 3d models for games, architecture, videos. (1368903)
3ddd
$1

Massproductions Mega
... massproductions , mega
ширина: 180 см
глубина: 90 см
высота: 79 см
3d_export
$4

mega metro station
...mega metro station
3dexport
mega metro station. ready to game. thanks all downloaders!!
3ddd
$1
BAS Mega
...bas mega
3ddd
bas , ванна
ванна
Zero
3ddd
$1

ZERO, BEAM
...zero, beam
3ddd
zero
поворотная люстра zero , beam
design_connected
$9

Zero-in
...zero-in
designconnected
established & sons zero-in tables computer generated 3d model. designed by jay osgerby .
3ddd
free

Sub-Zero
...sub-zero
3ddd
sub-zero , голова
sub-zero corona render!
3ddd
$1
Metalspot / Zero
...metalspot / zero
3ddd
metalspot
metalspot zero
3ddd
$1
Catalano Zero
...catalano zero
3ddd
catalano , унитаз
catalano zero
3ddd
$1

SUB ZERO
... sub zero
the first and only 3d model of sub zero refrigerator.
the model is very accurate.
turbosquid
free

Zero
... available on turbo squid, the world's leading provider of digital 3d models for visualization, films, television, and games.
turbosquid
free

Zero
... available on turbo squid, the world's leading provider of digital 3d models for visualization, films, television, and games.
turbosquid
free
Zero
... available on turbo squid, the world's leading provider of digital 3d models for visualization, films, television, and games.
3ddd
$1

ZERO / Hide
...zero / hide
3ddd
zero
polys: 25486
wire-spline
Dual
turbosquid
free

Dual Pistols
...ls
turbosquid
free 3d model dual pistols for download as fbx on turbosquid: 3d models for games, architecture, videos. (1320360)
turbosquid
$2

Dual Axe
...urbosquid
royalty free 3d model dual axe for download as fbx on turbosquid: 3d models for games, architecture, videos. (1332372)
turbosquid
$10

Dual Lesaths
... available on turbo squid, the world's leading provider of digital 3d models for visualization, films, television, and games.
3ddd
$1

плитка Dual Bianco (Испания)
...й плитки venis dual (испания). технические качества: устойчивость к стирания, отличная геометрия, отсутствие проблем при укладке.
turbosquid
$35

Dual Mesh Fonts
...ree 3d model dual mesh fonts for download as ma, obj, and fbx on turbosquid: 3d models for games, architecture, videos. (1352989)
turbosquid
$29

Dual Flask with Bungs
...del dual flask with bungs for download as obj, fbx, and blend on turbosquid: 3d models for games, architecture, videos. (1210512)
turbosquid
$19

Dual Socket Plug
...3d model dual socket plug for download as obj, fbx, and blend on turbosquid: 3d models for games, architecture, videos. (1303912)
turbosquid
$13

Dual Adjustable Pulley
... available on turbo squid, the world's leading provider of digital 3d models for visualization, films, television, and games.
turbosquid
$10

Amoi N809 Dual
... available on turbo squid, the world's leading provider of digital 3d models for visualization, films, television, and games.
turbosquid
$5

Dual Turret Tank
... available on turbo squid, the world's leading provider of digital 3d models for visualization, films, television, and games.
Z
3d_export
$5

nissan z
...nissan z
3dexport
nissan z
3ddd
$1

Vase Z
...vase z
3ddd
vase z
3ddd
$1

полотенцесушить Z
...полотенцесушить z
3ddd
полотенцесушитель
полотенцесушить z
design_connected
free

Z-Chair
...z-chair
designconnected
free 3d model of z-chair designed by karman, aleksei.
design_connected
$11

Z Lamp
...z lamp
designconnected
phillips z lamp computer generated 3d model. designed by kalff, louis.
3d_export
$5

Dragon balls z
...dragon balls z
3dexport
dragon ball z
turbosquid
$20

Fighter Z
...
turbosquid
royalty free 3d model fighter z for download as on turbosquid: 3d models for games, architecture, videos. (1292563)
turbosquid
$9

Pen Z
...pen z
turbosquid
free 3d model pen z for download as obj on turbosquid: 3d models for games, architecture, videos. (1686775)
turbosquid
free

z chair
...z chair
turbosquid
free 3d model z chair for download as max on turbosquid: 3d models for games, architecture, videos. (1410230)
turbosquid
$5

Letter Z
...urbosquid
royalty free 3d model letter z for download as max on turbosquid: 3d models for games, architecture, videos. (1408540)
Mount
3d_export
free

mounting bracket
...mounting plate is the portion of a hinge that attaches to the wood. mounting plates can be used indoors, cabinetry and furniture.
turbosquid
$2

MOUNTING
... available on turbo squid, the world's leading provider of digital 3d models for visualization, films, television, and games.
turbosquid
free

Mounts
... available on turbo squid, the world's leading provider of digital 3d models for visualization, films, television, and games.
turbosquid
free

Mount Fuji
...fuji
turbosquid
free 3d model mount fuji for download as obj on turbosquid: 3d models for games, architecture, videos. (1579977)
3d_export
$5

Headphone mount LR
...headphone mount lr
3dexport
headphone mount l+r
turbosquid
$39

Mount rainier
...quid
royalty free 3d model mount rainier for download as fbx on turbosquid: 3d models for games, architecture, videos. (1492586)
turbosquid
$5

pipe mounting
...quid
royalty free 3d model pipe mounting for download as obj on turbosquid: 3d models for games, architecture, videos. (1293744)
turbosquid
$3

Mounting Tires
...uid
royalty free 3d model mounting tires for download as fbx on turbosquid: 3d models for games, architecture, videos. (1708511)
3d_export
$5

Magnetic GoPro Mount
...pro mount
3dexport
cool magnetic mount for gopro. allows you to mount the camera on flat metal surfaces and get exclusive shots.
turbosquid
$5

Stone Mount
...ty free 3d model stone mount for download as ma, obj, and fbx on turbosquid: 3d models for games, architecture, videos. (1370306)