Thingiverse
Dual fan mount for Printrbot Simple Metal by WaveSupportApparatus
by Thingiverse
Last crawled date: 2 years, 12 months ago
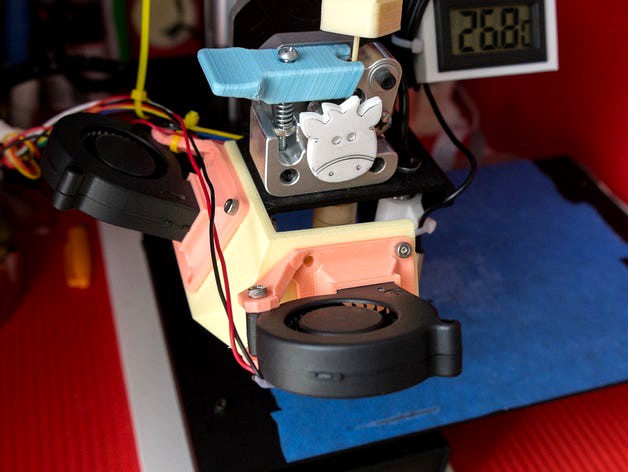
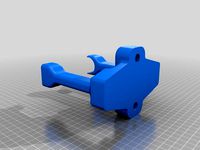
After publishing my experiment about how fans and fan shrouds affect overhang success and appearance, I became curious about whether using dual fans would improve my results. I couldn't find anyone who had made a frame to hold two print-cooling fans onto a Printrbot Simple Metal, so I designed my own.
I have experimentally demonstrated that using two fans instead of one improves the printing success and surface quality of tall and thin features like spikes, horns, screws etc, and reduces warping in general.
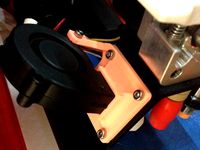
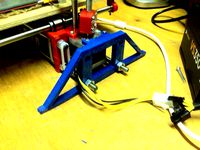
This frame attaches to the existing 40 mm fan mount holes and provides a second 40 mm mount in front of the hot-end (the bed levelling probe prevents me from putting the fan to the side, which is how other printer manufacturers have arranged them). The two fan mounts are equidistant from the hot-end, so you can use any existing fan shroud and be assured that it is pointing at the right place.
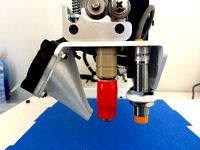
The demonstration photos show my printer fitted for a test print, with blower fans via my universal blower fan mount supplying EricY's Improved Fan Shroud for jetting air onto the working face from two directions.
What fan shrouds should you use?
According to my experiment, different kinds of fan shrouds are good at different things:
Shrouds that focus air at the nozzle are good for overhangs and thin features.
Shrouds that blow air broadly over the printing area are good at reducing warping.
It's no surprise that the results suggest that you should use one of each! Here's what I use:
For the focused shroud, I use EricY's design. I mounted it on the left side of the printer, but I don't think it matters since the dual-fan mount can accept any shroud interchangeably.
For broad airflow, I'm actually using the blower fan by itself without a shroud, which is what the experiment showed worked best.
I'm working on some shrouds of my own to apply what I've learned.
Important notes!
Do not hot-swap your cooling fans. There is a chance of damaging your controller board. Always turn off and unplug your printer before messing with its wiring.
You will need M3 screws and nuts for fitting this frame and its accessories to your printer. I used a range of screw lengths from 15 mm to 30 mm, depending on the shroud I was testing.
I have experimentally demonstrated that using two fans instead of one improves the printing success and surface quality of tall and thin features like spikes, horns, screws etc, and reduces warping in general.
This frame attaches to the existing 40 mm fan mount holes and provides a second 40 mm mount in front of the hot-end (the bed levelling probe prevents me from putting the fan to the side, which is how other printer manufacturers have arranged them). The two fan mounts are equidistant from the hot-end, so you can use any existing fan shroud and be assured that it is pointing at the right place.
The demonstration photos show my printer fitted for a test print, with blower fans via my universal blower fan mount supplying EricY's Improved Fan Shroud for jetting air onto the working face from two directions.
What fan shrouds should you use?
According to my experiment, different kinds of fan shrouds are good at different things:
Shrouds that focus air at the nozzle are good for overhangs and thin features.
Shrouds that blow air broadly over the printing area are good at reducing warping.
It's no surprise that the results suggest that you should use one of each! Here's what I use:
For the focused shroud, I use EricY's design. I mounted it on the left side of the printer, but I don't think it matters since the dual-fan mount can accept any shroud interchangeably.
For broad airflow, I'm actually using the blower fan by itself without a shroud, which is what the experiment showed worked best.
I'm working on some shrouds of my own to apply what I've learned.
Important notes!
Do not hot-swap your cooling fans. There is a chance of damaging your controller board. Always turn off and unplug your printer before messing with its wiring.
You will need M3 screws and nuts for fitting this frame and its accessories to your printer. I used a range of screw lengths from 15 mm to 30 mm, depending on the shroud I was testing.
Similar models
thingiverse
free

Printrbot Metal Plus Dual Extruder Blower Fans by Jon_S
... left blower mounts with the intake facing up, and the right blower is flipped 180° so that the intake is facing towards the bed.
thingiverse
free
Blower fan to 40 mm fan adapter mount (fits 50x15 mm blower fans) by WaveSupportApparatus
... existing pb simple metal shroud you can find. the blower ensures strong airflow through your shroud, making your prints happier.
thingiverse
free

PrintrBot Chassis Mounted Blower Fan Kit by iplop
... this is a wip; i haven't gotten around to designing the blower fan chassis mount yet (i'm using zip-ties at the moment).
thingiverse
free

Fan Shroud - Printrbot Metal Plus V0.2 by Phaenom
...irects airflow from blower fan around the nozzle to cool the part.
this design is still a work in progress so expect more changes
thingiverse
free
Printrbot Simple Metal Improved Fan Shroud by EricY
...so gave it a longer and more organic shape to better minimize the back pressure. so far it seems to give more predictable prints.
thingiverse
free

Printrbot Play 30mm Blower Fan Shroud by chrisbehling
...o, i designed this mount for a 30mm high-speed blower fan from seemecnc: https://www.seemecnc.com/products/30mm-x-10mm-blower-fan
thingiverse
free
Printrbot Ubis 13 Fan Shroud for a 40mm fan (Simple Metal) by ScarabCoder
...o your ubis 13 hot end. i use it on my printrbot simple metal, not sure if it works for any other printer. modeled in solidworks.
thingiverse
free

Fan Shroud for E3D v6 Hotend on Printrbot Simple Metal with Secure Fit Spacer by tonyyoungblood
...y simonwlchan's fan shroud, which is a great choice if you opt for the longer spacer. http://www.thingiverse.com/thing:957865
thingiverse
free

tronxy x3 blower fan shroud by DCHCUSTOMS
...issues with the mounting :) it fits a 50mm blower fan and puts out good flow and seems to make a decent improvement to pla prints
thingiverse
free

Printrbot Simple Metal 40mm Fan Shroud Shim by 3DMasterRace
...e hot end in the centre of the fan shroud on my printrbot simple metal.
used on this:-
http://www.thingiverse.com/make:123627
Wavesupportapparatus
thingiverse
free
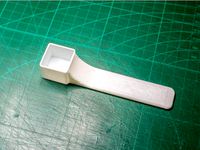
Metamucil measuring scoop by WaveSupportApparatus
...ry fibre supplement, equivalent to about 6 grams. scoop up a bunch of metamucil powder, level off the scoop, and you're done!
thingiverse
free
Drying tray by WaveSupportApparatus
...and adds more cleaning work for you later. print this drying tray and stick some rubber feet onto it, and this problem is solved!
thingiverse
free
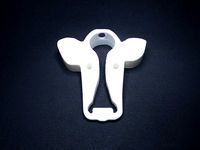
Cow face doorstop by WaveSupportApparatus
...d by gayatri for the noun project.
its dimensions are 70 × 70 × 20 mm, or very approximately 2¾ × 2¾ × ¾ inches in ye olde unitſ.
thingiverse
free

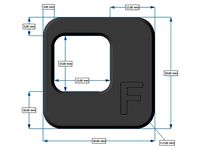
TEST - The generalised test object by WaveSupportApparatus
...ppearance and bonding.
flow rate calibration (read this procedure).
visualise ringing/vibration inherent to the x, y, and z axes.
thingiverse
free

Stub-handled ice scraper by WaveSupportApparatus
... you might hold a screwdriver, or you can hold it with your fingertips inside the hollow and the base of the handle in your palm.
thingiverse
free

Plant label (120 × 25 × 0.60 mm) by WaveSupportApparatus
...esupportapparatus
thingiverse
a large plant tag measuring 120 × 25 × 0.60 mm (l×w×d). can fit into the label slots of most pots.
thingiverse
free

8-strip PCR tube opener by WaveSupportApparatus
...r strips quickly (both domed- and flat-top tubes).
if you want to open rows of larger tubes, look at kailun's multi-decapper.
thingiverse
free

4-way wire connector (2 mm hanger wire) by WaveSupportApparatus
... by wavesupportapparatus
thingiverse
90° connector for connecting hanger wires (2 mm od). use super glue to reinforce the joint.
thingiverse
free
Dimensional test print by WaveSupportApparatus
....
dimensional accuracy is less important than getting enough plastic down. calibrate your flow rate correctly to figure this out.
thingiverse
free

Leitz Wetzlar Periplan NF 10x eyepiece cover by WaveSupportApparatus
...periplan nf 10x eyepiece to protect it from dust and damage. the cover positively snaps onto the eyepiece with very little force.
Printrbot
thingiverse
free

printrbot gasket by Usernameunavailible
...printrbot gasket by usernameunavailible
thingiverse
a part for printrbots
thingiverse
free
Printrbot Aluminum by Chris_the_Carpenter
...printrbot aluminum by chris_the_carpenter
thingiverse
a redesign of the awesome printrbot, in aluminum.
thingiverse
free
PrintrBot keychain by SuperMaku
...printrbot keychain by supermaku
thingiverse
printrbot keychain. may need to be scaled up.
thingiverse
free
Printrbot foot by aliekens
...printrbot foot by aliekens
thingiverse
add wider feet to a printrbot for improved stability.
thingiverse
free
Printrbot to CNC by mmrrsiam
...printrbot to cnc by mmrrsiam
thingiverse
make your printrbot also a small cnc machine....
thingiverse
free

Printrbot Keychain by jackbivona
...printrbot keychain by jackbivona
thingiverse
printrbot keychain for all you pb customers out there
thingiverse
free

Printrbot+ Nutkeepr by DonaldJ
...printrbot+ nutkeepr by donaldj
thingiverse
clip to retain nut on z-axis threaded rod of printrbot+
thingiverse
free

PrintrBot Tool Caddy by spr_consulting
...printrbot tool caddy by spr_consulting
thingiverse
printrbot tool caddy.
thingiverse
free
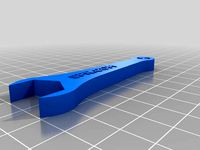
Printrbot Sensor Wrench by spr_consulting
...printrbot sensor wrench by spr_consulting
thingiverse
curvaceous printrbot sensor wrench.
thingiverse
free
Spool Holder for Printrbot by doubleAdoubleU
...spool holder for printrbot by doubleadoubleu
thingiverse
spool holder for a printrbot simple metal
Dual
turbosquid
free

Dual Pistols
...ls
turbosquid
free 3d model dual pistols for download as fbx on turbosquid: 3d models for games, architecture, videos. (1320360)
turbosquid
$2

Dual Axe
...urbosquid
royalty free 3d model dual axe for download as fbx on turbosquid: 3d models for games, architecture, videos. (1332372)
turbosquid
$10

Dual Lesaths
... available on turbo squid, the world's leading provider of digital 3d models for visualization, films, television, and games.
3ddd
$1

плитка Dual Bianco (Испания)
...й плитки venis dual (испания). технические качества: устойчивость к стирания, отличная геометрия, отсутствие проблем при укладке.
turbosquid
$35

Dual Mesh Fonts
...ree 3d model dual mesh fonts for download as ma, obj, and fbx on turbosquid: 3d models for games, architecture, videos. (1352989)
turbosquid
$29

Dual Flask with Bungs
...del dual flask with bungs for download as obj, fbx, and blend on turbosquid: 3d models for games, architecture, videos. (1210512)
turbosquid
$19

Dual Socket Plug
...3d model dual socket plug for download as obj, fbx, and blend on turbosquid: 3d models for games, architecture, videos. (1303912)
turbosquid
$13

Dual Adjustable Pulley
... available on turbo squid, the world's leading provider of digital 3d models for visualization, films, television, and games.
turbosquid
$10

Amoi N809 Dual
... available on turbo squid, the world's leading provider of digital 3d models for visualization, films, television, and games.
turbosquid
$5

Dual Turret Tank
... available on turbo squid, the world's leading provider of digital 3d models for visualization, films, television, and games.
Fan
3d_export
$5

fan
...fan
3dexport
fan 3d model, table fan, fan, electric fan, ventilator
archibase_planet
free

Fan
...fan
archibase planet
fan large fan
fan out n260707 - 3d model for interior 3d visualization.
archibase_planet
free

Fan
...fan
archibase planet
fan ceiling fan ventilator
fan stealth n300615 - 3d model (*.gsm+*.3ds) for interior 3d visualization.
3d_export
$15

fan
...fan
3dexport
is an ancient fan
3ddd
$1

Fan-C-Fan by marco gallegos
...n-c-fan by marco gallegos
3ddd
вентилятор , marco gallegos
fan-c-fan by marco gallegos
3d_export
$10

fan
...fan
3dexport
a detailed fan designed for home or space blowing is now available for only 19.99!
turbosquid
$1

Fan
...fan
turbosquid
free 3d model fan for download as on turbosquid: 3d models for games, architecture, videos. (1427865)
turbosquid
$14

Fan
...fan
turbosquid
royalty free 3d model fan for download as on turbosquid: 3d models for games, architecture, videos. (1415642)
3ddd
$1

Светильник Fan
...светильник fan
3ddd
fan , italamp
светильник fan, производитель italamp
turbosquid
$25

Fan
...fan
turbosquid
royalty free 3d model fan for download as c4d on turbosquid: 3d models for games, architecture, videos. (1483246)
Mount
3d_export
free

mounting bracket
...mounting plate is the portion of a hinge that attaches to the wood. mounting plates can be used indoors, cabinetry and furniture.
turbosquid
$2

MOUNTING
... available on turbo squid, the world's leading provider of digital 3d models for visualization, films, television, and games.
turbosquid
free

Mounts
... available on turbo squid, the world's leading provider of digital 3d models for visualization, films, television, and games.
turbosquid
free

Mount Fuji
...fuji
turbosquid
free 3d model mount fuji for download as obj on turbosquid: 3d models for games, architecture, videos. (1579977)
3d_export
$5

Headphone mount LR
...headphone mount lr
3dexport
headphone mount l+r
turbosquid
$39

Mount rainier
...quid
royalty free 3d model mount rainier for download as fbx on turbosquid: 3d models for games, architecture, videos. (1492586)
turbosquid
$5

pipe mounting
...quid
royalty free 3d model pipe mounting for download as obj on turbosquid: 3d models for games, architecture, videos. (1293744)
turbosquid
$3

Mounting Tires
...uid
royalty free 3d model mounting tires for download as fbx on turbosquid: 3d models for games, architecture, videos. (1708511)
3d_export
$5

Magnetic GoPro Mount
...pro mount
3dexport
cool magnetic mount for gopro. allows you to mount the camera on flat metal surfaces and get exclusive shots.
turbosquid
$5

Stone Mount
...ty free 3d model stone mount for download as ma, obj, and fbx on turbosquid: 3d models for games, architecture, videos. (1370306)
Metal
3d_ocean
$10

Metal Barrel
...metal barrel
3docean
barrel barrels metal metal barrel wood barrel
metal barrel
turbosquid
$14

Metals
...als
turbosquid
royalty free 3d model metals for download as on turbosquid: 3d models for games, architecture, videos. (1486252)
3d_ocean
$18
Metal Furniture
...metal furniture
3docean
design desk indoor industrial metal metal furniture restoration table
metal furniture 3d model
3d_export
$5
metal table
...metal table
3dexport
metal table.blend
3d_export
$5
Metal Shelf
...metal shelf
3dexport
metal shelf
3d_export
free

metal detector
...metal detector
3dexport
metal detector
3ddd
$1
metal lux
...metal lux
3ddd
dedalo , metal lux
люстра и бра metal lux коллекция dedalo.
3ddd
$1
bonded metal
...bonded metal
3ddd
https://www.forms-surfaces.com/bonded-metal
boded tiled metal
3ddd
$1
Metal
...metal
3ddd
1280-1024 бесшовный 8-)
3d_export
$5

cgaxis metal
...cgaxis metal
3dexport
notebook cgaxis metal
Simple
turbosquid
$1

Simple goblet (Taca simples)
... available on turbo squid, the world's leading provider of digital 3d models for visualization, films, television, and games.
3d_export
$5
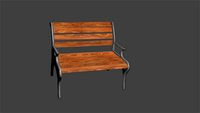
simple bench
...simple bench
3dexport
the simple bench which can be used in simple projects or video-games.
3d_export
$5
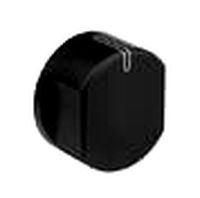
simple knob
...simple knob
3dexport
simple knob
3d_export
$5
simple handle
...simple handle
3dexport
simple handle
3d_export
$5
simple button
...simple button
3dexport
simple button
3d_export
$5

simple spindle
...simple spindle
3dexport
simple spindle
3d_export
$5

simple wheel
...simple wheel
3dexport
simple wheel
3d_export
$5

simple chair
...simple chair
3dexport
simple blue chair
3d_export
free

Simple room
...simple room
3dexport
here is a simple but beautiful room
3ddd
free

SIMPLE | Кресло
...io cianfarra , simple
производитель area declic дизайн giulio cianfarra коллекция simple