Thingiverse
Dual Extruder / Dual Material Makerbot by ScribbleJ
by Thingiverse
Last crawled date: 2 years, 12 months ago
This is going to be a reaaaal long one, folks. Better buckle up your thingibelts.
I believe this project is complete. There are workable, though probably not ideal, solutions to all major problems. The code and mount are both perfectly usable.
Youtube videos availabe at:http://www.youtube.com/watch?v=tSp8FKgoY8khttp://www.youtube.com/watch?v=mv3wxvR8w5A
New! http://www.youtube.com/watch?v=XafKYIxlgBk
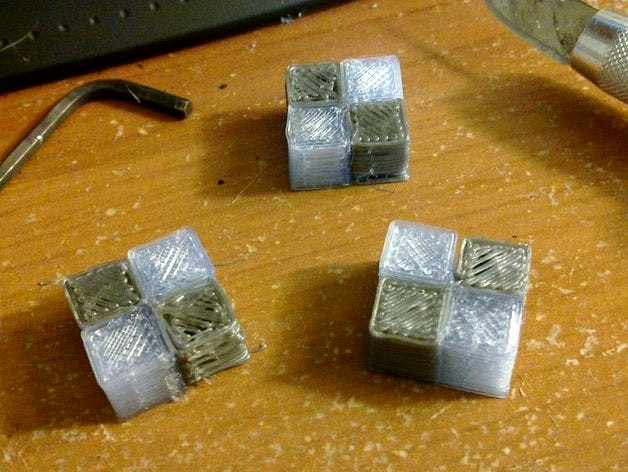
For people who just want the short version to go with the photos: Of course when I thought about what to print first, I thought the classic 20mm cube, but in a checkerboard pattern.
Setting the head offsets in the software exactly is important, and not difficult, but I couldn't dial it in during the course of this project as every time I'd set it I'd change something to unset it again. That's the only reason many of the prints are overlapping in odd ways.
Any ooze tends to accumulate at the offset position and eventually get rolled into the model, making a mess. The final update to the script has solved this with some ooze-controlling reversal, which I didn't bother to get dialed in exactly before closing this file. :)
THE STORY:
On Friday, it struck me I had a MK5 hot end just sitting here in a box, unusued, and I thought -- wouldn't two extruders in one machine be a neat idea? You could print two colors together, or you could use one to print some kind of support material; who knows what that might be. I knew you could dissolve PLA with toxic chemicals, but I also knew I'd never be allowed to play with toxic chemicals; I'm not even really allowed to print ABS.
I decided I would have the entire project complete, from conception to completion, done by the end of the weekend. You might have noticed my rash of part releases.
Well, I missed it by /that/ much, but it turns out to be good news. MBI on Monday announced dissolvable plastic ( http://store.makerbot.com/makerbot-pva.html )... which means now we know what to use as support material. The timing could not be more perfect. In addition, this makes the perfect thing to do with your old MK5 once you also have a shiny new MK6... Or maybe you bought a third-party hot end, like one of the excellent ones from Makergear.com, and now you can get your old stock hot end out of its drawer and use it again.
Now, when I say completion, I don't mean this project is finished, oh no. There's a very long list of little things to fix or change, and a short list of big things to fix or change.
CURRENT MAJOR PROBLEMS:
The bolts on the build platform mean your print area can be greatly reduced --
-- SOLVED... switching to the ABP cures this problem neatly.
Need a brilliant way to assure both heads are on the same Z-plane physically.
-- SOLVED... not exactly brilliant, but the new mount is easily adjustable.
CURRENT MINOR PROBLEMS:
It would be helpful to people who do not have the option of switching to the ABP to have a mount where the heads are aligned 90 degrees offset from this.
Some kind of quick-release mount for the second extruder would be nice. Maybe there would be a way to work Z-height adjustment into it.
-- SOLVED: V2 mount is easy to remove and install separately.
The closer the two heads together can be brought together, the less loss of build area will happen, bolts or no bolts.
It should be theoretically possible to drive two heads from one EC; if I blow up my other MOSFET I may have to pursue this possibility myself. This would require some hacking of RepG at the least and probably the firmware too.
The software could use many improvements; what I've given here is a workable starting point to build from.
TRIALS AND TRIBULATIONS:
I nearly hit my goal of having it all wrapped up by the weekend. I missed it because the 608-based Wade's style extruder I built off the STLs I uploaded over the weekend: http://www.thingiverse.com/thing:6492 did not work. It wouldn't push plastic.
You might think that meant it worked OK, I just couldn't demo it, and you'd be right. At this point, I had two stepper extruders working in concert but I couldn't make a test print, because one wouldn't push plastic. I felt like I couldn't put up the thingiverse entry until I could make the thumbnail a two-tone print.
So, this set me back a whole day. Well, this, and the fact that I have to work for a living, still...
I decided the problem was the bolt I hobbed wasn't nearly as good as Makerbot's MK5 drive gear thingy: http://store.makerbot.com/mk5-drive-gear.html ... while the MBI delrin extruder is of questionable value, this gear is the /bomb/. I tried hobbing another bolt, but I just couldn't make one that worked.
An additional problem is that the design STLs I posted have the wrong value for the filament distance from the hobbed bolt, making it add a lot of friction and nearly impossible to get in the hole.
So I decided that other people would want to use it with the DC motor, and I might as well buckle down and replace my 2nd stepper extruder with a DC extruder, temporarily. I couldn't find a 606 bearing on such short notice, but I've seen plenty of people run without it, so I made do.
It turned out this introduced a new problem. While I was fortunate to find the MBI ReplicatorG and Firmware supported everything I wanted to do /already/, which was REALLY NICE, THANKS GUYS!! ... I found there was a bug or oversight in the drivers for the stepper extruder version; if you use them, they will just delete any commands that drive a DC motor. So if you have one of each like I do for the moment, it won't run the DC motor.
Fortunately, this was about a ten minute fix in the RepG code, which I'm getting all too familiar with. (Patch will be supplied below if it isn't already when I hit PUBLISH).
Next the DC motor stopped responding (probably just needed a reboot, honestly), and in my naieve efforts to fix it, the mosfet blew up, literally; photo attached. I couldn't get it to switch to the second mosfet in the legitimate fashion, RepG wouldn't recognize the extruder to set it's eeprom... So I hardcoded the change in a copy of the firmware and uploaded it - finally the DC motor was back online and I had only lost about two hours...
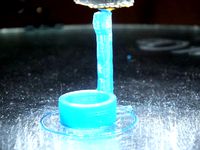
Once I finally got it all up and running, testing my software proved to have it's own fun points, too. First I got the offsets and everything all backwards, and nearly drove my print heads into the bolts many times. Once I finally got it completely sorted, the first test print I discovered a really fun thing -- if your print heads are off in the Z direction by a tiny amount, that's OK. But if the lower one prints last, it'll rip the tops off the taller one's print.
EDIT: I actually think the cause of the destroyed print in the photo and the other messy prints are all down to the shadow print/ooze that develops and tends to roll into the model. The latest version of the script provides ooze-combatance for this reason.
As you can see, I didn't find a way to measure my Y offset so I guessed 0 on the first print, the one with the missing tops, and I was wrong, so I adjusted it for the second print... in the wrong direction! Doh! It'll be fixed for any future photos, I hope. The X offset is easy enough to measure since that's the way the heads are aligned in my build. If you have the ABP, having them aligned in X like this is good 'cause then there are no worries about bolts AND you might be able to hack the ABP to get back any lost print area. It's a win-win.
But I'm not running the ABP right now, so I need to watch my bolts like a hawk and it would have been better if my mount has the heads aligned in Y instead of X - rotated 90 degrees.
UPDATE (2011-02-23):
I got one print off today before the DC motor stopped running. The LED on the mosfet comes on when I tell it to run, so I'm not sure what the problem could be. I still have the relay I built to run it on the Thing O Matic extruder controller, but it's on a cupcake EC and I'm surprised to find it fails there, too - have other people had that problem?
I also switched out my build platform so the bolts would run the other way.
I swapped in a different DC motor and it works, but the DC motor overall oozes much more and takes much longer to start again than the stepper motor, so the grey parts in my prints are coming out looking somewhat lousy.
Otherwise, you can see it's working well and I fixed my Y-offset by just adding 1/2 the difference between the top and bottom parts sizes to it.
Next I added springs to the front extruder, assuming I only need to be able to adjust one to match the fixed one. This helped my prints a lot -- part of the problem with the greyparts is they weren't getting good stick on the 1st layer. Now both materials are getting good stick. Changing out for the springs changed my X+Y offsets by a very small amount, but that's easy to measure using this test cube.
The springs seem like a workable solution, -- I'm surprised the thing is not wobbly, but I used very strong springs, so...
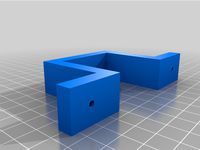
UPDATE (2011-02-24): Added new mount .STL; this one should be a good way to solve both the quick-remove problem and the z-alignment problem, at the cost of drilling 2-4 new holes into your stock acrylic bridge. I'm going to have to figure out how to get replacement lasercuts parts after these experiments are finalized, I bet.
Since the STLs aren't rendering here, you can see the new mount here: http://www.thingiverse.com/thing:6517 until I have a photo of the printed thing.
While adjusting my printer to print the part (I decided to lower the spring-loaded head down as low as I could to get the other out of the way, and just print in 1 material) I found there's an easy way to adjust the springs tension - while the end is cold and full of filament, simply turn the motor back a few steps (by hand?) and it will raise the end up, allowing you to easily twirl the nuts to your desired location, before lowering it back down. Youtube video here: http://www.youtube.com/watch?v=gJStB65cSvA
I am greatly looking forward to seeing the postman today, as he'll have my order from Makerbot with the dissolvable plastic, as well as the parts I will need to rebuild my stepper extruder properly, and eliminate the DC extruder.
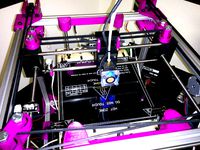
I finished printing the new mount. Checking in the control panel after the print revealed to my pleasure that the /other/ extruder, the one I didn't use in the print, was at a nice cool 30degrees still.
I wonder if I should have designed the mount to use the existing bolts on the front of the bridge. I guess I'd like 4 bolts for it though, so this is probably OK, even if the other way means less destruction.
If the big 'shadows' on my dual-color prints didn't make it clear I'm not doing anything to combat ooze presently, the print of this new mount will...
UPDATE: (2011-02-25)
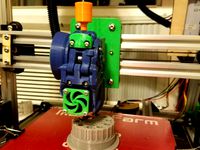
My box from Makerbot Industries showed up today. It had 4lbs of PVA, plus a handful of 606 bearings and those wonderful MK5 drive gears. So I rebuilt my second stepper extruder, and put on the new mount all at the same time.
The new mount works as advertised; it makes leveling much easier, and taking off the whole second extruder when you want to go back to 'normal' a snap. I recommend it. It also makes mounting everything a lot easier.
It does require you to drill 4 holes in your acrylic bridge. Drilling acrylic is supposed to be very tricky. I actually used a dremel instead of a drill, with a bit I dunno the name of, but I'll post a photo. I went slow, it cut like butter; I wasn't worried about cracking it at any point. My room does still have the faint aroma of my 8th grade shop class, where we all made acrylic salad spoons. Mom still uses it, 20 years later.
The only real problem I have remaining is the ooze creating a mess that frequently gets rolled into the model and turns it into a mess. Since I've got two functioning stepper extruders now, I'm working on additions to my combine script to handle reversing the filament feed in a sensible way when switching off heads. There will be a new version of the script up soon, and new photos.
If I solve the ooze issue to my satisfaction, I'll be ready to mark this WIP as done.
.... and I have now, in the latest version of the script. I'll write up full documentation under INSTRUCTIONS and call this finished.
Thanks for reading... and good luck with your dual-extruder printing!!
Once again, I owe thanks to everyone on IRC Freenode, especially Kliment this time for his encyclopedic knowledge of Gcodes. And thanks to RepG coders for having done most of the work. And thanks to my very patient fiance.
I believe this project is complete. There are workable, though probably not ideal, solutions to all major problems. The code and mount are both perfectly usable.
Youtube videos availabe at:http://www.youtube.com/watch?v=tSp8FKgoY8khttp://www.youtube.com/watch?v=mv3wxvR8w5A
New! http://www.youtube.com/watch?v=XafKYIxlgBk
For people who just want the short version to go with the photos: Of course when I thought about what to print first, I thought the classic 20mm cube, but in a checkerboard pattern.
Setting the head offsets in the software exactly is important, and not difficult, but I couldn't dial it in during the course of this project as every time I'd set it I'd change something to unset it again. That's the only reason many of the prints are overlapping in odd ways.
Any ooze tends to accumulate at the offset position and eventually get rolled into the model, making a mess. The final update to the script has solved this with some ooze-controlling reversal, which I didn't bother to get dialed in exactly before closing this file. :)
THE STORY:
On Friday, it struck me I had a MK5 hot end just sitting here in a box, unusued, and I thought -- wouldn't two extruders in one machine be a neat idea? You could print two colors together, or you could use one to print some kind of support material; who knows what that might be. I knew you could dissolve PLA with toxic chemicals, but I also knew I'd never be allowed to play with toxic chemicals; I'm not even really allowed to print ABS.
I decided I would have the entire project complete, from conception to completion, done by the end of the weekend. You might have noticed my rash of part releases.
Well, I missed it by /that/ much, but it turns out to be good news. MBI on Monday announced dissolvable plastic ( http://store.makerbot.com/makerbot-pva.html )... which means now we know what to use as support material. The timing could not be more perfect. In addition, this makes the perfect thing to do with your old MK5 once you also have a shiny new MK6... Or maybe you bought a third-party hot end, like one of the excellent ones from Makergear.com, and now you can get your old stock hot end out of its drawer and use it again.
Now, when I say completion, I don't mean this project is finished, oh no. There's a very long list of little things to fix or change, and a short list of big things to fix or change.
CURRENT MAJOR PROBLEMS:
The bolts on the build platform mean your print area can be greatly reduced --
-- SOLVED... switching to the ABP cures this problem neatly.
Need a brilliant way to assure both heads are on the same Z-plane physically.
-- SOLVED... not exactly brilliant, but the new mount is easily adjustable.
CURRENT MINOR PROBLEMS:
It would be helpful to people who do not have the option of switching to the ABP to have a mount where the heads are aligned 90 degrees offset from this.
Some kind of quick-release mount for the second extruder would be nice. Maybe there would be a way to work Z-height adjustment into it.
-- SOLVED: V2 mount is easy to remove and install separately.
The closer the two heads together can be brought together, the less loss of build area will happen, bolts or no bolts.
It should be theoretically possible to drive two heads from one EC; if I blow up my other MOSFET I may have to pursue this possibility myself. This would require some hacking of RepG at the least and probably the firmware too.
The software could use many improvements; what I've given here is a workable starting point to build from.
TRIALS AND TRIBULATIONS:
I nearly hit my goal of having it all wrapped up by the weekend. I missed it because the 608-based Wade's style extruder I built off the STLs I uploaded over the weekend: http://www.thingiverse.com/thing:6492 did not work. It wouldn't push plastic.
You might think that meant it worked OK, I just couldn't demo it, and you'd be right. At this point, I had two stepper extruders working in concert but I couldn't make a test print, because one wouldn't push plastic. I felt like I couldn't put up the thingiverse entry until I could make the thumbnail a two-tone print.
So, this set me back a whole day. Well, this, and the fact that I have to work for a living, still...
I decided the problem was the bolt I hobbed wasn't nearly as good as Makerbot's MK5 drive gear thingy: http://store.makerbot.com/mk5-drive-gear.html ... while the MBI delrin extruder is of questionable value, this gear is the /bomb/. I tried hobbing another bolt, but I just couldn't make one that worked.
An additional problem is that the design STLs I posted have the wrong value for the filament distance from the hobbed bolt, making it add a lot of friction and nearly impossible to get in the hole.
So I decided that other people would want to use it with the DC motor, and I might as well buckle down and replace my 2nd stepper extruder with a DC extruder, temporarily. I couldn't find a 606 bearing on such short notice, but I've seen plenty of people run without it, so I made do.
It turned out this introduced a new problem. While I was fortunate to find the MBI ReplicatorG and Firmware supported everything I wanted to do /already/, which was REALLY NICE, THANKS GUYS!! ... I found there was a bug or oversight in the drivers for the stepper extruder version; if you use them, they will just delete any commands that drive a DC motor. So if you have one of each like I do for the moment, it won't run the DC motor.
Fortunately, this was about a ten minute fix in the RepG code, which I'm getting all too familiar with. (Patch will be supplied below if it isn't already when I hit PUBLISH).
Next the DC motor stopped responding (probably just needed a reboot, honestly), and in my naieve efforts to fix it, the mosfet blew up, literally; photo attached. I couldn't get it to switch to the second mosfet in the legitimate fashion, RepG wouldn't recognize the extruder to set it's eeprom... So I hardcoded the change in a copy of the firmware and uploaded it - finally the DC motor was back online and I had only lost about two hours...
Once I finally got it all up and running, testing my software proved to have it's own fun points, too. First I got the offsets and everything all backwards, and nearly drove my print heads into the bolts many times. Once I finally got it completely sorted, the first test print I discovered a really fun thing -- if your print heads are off in the Z direction by a tiny amount, that's OK. But if the lower one prints last, it'll rip the tops off the taller one's print.
EDIT: I actually think the cause of the destroyed print in the photo and the other messy prints are all down to the shadow print/ooze that develops and tends to roll into the model. The latest version of the script provides ooze-combatance for this reason.
As you can see, I didn't find a way to measure my Y offset so I guessed 0 on the first print, the one with the missing tops, and I was wrong, so I adjusted it for the second print... in the wrong direction! Doh! It'll be fixed for any future photos, I hope. The X offset is easy enough to measure since that's the way the heads are aligned in my build. If you have the ABP, having them aligned in X like this is good 'cause then there are no worries about bolts AND you might be able to hack the ABP to get back any lost print area. It's a win-win.
But I'm not running the ABP right now, so I need to watch my bolts like a hawk and it would have been better if my mount has the heads aligned in Y instead of X - rotated 90 degrees.
UPDATE (2011-02-23):
I got one print off today before the DC motor stopped running. The LED on the mosfet comes on when I tell it to run, so I'm not sure what the problem could be. I still have the relay I built to run it on the Thing O Matic extruder controller, but it's on a cupcake EC and I'm surprised to find it fails there, too - have other people had that problem?
I also switched out my build platform so the bolts would run the other way.
I swapped in a different DC motor and it works, but the DC motor overall oozes much more and takes much longer to start again than the stepper motor, so the grey parts in my prints are coming out looking somewhat lousy.
Otherwise, you can see it's working well and I fixed my Y-offset by just adding 1/2 the difference between the top and bottom parts sizes to it.
Next I added springs to the front extruder, assuming I only need to be able to adjust one to match the fixed one. This helped my prints a lot -- part of the problem with the greyparts is they weren't getting good stick on the 1st layer. Now both materials are getting good stick. Changing out for the springs changed my X+Y offsets by a very small amount, but that's easy to measure using this test cube.
The springs seem like a workable solution, -- I'm surprised the thing is not wobbly, but I used very strong springs, so...
UPDATE (2011-02-24): Added new mount .STL; this one should be a good way to solve both the quick-remove problem and the z-alignment problem, at the cost of drilling 2-4 new holes into your stock acrylic bridge. I'm going to have to figure out how to get replacement lasercuts parts after these experiments are finalized, I bet.
Since the STLs aren't rendering here, you can see the new mount here: http://www.thingiverse.com/thing:6517 until I have a photo of the printed thing.
While adjusting my printer to print the part (I decided to lower the spring-loaded head down as low as I could to get the other out of the way, and just print in 1 material) I found there's an easy way to adjust the springs tension - while the end is cold and full of filament, simply turn the motor back a few steps (by hand?) and it will raise the end up, allowing you to easily twirl the nuts to your desired location, before lowering it back down. Youtube video here: http://www.youtube.com/watch?v=gJStB65cSvA
I am greatly looking forward to seeing the postman today, as he'll have my order from Makerbot with the dissolvable plastic, as well as the parts I will need to rebuild my stepper extruder properly, and eliminate the DC extruder.
I finished printing the new mount. Checking in the control panel after the print revealed to my pleasure that the /other/ extruder, the one I didn't use in the print, was at a nice cool 30degrees still.
I wonder if I should have designed the mount to use the existing bolts on the front of the bridge. I guess I'd like 4 bolts for it though, so this is probably OK, even if the other way means less destruction.
If the big 'shadows' on my dual-color prints didn't make it clear I'm not doing anything to combat ooze presently, the print of this new mount will...
UPDATE: (2011-02-25)
My box from Makerbot Industries showed up today. It had 4lbs of PVA, plus a handful of 606 bearings and those wonderful MK5 drive gears. So I rebuilt my second stepper extruder, and put on the new mount all at the same time.
The new mount works as advertised; it makes leveling much easier, and taking off the whole second extruder when you want to go back to 'normal' a snap. I recommend it. It also makes mounting everything a lot easier.
It does require you to drill 4 holes in your acrylic bridge. Drilling acrylic is supposed to be very tricky. I actually used a dremel instead of a drill, with a bit I dunno the name of, but I'll post a photo. I went slow, it cut like butter; I wasn't worried about cracking it at any point. My room does still have the faint aroma of my 8th grade shop class, where we all made acrylic salad spoons. Mom still uses it, 20 years later.
The only real problem I have remaining is the ooze creating a mess that frequently gets rolled into the model and turns it into a mess. Since I've got two functioning stepper extruders now, I'm working on additions to my combine script to handle reversing the filament feed in a sensible way when switching off heads. There will be a new version of the script up soon, and new photos.
If I solve the ooze issue to my satisfaction, I'll be ready to mark this WIP as done.
.... and I have now, in the latest version of the script. I'll write up full documentation under INSTRUCTIONS and call this finished.
Thanks for reading... and good luck with your dual-extruder printing!!
Once again, I owe thanks to everyone on IRC Freenode, especially Kliment this time for his encyclopedic knowledge of Gcodes. And thanks to RepG coders for having done most of the work. And thanks to my very patient fiance.
Similar models
thingiverse
free

Extended Extruder Mount for Ender 5-Plus by B10K
...ptfe tube doesn't have to be as long because the extruder is a little bit closer to the bed
required hardware: x2 m4x8 screws
thingiverse
free

Dual extruder stepper motor mount TronXY-X1 by Guusvanmarle
...#39;t work.
update 08/08/2018:
i have printed it and the design wasn't great so i made a new one and this one is much better.
thingiverse
free

Nema 17 Stepper Motor Mount for 2020 Extrusion by camo6016
... to get the motor out.
its designed this way so it doesn't extrude from the confines of the 3d printer which i an building.
thingiverse
free

Tevo Titan Mounting Brackets (Single, Dual & Triple version) by rj3005
...sions for 1 extruder, 2 extruders and 3 extruders. note that you must use pancake stepper motors; longer stepper motors won´t fit
thingiverse
free
Stepper Motor Strap by illgenr
...to fit a 4.5cm stepper motor. couldn't find anything similar i used this to mount a bowden extruder on...
thingiverse
free

Anet A8 Bowden Extruder Motor Mount by tman67234
...#39;t have enough room on top for the existing bowden motor mount i was using, so i needed something that sat lower on the frame.
thingiverse
free

Rear stepper motor mount for bowden by Admant77
...for a very specific application, but i hope it maybe helps someone.
also included the 123d file so you can tweak it as necessary.
thingiverse
free

Ender 3 Z-Axis Support with Offset
...build my own.
a bearing 608 is needed, no screws, just slide it in.
used stepper mount: https://www.thingiverse.com/thing:2752080
thingiverse
free
Makerfarm Pegasus xcarriage for Toranado extruder by LEO76
...t bad and itll be covered by the bolts. i have not printed this new one so if i could get some feedback that would be awesome!!!!
thingiverse
free

Insulator retainer Supersized by Fido
...er body.
i know that the newer extruders have already solved this problem but as for me, i want use the old one as long as i can.
Scribblej
thingiverse
free
ScribbleJ CoreXY Beta by ScribbleJ
...j/corexy-v1https://github.com/scribblej/corexy-v1#corexy-beta
full gallery of development photos here: http://imgur.com/a/donun
thingiverse
free

RAMPS Clip-on Fanmount by ScribbleJ
...ramps clip-on fanmount by scribblej
thingiverse
simple clip-on mount for 40mm cooling fan.
thingiverse
free

Endcap for Pipe or Rod by ScribbleJ
...endcap for pipe or rod by scribblej
thingiverse
simple, customizable endcap for pipe or rod, with optional setscrew.
thingiverse
free

Chapstick Holder by ScribbleJ
...hapstick holder for bicycles!
you might ask "why?" and i couldn't tell you. this item was requested by a friend.
thingiverse
free
Parametric Pen Clip by ScribbleJ
...en clip by scribblej
thingiverse
useful for anything cylindrical. i use it to make clips for my electronic cigarette batteries.
thingiverse
free

Parametric Pipe Mounting Flange by ScribbleJ
...c pipe mounting flange by scribblej
thingiverse
for mounting pipes and rods to flat things -- for example, a shower curtain rod.
thingiverse
free

ScribbleJ's Ring Sizer with Embossed Labels by vandarin
...scribblej's ring sizer with embossed labels by vandarin
thingiverse
added text to the rings.
thingiverse
free

OpenSCAD Bend Module by ScribbleJ
...se
nothing fancy at all, just makes a bend in a cube.
update: as unfancy as it was, a minor bug means i posted a new version.
thingiverse
free
(Yet Another) Printable Quad Frame by ScribbleJ
...(yet another) printable quad frame by scribblej
thingiverse
i'll update this later. maybe.
thingiverse
free

Simple Prusa Spool Mount by ScribbleJ
...ount by scribblej
thingiverse
just a quick and dirty way to mount a spool to your prusa without having to disassemble anything.
Makerbot
thingiverse
free

MakerBot Mixtape by MakerBot
...t.com/makerbot-mixtape.html
designed by john b., matt k. and john d.
a collaborative project with playbutton
www.playbutton.com
thingiverse
free

MakerBot Nameplate by MakerBot
...plicator. this was seen in episode 5 of season 2 of makerbot tv http://www.youtube.com/watch?v=k815gaeelw8
created by todd blatt
thingiverse
free

Makerbot Mixtape Heart by MakerBot
... about a makerbot mixtape in a heart!
made by using the makerbot mixtape negative file
designed by john briscella and matt kroner
thingiverse
free

MakerBot Gnome by MakerBot
...at details that were not lost.
for more information on the makerbot digitizer desktop 3d scanner, visit makerbot.com/digitizer.
thingiverse
free
Makerbot Skate Park by MakerBot
...makerbot skate park by makerbot
thingiverse
a complete fingerboarding skate park.
thingiverse
free
MakerBot BotStep17 REVE by MakerBot
...esigned by harry mulliken.
this is part of the makerbot replicator, which you can find at http://www.thingiverse.com/thing:18813
thingiverse
free
Makerbot Mixtape Negative by MakerBot
...ngiverse
now your can make a makerbot mixtape out of almost any thing on thingiverse.
designed by john briscella and matt kroner
thingiverse
free
MakerBot Man Cupid by MakerBot
...piece at once and get moving parts right off the build plate.
available in the makerbot store gumball machine for a limited time!
thingiverse
free
MakerBot Pendant by MakerBot
...39;t go wrong sporting this necklace! wear it with pride. both dualstrusion and one color models are available.
created by todd
thingiverse
free
MakerBot Dynamo by MakerBot
...
and if a led not exciting enough for you, just think of all the other wonderful things you can power, one hand crank at a time.
Dual
turbosquid
free

Dual Pistols
...ls
turbosquid
free 3d model dual pistols for download as fbx on turbosquid: 3d models for games, architecture, videos. (1320360)
turbosquid
$2

Dual Axe
...urbosquid
royalty free 3d model dual axe for download as fbx on turbosquid: 3d models for games, architecture, videos. (1332372)
turbosquid
$10

Dual Lesaths
... available on turbo squid, the world's leading provider of digital 3d models for visualization, films, television, and games.
3ddd
$1

плитка Dual Bianco (Испания)
...й плитки venis dual (испания). технические качества: устойчивость к стирания, отличная геометрия, отсутствие проблем при укладке.
turbosquid
$35

Dual Mesh Fonts
...ree 3d model dual mesh fonts for download as ma, obj, and fbx on turbosquid: 3d models for games, architecture, videos. (1352989)
turbosquid
$29

Dual Flask with Bungs
...del dual flask with bungs for download as obj, fbx, and blend on turbosquid: 3d models for games, architecture, videos. (1210512)
turbosquid
$19

Dual Socket Plug
...3d model dual socket plug for download as obj, fbx, and blend on turbosquid: 3d models for games, architecture, videos. (1303912)
turbosquid
$13

Dual Adjustable Pulley
... available on turbo squid, the world's leading provider of digital 3d models for visualization, films, television, and games.
turbosquid
$10

Amoi N809 Dual
... available on turbo squid, the world's leading provider of digital 3d models for visualization, films, television, and games.
turbosquid
$5

Dual Turret Tank
... available on turbo squid, the world's leading provider of digital 3d models for visualization, films, television, and games.
Extruder
3ddd
$1

Extruded Chair
...extruded chair
3ddd
extruded , tom dixon
inspired by tom dixon extruded chair
turbosquid
$15

Extruded Table
... extruded table for download as blend, dae, fbx, obj, and stl on turbosquid: 3d models for games, architecture, videos. (1634137)
turbosquid
$2

3D Printer Extruder
...d
royalty free 3d model 3d printer extruder for download as on turbosquid: 3d models for games, architecture, videos. (1537359)
turbosquid
$1

Zombie extruded text
...oyalty free 3d model zombie extruded text for download as obj on turbosquid: 3d models for games, architecture, videos. (1322198)
turbosquid
$4

Extruder conical screw
...el extruder conical screw for download as sldpr, ige, and stl on turbosquid: 3d models for games, architecture, videos. (1524433)
turbosquid
$50

3d PRINTER - Extruder
... available on turbo squid, the world's leading provider of digital 3d models for visualization, films, television, and games.
turbosquid
$15

Extruded Table 2
...xtruded table 2 for download as blend, dae, fbx, obj, and stl on turbosquid: 3d models for games, architecture, videos. (1621846)
turbosquid
$10

Maya Extrude Tool
... available on turbo squid, the world's leading provider of digital 3d models for visualization, films, television, and games.
3d_export
$5

world earth extrude map
...world earth extrude map
3dexport
3ddd
$1

Simply Elegant Extruded Tree Coffee Table Design
...ble by link studios. the silhouette of a tree is visible at one angle, extruded from the surface to create the support structure.
Material
3d_export
$245
top of the material
...top of the material
3dexport
top of the material,commercial ceiling ceiling material, metal material
3d_ocean
$5
Concrete material
...concrete material
3docean
concrete cover material realistic textures
realistic concrete material
3d_ocean
$3

Grass Material
...grass material
3docean
grass material
include normal map
3d_ocean
$3
Terrain material
...terrain material
3docean
terrain material include normal map
3d_ocean
$3
Wood Material
...wood material
3docean
wood material include normal map
vizpark
$10

Material Manager
...ager
vizpark
the vp material manager is a new innovative tool to manage materials within 3ds max® in ways never possible before.
vizpark
free
Material Manager
...ager
vizpark
the vp material manager is a new innovative tool to manage materials within 3ds max® in ways never possible before.
3d_ocean
$7
R16 Material Kit(50+ Materials!)
...ls -fabrics -automotive materials -architectural materials -a complimentary studio -abstract materials -rocks all for the pric...
3d_ocean
$5
Frozen Materials
...erials the project includes the frozen materials and frosted effect. for the material included diffuse and map normal. thank you!
design_connected
$16

Material Pendant
...material pendant
designconnected
new works material pendant computer generated 3d model. designed by noergaard & kechayas.