Thingiverse

Drill Abrasive Drum by Dagongar
by Thingiverse
Last crawled date: 2 years, 11 months ago
Drum to assemble strips of sandpaper.
I have made two designs:
60 mm long x 50 mm in diameter, to use strips of 205x60 sandpaper. You can use standard roll paper 120 mm wide by cutting it in half.
56 mm long x 66.8 mm in diameter, to be used with sheets of standard size paper (280x230), cut into 5 strips of 56x230 (see figure 6).
They are tested up to 3000 rpm, which is the maximum of my drill, no problems.
Necessary material (Image 1):
Printed drum and jaw.
M8 screw, hexagonal head, 100 mm of length.
M8 nut.
Lock washer for M8 to prevent loosening of the nut.
1.5 mm diameter wire
Drum mounting:
Insert the jaw into the corresponding hole in the drum, aligning the hole of the jaw with that of the drum.
Insert the screw so that the head is fitted into the hexagon.
Bend the wire at 90º angle leaving 6 mm on the short side and 58 or 54 mm on the longest, depending on the drum we are mounting.
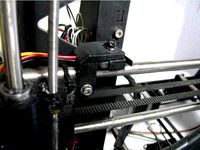
Insert the wire as shown in figure 2
Insert the washer and nut.
Mounting the sandpaper on the drum:
Make a curve at 20 mm from one end, leaving the abrasive out.
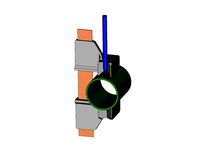
Place it on the drum as shown in figure 3 and push down.
Squeeze the sandpaper tightly around the drum.
Rotate the jaw to hold the sandpaper (Image 5).
Tighten the jaw by pushing with a screwdriver as shown in figure 4.
Notes:
The radius of the screw hole and the circumference of the hex head are designed to adjust with very little tolerance to avoid vibrations.
To cut the sandpaper, use a metal ruler and a cutter on the paper / fabric part, cutting it superficially (if you try to cut completely, you will lose the edge). Fold the paper by the mark and finish cutting by hand.
In version 1.1 the diameter of the screw hole has been reduced in 0,2 mm for a better fit.
Tambor para montar tiras de papel de lija.
He hecho dos diseños:
60 mm de largo x 50 mm de diámetro, para usar tiras de papel de lija de 205x60. Se puede usar papel de lija en rollo estandar de 120 mm de ancho cortándolo por la mitad.
56 mm de largo x 66,8 mm de diámetro, para usar con hojas de papel de lija de tamaño estandar (280x230) cortándolo en 5 tiras de 56x230 (Ver imagen 6).
Están probados hasta a 3000 rpm, que es el máximo de mi taladro, sin problemas.
Material necesario (Imagen 1):
Tambor y mordaza impresos.
Tornillo M8 de cabeza hexagonal de 100 mm de largo.
Tuerca M8.
Arandela para M8, preferiblemente rizada para evitar que se afloje la tuerca.
Alambre de 1,5 mm de diámetro
Montaje del tambor:
Insertar la mordaza en el hueco correspondiente del tambor, alineando el agujero de la mordaza con el del tambor.
Insertar el tornillo de modo que la cabeza quede encajada el en hueco hexagonal.
Doblar el alambre en ángulo recto dejando 6 mm en el lado más corto y 58 o 54 mm en el más largo, dependiendo del tambor que estemos montando.
Insertar el alambre como se muestra en la imagen 2
Poner la arandela y la tuerca.
Montaje del papel de lija en el tambor:
Hacer un doblez a unos 20 mm de un extremo, dejando el abrasivo hacia fuera.
Colocarlo en el tambor como se muestra en la figura 3 y empujarlo hacia abajo.
Tensar el papel de lija para que quede apretado alrededor del tambor.
Bascular la mordaza para que sujete el papel de lija (Imagen 5).
Apretar la mordaza empujando con un destornillador como se muetra en la figura 4.
Notas:
El radio del agujero del tornillo y el circunradio de la cabeza hexagonal están diseñados para que ajusten con muy poca tolerancia para evitar vibraciones.
Para cortar el papel de lija, usar una regla metálica y cutter por la parte del papel/tela, cortando superficialmente (si se intenta cortar completamente, se perderá el filo). Doblar el papel por la marca y terminar de cortarlo a mano.
En la versión 1,1 se ha reducido el diámetro del agujero del tornillo en 0,2 mm para un mejor ajuste.
I have made two designs:
60 mm long x 50 mm in diameter, to use strips of 205x60 sandpaper. You can use standard roll paper 120 mm wide by cutting it in half.
56 mm long x 66.8 mm in diameter, to be used with sheets of standard size paper (280x230), cut into 5 strips of 56x230 (see figure 6).
They are tested up to 3000 rpm, which is the maximum of my drill, no problems.
Necessary material (Image 1):
Printed drum and jaw.
M8 screw, hexagonal head, 100 mm of length.
M8 nut.
Lock washer for M8 to prevent loosening of the nut.
1.5 mm diameter wire
Drum mounting:
Insert the jaw into the corresponding hole in the drum, aligning the hole of the jaw with that of the drum.
Insert the screw so that the head is fitted into the hexagon.
Bend the wire at 90º angle leaving 6 mm on the short side and 58 or 54 mm on the longest, depending on the drum we are mounting.
Insert the wire as shown in figure 2
Insert the washer and nut.
Mounting the sandpaper on the drum:
Make a curve at 20 mm from one end, leaving the abrasive out.
Place it on the drum as shown in figure 3 and push down.
Squeeze the sandpaper tightly around the drum.
Rotate the jaw to hold the sandpaper (Image 5).
Tighten the jaw by pushing with a screwdriver as shown in figure 4.
Notes:
The radius of the screw hole and the circumference of the hex head are designed to adjust with very little tolerance to avoid vibrations.
To cut the sandpaper, use a metal ruler and a cutter on the paper / fabric part, cutting it superficially (if you try to cut completely, you will lose the edge). Fold the paper by the mark and finish cutting by hand.
In version 1.1 the diameter of the screw hole has been reduced in 0,2 mm for a better fit.
Tambor para montar tiras de papel de lija.
He hecho dos diseños:
60 mm de largo x 50 mm de diámetro, para usar tiras de papel de lija de 205x60. Se puede usar papel de lija en rollo estandar de 120 mm de ancho cortándolo por la mitad.
56 mm de largo x 66,8 mm de diámetro, para usar con hojas de papel de lija de tamaño estandar (280x230) cortándolo en 5 tiras de 56x230 (Ver imagen 6).
Están probados hasta a 3000 rpm, que es el máximo de mi taladro, sin problemas.
Material necesario (Imagen 1):
Tambor y mordaza impresos.
Tornillo M8 de cabeza hexagonal de 100 mm de largo.
Tuerca M8.
Arandela para M8, preferiblemente rizada para evitar que se afloje la tuerca.
Alambre de 1,5 mm de diámetro
Montaje del tambor:
Insertar la mordaza en el hueco correspondiente del tambor, alineando el agujero de la mordaza con el del tambor.
Insertar el tornillo de modo que la cabeza quede encajada el en hueco hexagonal.
Doblar el alambre en ángulo recto dejando 6 mm en el lado más corto y 58 o 54 mm en el más largo, dependiendo del tambor que estemos montando.
Insertar el alambre como se muestra en la imagen 2
Poner la arandela y la tuerca.
Montaje del papel de lija en el tambor:
Hacer un doblez a unos 20 mm de un extremo, dejando el abrasivo hacia fuera.
Colocarlo en el tambor como se muestra en la figura 3 y empujarlo hacia abajo.
Tensar el papel de lija para que quede apretado alrededor del tambor.
Bascular la mordaza para que sujete el papel de lija (Imagen 5).
Apretar la mordaza empujando con un destornillador como se muetra en la figura 4.
Notas:
El radio del agujero del tornillo y el circunradio de la cabeza hexagonal están diseñados para que ajusten con muy poca tolerancia para evitar vibraciones.
Para cortar el papel de lija, usar una regla metálica y cutter por la parte del papel/tela, cortando superficialmente (si se intenta cortar completamente, se perderá el filo). Doblar el papel por la marca y terminar de cortarlo a mano.
En la versión 1,1 se ha reducido el diámetro del agujero del tornillo en 0,2 mm para un mejor ajuste.
Similar models
3dwarehouse
free

mordaza de presion
...mordaza de presion
3dwarehouse
mordaza de madera para taladro vertical, falta el diseño del tornillo y la manivela del mismo
thingiverse
free

Universal telescope mount by DavidGAV_
... que también se pueda montar en oculares con 33.5 mm de diámetro.
también se adapta la posición de la cámara a un xiaomi mi 9 se.
thingiverse
free

4 Jaw Lathe Chuck by fvergniaud
...m8 allen x 35 mm
8- tor m4 allen x 15 mm
4- tor m6 x 20
8- tuercas m4
tornillos y tuercas m6 para el ajuste del plato al manchon.
3dwarehouse
free

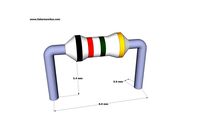
Resistencia un cuarto de vatio para insertar en PCB
...ncho del cuerpo: 6.4 mm diámetro del cuerpo : 2.4 mm diámetro del terminal: 0.6 mm #educación #electrónica #resistencia #resistor
3dwarehouse
free
Resistencia un octavo de vatio para insertar en PCB
... ancho del cuerpo: 4 mm diámetro del cuerpo : 1.6 mm diámetro del terminal: 0.6 mm #educación #electrónica #resistencia #resistor
thingiverse
free

Idler reforzado en la zona de los tornillos. para Greg's extruder by pelanas
...ita el cuerpo, aumentando el material en esa zona y haciendo uno de los agujeros de 2.3mm para roscar m3 directamente a la pieza.
thingiverse
free
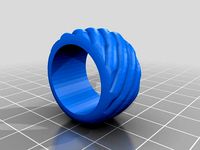
Anillo helicoidal by Trenes_y_Joyas
...ficie. el diámetro interno es de 20 mm, con lo que para ajustar sólo hay que usar un escalado en proporción a lo que se necesite.
3dwarehouse
free

Plato abatible Air IPSC v1 - (Para impresion 3D)
... para que gire, y -0’5mm en los tornillos para que entren bastante justos pero sea efectivo al regular la sensibilidad del plato.
thingiverse
free
Tensor Eje Y (Artillery X1) by laureotero
...3186e155e&ws_ab_test=searchweb0_0,searchweb201602_,searchweb201603_)
perilla
1 tornillo m5x40mm
1 tuerca m5
1 arandela m5 (?)
thingiverse
free

Lantern support for bike by canu
...metro, se ajusta la base al manubrio. en el otro extremo, se tiene una mordaza de diámetro 22mm que sujeta a presión la linterna.
Dagongar
thingiverse
free

Smoking Pipe Holder by Dagongar
...smoking pipe holder by dagongar
thingiverse
holder for smoking pipe
thingiverse
free
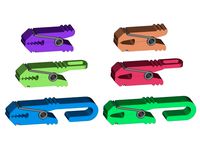
Small Clamps by Dagongar
...on 1 y 5 dientes, normal, con anilla para colgar y con un gancho.
los resortes se han obtenido de las pinzas de la ropa normales.
thingiverse
free
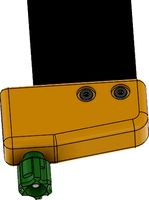
Prusa I3 Steel X & Z axis endstop holder by Dagongar
...st and reliable prusa i3 steel x and z axis mechanical endstop holder.
use 20 mm m3 screw allen head with nylon insert lock nut.
thingiverse
free

Drill bit sharpener for "generic" rotary tool by Dagongar
...common, but the thread to attach accessories is smaller than the dremel one.
see the mgx sharpener description for instructions.
thingiverse
free

Bic Lighter Waterproof Cap by Dagongar
... al que se le ha añadido una junta de goma tórica de 20x2 mm o 20x2,5 mm (20 mm es el diámetro interior y 2/2,5 mm es la altura).
thingiverse
free
Dual Center Finder For Pipes by Dagongar
...e monta cuesta trabajo introducir la regla, poner un poco de grasa en las guías y en la regla, después, se desliza con facilidad.
thingiverse
free

Pocket box by Dagongar
...la parte del botón que sobresale en el interior de la caja.
poner un alambre de 0,7 mm de diámetro como pasador de las bisagras.
thingiverse
free
Credit card blade by Dagongar
...rglue.
aviso: las hojas de cutter son una herramienta peligrosa. no son un juguete, ni para uso escolar ni para fines educativos.
thingiverse
free
Office Desk Organizer by Dagongar
... yo he puesto una lámpara halógena de 42w apuntando a la pieza, para mantenerla caliente entre 70 y 90 º c. (ver imágenes 1 y 2).
thingiverse
free
Wheel and shaft replacement for dishwasher basket by Dagongar
...edor, es necesario cortarlo longitudinalmente y abrirlo en lugar de sacar la pieza tirando, ya que se podrían romper los ganchos.
Abrasive
turbosquid
$5

A wooden chair with scuffs and abrasions
...scuffs and abrasions for download as blend, fbx, obj, and stl on turbosquid: 3d models for games, architecture, videos. (1709816)
turbosquid
$5

A wooden chair with scuffs and abrasions
...scuffs and abrasions for download as blend, fbx, obj, and stl on turbosquid: 3d models for games, architecture, videos. (1709807)
turbosquid
$5

A wooden chair with scuffs and abrasions
...scuffs and abrasions for download as blend, fbx, obj, and stl on turbosquid: 3d models for games, architecture, videos. (1709787)
turbosquid
$5

A wooden chair with scuffs and abrasions
...scuffs and abrasions for download as blend, fbx, obj, and stl on turbosquid: 3d models for games, architecture, videos. (1709773)
turbosquid
$5

A wooden chair with scuffs and abrasions
...scuffs and abrasions for download as blend, fbx, obj, and stl on turbosquid: 3d models for games, architecture, videos. (1709833)
turbosquid
$5

A wooden chair with scuffs and abrasions
...scuffs and abrasions for download as blend, fbx, obj, and stl on turbosquid: 3d models for games, architecture, videos. (1709821)
turbosquid
$10

A set of wooden chairs with scuffs and abrasions
...scuffs and abrasions for download as blend, fbx, obj, and stl on turbosquid: 3d models for games, architecture, videos. (1709852)
3d_export
$5

a wooden chair with scuffs and abrasions
...s 1<br>vertices 312<br>ribs 790<br>facets 484<br>triangles 484<br>if you need an adjustment, write!
3d_export
$5
a wooden chair with scuffs and abrasions
...s 1<br>vertices 168<br>ribs 400<br>facets 240<br>triangles 240<br>if you need an adjustment, write!
3d_export
$5

a wooden chair with scuffs and abrasions
...s 1<br>vertices 360<br>ribs 836<br>facets 488<br>triangles 488<br>if you need an adjustment, write!
Drum
3d_export
$5

drums
...drums
3dexport
drums
3d_ocean
$20

Drums
...iled model of drums. charleston,bass drum, tamtam drums, cymbal,etc. available in .blend, .obj, and .lwo format. ready for render
archibase_planet
free

Drum
...hibase planet
drum musical instrument tambour drum kit
drum taiko n091115 - 3d model (*.gsm+*.3ds) for interior 3d visualization.
design_connected
$9

Drum
...drum
designconnected
brent comber drum computer generated 3d model. designed by comber, brent.
3d_export
$15

Conga Drum
...conga drum
3dexport
conga drums
3d_export
$10

electro drums
...electro drums
3dexport
electro drums
3d_export
$5

electric drums
...electric drums
3dexport
electric drums
turbosquid
$1

Drum
...turbosquid
royalty free 3d model drum for download as blend on turbosquid: 3d models for games, architecture, videos. (1480093)
turbosquid
$1

Drums
...s
turbosquid
royalty free 3d model drums for download as max on turbosquid: 3d models for games, architecture, videos. (1240112)
turbosquid
$5

Drum
...squid
royalty free 3d model drum for download as max and fbx on turbosquid: 3d models for games, architecture, videos. (1358188)
Drill
archibase_planet
free

Drill
...drill
archibase planet
drill electric drill power drill
drill n091107 - 3d model (*.gsm+*.3ds) for interior 3d visualization.
archibase_planet
free

Drill
...drill
archibase planet
drill hand drill
drill 1 - 3d model (*.gsm+*.3ds) for interior 3d visualization.
archibase_planet
free
Drill
...drill
archibase planet
drill hand drill
drill 2 - 3d model (*.gsm+*.3ds) for interior 3d visualization.
archibase_planet
free

Drill
...drill
archibase planet
drill hand drill
drill 3- 3d model (*.gsm+*.3ds) for interior 3d visualization.
archibase_planet
free
Drill
...drill
archibase planet
boring rig rig drill
drill n070807 - 3d model for interior 3d visualization.
archibase_planet
free
Drill
...drill
archibase planet
hand drill toolware
drill 2 - 3d model (*.gsm+*.3ds) for interior 3d visualization.
archibase_planet
free
Drill
...drill
archibase planet
perforator drill auger
drill 3 - 3d model (*.gsm+*.3ds) for interior 3d visualization.
turbosquid
$25
Drill
...ll
turbosquid
royalty free 3d model drill for download as ma on turbosquid: 3d models for games, architecture, videos. (1203923)
archibase_planet
free
Drill
...drill
archibase planet
boring mill perforator driller
drill pro 1 - 3d model (*.gsm+*.3ds) for interior 3d visualization.
3d_export
free

drill bit
...drill bit
3dexport
drill bit