Thingiverse
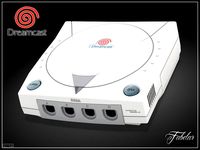
Dreamcast GDEMU Mount w/SD Extender by kirillre4
by Thingiverse
Last crawled date: 3 years, 3 months ago
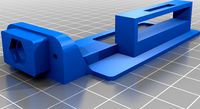
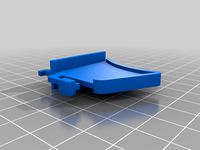
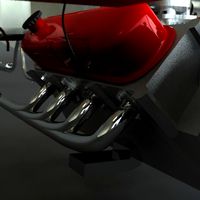
This is modular Dreamcast GDEMU (optical drive emulator) mounting system. It's designed to fit several criteria:
Rigidity and sturdiness;
Restoration of original airflow;
Simple to print (minimal support and overhang);
Compatibility with other mods;
Expandability
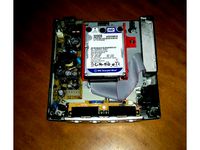
and a couple of my personal aesthetic choices - SD card loading by sliding it into the slot horizontally (imgur video) and an option to get rid of external power brick for PicoPSU/DreamPSU by installing AC/DC power supply board internally.
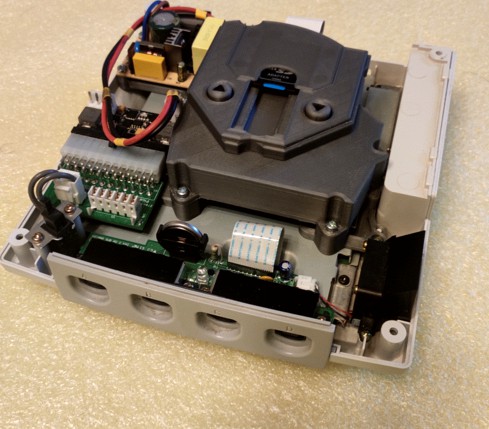
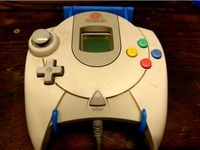
Here's what complete build with dual buttons and internal 12V PSU looks like:
(and also album with much more photos and commentary on this build, as a supplementary material to instructions provided below)
This build requires several extra items:
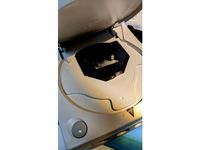
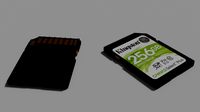
SD Card extender (20 or 40 cm ribbon reccommended). You can buy them from AliExpress/eBay, there are two main options available (see picture above) - sold without shell (right one) and with shell (left one, shell removed). Ones without shell usually have two "ears" with mounting holes. Ultimately it doesn't matter which one you pick, as this design is compatible with either option, but version without shell might require to twist the ribbon, not just fold it;
M3 threaded brass inserts (16+) (I've used 5mm ones, but you can use 3 and 4 mm ones too);
M3x6 (8+), M3x10(8+) screws (DIN7985 or similar), optionally some M3x8. Just get 20 of each, honestly.
Optional parts:
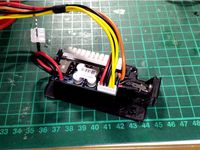
For internal AC-DC PSU build:
12V3A Power Supply (linked is the one I've used);
IEC 320 C8 PCB mounted plug (just look at the one on stock PSU, you need exactly the same one).
For dual button build:
12x12mm tactile switches with a square peg (like this one);
about 1m of electric wire;
2.54 pitch pin header male (3 pins) and either DuPont connector with 2.54 pitch (3 pins)(if you have proper tools for crimping them), or female pin header for soldering.
For single button build:
spring (30 mm uncompressed length, 5 mm outer diameter). Springs like this are very common in cheap ballpoint pens (that's exactly where I got mine, from 10-pack of ballpoint pens from dollar store). Button will work just fine without the spring, spring only adds more travel to the press.
Regarding dual button setup
I'm providing the files, because I already spent time making those, but I don't recpmmend doing this build - for all extra effort it takes, that setup is pretty much useless. If you're using GD Menu (like 99.9% GDEMU users, including me), both buttons will force console to boot back into GD Menu. Switching between disc images on SD card only works when you don't have GD Menu.
Compatibilty:
This mod should be compatible with most PicoPSU mods, stock PSU (only with [NO REAR EXT] Support), GDEMU (obviously), Noctua mod - I've tested it with this bracket. I haven't tested it with DreamPSU and DCHDMI, but I don't think there would be issues with those.
Which files to print:
All files with [ALL] - those files are universal for all builds
All files with [1B] OR [2B] for single button or dual button builds respectively.
If you plan to have an internal AC-DC PSU, print BOTH [REAR EXT] (Support and 12V3A PSU mount) files. Otherwise print only [NO REAR EXT] Support.
Here's build instructions (I've also uploaded them as "Assembly instructions.zip", in case something happens to imgur versions):
Here are extra/different steps for other options:
And finally some last minute addition that is not in the photos
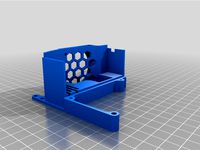
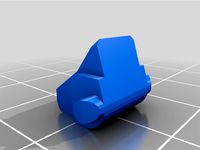
These 4 holes are intended for mounting extra modifications. I've provided three files with [EXT] in titles as examples - those are mounts for 20x80 protoboard.
Though in the end I've ended up with a bit more refined holder (and shortened the board to 60 mm)
I'm using the board to break out 5V and 12V lines from PicoPSU (mostly for planned extra fans and this mod ).
Rigidity and sturdiness;
Restoration of original airflow;
Simple to print (minimal support and overhang);
Compatibility with other mods;
Expandability
and a couple of my personal aesthetic choices - SD card loading by sliding it into the slot horizontally (imgur video) and an option to get rid of external power brick for PicoPSU/DreamPSU by installing AC/DC power supply board internally.
Here's what complete build with dual buttons and internal 12V PSU looks like:
(and also album with much more photos and commentary on this build, as a supplementary material to instructions provided below)
This build requires several extra items:
SD Card extender (20 or 40 cm ribbon reccommended). You can buy them from AliExpress/eBay, there are two main options available (see picture above) - sold without shell (right one) and with shell (left one, shell removed). Ones without shell usually have two "ears" with mounting holes. Ultimately it doesn't matter which one you pick, as this design is compatible with either option, but version without shell might require to twist the ribbon, not just fold it;
M3 threaded brass inserts (16+) (I've used 5mm ones, but you can use 3 and 4 mm ones too);
M3x6 (8+), M3x10(8+) screws (DIN7985 or similar), optionally some M3x8. Just get 20 of each, honestly.
Optional parts:
For internal AC-DC PSU build:
12V3A Power Supply (linked is the one I've used);
IEC 320 C8 PCB mounted plug (just look at the one on stock PSU, you need exactly the same one).
For dual button build:
12x12mm tactile switches with a square peg (like this one);
about 1m of electric wire;
2.54 pitch pin header male (3 pins) and either DuPont connector with 2.54 pitch (3 pins)(if you have proper tools for crimping them), or female pin header for soldering.
For single button build:
spring (30 mm uncompressed length, 5 mm outer diameter). Springs like this are very common in cheap ballpoint pens (that's exactly where I got mine, from 10-pack of ballpoint pens from dollar store). Button will work just fine without the spring, spring only adds more travel to the press.
Regarding dual button setup
I'm providing the files, because I already spent time making those, but I don't recpmmend doing this build - for all extra effort it takes, that setup is pretty much useless. If you're using GD Menu (like 99.9% GDEMU users, including me), both buttons will force console to boot back into GD Menu. Switching between disc images on SD card only works when you don't have GD Menu.
Compatibilty:
This mod should be compatible with most PicoPSU mods, stock PSU (only with [NO REAR EXT] Support), GDEMU (obviously), Noctua mod - I've tested it with this bracket. I haven't tested it with DreamPSU and DCHDMI, but I don't think there would be issues with those.
Which files to print:
All files with [ALL] - those files are universal for all builds
All files with [1B] OR [2B] for single button or dual button builds respectively.
If you plan to have an internal AC-DC PSU, print BOTH [REAR EXT] (Support and 12V3A PSU mount) files. Otherwise print only [NO REAR EXT] Support.
Here's build instructions (I've also uploaded them as "Assembly instructions.zip", in case something happens to imgur versions):
Here are extra/different steps for other options:
And finally some last minute addition that is not in the photos
These 4 holes are intended for mounting extra modifications. I've provided three files with [EXT] in titles as examples - those are mounts for 20x80 protoboard.
Though in the end I've ended up with a bit more refined holder (and shortened the board to 60 mm)
I'm using the board to break out 5V and 12V lines from PicoPSU (mostly for planned extra fans and this mod ).
Similar models
thingiverse
free
Dreamcast PicoPSU Mount (24pin) by Dreamcazman
...tie extra dc cable down, one without. i printed mine out then realised i didn't need the cable tie downs, hence the revision.
thingiverse
free
Add-ons 4 GDEMU Remote SD Card Mount
...ww.thingiverse.com/thing:3362309)
i changed the button for clone gdemu users, too. the original is 2,4mm to short and sit to low.
thingiverse
free

Carcasa para GDEMU de Dreamcast con lector SD integrado y soporte / GDEMU Dreamcast tray with integrated SD Reader and support by jsm84b
.../2018/12/15/carcasa-impresa-para-gdemu-de-dreamcast-con-lector-sd-integrado/
detalles de gdemu:https://gdemu.wordpress.com/about/
thingiverse
free
GDEMU Mount Button Flat & Raised Logo by TheJeffChen
...go file.
if your printer is as dumb as mine, you can print the flat button and the swirl logo separated, then glue them together.
thingiverse
free
Sega Dreamcast Internal 2.5" Hard Drive Mount by pcwzrd13
...this will not work with the va2 model dreamcast as it has a different style gd-rom drive with no enclosure to mount the caddy to.
thingiverse
free
Saturn 24 pin picopsu mount by aldovanucci
... would not fit into the original bracket without significant modification. this remix should allow the use of any 24 pin atx psu.
thingiverse
free

Dreamcast internal AC-DC PSU mod by Dreamcazman
...ve just used my original dc power supply, but my dc was an import & trying to find a 220v psu these days is rather difficult.
thingiverse
free

Sega Dreamcast GD-EMU SD Card Tray by twistedsymphony
...x. i believe fitment should work on all dreamcasts, however if you use this file i would appreciate a comment confirming fitment.
thingiverse
free
Sega Dreamcast ODE mount (poor man version) by uberyoji
...proper aligwnt of the button.
i also included a version without any sd slot for people who wants to use only an sdd or something.
thingiverse
free

Sega Dreamcast GD-EMU SD Card Tray (alternative, for clones) by Dreamcazman
...ensate for the difference.
only the tray without card holders was altered. happy to do the others if there's enough requests.

Gdemu
thingiverse
free

Gdemu remix bracket by philosiraptor117
...se
remix of https://www.thingiverse.com/thing:3102960/files?fbclid=iwar33tp7qheckutpl8mzjbat1714hirtfn-u0p3w_zdttmbkyu_noawurm_k
thingiverse
free
GDEmu Tray with fan by dch1980
...s a remix of
https://www.thingiverse.com/thing:4742830
and
https://www.thingiverse.com/thing:1585333
because i like both designs.
thingiverse
free
Add-ons 4 GDEMU Remote SD Card Mount
...ww.thingiverse.com/thing:3362309)
i changed the button for clone gdemu users, too. the original is 2,4mm to short and sit to low.
thingiverse
free
Carcasa para GDEMU de Dreamcast con lector SD integrado y soporte / GDEMU Dreamcast tray with integrated SD Reader and support by jsm84b
.../2018/12/15/carcasa-impresa-para-gdemu-de-dreamcast-con-lector-sd-integrado/
detalles de gdemu:https://gdemu.wordpress.com/about/
thingiverse
free
GDEMU Mount Button Flat & Raised Logo by TheJeffChen
...go file.
if your printer is as dumb as mine, you can print the flat button and the swirl logo separated, then glue them together.
thingiverse
free

Another SD Extender Holder for "GDEMU Dreamcast tray" by yvesall
...hingiverse.com/thing:4585275
note:
i printed it upside down to have a smooth surface on top
i used two m2.6x8 self-tapping screws
thingiverse
free
Dreamcast internal AC-DC PSU mod by Dreamcazman
...to use a power brick. i already had a gdemu set up the way i liked so i found...
thingiverse
free

Saturn Rhea / Phoebe Remote SD Card Mount
...saturn. it's design is heavily inspired by gregg collins's gdemu remote sd card mount desing. the bottom shell is...
thingiverse
free
Sega Dreamcast GD-EMU SD Card Tray by twistedsymphony
..."_for_old_rev_gdemu" files. if you have version 5.1 or newer gdemu then use the file without that suffix. i believe...
Dreamcast
turbosquid
$5

Sega Dreamcast
... available on turbo squid, the world's leading provider of digital 3d models for visualization, films, television, and games.
3d_export
$47

Sega Dreamcast 3D Model
...alistic toy computer people play nostalgia classic cartridge gaming video game pal
sega dreamcast 3d model fabelar 62969 3dexport
cg_studio
$43
Sega Dreamcast3d model
...sega dreamcast3d model
cgstudio
.max - sega dreamcast 3d model, royalty free license available, instant download after purchase.
thingiverse
free

Medaillon Dreamcast by Edbo
...medaillon dreamcast by edbo
thingiverse
medaillon dreamcast 80mm
thingiverse
free

Sega DreamCast Logo by AwesomeA
...sega dreamcast logo by awesomea
thingiverse
sega dreamcast logo
thingiverse
free
Dreamcast Lightgun Trigger
...fusion360 and i had a replacement!
to clarify, this if for the: "interact starfire lightblaster for the sega dreamcast"
thingiverse
free
Sega Dreamcast VMU Holder by pcwzrd13
...sega dreamcast vmu holder by pcwzrd13
thingiverse
a dreamcast vmu holder which holds up to 10 vmus / memory cards.
thingiverse
free

Sega Dreamcast VMU by pcwzrd13
...out correctly (possibly would have printed fine in a higher resolution). it should be easy enough to add the logo if you want it.
thingiverse
free
Dreamcast Broken Trigger by Kroshar
...trigger normally it should hold by itself but it depends on the printer (and settings) but you can easy glue it insite for safty.
thingiverse
free
Dreamcast Controller Holder by bkbreyme
...lder, re-sized to fit the sega dreamcast controller.
update: increased the size of the slots in the base to better fit the arms.
Sd
3d_ocean
$4
SD-Card
...sd-card
3docean
camera memory mmc mp3 player ram rom sd card
a sd-card
3ddd
$1

Ravak SDS Evolution
...ravak sds evolution
3ddd
sds , ravak
sds
3d_export
$5
SD Card
...sd card
3dexport
photorealistic sd memory card model. cycles engine. blender 3d v.2.82
3d_export
$10
customizable sd port
...customizable sd port
3dexport
customizable sd port
turbosquid
$1

sd card
...rbosquid
royalty free 3d model sd card for download as sldpr on turbosquid: 3d models for games, architecture, videos. (1198502)
turbosquid
$15
SD-DU107P81P1M.rfa
... available on turbo squid, the world's leading provider of digital 3d models for visualization, films, television, and games.
turbosquid
$15
SD-DU147P81P1M.rfa
... available on turbo squid, the world's leading provider of digital 3d models for visualization, films, television, and games.
turbosquid
$15

SD-DU127P81P1M.rfa
... available on turbo squid, the world's leading provider of digital 3d models for visualization, films, television, and games.
turbosquid
$15

SD-DU117P81P1M.rfa
... available on turbo squid, the world's leading provider of digital 3d models for visualization, films, television, and games.
turbosquid
$15

SD-DU187P81P1M.rfa
... available on turbo squid, the world's leading provider of digital 3d models for visualization, films, television, and games.
Extender
turbosquid
$39
Extending table
...id
royalty free 3d model extending table for download as max on turbosquid: 3d models for games, architecture, videos. (1290552)
turbosquid
$5
Extend Table
...squid
royalty free 3d model extend table for download as skp on turbosquid: 3d models for games, architecture, videos. (1372508)
turbosquid
$40
Engine Extended
... available on turbo squid, the world's leading provider of digital 3d models for visualization, films, television, and games.
turbosquid
$12

Triple extender
... available on turbo squid, the world's leading provider of digital 3d models for visualization, films, television, and games.
turbosquid
$99

Monica (Extended Pack)
... available on turbo squid, the world's leading provider of digital 3d models for visualization, films, television, and games.
turbosquid
$19
Berlino Extendable Table
... available on turbo squid, the world's leading provider of digital 3d models for visualization, films, television, and games.
turbosquid
$3
Extendable Modern Table
... available on turbo squid, the world's leading provider of digital 3d models for visualization, films, television, and games.
3d_export
$32

KC10 Extender 3D Model
...c 10 aircraft jet fighter bomber close support interceptor spy attacker plane
kc10 extender 3d model martialartist 24527 3dexport
3d_export
$50
Extended Range Trailer 3D Model
...railer 3d model
3dexport
extended range trailer military patrol equipment
extended range trailer 3d model dougmavs 75684 3dexport
design_connected
$13

Big Dining Tables Extended
...ining tables extended
designconnected
bonaldo big dining tables extended computer generated 3d model. designed by gilles, alain.
W
3ddd
$1
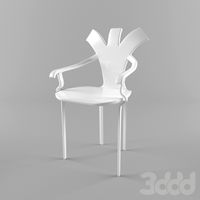
chair W
...chair w
3ddd
chair w
3ddd
$1
кресло w
...кресло w
3ddd
капитоне
кресло w
3ddd
$1
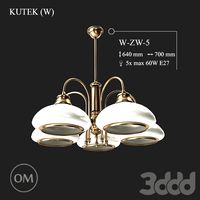
KUTEK (W) W-ZW-5
...kutek (w) w-zw-5
3ddd
kutek
3d модель люстри (w) w-zw-5 фабрики kutek. в архиве: max2012, obj, fbx, mat.(два варианта металла)
3ddd
$1
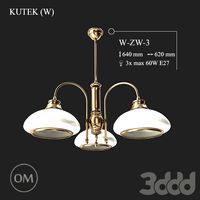
KUTEK (W) W-ZW-3
...kutek (w) w-zw-3
3ddd
kutek
3d модель люстри (w) w-zw-3 фабрики kutek. в архиве: max2012, obj, fbx, mat. (два варианта металла)
3ddd
$1
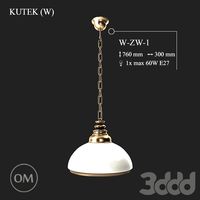
KUTEK (W) W-ZW-1
...kutek (w) w-zw-1
3ddd
kutek
3d модель люстри (w) w-zw-1 фабрики kutek. в архиве: max2012, obj, fbx, mat (два варианта металла).
3ddd
free
aneken W&W
...aneken w&w
3ddd
2 женских манекена, ценники и фолио. материалы и текстуры прилагаются.
design_connected
$9
KTribe W
...ktribe w
designconnected
ktribe w computer generated 3d model. designed by starck, philippe.
design_connected
$16

Troy W
...troy w
designconnected
magis troy w computer generated 3d model. designed by wanders, marcel.
turbosquid
$9

Menu - Benjamin Hubert - W W Carafe
... available on turbo squid, the world's leading provider of digital 3d models for visualization, films, television, and games.
turbosquid
$9

Menu - Benjamin Hubert - W W Carafe
... available on turbo squid, the world's leading provider of digital 3d models for visualization, films, television, and games.
Mount
3d_export
free

mounting bracket
...mounting plate is the portion of a hinge that attaches to the wood. mounting plates can be used indoors, cabinetry and furniture.
turbosquid
$2

MOUNTING
... available on turbo squid, the world's leading provider of digital 3d models for visualization, films, television, and games.
turbosquid
free

Mounts
... available on turbo squid, the world's leading provider of digital 3d models for visualization, films, television, and games.
turbosquid
free

Mount Fuji
...fuji
turbosquid
free 3d model mount fuji for download as obj on turbosquid: 3d models for games, architecture, videos. (1579977)
3d_export
$5

Headphone mount LR
...headphone mount lr
3dexport
headphone mount l+r
turbosquid
$39

Mount rainier
...quid
royalty free 3d model mount rainier for download as fbx on turbosquid: 3d models for games, architecture, videos. (1492586)
turbosquid
$5

pipe mounting
...quid
royalty free 3d model pipe mounting for download as obj on turbosquid: 3d models for games, architecture, videos. (1293744)
turbosquid
$3

Mounting Tires
...uid
royalty free 3d model mounting tires for download as fbx on turbosquid: 3d models for games, architecture, videos. (1708511)
3d_export
$5

Magnetic GoPro Mount
...pro mount
3dexport
cool magnetic mount for gopro. allows you to mount the camera on flat metal surfaces and get exclusive shots.
turbosquid
$5

Stone Mount
...ty free 3d model stone mount for download as ma, obj, and fbx on turbosquid: 3d models for games, architecture, videos. (1370306)