Thingiverse

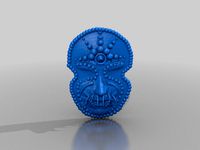
DIY Fabric Face Mask Clip 2 by logancave02
by Thingiverse
Last crawled date: 4 years, 2 months ago
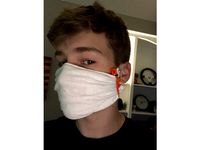
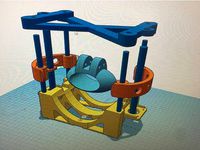
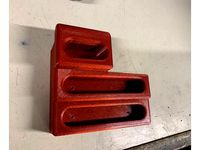
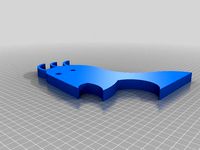
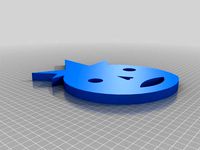
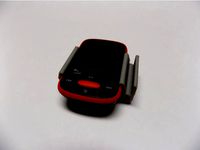
These clips allow you to make a mask out of any suitable fabric material. This design includes files to make the clips that hold the fabric, and the rings that keep the clips clamped down on the fabric. The way the're designed they hold very tight to any fabric and can be worn all day without any slipping. This mask is designed to prevent you from touching your mouth or nose, and although not professionally tested, help prevent large infected particulate matter from entering your mouth or nose. As the Covid-19 virus is not airborne this mask works to help prevent you from contracting Covid by keeping you from touching your mouth and nose.
I designed this to best fit two layers of thin cotton fabric but more should work so long as they can fit into the clips -Video Coming Soon
YOU WILL NEED:
Fabric of any type (preferably cotton or other comfortable, breathable fabric)
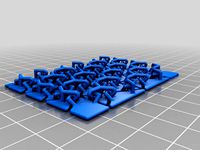
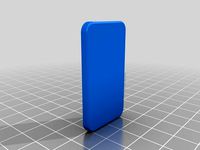
2x 3D printed clips (provided)
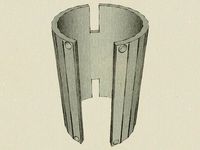
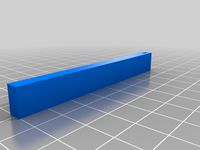
2x 3D printed rings (provided)
2x large- rubber bands (preferably 4"+), OR some kind of string or yarn
INSTRUCTIONS:
Start by 3D Printing 2 of the provided clips and rings using the settings stated below.
- Measurement & Fabric -
Measure the width of your face, measuring the front of ear to ear.
Measure the height from the middle of your nose to the bottom of your chin. (double or triple this measurement when cutting depending on how many layers you want).
using a marker, pen, or pencil, draw your measurements onto the fabric.
Using scissors, cut along the lines you drew on the fabric.
Fold the fabric if necessary.
- Attaching the Clips -
Align the fabric so that the smooth folded side is at the bottom and the open ends are at the top.
Starting about a 1/2" from the edge of the fabric, feed some of the fabric down into the clip, making sure you get the fabric down into the bottom.
Keep pushing the fabric down into the clip allowing it to sort of bunch up (try to distribute the bunches throughout the clip so as they are not too large).
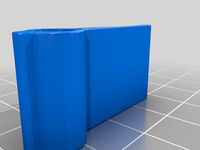
Squeeze together the open end of the clip with all of the fabric within and slide the square ring over and slide it down as far as possible (it should be a tight fit).
To have the straps go around your head, cut and fasten either your rubber band OR string to fasten the straps of the mask. Above, I used twine on the top strap and a cut rubber band on the bottom. You can also use a single uncut rubber band on the middle loop to fasten the masks simply over the ear (similar to the old design).
Fit mask onto face. If it is lose, pull more fabric through the clips until it is at the desired size.
Cut excess fabric off of the ends once desired fitment is achieved.
Optional: Use a paperclip to conform the mask around the shape of your nose for a better fit.
I designed this to best fit two layers of thin cotton fabric but more should work so long as they can fit into the clips -Video Coming Soon
YOU WILL NEED:
Fabric of any type (preferably cotton or other comfortable, breathable fabric)
2x 3D printed clips (provided)
2x 3D printed rings (provided)
2x large- rubber bands (preferably 4"+), OR some kind of string or yarn
INSTRUCTIONS:
Start by 3D Printing 2 of the provided clips and rings using the settings stated below.
- Measurement & Fabric -
Measure the width of your face, measuring the front of ear to ear.
Measure the height from the middle of your nose to the bottom of your chin. (double or triple this measurement when cutting depending on how many layers you want).
using a marker, pen, or pencil, draw your measurements onto the fabric.
Using scissors, cut along the lines you drew on the fabric.
Fold the fabric if necessary.
- Attaching the Clips -
Align the fabric so that the smooth folded side is at the bottom and the open ends are at the top.
Starting about a 1/2" from the edge of the fabric, feed some of the fabric down into the clip, making sure you get the fabric down into the bottom.
Keep pushing the fabric down into the clip allowing it to sort of bunch up (try to distribute the bunches throughout the clip so as they are not too large).
Squeeze together the open end of the clip with all of the fabric within and slide the square ring over and slide it down as far as possible (it should be a tight fit).
To have the straps go around your head, cut and fasten either your rubber band OR string to fasten the straps of the mask. Above, I used twine on the top strap and a cut rubber band on the bottom. You can also use a single uncut rubber band on the middle loop to fasten the masks simply over the ear (similar to the old design).
Fit mask onto face. If it is lose, pull more fabric through the clips until it is at the desired size.
Cut excess fabric off of the ends once desired fitment is achieved.
Optional: Use a paperclip to conform the mask around the shape of your nose for a better fit.
Similar models
thingiverse
free
Covid-19 DIY Fabric Face Mask Clips by logancave02
...
cut excess fabric off of the ends.
optional: use a paperclip to conform the mask around the shape of your nose for a better fit.
thingiverse
free

Clips to make a COVID-19 shop towel mask by elmoray
...e to use the clips with a hepa paper from a vacuum bag, but i have not tested that.
stay safe and stay home as much as you can!
thingiverse
free

I Heart LNK Mask Clip by geeksta_dlt
...ingiverse
mask strap clip to keep face mask straps off your ears. i<3lnk variant. stl for 3d print and svg for laser cutting.
thingiverse
free

Muzzle Master (mask breather / glasses fog preventer), 3D print or laser cut by patricklingane
...terial is pliable enough to be bent at the bottom (step 1), yet rigid enough to not bend excessively around the nose during wear.
thingiverse
free

Medical Mask Clip (Keep the bands off your ears) by Oop_Ack
...ip to help keep the locking bands off your ears.
you can place above your ears or below.
we have found below is more comfortable.
thingiverse
free

Surgical Mask Strap Extender by AGorshkov
...surgical mask strap extender by agorshkov
thingiverse
strap that helps keep the surgical mask bands off your ears for comfort
thingiverse
free

Facemask Spacer - Adjustable by not-unusual
...h scissors. after getting the proper length, you can use a hair dryer or heat gun to place a moderate bend in the band if needed.
thingiverse
free

Mask Building Kit with no sew by exeware
...ype of attaching or make multiple layers mask. i have read that vacuum cleaner bags are the best household materials. keep safe!!
thingiverse
free

Covid mask strap ear protector by 3dDoot
... strap ear protector by 3ddoot
thingiverse
a clip used to hold the straps of a mask instead of the straps resting on your ears.
thingiverse
free

Mask Frame (small, 16 stack) by Ruthalas
.... for the rubber bands, i am using two seven inch rubber bands that are cut once and tied on either side thought the holes."
Logancave02
thingiverse
free

McLaren 3D Logo by logancave02
...a 3d model of the mclaren logo. it prints in one peice and looks great sitting on a desk or even on top of a makerbot replicator.
thingiverse
free
Covid-19 DIY Fabric Face Mask Clips by logancave02
...
cut excess fabric off of the ends.
optional: use a paperclip to conform the mask around the shape of your nose for a better fit.
Fabric
thingiverse
free

FABRIC by leonk
...fabric by leonk
thingiverse
fabric
thingiverse
free

Squarebric Fabric - Another Fabric by FactorX12
... fabric - another fabric by factorx12
thingiverse
yet another fabric, created in blockscad. and, it is, of course, customizable.
thingiverse
free

Fabric by mn2910
...fabric by mn2910
thingiverse
a great fabric for decoration
thingiverse
free
fabric by mehulkk
...fabric by mehulkk
thingiverse
3d printable fabric
thingiverse
free
Fabric Bolts by JeffreyWheeless
...fabric bolts by jeffreywheeless
thingiverse
fabric bolt to help organize your supply of fabrics
thingiverse
free

time fabric by Syzguru11
...time fabric by syzguru11
thingiverse
time fabric
thingiverse
free
PIECE OF FABRIC by nagato
...piece of fabric by nagato
thingiverse
piece of fabric
thingiverse
free

piece fabric by leonk
...piece fabric by leonk
thingiverse
piece fabric
thingiverse
free

Piece of Fabric by leonk
...piece of fabric by leonk
thingiverse
piece of fabric
thingiverse
free

PIECE OF FABRIC by leonk
...piece of fabric by leonk
thingiverse
piece of fabric
Diy
thingiverse
free

dockking diy
...dockking diy
thingiverse
diy dock king
thingiverse
free

DIY GoPro Dual handles (DIY ??? ????) by seokhunkim
...gopro dual handles (diy ??? ????) by seokhunkim
thingiverse
diy gopro dual handles.
youtube link : http://youtu.be/jrnu5ph7p_c
thingiverse
free

DIY Photobooth
...diy photobooth
thingiverse
here are some files for a diy photobooth i made myself, have fun with it
thingiverse
free

DIY keychain by arki03
...diy keychain by arki03
thingiverse
diy keychain
thingiverse
free

DIY Tattoogun by NRX
...diy tattoogun by nrx
thingiverse
diy tattoogun
thingiverse
free
diy ventilator by Devon3DP
... ventilator by devon3dp
thingiverse
diy ventilator covid 19 work in progresshttps://github.com/devon3dp/covid-19-diy-ventilators
thingiverse
free
DIY Climbing Hangboard
...diy climbing hangboard
thingiverse
2 part diy hangboard
thingiverse
free

DIY Keychain by sreenath
...diy keychain by sreenath
thingiverse
diy keychain,
for multi color pause and change filament at different elevations
thingiverse
free
Fume Extractor DIY by mwieland
...fume extractor diy by mwieland
thingiverse
diy fume extractor.
project page: https://www.tsb.space/bl0g/diy-fume-extractor/
thingiverse
free
OTTO DIY by bitsmaker
...otto diy by bitsmaker
thingiverse
otto diy dans eden robot için kullanabileceğiniz basit ve kullanışlı modeller
Mask
thingiverse
free

Shayson Mask to Mask by Tiger66639
...shayson mask to mask by tiger66639
thingiverse
diving mask to mask
thingiverse
free

Mask
...mask
thingiverse
mask creation.
thingiverse
free

the mask for your mask
...sk
thingiverse
we all where mask!!!!!! btw i set this under the sub-straight in slicer(cura) to cut in half to be an actual mask
thingiverse
free
mask by Syzguru11
...mask by syzguru11
thingiverse
mask
thingiverse
free

mask by Syzguru11
...mask by syzguru11
thingiverse
mask
thingiverse
free

mask by Syzguru11
...mask by syzguru11
thingiverse
mask
thingiverse
free

Mask by astorck
...mask by astorck
thingiverse
mask
thingiverse
free
mask by Dzecko
...mask by dzecko
thingiverse
mask
thingiverse
free
MASK by leonk
...mask by leonk
thingiverse
mask
thingiverse
free

Mask by Milena_3DStar
...mask by milena_3dstar
thingiverse
mask.
Face
thingiverse
free

face
...face
thingiverse
my first face
thingiverse
free

Face
...face
thingiverse
just a simple face i made in like 5 minutes.
thingiverse
free
Face Toucher
...face toucher
thingiverse
face toucher, for touching faces. in a time when touching your face is bad, here is a thing for you.
thingiverse
free

FACE by nagato
...face by nagato
thingiverse
face
thingiverse
free

face by angel19000
...face by angel19000
thingiverse
face
thingiverse
free

Face by Iqra
...face by iqra
thingiverse
face
thingiverse
free

Face by dcgstudent
...face by dcgstudent
thingiverse
a face
thingiverse
free

face by nagato
...face by nagato
thingiverse
face
thingiverse
free
FACE by nagato
...face by nagato
thingiverse
face
thingiverse
free
FACE by nagato
...face by nagato
thingiverse
face
Clip
thingiverse
free

Clip
...clip
thingiverse
clip.
thingiverse
free

Meta Clips: Parametric Round Clips... with a clip! by hugomatic
...meta clips: parametric round clips... with a clip! by hugomatic
thingiverse
sometimes your clips need clipping too.
thingiverse
free
clip
...clip
thingiverse
clip for screen door screen install
thingiverse
free

SanDisk Clip Zip Clip by inflam52
...sandisk clip zip clip by inflam52
thingiverse
sandisk clip zip clip
thingiverse
free
Desk clip cable clip by Kexei
...desk clip cable clip by kexei
thingiverse
clip this on a side of your desk to clip cables
thingiverse
free
Sansa Clip Clip by BrayChristopher
...r up the volume controls, but the screen and the front buttons are still accessible.
i also uploaded some of my earlier concepts.
thingiverse
free

Sansa Clip clip by Pr0nboy
...nk it is functional. this was designed for the original sansa clip, i don't know whether this will work with the clip+ series
thingiverse
free
Clip
...clip
thingiverse
this clip helps mark where a child's height is on a tape measure.
thingiverse
free

CLIP
...clip
thingiverse
.
thingiverse
free
Clip for SanDisk Sansa Clip+ by oet
...clip for sandisk sansa clip+ by oet
thingiverse
i broke the clip on my sansa clip+ mp3 player so i created a new one.
2
thingiverse
free

KV-2-2-2 by redstone125
...kv-2-2-2 by redstone125
thingiverse
nuclear death refrigerator x3.
thingiverse
free

Braccialetto 2 - Bracelets 2 by doctormao
...braccialetto 2 - bracelets 2 by doctormao
thingiverse
braccialetto 2 - bracelets 2
thingiverse
free

Schleuder 2 / Slingshot 2 by Ju5tMak3
...schleuder 2 / slingshot 2 by ju5tmak3
thingiverse
schleuder 2 / slingshot 2
have fun
thingiverse
free

2-Hexagon-2 by letongtr
...2-hexagon-2 by letongtr
thingiverse
ultrascope project
thingiverse
free
X'2 2 by kwcartroom
...x'2 2 by kwcartroom
thingiverse
try number 2
thingiverse
free

2 Color Box (#2) by David_Mussaffi
...2 color box (#2) by david_mussaffi
thingiverse
2 color box (#2)https://www.youtube.com/watch?v=g5jgss-fn_8
thingiverse
free

Toy Gun 2-2
...toy gun 2-2
thingiverse
this morning's design.
thingiverse
free

(a+b)^2 = a^2 +2ab+b^2, algebraic formula by lgbu
... ways to explain (a+b)^2 = a^2 +2ab+b^2.
the board alone is enough; the component pieces just add another layer of manipulation.
thingiverse
free

2 by orhandrkn
...2 by orhandrkn
thingiverse
2
thingiverse
free
2 by Nicolewake
...2 by nicolewake
thingiverse
2