Thingiverse
Delta Upgrade by LucaTheRock
by Thingiverse
Last crawled date: 3 years ago
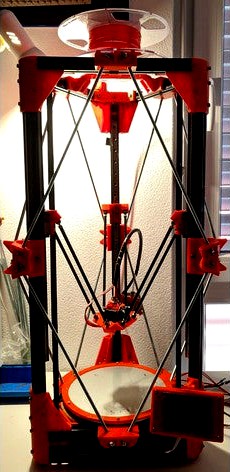
FlSun Delta 3D Printer Upgrade (English below)
Ho acquistato questa stampante FLSun 3D Delta da quasi due anni e dopo averla assemblata ed utilizzata per un anno, ho deciso di apportarle delle modifiche per cercare di risolvere alcuni problemi principali:
Rigidità della struttura carente
Giunti meccanici dei "Rod" con troppo gioco
Dopo aver cercato tutte le informazioni necessarie ho stilato una serie di modifiche per ovviare ai problemi sopraelencati, che si riassumono così:
Sistema per irrigidire la struttura tramite barre filettate
Giunti magnetici per Carriage ed Effector
Nuova Board MKS Gen 1.4 con Driver TMC2130 guidati in SPI
Nuovo sistema di fissaggio del Bed isolandolo termicamente nella parte inferiore
Supporto per alimentatore e Board raffreddato ad aria
Angolare inferiore unico (quello originale è composto da due pezzi) con piedini per far appoggiare la struttura su tre punti definiti (e non sui profili in aluminio)
Accorciare tubo di alimentazione in PTFE il più possibile e sistema di pulizia del filamento
Dopo tanti tentativi e stampe fallite (tante!) sono arrivato al termine con il progetto che vi sto presentando; ed eccovi i dettagli:
Sistema anti vibrazioni:
Il sistema è composto da tre elementi principali (inferiore, centrale e superiore) che permette di connettere in maniere rigida le diagonali della struttura tramite delle barre M6, il sistema è concepito con dei giunti semisferici che permettono una certa tolleranza negli angoli delle barre filettate.
L'elemento inferiore permette di fissare il Bed tramite delle viti M3, l'altezza del Bed l'ho regolata con dei pezzi d'acciaio (dadi quadrati M4...) di spessore variabile aggiustati per avere una perpendicolarità ottima tra il Bed e le torri. Questo elemento permette anche di supportare l'isolazione termica del Bed tramite tre squadrette, fatta di sughero (spessore 10 mm) e tagliata su misura. Per fissare il Bed (diametro 220mm) con il piano in borosilicato (diametro 200mm) bisogna stampare 6 pezzi del "Bed fixing".
L'elemento superiore permette di agganciare il sistema per sostenere e lasciar ruotare la bobina del filamento (stampato da un progetto trovato qui in Thingiverse che non ricordo).
Per il sistema di irrigidimento della struttura si necessita dei seguenti pezzi:
3x di ogni elemento inferiore, centrale e superiore
1x degli accessori
12x barre filettate M6 lunghe 340 mm
24x dadi M6
24x ranelle piatte M6
24x ranelle spaccate M6
Viti M4 e dadi a martello per fissare i pezzi ai profili in aluminio
Per l'elemento inferiore con fissaggio Bed:
3x viti M3x20
3x viti M3x15
6x dadi M3
6x viti M4x40
6x dado M4
Sughero spessore 10 mm x almeno 200 mm diametro
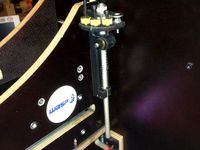
Carriage ed Effector con giunti magnetici:
Stampare 3x Carriage ed 1x Effector con relativi accessori. Gli accessori comprendono due condotti d'aria che devono essere incollati alla base del Effector ed un pezzo che permette di fissare l'Hot End. L'Effector è possibile stamparlo, con una buona regolazione della stampante, senza supporti!
I Rod li ho incollati grazie alla maschera di fissaggio "Support for pasting Rod" fissata ad una barr d'acciaio con due fori M3 a 218 mm di distanza. Il collegamento tra la sfera d'acciaio ed il tubo in carbonio l'ho ottenuto tagliando dei pezzi lunghi 40 mm dalla barra filettata M4 (non ho trovato dei grani così lunghi).
Nel Carriage e nell'Effector ho fatto degli incavi supplementari per inserire dei cilindri magnetici (diametro 6 x 3 di spessore) in modo di aumentare la forza magnetica. I piccoli fori servono a spingere fuori i magneti. Fate delle prove di stampa per trovare la tolleranza che consente d'inserire i magneti bloccandoli!
Da acquistare:
6x Tubi in carbonio 4/6
12x sfere acciaio diametro 12
12x magneti semisferici diametro 12
12x magneti cilindrici 6x3
2x ventilatori radiali 30/30
1x ventilatore assiale 30/30
1x Hot End E3D V6
Viti M3 di varia lunghezza
Barra M4 (per ottenere 12 pezzi di 40 mm)
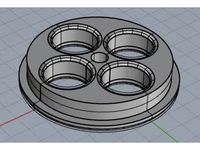
Sistema di fissaggio Bed:
Stampare 6x "Bed fixing" tenendo conto che io possiedo un Bed di 220 mm (con 6 fori da 3 mm su un diametro di 210 mm) ed un piano in borosilicato da 200 mm. Le tolleranze dell'incastro dei 6 pezzi sono strette e bisogna lavorare un po' con la carta vetrata in modo d'avere una connessione senza gioco.
Supporto per alimentatore e Board raffreddati ad aria:
Stampare 1x "Power supply and Board support 1 & 2". Unire tramite viti M4 il ventilatore ed i due pezzi. Possibile creare un box che racchiude il tutto (ancora in sviluppo).
Da acquistare:
4x viti M4x15 e dadi
Ventilatore 80/80 per 10 mm spessore
Nuova Board MKS Gen 1.4 con Driver TMC2130 guidati in SPI:
Vi consiglio il sito:https://toms3d.org/2017/12/09/tmc2130-guide/
Da fissare al supporto tramite due viti M4x10 e dadi
Sistema di pulizia filamento:
Stampare 1x "Filament cleaning", inserire un pezzo di spugna e far passare il filamento. Personalmente ho aggiunto un connettore M5 per il tubo in PTFE (4/2) in modo da guidare il filamento fino all'entrata dell'estrusore.
Dalle foto potete ricavare le altre informazioni che probabilmente ho omesso in questo romanzo ;)
In caso di dubbi o domande non esitate a contattarmi!
---------------------ENGLISH------------------
I bought this FLSun 3D Delta printer for almost two years and after assembling it and using it for a year, I decided to make some changes to try to solve some main problems:
Rigidity of the structure
Mechanical Rod joints with too much play
After searching all the necessary information, I made a series of changes to overcome the above problems, which are summarized as follows:
System to stiffen the structure by threaded bars
Magnetic couplings for Carriage and Effector
New Board MKS Gen 1.4 with Driver TMC2130 driven in SPI
New system for fixing the Bed and insulating it thermally in the lower part
Support for air-cooled power supply and board
Single lower corner piece (the original one is made up of two pieces) with feet to support the structure on three defined points (and not on the aluminum profiles)
Shorten PTFE supply pipe as much as possible and filament cleaning system
After so many failed attempts and prints (so many!) I arrived at the end with the project I am presenting to you; and here are the details:
Anti-vibration system:
The system is composed of three main elements (lower, central and upper) that allows the rigid diagonal connections of the structure to be connected through the M6 bars, the system is designed with semispherical joints that allow a certain tolerance in the corners of the threaded bars.
The lower element allows the Bed to be fixed with M3 screws, the height of the Bed has been adjusted with pieces of steel (square nuts M4 ...) of variable thickness adjusted to have an excellent perpendicularity between the Bed and the towers. This element also allows supporting the thermal insulation of the Bed through three brackets. To fix the Bed (diameter 220mm) with the borosilicate top (diameter 200mm) it is necessary to print 6 pieces of the "Bed fixing".
The upper element allows to hook the system to support and let the filament coil rotate (printed from a project found here in Thingiverse that I can not remember).
For the stiffening system of the structure we need the following pieces:
3x of each lower, middle and upper element
1x of the accessories
12x M6 threaded bars 340 mm long
24x dice M6
24x flat washers M6
24x split washers M6
M4 screws and hammer nuts to fix the pieces to the aluminum profiles
For the lower element with Bed attachment:
3x M3x20 screws
3x M3x15 screws
6x M3 dice
6x M4x40 screws
6x M4 nut
Cork thickness 10 mm x at least 200 mm diameter
Carriage and Effector with magnetic joints:
Print 3x Carriage and 1x Effector with related accessories. The accessories include two air ducts that must be glued to the base of the Effector and a piece that allows you to fix the Hot End. The Effector can be printed, with a good adjustment of the printer, without supports!
I have glued the Rods thanks to the "Support for pasting Rod" fastening mask fixed to a steel bar with two M3 holes at a distance of 218 mm. The connection between the steel ball and the carbon tube I got it by cutting some 40 mm long pieces from the threaded bar M4 (I did not find any grains so long).
In the Carriage and in the Effector I made additional grooves to insert magnetic cylinders (diameter 6 x 3 thickness) in order to increase the magnetic force. The small holes are used to push the magnets out. Do some printing tests to find the tolerance that allows you to insert the magnets locking them!
To buy:
6x carbon tubes 4/6
12x steel balls diameter 12
12x semispherical magnets 12 diameter
12x cylindrical magnets 4x5
2x 30/30 radial fans
1x 30/30 axial fan
1x Hot End E3D V6
M3 screws of various length
M4 bar (to obtain 12 pieces of 40 mm)
Bed fastening system:
Print 6x "Bed fixing" considering that I have a Bed of 220 mm (with 6 holes of 3 mm on a diameter of 210 mm) and a 200 mm borosilicate top. The tolerances of the interlocking of the 6 pieces are tight and you have to work a little with the sandpaper in order to have a connection without play.
Support for air-cooled power supply and board:
Print 1x "Power supply and Board support 1 & 2". Combine the fan and the two pieces with M4 screws.You can create a box that contains everything (still under development).
To buy:
4x M4x15 screws and nuts
80/80 fan for 10 mm thickness
New Board MKS Gen 1.4 with Driver TMC2130 driven in SPI:
I recommend the site:https://toms3d.org/2017/12/09/tmc2130-guide/
To be fixed to the support by means of two M4x10 screws and nuts
Filament cleaning system:
Print 1x "Filament cleaning", insert a piece of sponge and pass the filament. Personally, I added an M5 connector for the PTFE tube (4/2) to guide the filament to the entrance of the extruder.
From the photos you can get the other information that I probably omitted in this novel ;)
In case of doubts or questions please do not hesitate to contact me!
Ho acquistato questa stampante FLSun 3D Delta da quasi due anni e dopo averla assemblata ed utilizzata per un anno, ho deciso di apportarle delle modifiche per cercare di risolvere alcuni problemi principali:
Rigidità della struttura carente
Giunti meccanici dei "Rod" con troppo gioco
Dopo aver cercato tutte le informazioni necessarie ho stilato una serie di modifiche per ovviare ai problemi sopraelencati, che si riassumono così:
Sistema per irrigidire la struttura tramite barre filettate
Giunti magnetici per Carriage ed Effector
Nuova Board MKS Gen 1.4 con Driver TMC2130 guidati in SPI
Nuovo sistema di fissaggio del Bed isolandolo termicamente nella parte inferiore
Supporto per alimentatore e Board raffreddato ad aria
Angolare inferiore unico (quello originale è composto da due pezzi) con piedini per far appoggiare la struttura su tre punti definiti (e non sui profili in aluminio)
Accorciare tubo di alimentazione in PTFE il più possibile e sistema di pulizia del filamento
Dopo tanti tentativi e stampe fallite (tante!) sono arrivato al termine con il progetto che vi sto presentando; ed eccovi i dettagli:
Sistema anti vibrazioni:
Il sistema è composto da tre elementi principali (inferiore, centrale e superiore) che permette di connettere in maniere rigida le diagonali della struttura tramite delle barre M6, il sistema è concepito con dei giunti semisferici che permettono una certa tolleranza negli angoli delle barre filettate.
L'elemento inferiore permette di fissare il Bed tramite delle viti M3, l'altezza del Bed l'ho regolata con dei pezzi d'acciaio (dadi quadrati M4...) di spessore variabile aggiustati per avere una perpendicolarità ottima tra il Bed e le torri. Questo elemento permette anche di supportare l'isolazione termica del Bed tramite tre squadrette, fatta di sughero (spessore 10 mm) e tagliata su misura. Per fissare il Bed (diametro 220mm) con il piano in borosilicato (diametro 200mm) bisogna stampare 6 pezzi del "Bed fixing".
L'elemento superiore permette di agganciare il sistema per sostenere e lasciar ruotare la bobina del filamento (stampato da un progetto trovato qui in Thingiverse che non ricordo).
Per il sistema di irrigidimento della struttura si necessita dei seguenti pezzi:
3x di ogni elemento inferiore, centrale e superiore
1x degli accessori
12x barre filettate M6 lunghe 340 mm
24x dadi M6
24x ranelle piatte M6
24x ranelle spaccate M6
Viti M4 e dadi a martello per fissare i pezzi ai profili in aluminio
Per l'elemento inferiore con fissaggio Bed:
3x viti M3x20
3x viti M3x15
6x dadi M3
6x viti M4x40
6x dado M4
Sughero spessore 10 mm x almeno 200 mm diametro
Carriage ed Effector con giunti magnetici:
Stampare 3x Carriage ed 1x Effector con relativi accessori. Gli accessori comprendono due condotti d'aria che devono essere incollati alla base del Effector ed un pezzo che permette di fissare l'Hot End. L'Effector è possibile stamparlo, con una buona regolazione della stampante, senza supporti!
I Rod li ho incollati grazie alla maschera di fissaggio "Support for pasting Rod" fissata ad una barr d'acciaio con due fori M3 a 218 mm di distanza. Il collegamento tra la sfera d'acciaio ed il tubo in carbonio l'ho ottenuto tagliando dei pezzi lunghi 40 mm dalla barra filettata M4 (non ho trovato dei grani così lunghi).
Nel Carriage e nell'Effector ho fatto degli incavi supplementari per inserire dei cilindri magnetici (diametro 6 x 3 di spessore) in modo di aumentare la forza magnetica. I piccoli fori servono a spingere fuori i magneti. Fate delle prove di stampa per trovare la tolleranza che consente d'inserire i magneti bloccandoli!
Da acquistare:
6x Tubi in carbonio 4/6
12x sfere acciaio diametro 12
12x magneti semisferici diametro 12
12x magneti cilindrici 6x3
2x ventilatori radiali 30/30
1x ventilatore assiale 30/30
1x Hot End E3D V6
Viti M3 di varia lunghezza
Barra M4 (per ottenere 12 pezzi di 40 mm)
Sistema di fissaggio Bed:
Stampare 6x "Bed fixing" tenendo conto che io possiedo un Bed di 220 mm (con 6 fori da 3 mm su un diametro di 210 mm) ed un piano in borosilicato da 200 mm. Le tolleranze dell'incastro dei 6 pezzi sono strette e bisogna lavorare un po' con la carta vetrata in modo d'avere una connessione senza gioco.
Supporto per alimentatore e Board raffreddati ad aria:
Stampare 1x "Power supply and Board support 1 & 2". Unire tramite viti M4 il ventilatore ed i due pezzi. Possibile creare un box che racchiude il tutto (ancora in sviluppo).
Da acquistare:
4x viti M4x15 e dadi
Ventilatore 80/80 per 10 mm spessore
Nuova Board MKS Gen 1.4 con Driver TMC2130 guidati in SPI:
Vi consiglio il sito:https://toms3d.org/2017/12/09/tmc2130-guide/
Da fissare al supporto tramite due viti M4x10 e dadi
Sistema di pulizia filamento:
Stampare 1x "Filament cleaning", inserire un pezzo di spugna e far passare il filamento. Personalmente ho aggiunto un connettore M5 per il tubo in PTFE (4/2) in modo da guidare il filamento fino all'entrata dell'estrusore.
Dalle foto potete ricavare le altre informazioni che probabilmente ho omesso in questo romanzo ;)
In caso di dubbi o domande non esitate a contattarmi!
---------------------ENGLISH------------------
I bought this FLSun 3D Delta printer for almost two years and after assembling it and using it for a year, I decided to make some changes to try to solve some main problems:
Rigidity of the structure
Mechanical Rod joints with too much play
After searching all the necessary information, I made a series of changes to overcome the above problems, which are summarized as follows:
System to stiffen the structure by threaded bars
Magnetic couplings for Carriage and Effector
New Board MKS Gen 1.4 with Driver TMC2130 driven in SPI
New system for fixing the Bed and insulating it thermally in the lower part
Support for air-cooled power supply and board
Single lower corner piece (the original one is made up of two pieces) with feet to support the structure on three defined points (and not on the aluminum profiles)
Shorten PTFE supply pipe as much as possible and filament cleaning system
After so many failed attempts and prints (so many!) I arrived at the end with the project I am presenting to you; and here are the details:
Anti-vibration system:
The system is composed of three main elements (lower, central and upper) that allows the rigid diagonal connections of the structure to be connected through the M6 bars, the system is designed with semispherical joints that allow a certain tolerance in the corners of the threaded bars.
The lower element allows the Bed to be fixed with M3 screws, the height of the Bed has been adjusted with pieces of steel (square nuts M4 ...) of variable thickness adjusted to have an excellent perpendicularity between the Bed and the towers. This element also allows supporting the thermal insulation of the Bed through three brackets. To fix the Bed (diameter 220mm) with the borosilicate top (diameter 200mm) it is necessary to print 6 pieces of the "Bed fixing".
The upper element allows to hook the system to support and let the filament coil rotate (printed from a project found here in Thingiverse that I can not remember).
For the stiffening system of the structure we need the following pieces:
3x of each lower, middle and upper element
1x of the accessories
12x M6 threaded bars 340 mm long
24x dice M6
24x flat washers M6
24x split washers M6
M4 screws and hammer nuts to fix the pieces to the aluminum profiles
For the lower element with Bed attachment:
3x M3x20 screws
3x M3x15 screws
6x M3 dice
6x M4x40 screws
6x M4 nut
Cork thickness 10 mm x at least 200 mm diameter
Carriage and Effector with magnetic joints:
Print 3x Carriage and 1x Effector with related accessories. The accessories include two air ducts that must be glued to the base of the Effector and a piece that allows you to fix the Hot End. The Effector can be printed, with a good adjustment of the printer, without supports!
I have glued the Rods thanks to the "Support for pasting Rod" fastening mask fixed to a steel bar with two M3 holes at a distance of 218 mm. The connection between the steel ball and the carbon tube I got it by cutting some 40 mm long pieces from the threaded bar M4 (I did not find any grains so long).
In the Carriage and in the Effector I made additional grooves to insert magnetic cylinders (diameter 6 x 3 thickness) in order to increase the magnetic force. The small holes are used to push the magnets out. Do some printing tests to find the tolerance that allows you to insert the magnets locking them!
To buy:
6x carbon tubes 4/6
12x steel balls diameter 12
12x semispherical magnets 12 diameter
12x cylindrical magnets 4x5
2x 30/30 radial fans
1x 30/30 axial fan
1x Hot End E3D V6
M3 screws of various length
M4 bar (to obtain 12 pieces of 40 mm)
Bed fastening system:
Print 6x "Bed fixing" considering that I have a Bed of 220 mm (with 6 holes of 3 mm on a diameter of 210 mm) and a 200 mm borosilicate top. The tolerances of the interlocking of the 6 pieces are tight and you have to work a little with the sandpaper in order to have a connection without play.
Support for air-cooled power supply and board:
Print 1x "Power supply and Board support 1 & 2". Combine the fan and the two pieces with M4 screws.You can create a box that contains everything (still under development).
To buy:
4x M4x15 screws and nuts
80/80 fan for 10 mm thickness
New Board MKS Gen 1.4 with Driver TMC2130 driven in SPI:
I recommend the site:https://toms3d.org/2017/12/09/tmc2130-guide/
To be fixed to the support by means of two M4x10 screws and nuts
Filament cleaning system:
Print 1x "Filament cleaning", insert a piece of sponge and pass the filament. Personally, I added an M5 connector for the PTFE tube (4/2) to guide the filament to the entrance of the extruder.
From the photos you can get the other information that I probably omitted in this novel ;)
In case of doubts or questions please do not hesitate to contact me!
Similar models
thingiverse
free

Prusa i3 upgrade supporto filamento by philfire
... nessun pezzo occorrono supporti. le parti laterali, consiglio di stamparle ruotate di 180 gradi, proprio per evitare i supporti.
thingiverse
free
Finecorsa asse Z con memoria di 4 livelli by tecnicotibetano
...o 6mm. la molla e il seeger non sono indispensabili. le viti dei fine corsa sono di m3, la vite di bloccaggio dell'asta è m4.
thingiverse
free

Staffa per Router e Modem Fastweb by Krashone
...elle viti presenti al muro per poi reggere un router tp-link ed un router modem fastweb; in questo modo ho liberato la scrivania.
thingiverse
free

Supporto Bobina Nylon Taluman per PowerWasp by 3Danilo
...rto bobina nylon taluman per powerwasp by 3danilo
thingiverse
stampare i pezzi e montarli con viti testa tonda m4 x 10 e dadi m4
thingiverse
free

Tanfoglio Stock, CZ 75 SP01, magazine pouch by Peppeva
...2017ho adattato le dimenzioni dei portacaricatori in modo da contenere un frame da 35x21.5 probabilmente per caricatori 40s&w
thingiverse
free

Opera 3DP by Raleon
...
asse z 2x230 mm.
il supporto del display è di trigubovich, https://www.thingiverse.com/thing:1116163 modificato in alcune parti.
thingiverse
free

Cr10s support by Smilzomv
... filettatura.
per le aste 4 viti m5.
dadi t-slot m5.
aggiungo file stp se ritenete di apportare modifiche per la vostra stampante
thingiverse
free

fanale anteriore bicicletta by josh91
...na stampa
p.s. aggiungo un altro tipo di supporto per un altro fanale che ho realizzato per una bici diversa [fanale coperchio 2]
thingiverse
free

tronxy x5s bed level by Pietro92
...gari bloccarla con un pò di colla per assicurare un serraggio migliore. io personalmente ho utilizzato viti m4x50
stampate in abs
thingiverse
free
Puleggia per bobine con foro diametro 36mm by legno75
...anno un diametro di 36mm. ho disegnato la puleggia usando rhino e ho applicato dei fori per economizzare il consumo di filamento.
Delta
design_connected
$16

Delta
...delta
designconnected
lj lamps delta computer generated 3d model. designed by janowski-lenhart, sasha.
design_connected
$16
Delta
...delta
designconnected
arflex international spa delta computer generated 3d model. designed by koivisto, eero.
design_connected
$13
Delta
...delta
designconnected
emu group delta armchairs computer generated 3d model. designed by marin chiaramonte .
3ddd
$1

Delta Light
...delta light
3ddd
delta light , you-turn reo 3033
точечний светильник delta light
3ddd
$1
Blanco / delta
...blanco / delta
3ddd
blanco , мойка
мойка blanco delta со смесителем
3ddd
$1
Delta Light Spot
...delta light spot
3ddd
delta light
светильник фирмы delta light
3ddd
free

Bianchi Delta LVMDLT200100
...i delta lvmdlt200100
3ddd
bianchi delta , смеситель
смеситель bianchi delta lvmdlt200100
design_connected
free
Delta 190
...delta 190
designconnected
free 3d model of delta 190 by zanotta designed by progetti, emaf.
design_connected
$27
Delta 211
...delta 211
designconnected
zanotta delta 211 computer generated 3d model. designed by progetti, emaf.
design_connected
$27
Delta 234
...delta 234
designconnected
zanotta delta 234 computer generated 3d model. designed by progetti, emaf.
Upgrade
turbosquid
$15

Upgraded Glock
...e 3d model upgraded glock for download as obj, fbx, and blend on turbosquid: 3d models for games, architecture, videos. (1185950)
3ddd
$1

Calligaris / UPGRADE
...calligaris / upgrade
3ddd
calligaris
c материалом
3d_export
free

cz upgrade
...cz upgrade
3dexport
https://www.buymeacoffee.com/mestrezen3d https://linktr.ee/mestrezen3
turbosquid
$80

Custer Tank upgrade
... available on turbo squid, the world's leading provider of digital 3d models for visualization, films, television, and games.
3d_export
$10

Upgraded tea cup
...upgraded tea cup
3dexport
a cup with an unusual design and a unique shape for a more enjoyable tea experience
3d_export
$8

dixy outlander classic style upgraded poplar wood lounge chair
...utlander classic style upgraded poplar wood lounge chair
3dexport
dixy outlander classic style upgraded poplar wood lounge chair
turbosquid
free

AK-12 + Upgrades low-poly 3D model
...ow-poly 3d model for download as fbx, blend, and unitypackage on turbosquid: 3d models for games, architecture, videos. (1501145)
evermotion
$700

Upgrade from V-ray 1.5 to 3.5 for 3ds max
...here is no need to purchase a new dongle - your current dongles will be reprogrammed to carry v-ray 3. evermotion 3d models shop.
evermotion
$300

Upgrade from V-Ray 2.0 to V-ray 3.5 for 3ds Max
... interface (gui) for editing settings on one machine and one render node for rendering on one machine. evermotion 3d models shop.
3d_export
$8

alfa romeo carabo 1968-2045 varlkiria upgrade
...8px<br>hud navigator: 1024x79px<br>hud multimedia: 1920px<br>logo carabo: 500x270px<br>prew in artstation