Thingiverse

Delta Roller by cwaa
by Thingiverse
Last crawled date: 3 years, 1 month ago
My first printer was a Voxel OX from Open Builds. Its been running for two years and I have been thinking about a large delta build. For stability I wanted no plastic parts in the frame. I have followed other builds and for this size printer most are using materials custom cut on a CNC or water jet. I could not justify a $20 13" x 13" x.125 build plate being custom cut for $150. My top and bottom plates together cost $40 and would have cost another $200 to have them professionally cut. So the basis of my build is to cut all of my materials myself and use drill jigs to give me the necessary accuracy for this build. My tools include a 12" radial arm saw, a 10" table saw, a jig saw and a scroll saw, along with a drill press and misc. hand tools. Right now I am in assembly having cut my plates and just received the v-slot materials. The total out of pocket costs for the frame material excluding freight is less than $200.
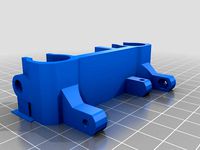
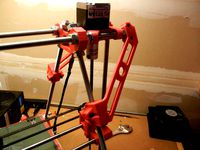
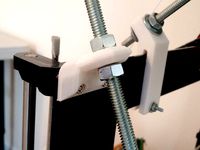
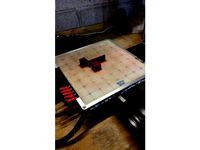
When I began looking at this build, I wanted a wide rod spacing to enhance effector stability. I started out with 2080 uprights in my design and that gave me 100 mm between rods. I reduced that to 2060 after some conversations with others. Now the rod spacing is 80mm to give the carriage as much stability as possible. Also using 4 wheels per carriage while most use only 3 on a 2020 upright. When it came to the joints, I simple reverted to my structural background. The only other design that seemed strong enough was those using metal cast vertices, but they limit your choice in uprights. The corners have 9 bolts holding the upright, to the plate and the plate to the horizontal brace. Its like having a 100 mm corner brace. The plates and braces form a box at the bottom and top that is extremely ridged and flat. The horizontal braces not only brace the upright, but pull the plates into a flat position. I am building the frame without tightening the bolts from the horizontal braces to the uprights. After everything is assembled and check for square and alignment, I will slowly tighten the horizontal bolts both top and bottom and that will "lock" the frame in place. The power supply and SSR for the heated bed go into the bottom covered by a fireproof panel. There are two fans and one power inlet built into the lower horizontal braces. The electronics will rest on the top plate as will the motors. If I enclose the printer, I want the electronics outside of the heated area. My choices for controller is another Smoothie board, Duet Network, or Azteeg X5 mini.
When I began looking at this build, I wanted a wide rod spacing to enhance effector stability. I started out with 2080 uprights in my design and that gave me 100 mm between rods. I reduced that to 2060 after some conversations with others. Now the rod spacing is 80mm to give the carriage as much stability as possible. Also using 4 wheels per carriage while most use only 3 on a 2020 upright. When it came to the joints, I simple reverted to my structural background. The only other design that seemed strong enough was those using metal cast vertices, but they limit your choice in uprights. The corners have 9 bolts holding the upright, to the plate and the plate to the horizontal brace. Its like having a 100 mm corner brace. The plates and braces form a box at the bottom and top that is extremely ridged and flat. The horizontal braces not only brace the upright, but pull the plates into a flat position. I am building the frame without tightening the bolts from the horizontal braces to the uprights. After everything is assembled and check for square and alignment, I will slowly tighten the horizontal bolts both top and bottom and that will "lock" the frame in place. The power supply and SSR for the heated bed go into the bottom covered by a fireproof panel. There are two fans and one power inlet built into the lower horizontal braces. The electronics will rest on the top plate as will the motors. If I enclose the printer, I want the electronics outside of the heated area. My choices for controller is another Smoothie board, Duet Network, or Azteeg X5 mini.
Similar models
thingiverse
free

Magnet Delta Rod JIG by mpires
...magnet delta rod jig by mpires
thingiverse
magnet jig.
i did this "jig" to build my delta m6 carbon fiber rods.
thingiverse
free
Rostock Modded Parts - Carriage, Platform (for Ball Links); Belt Spreader; Corner Support by piit79
... idler bracket can be put above for belt tightening)
-- bottom belt spreader
-- bottom corner support (for better case stability)
thingiverse
free
Bolted Prusa Framed Stabilizer by Aerotayl
...nterfere with x axis motor and not allow for maximum height. i have removed the brace from that side and still use three braces.
thingiverse
free

Parameterized clamp to brace printer to a bottom wood plate by avri
...oden plate
customize to your printer using the scad file. the current settings are for my printer - a makerfarm prusa i3 8"
thingiverse
free
Prusa i3 Z Axis Stabilizer for board mount by mprobot
...crews into the board that the printer is mounted on.
requires one 5/16" x 36" rod cut in half, 8 nuts, and 4 screws.
thingiverse
free

Delta/Kossel Belt adjustPlatform by yngbra94
...on the top of the 40x40mm aluminium profile.
since the profile i at rest and the top platform i loose, the belts will be tighten.
thingiverse
free

5/16 threaded rod Z-brace for Tevo Tarantula by teikjoon
...e brackets are not load bearing, they just need to be stiff enough to prevent the z gantry from oscillating as the hot end moves!
thingiverse
free

Tevo Tornado Rear Frame Mount
...
i used one of the 10" rod pieces left over on the top left frame with a support for my spool holder (will publish soon).
thingiverse
free

Kossel Rod Jig by xile6
...ame.
picture is my carbon rods ,which im replacing because they crack, but have metal ones on the way. thats why i made this jig.
thingiverse
free

Z Brace for 3D Printer by katolystic
...er platform. fits any 1/2" tube. the brace is made to stabilize and prevent the forward and backward swing of the top frame.
Cwaa
thingiverse
free
Bicolored dice by cwaa
...bicolored dice by cwaa
thingiverse
this is a large di made with two colors on my custom printer.
thingiverse
free

Monarch Butterfly by cwaa
...monarch butterfly by cwaa
thingiverse
this is gcode for a two color printer. i used abs @ 265 c and a bed at 120 c.
thingiverse
free

PiTFT/camera by cwaa
...mera by cwaa
thingiverse
i am experimenting with a pi 3 b and a 2.8 capacitive screen hooked to the pi camera in one enclosure.
thingiverse
free

Piezo mount for Prometheus Hot end by cwaa
...piezo mount for prometheus hot end by cwaa
thingiverse
this is a design for the j-head of the prometheus hot end.
thingiverse
free

3D and Carbon Drone by cwaa
...o a h frame that i didn't like and so i have this current design. i have yet to up load files as this is a work in progress.
thingiverse
free
Voxel OX single Z axis conversion by cwaa
...out $9.00. you can get them cheaper, but they take a month to arrive.
so if you have a voxel ox and want convert it....have fun.
Delta
design_connected
$16
Delta
...delta
designconnected
arflex international spa delta computer generated 3d model. designed by koivisto, eero.
design_connected
$16

Delta
...delta
designconnected
lj lamps delta computer generated 3d model. designed by janowski-lenhart, sasha.
design_connected
$13
Delta
...delta
designconnected
emu group delta armchairs computer generated 3d model. designed by marin chiaramonte .
3ddd
$1

Delta Light
...delta light
3ddd
delta light , you-turn reo 3033
точечний светильник delta light
3ddd
$1
Blanco / delta
...blanco / delta
3ddd
blanco , мойка
мойка blanco delta со смесителем
3ddd
$1
Delta Light Spot
...delta light spot
3ddd
delta light
светильник фирмы delta light
3ddd
free
Bianchi Delta LVMDLT200100
...i delta lvmdlt200100
3ddd
bianchi delta , смеситель
смеситель bianchi delta lvmdlt200100
design_connected
free
Delta 190
...delta 190
designconnected
free 3d model of delta 190 by zanotta designed by progetti, emaf.
design_connected
$27
Delta 211
...delta 211
designconnected
zanotta delta 211 computer generated 3d model. designed by progetti, emaf.
design_connected
$27
Delta 234
...delta 234
designconnected
zanotta delta 234 computer generated 3d model. designed by progetti, emaf.
Roller
turbosquid
$26
Roller A
...urbosquid
royalty free 3d model roller a for download as fbx on turbosquid: 3d models for games, architecture, videos. (1350603)
turbosquid
$3
Roller
...oyalty free 3d model roller for download as 3ds, max, and obj on turbosquid: 3d models for games, architecture, videos. (1460818)
3ddd
$1
edilkamin roller
...edilkamin roller
3ddd
камин
edilkamin roller 360
3ddd
$1
Roller Blinds
...roller blinds
3ddd
рулонная
roller blinds black out finish
turbosquid
$50

Roller
... roller for download as max, max, c4d, max, max, fbx, and obj on turbosquid: 3d models for games, architecture, videos. (1700762)
3d_export
$10
rollers
...lers
3dexport
this is low-poly model of rollers.<br>model:<br>- low-poly<br>- textured<br>- uv unwrapped
3d_export
$28
Roller 3D Model
...roller 3d model
3dexport
roller construction boss evil
roller 3d model adagio15740837 50561 3dexport
3d_export
$6
hopper roller conveyor
...hopper roller conveyor
3dexport
hopper roller conveyor
3d_export
$12

roller skates
...roller skates
3dexport
3d_ocean
$19
roller skate
...can scanned skates skating sport
3d scan of roller skate. the model has been retopologized and made fully compatible with zbrush.