Thingiverse
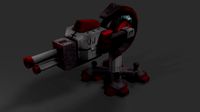
Delta Laser Engraver by AlMuz
by Thingiverse
Last crawled date: 3 years, 1 month ago
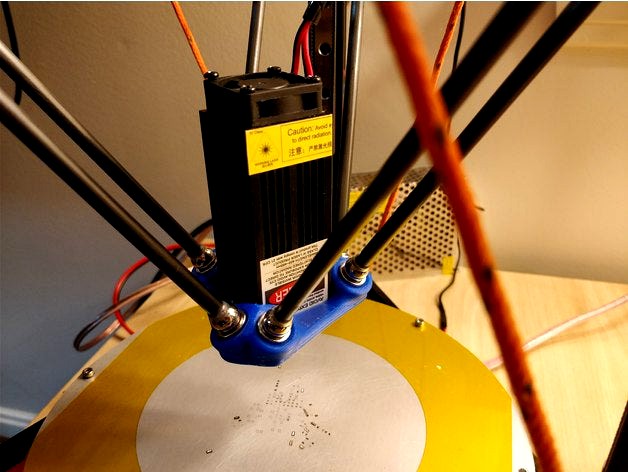
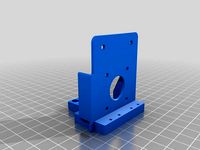
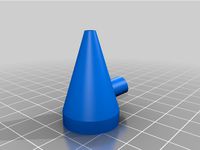
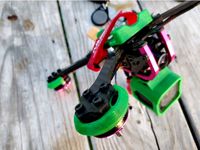
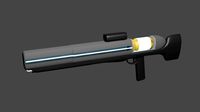
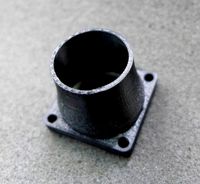
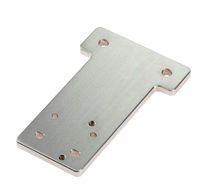
I needed laser engraver, but didn't wanna buy one to save space in my rental apartment. Instead I've got a 5W solid state laser module and installed it on my Delta Printer. Since my delta printer using magnetic joints - I can swap between laser head and 3D printer head in a matter of seconds. This mount with a set of 6 countersunk magnets replaces standard K800 magnetic effector (like the red one on picture).
Magnets (12 mm countersunk)
https://www.ebay.com/itm/122110638994
Laser module 2.5W
Best value for the money!https://www.ebay.com/itm/Focusable-High-Power-2-5W-450nm-Blue-Laser-Module-TTL-12V-Carving-free-Goggles-H-/152845584678?_trksid=p2385738.m4383.l4275.c10
Laser module 5W
Faster and cleaner cuts of thicker materials!https://www.ebay.com/itm/5W-Laser-Head-Engraving-Module-Wood-Marking-Wood-Cutting-For-Engraver-W-TTL/323002592505
TLL input is a must have
Otherwise it will be harder to control laser exposure. Without TTL input you can only vary the speed of laser trajectory. Which might be not enough for some some scenarios and hard to tune to the required level. Connecting TTL input to colling FAN output MOSFET you can control laser power setting fan speed (M106 Sxxx and M107 G-code commands). Please refer to details on this page: https://electronics.stackexchange.com/questions/321987/convert-12vdc-fan-controller-output-to-ttl-signal-of-laser
And DON'T FORGET protection glasses
For a blue laser you need green colorhttps://www.ebay.com/itm/Alternative-Laser-Eye-Protection-Safety-Glasses-Goggles-For-Various-lasers-1pc
Applications
If you do home PCB DIY - the laser engraver is absolutely must have thing for you. Because it helps to accomplish different stages of PCB manufacturing:
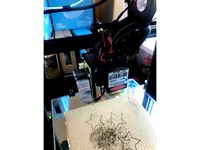
At low power setting you may use blue laser to expose copper layer pattern directly to photo-resist film applied to copper clad. No need to print templates on clear plastic projector film and then struggle with variability of UV lamp distance and time of exposure. I also had to print two mirrored templates and precisely align them together, since having single layer of ink-jet ink were not enough to properly block UV light. Exposing photo-resist dirreclty with with laser can give you resolution of 1/10 of mm or more (google for LaserWeb tool on GitHub). It is better when done by low power lasers, they have nicer circular spot, I had to back-focus my 5W laser by 2 mm and still use minimal power (4..5%) so that low-power defocused spot doesn't burn photoresist and actually cures it, the spot is still small enough to give me 0.10 mm traces (see my pic of PCB in the develop solution).
LaserWeb tool (https://github.com/LaserWeb/LaserWeb4) is ideal for the purpose to combine path routing and raster operations together (for traces and copper-pours respectively).
If you still don't wanna hustle with laminating photo-resist film to your copper clad and its development in caustic soda solution - you may skip these going slightly dirtier way, but still using a laser. Just spray paint your PCB with black acrylic paint and then burn the negative pattern with a laser at high-power setting. Vaporizing the acrylic paint is less precise than exposing photo-resist at low power, but for the sake of simplicity you may trade off the accuracy.
2..5W laser can cut plastic films that may be used as SMD-stencils to apply solder paste on PCB pads. To get clean cuts without curling of plastic drop a white paper sheet on top of the plastic film and spray it with water. Wait for paper to soaked and swipe-off the excess water with a credit card (yeah, sorry, you need a credit card here). Water-soaked sheet of paper on top cools down the plastic edge immediately after laser slit through. It also helps to absorb laser energy when cutting clear plastic films. Without paper it almost impossible to cut clear plastic film, yellowish kapton however absorbs laser light quite effectively and burns fast, still need watered paper to prevent excessive curling on cut edges.
Finally - 2..5W laser can cut colored acrylic and plywood. It can't do clear plexiglas for the very same reason of energy absorption vs its dissipation ratio. On a picture - I've got a solder-paste applicator setup for one of my PCBs. SMD-stencil for solder paste was cut out of clear plastic film used for projectors. A jig to hold custom-shaped PCB was cut out of 1/16" black non-transparent acrylic sheet (the same thickness as of PCB). Absolute satisfaction of using this (did like 150 boards in few hours).
https://youtu.be/ADJc9kbJicc
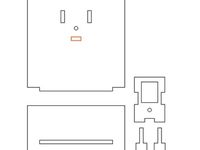
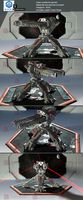
UPDATE June 11 2019
Attached an image with steps and diagrams to locate the G(gate)-pin of the FAN MOSFET to be used as TTL signal source. Download an image in original size to view the details.
Magnets (12 mm countersunk)
https://www.ebay.com/itm/122110638994
Laser module 2.5W
Best value for the money!https://www.ebay.com/itm/Focusable-High-Power-2-5W-450nm-Blue-Laser-Module-TTL-12V-Carving-free-Goggles-H-/152845584678?_trksid=p2385738.m4383.l4275.c10
Laser module 5W
Faster and cleaner cuts of thicker materials!https://www.ebay.com/itm/5W-Laser-Head-Engraving-Module-Wood-Marking-Wood-Cutting-For-Engraver-W-TTL/323002592505
TLL input is a must have
Otherwise it will be harder to control laser exposure. Without TTL input you can only vary the speed of laser trajectory. Which might be not enough for some some scenarios and hard to tune to the required level. Connecting TTL input to colling FAN output MOSFET you can control laser power setting fan speed (M106 Sxxx and M107 G-code commands). Please refer to details on this page: https://electronics.stackexchange.com/questions/321987/convert-12vdc-fan-controller-output-to-ttl-signal-of-laser
And DON'T FORGET protection glasses
For a blue laser you need green colorhttps://www.ebay.com/itm/Alternative-Laser-Eye-Protection-Safety-Glasses-Goggles-For-Various-lasers-1pc
Applications
If you do home PCB DIY - the laser engraver is absolutely must have thing for you. Because it helps to accomplish different stages of PCB manufacturing:
At low power setting you may use blue laser to expose copper layer pattern directly to photo-resist film applied to copper clad. No need to print templates on clear plastic projector film and then struggle with variability of UV lamp distance and time of exposure. I also had to print two mirrored templates and precisely align them together, since having single layer of ink-jet ink were not enough to properly block UV light. Exposing photo-resist dirreclty with with laser can give you resolution of 1/10 of mm or more (google for LaserWeb tool on GitHub). It is better when done by low power lasers, they have nicer circular spot, I had to back-focus my 5W laser by 2 mm and still use minimal power (4..5%) so that low-power defocused spot doesn't burn photoresist and actually cures it, the spot is still small enough to give me 0.10 mm traces (see my pic of PCB in the develop solution).
LaserWeb tool (https://github.com/LaserWeb/LaserWeb4) is ideal for the purpose to combine path routing and raster operations together (for traces and copper-pours respectively).
If you still don't wanna hustle with laminating photo-resist film to your copper clad and its development in caustic soda solution - you may skip these going slightly dirtier way, but still using a laser. Just spray paint your PCB with black acrylic paint and then burn the negative pattern with a laser at high-power setting. Vaporizing the acrylic paint is less precise than exposing photo-resist at low power, but for the sake of simplicity you may trade off the accuracy.
2..5W laser can cut plastic films that may be used as SMD-stencils to apply solder paste on PCB pads. To get clean cuts without curling of plastic drop a white paper sheet on top of the plastic film and spray it with water. Wait for paper to soaked and swipe-off the excess water with a credit card (yeah, sorry, you need a credit card here). Water-soaked sheet of paper on top cools down the plastic edge immediately after laser slit through. It also helps to absorb laser energy when cutting clear plastic films. Without paper it almost impossible to cut clear plastic film, yellowish kapton however absorbs laser light quite effectively and burns fast, still need watered paper to prevent excessive curling on cut edges.
Finally - 2..5W laser can cut colored acrylic and plywood. It can't do clear plexiglas for the very same reason of energy absorption vs its dissipation ratio. On a picture - I've got a solder-paste applicator setup for one of my PCBs. SMD-stencil for solder paste was cut out of clear plastic film used for projectors. A jig to hold custom-shaped PCB was cut out of 1/16" black non-transparent acrylic sheet (the same thickness as of PCB). Absolute satisfaction of using this (did like 150 boards in few hours).
https://youtu.be/ADJc9kbJicc
UPDATE June 11 2019
Attached an image with steps and diagrams to locate the G(gate)-pin of the FAN MOSFET to be used as TTL signal source. Download an image in original size to view the details.
Similar models
thingiverse
free
ManaSE Clon Base and Laser Support by joshuruiz
...450nm-5w-laser-engraving-module-blue-light-marking-engraver-with-ttl-modulation-p-1218494.html?rmmds=search&cur_warehouse=usa
thingiverse
free
Laser mount cr10s fang by Sorcon
...53.m1438.l2649
short dial holder cr-10 byhttps://www.thingiverse.com/lucassaldanhawerneck/about
www.thingiverse.com/thing:2696551
grabcad
free

Sculpfun S9 Laser Module
...dule
grabcad
sculpfun s9 laser module which is able to engrave and cut wood, leather, paper, plastic, and non metallic materials
thingiverse
free
BCN3D Sigma 5.5W Laser mount by m0w1337
...ent firmware will not turn off the laser during homing, so first cut the laser supply and then cancel the print.
happy hacking :)
thingiverse
free

Mounting Plate for 450nm 5W Banggood Laser by cows2computers
...his cnc:https://www.thingiverse.com/thing:3026040
i would suggest using this air assist:https://www.thingiverse.com/thing:4566347
thingiverse
free
Laser air assist 33mm diode by LordSylow
...
pushed on and is also used as a simple focus wheel.
i cut 3mm mdf in 2 pases with this air assist.
it's simple and it works.
thingiverse
free

MPCNC Chineese Laser Mount by nellson
....
i printed with supports, .2 away from the body, with 20% infill as the laser is very light, no need to get heavy on the print.
thingiverse
free
Laser Cut Simple DHT11 sensor Base by Alveli
...ase
using 3mm mdf or you can use 3mm acrylic
the red rectangle is the space for the connector you can chose to engrave or cut it
thingiverse
free

Laser Engraved Calendar. Laser burned and cut 2015 circle calendar on wood. by TexasLaser
...slaser
thingiverse
laser engraved wood calendar 2015.
laser burned and cut 2015 circle calendar on wood.
used 1/8 birch plywood.
grabcad
free

Tiny Cutting A6 CNC engraving
...is machine is design to engraving pcb and cutting with acrylic or wood . something can i help with please contact me, thank you..
Almuz
thingiverse
free

1500 mAh LiPo tray for carbon drone frames by AlMuz
...battery mounting.
prevents scratching the battery with the screws.
helps to strap the battery to a drone with perfect alignment.
thingiverse
free
Suspension LiPo Guard by AlMuz
...or throttle, pitch forward - then put your fpv goggles on and hit full throttle.
(make sure no one stands in front of your drone)
thingiverse
free

Tevo Tornado - Flush Strain Relief by AlMuz
...eveling knobs. plastic washers are needed to avoid glass cracking by more even distribution of pressure when tightening the nuts,
thingiverse
free
Mono X Vat Drainer by AlMuz
...ut level and centered to printer.
third variation is slimmer version of the second with offset to be able to drop the lid on top.
thingiverse
free

FuriBee GT215, TransTEC Lightning GoPro Session TPU mount by AlMuz
...hat spaced 23 mm from each other.
ads 10 degrees to top plate angle (20 deg), so the total line of sight is 30 deg to base plane.
thingiverse
free

S500 - Low Profile Battery Mount by AlMuz
...e got s500 frame? you also might be interested in programmable led boards of my own design: https://www.ebay.com/itm/112821970650
thingiverse
free
Air-plush TPU bumper/softmount for 2306, 2308, 2205 motor by AlMuz
...und your motor. if the impact is too hard - the inner thicker tpu wall absorbs the energy before transferring that to motor bell.
thingiverse
free

S500 - No-Frustration Landing Gear by AlMuz
...me? you also might be interested in programmable led boards of my own design: https://www.ebay.com/itm/112821970650
happy flying!
thingiverse
free

Tevo Tornado - belt-driven 2-nd Z-rod with minimal parts by AlMuz
...ns. when set perfectly square - tighten-up the set-screws of the 40t puley on the 2-nd z rod.
level the bed and run a test print!
Engraver
turbosquid
$8
Engraved Sword
...alty free 3d model engraved sword for download as max and fbx on turbosquid: 3d models for games, architecture, videos. (1168563)
turbosquid
$10
Engraved tiger
...ree 3d model engraved tiger for download as max, obj, and fbx on turbosquid: 3d models for games, architecture, videos. (1298214)
turbosquid
$1
Engraver(General)
... available on turbo squid, the world's leading provider of digital 3d models for visualization, films, television, and games.
turbosquid
$19
Seax Knife Engraved
...model seax knife engraved for download as blend, fbx, and obj on turbosquid: 3d models for games, architecture, videos. (1497294)
3d_export
$5
scary monster engraving
...nal engraving for 3d printing will give your environment an exotic look! it will look great if you paint it in the color of stone
turbosquid
$59
Emerald Engraving Ring
... available on turbo squid, the world's leading provider of digital 3d models for visualization, films, television, and games.
turbosquid
$23
Runes Engraving Set
... available on turbo squid, the world's leading provider of digital 3d models for visualization, films, television, and games.
turbosquid
$15
Decoration Engraved table
... available on turbo squid, the world's leading provider of digital 3d models for visualization, films, television, and games.
turbosquid
$8
Viking helmet with engraved
...met with engraved for download as c4d, 3ds, dxf, fbx, and obj on turbosquid: 3d models for games, architecture, videos. (1618783)
turbosquid
$5

Engraved coffee cup
...ved coffee cup for download as blend, dae, fbx, obj, and gltf on turbosquid: 3d models for games, architecture, videos. (1713648)
Delta
design_connected
$16
Delta
...delta
designconnected
arflex international spa delta computer generated 3d model. designed by koivisto, eero.
design_connected
$16
Delta
...delta
designconnected
lj lamps delta computer generated 3d model. designed by janowski-lenhart, sasha.
design_connected
$13
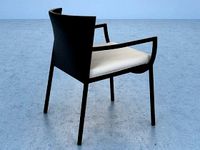
Delta
...delta
designconnected
emu group delta armchairs computer generated 3d model. designed by marin chiaramonte .
3ddd
$1

Delta Light
...delta light
3ddd
delta light , you-turn reo 3033
точечний светильник delta light
3ddd
$1
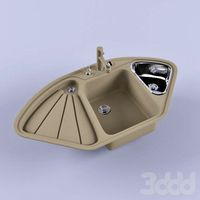
Blanco / delta
...blanco / delta
3ddd
blanco , мойка
мойка blanco delta со смесителем
3ddd
$1
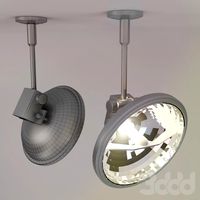
Delta Light Spot
...delta light spot
3ddd
delta light
светильник фирмы delta light
3ddd
free
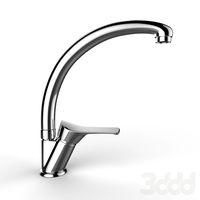
Bianchi Delta LVMDLT200100
...i delta lvmdlt200100
3ddd
bianchi delta , смеситель
смеситель bianchi delta lvmdlt200100
design_connected
free
Delta 190
...delta 190
designconnected
free 3d model of delta 190 by zanotta designed by progetti, emaf.
design_connected
$27
Delta 211
...delta 211
designconnected
zanotta delta 211 computer generated 3d model. designed by progetti, emaf.
design_connected
$27
Delta 234
...delta 234
designconnected
zanotta delta 234 computer generated 3d model. designed by progetti, emaf.
Laser
3d_export
$5
laser
...laser
3dexport
a 3d laser
3d_export
free
cnc 3dp laser nozzle for 2w laser opt lasers
...logy that gave birth to cutting and engraving laser heads this laser nozzle was designed for, read the article in the link below:
3d_export
free
cnc laser mount opt lasers
...eive the engraving and cutting laser heads this cnc machine laser mount was designed for, read the article on the following page:
turbosquid
$20
Laser
... available on turbo squid, the world's leading provider of digital 3d models for visualization, films, television, and games.
turbosquid
$15
Laser
... available on turbo squid, the world's leading provider of digital 3d models for visualization, films, television, and games.
turbosquid
$3
Laser
... available on turbo squid, the world's leading provider of digital 3d models for visualization, films, television, and games.
3d_export
$5

laser sword
...laser sword
3dexport
it is a blue laser sword with a metal frame
3d_ocean
$19
Laser Turret
...be used in any sf type of game, especially in tower defense games. - laser turret: 3025 polygons - props: 270 polygons - textu...
3d_export
free
workbee cnc laser mount for opt lasers
...the specifications of engraving and cutting laser heads this mount was designed for, please take a look at the following website:
3d_export
free

shapeoko cnc laser mount for opt lasers
...ind out the opportunities that adding a cutting and engraving laser head to your cnc can bring, take a look at the website below: