Thingiverse
Davinci 1.0 rebuild kit WIP by DC010
by Thingiverse
Last crawled date: 4 years, 8 months ago
I'm currently pretty busy, but I waned to share my WIP. I may add more instructions later, but for those who can see what I'm doing and put the parts in place, here you go.
This started by wanting to use, https://www.thingiverse.com/thing:594392 and during our initial modifications we bricked our main board so...
We bought a RAMPS 3D printer board w/ display and NEMA 17 (1.8/step) stepper motors.
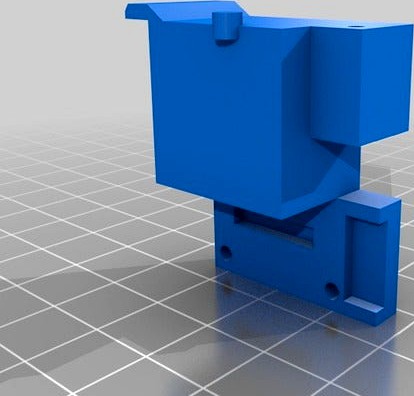
Instead of trying to make massive modifications or screwing everything together, I wanted to try and just clip on as much as I could. The Z axis end stop is where the most would be lost, so I did design a replacement to minimize that, but the X and Y axis just clip onto the original mounts. You may need to trim the leads coming out the back of the switches to get them to sit flush on these mounts, but it did not adversely affect anything.
The NEMA 17 motors have a longer post but shorter body, so I am including a spacer that gives it just enough room to fit in the stock mounts.
Also, I know the display sitting on the top/back of the printer isn't ideal, but given the length of the cables, it does the job, but I suggest running the display cables first, as they won't fit w/ the rest of the cables through (learn from my mistake).
If you want, i also modified the extruder clamp for the boden model to retain the hex nuts that we normally use.
This started by wanting to use, https://www.thingiverse.com/thing:594392 and during our initial modifications we bricked our main board so...
We bought a RAMPS 3D printer board w/ display and NEMA 17 (1.8/step) stepper motors.
Instead of trying to make massive modifications or screwing everything together, I wanted to try and just clip on as much as I could. The Z axis end stop is where the most would be lost, so I did design a replacement to minimize that, but the X and Y axis just clip onto the original mounts. You may need to trim the leads coming out the back of the switches to get them to sit flush on these mounts, but it did not adversely affect anything.
The NEMA 17 motors have a longer post but shorter body, so I am including a spacer that gives it just enough room to fit in the stock mounts.
Also, I know the display sitting on the top/back of the printer isn't ideal, but given the length of the cables, it does the job, but I suggest running the display cables first, as they won't fit w/ the rest of the cables through (learn from my mistake).
If you want, i also modified the extruder clamp for the boden model to retain the hex nuts that we normally use.