Thingiverse
Cupcake XY Stage Quick Release Kit by randyy
by Thingiverse
Last crawled date: 2 years, 12 months ago
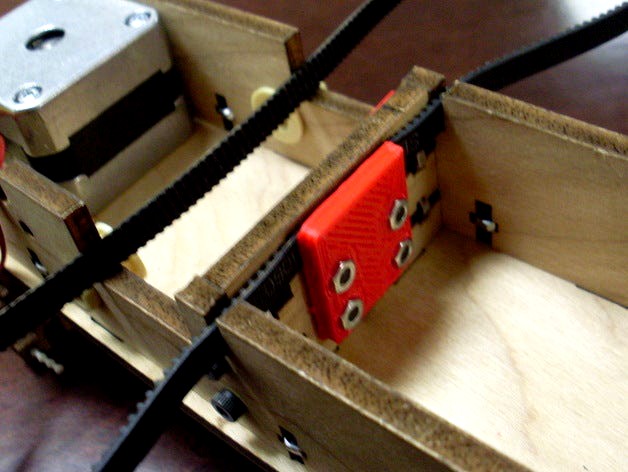
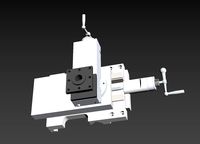
Like TwoTimes, I've been experimenting with new chassis designs. I became so frustrated with repeatedly tearing down and reassembling my Makerbot that I designed this kit to make removal of the entire XY stage a breeze. It also makes cleaning out the floor of the build area very easy. The entire process takes less than a minute and requires NO TOOLS!!!
To change the XY stage out on a stock Makerbot, I typically had to: 1) Remove the 8 bolts holding the rod covers on the left side of the bot with a hex wrench and needlenose pliers to hold the nuts. 2) Remove the rod covers and slide the rods out. 3) Loosen the X Idler with a different hex wrench and an open end wrench 4) Put a band-aid on the cut I got when the wrench slipped 5) Take the XY stage off and loosen the 4 bolts holding the belt retainers on, removing the belt from the XY stage. 5) Fish around for the nuts that I dropped and lost in my Cupcake, and after giving up, pull new ones from my spares box 6) Put the experimental stage on the belt and place the assembly into the Cupcake. 7) Wrestle with holding tension on the idler with one hand, hold the bottom nut with my second hand, and tighten the M8 bolt with my third hand, hoping that I've gotten it tight enough but not too tight. 8) replace the guide rods and begin replacing the rod covers and bolts. 9) Pretend I'm a neurosurgeon or operating the Mars rover by blindly trying to thread a nut onto an M3 bolt using needlenose pliers, holding the nut between the idler pulley and guide rod. 10) Put a dollar in the Swear Jar after dropping the nut for the 16th time. 17) Finally get it all together and realize 30 minutes have passed and I'm no longer in the mood to use the Makerbot.
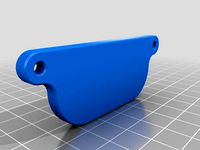
With the parts in this kit, the process is more like this: 1) With your FINGERS, slide the guide rod covers down until the keyholes in the covers allow them to fall off in your hand. 2) Leave the screws right where they are, knowing they will be held in position by the nut retainer on the inside of the bot. 3) (assuming #2 even counts), Slide the guide rods out. 4) Slide the XY stage to the left and with your FINGER, push inward on the right tab on the X belt retainer (from this kit) just inside the hole that the X belt runs through. Pushing in on the tab releases tension on the belt. 4) Push the XY stage rearward to release the belt's teeth and pull up on the XY stage, removing it from the bot. 5) To replace it, simply slide the belt into the slot on the XY stage and wiggle it back and forth until you feel the belt teeth seat into their slots. 6) Push on the tab on the LEFT side of the stage, which will tension up the belt, locking it in place. 7) Replace the guide rods. 8) Push on the inner nut retainer, which will hold the bolts for the rod cover plates solidly in position as you slide the keyholes of the rod caps over the bolts. 9) Push up on the rod caps, moving the bolts onto the thin section of the keyhole. The integrated spring will hold the covers in place. Your bot is ready to use.
Full disclosure - Although this was a unique creation, I later discovered that my spring design for the rod cover was already "invented" by Wasjazn (http://www.thingiverse.com/thing:3745). I was using it to hold the cover in place against gravity, while Wasjazn used it to take rattle out of short guide rods. I have since modified my design to include the anti-rattle function, but my design's keyhole installation and nut retainer are completely unique.
To change the XY stage out on a stock Makerbot, I typically had to: 1) Remove the 8 bolts holding the rod covers on the left side of the bot with a hex wrench and needlenose pliers to hold the nuts. 2) Remove the rod covers and slide the rods out. 3) Loosen the X Idler with a different hex wrench and an open end wrench 4) Put a band-aid on the cut I got when the wrench slipped 5) Take the XY stage off and loosen the 4 bolts holding the belt retainers on, removing the belt from the XY stage. 5) Fish around for the nuts that I dropped and lost in my Cupcake, and after giving up, pull new ones from my spares box 6) Put the experimental stage on the belt and place the assembly into the Cupcake. 7) Wrestle with holding tension on the idler with one hand, hold the bottom nut with my second hand, and tighten the M8 bolt with my third hand, hoping that I've gotten it tight enough but not too tight. 8) replace the guide rods and begin replacing the rod covers and bolts. 9) Pretend I'm a neurosurgeon or operating the Mars rover by blindly trying to thread a nut onto an M3 bolt using needlenose pliers, holding the nut between the idler pulley and guide rod. 10) Put a dollar in the Swear Jar after dropping the nut for the 16th time. 17) Finally get it all together and realize 30 minutes have passed and I'm no longer in the mood to use the Makerbot.
With the parts in this kit, the process is more like this: 1) With your FINGERS, slide the guide rod covers down until the keyholes in the covers allow them to fall off in your hand. 2) Leave the screws right where they are, knowing they will be held in position by the nut retainer on the inside of the bot. 3) (assuming #2 even counts), Slide the guide rods out. 4) Slide the XY stage to the left and with your FINGER, push inward on the right tab on the X belt retainer (from this kit) just inside the hole that the X belt runs through. Pushing in on the tab releases tension on the belt. 4) Push the XY stage rearward to release the belt's teeth and pull up on the XY stage, removing it from the bot. 5) To replace it, simply slide the belt into the slot on the XY stage and wiggle it back and forth until you feel the belt teeth seat into their slots. 6) Push on the tab on the LEFT side of the stage, which will tension up the belt, locking it in place. 7) Replace the guide rods. 8) Push on the inner nut retainer, which will hold the bolts for the rod cover plates solidly in position as you slide the keyholes of the rod caps over the bolts. 9) Push up on the rod caps, moving the bolts onto the thin section of the keyhole. The integrated spring will hold the covers in place. Your bot is ready to use.
Full disclosure - Although this was a unique creation, I later discovered that my spring design for the rod cover was already "invented" by Wasjazn (http://www.thingiverse.com/thing:3745). I was using it to hold the cover in place against gravity, while Wasjazn used it to take rattle out of short guide rods. I have since modified my design to include the anti-rattle function, but my design's keyhole installation and nut retainer are completely unique.
Similar models
thingiverse
free

Ormerod 2 Y-idler with Rod twist fix and belt tensioning by darathy
...
1xm3x30 bolt and 1xm3 nut for the belt tension bracket.
for the bearing the same m3 bolt from original idler should work fine.
thingiverse
free

Y-Axis Idler Support Bracket with Quickrelease for Thing-O-Matic by Quin
...-o-matic upgrade things:
y-axis idler support bracket for thing-o-matic
the rod cover from cupcake xy stage quick release kit
thingiverse
free

Prusa i3 MK2 X-Idler Tensioner by Jasenk
... kit came with extras that i used.
the pully slide (x-end-idler-front-tensioner) fits one way. if it's tight flip it around.
thingiverse
free
X axis end clamp by bunjatec
...ll need to print :
1x end clamp
2x end clamp fixings
the clamp then holds the ends of the x stage rods and stops them poking out.
thingiverse
free

Idler_Pulley_Bracket For the Rigidbot by kllantz
...like to make stuff easy to remove.)
i just pulled my belt to tension it but there are lots of belt tensioning option out there.
thingiverse
free

Prusa i3 x-belt tensionner upgrade by ffleurey
...nut in the middle is the original one from the prusa i3 idler holder. the bolt holding the idler holder in the x end is removed.
thingiverse
free

Tension Nut/Friction Brake by geoff_cohen
...n the 1st time - i use a spare rod & (reasonably) gently hammer it through the nut - after that it will slide on & off ok
thingiverse
free

Prusa I3 X-end Idler w/ tensioner by rball716
...lide in place
no support necessary. print out my 25mm bridge test and as long as you can print that this will print no problem
thingiverse
free

Ord Bot Hadron Webcam/Light Mount X-Axis Tensioner Mash Up by jneilliii
...t-nuts to mount bracket to x-axis and m4x20 bolts and m4 nuts for tensioning bolts as described in predecessor's description.
thingiverse
free

D-Bot Corexy Timing belt tentioner by Gecko2204
...bearings and 3 bolts to secure them.
the idler on the tip slides to tighten the belt and fastens with the adjuster at the bottom.
Randyy
thingiverse
free

Football Kicking Tee by randyy
...chedule 40 pvc we had at the house, but you can adjust the parameters in the attached scad for other supplies you have available.
thingiverse
free

FrankenCarriage by randyy
...v3, which is a complete redesign. i'm still hopeful it will work with modification, but i cannot recommend it at this point.
thingiverse
free

Makerbottable Simple spool system by randyy
...kes to avoid the problem people were having with one of the hollows printing solid. i just skeined it in 0035 and it looks good.
thingiverse
free

OpenSCAD Parts Library by randyy
...le that doubled the expected size (used diameter as radius). added rezprinter and rezscreen functions for adjusting facet sizes.
thingiverse
free
Parametric Filament Spool Mk2 by randyy
...ic designs from the openscad file, also download libs.scad from http://www.thingiverse.com/thing:6021 as it has required modules.
thingiverse
free

Vertical support with a bit of customisation by Alzibiff
...a hybrid consisting of smartroad's adjustable hooks http://www.thingiverse.com/thing:16357 , randyy#39;s parametric filament spool mk2: http://www.thingiverse.com/thing:8317 and finally watsdesign's vertical...
thingiverse
free

Lulzbot Refined Spindle by Verohomie
...by verohomie thingiverse this is a spindle variant on randyy#39;s excellent parametric filament spool, the two notches have been...
thingiverse
free
Heavy duty filament spool - for mendel by watsdesign
...mendel by watsdesign thingiverse remixed with http://www.thingiverse.com/thing:10254 (spindle for randyy#39;s spool), and http://www.thingiverse.com/thing:11250 (one piece printable arms) to adapt...
thingiverse
free

Printable Filament Spool Spindle for Reprap by tjhowse
...by tjhowse thingiverse this is a spindle variant on randyy#39;s excellent parametric filament spool, with two notches 60mm apart...
Cupcake
3ddd
$1

Cupcake
...cupcake
3ddd
cupcake , пирожное
cupcake
3ddd
$1

cupcakes
...cupcakes
3ddd
пироженное
cupcakes
3d_ocean
$4

Cupcake
...ownie cake cherry chocolate cream cupcake food muffin pastry shop. sweet plate porcelain
cupcake with cherry and chocolate chips.
3d_export
$12

cupcake
...cupcake
3dexport
turbosquid
$5

cupcake
...ke
turbosquid
royalty free 3d model cupcake for download as on turbosquid: 3d models for games, architecture, videos. (1615877)
turbosquid
$55

Cupcakes
...urbosquid
royalty free 3d model cupcakes for download as max on turbosquid: 3d models for games, architecture, videos. (1367521)
turbosquid
$39

Cupcake
...turbosquid
royalty free 3d model cupcake for download as fbx on turbosquid: 3d models for games, architecture, videos. (1238379)
turbosquid
$29

Cupcake
...turbosquid
royalty free 3d model cupcake for download as max on turbosquid: 3d models for games, architecture, videos. (1476932)
turbosquid
$15

Cupcake
...rbosquid
royalty free 3d model cupcake for download as blend on turbosquid: 3d models for games, architecture, videos. (1562969)
turbosquid
$2

cupcake
...turbosquid
royalty free 3d model cupcake for download as fbx on turbosquid: 3d models for games, architecture, videos. (1195648)
Xy
3ddd
$1

Вешалка напольная XY-027
...а штанги: 171 см
диаметр основания: 38 смhttp://mebelshopos.ru/aksessuary-ofisnye/veshalka-napolnaya-xy-027-detail.html
turbosquid
$9
XY Rectangular Dining Table
... available on turbo squid, the world's leading provider of digital 3d models for visualization, films, television, and games.
3ddd
$1

holly hunt xy bench
...eight: 17.75 in
width: 45 in, 26 in
depth: 18 in
больше превьюhttps://www.behance.net/gallery/24983999/bench-3d-model?
turbosquid
$8
Xy fine tuning handle adjusts the module
...odule for download as 3ds, max, ige, obj, fbx, stl, and sldas on turbosquid: 3d models for games, architecture, videos. (1331394)
3ddd
$1

pillows bed 2
...pillows bed 2 3ddd подушка , круглая dimensions: xy ...
3ddd
$1

Honeycomb Floor
...паркет parquet with metalic honeycomb floor demensions 500x500 cm xy multitexture +...
3d_export
$7

positioning screw mechanism
...and lead screw, constitute a double displacement adjustable mechanism, xy axis double position adjustable positioning.<br>**************************************<br>files format contains<br>-solidworks 2017<br>-step<br>-iges<br>- and...
3d_export
$9
positioning mechanism of heavy-duty platform
...activity -- ball mechanism activity ---- drive heavy load xy axis movement -- positioning completed<br>**************************************<br>files format contains<br>-solidworks 2017<br>-step<br>-iges<br>- and...
3d_export
$180

optical fiber laser marking machines assembly
...fiber laser marking machine<br>automatic loading and unloading laser marking machine<br>xy platform adjustable laser marking machine<br>laser marking machine used with...
thingiverse
free
XY ROBOT by ymtlab
...xy robot by ymtlab
thingiverse
xy robot
Release
turbosquid
$39

Sofa. Updated release
... available on turbo squid, the world's leading provider of digital 3d models for visualization, films, television, and games.
turbosquid
$8

Film releasing mechanism
...asing mechanism for download as 3ds, ige, obj, stl, and sldas on turbosquid: 3d models for games, architecture, videos. (1227251)
3d_export
$5

shift lock release kia soul
...shift lock release kia soul
3dexport
shift lock release kia soul
turbosquid
$14

Quick release swivel carabiner with ring
...ease swivel carabiner with ring for download as sldpr and stl on turbosquid: 3d models for games, architecture, videos. (1668426)
turbosquid
$60

AUTOMATIC AIR RELEASE VALVE GRP33-07
...odel automatic air release valve grp33-07 for download as ipt on turbosquid: 3d models for games, architecture, videos. (1404884)
3d_export
$10

Kitchen Release Mat
...xture format: .png .jpg<br>resolution: 1024*1024<br>pbr in substance painter<br>formats: .obj .gltf .fbx .blend
3d_export
$5
logitech g27-g29 quick release
...r and the other wheel adaptor.<br>files are in stl format, but if you want to edit parts i give you files in sldprt format.
3d_export
$20

mutante veneno
...model created in zbrush 33cm ready for printing, previously release in 6...
3d_export
$5

Drowned Plush Minecraft
...for microsoft windows, macos and linux, and was later re-release for a wide variety of platforms. it is the...
3d_export
$7

Toy drone for kids
...drone for kids. based on only 3 d models. release for toy...
Stage
archibase_planet
free
Stage
...stage
archibase planet
stage staging boards scene
stage n290814 - 3d model (*.gsm+*.3ds+*.max) for exterior 3d visualization.
archibase_planet
free

Stage
...stage
archibase planet
stage dais rostrum
aqua - stage - 3d model for interior 3d visualization.
3d_export
$100

Stage
...stage
3dexport
collapsible mapping stage decor dimensions
3d_export
$100

Stage
...stage
3dexport
double curtain stage decor sequence order
turbosquid
$49

stage
...e
turbosquid
royalty free 3d model stage for download as obj on turbosquid: 3d models for games, architecture, videos. (1305813)
turbosquid
$29

stage
...ty free 3d model stage for download as 3ds, obj, c4d, and fbx on turbosquid: 3d models for games, architecture, videos. (1400329)
turbosquid
$29
stage
...ty free 3d model stage for download as c4d, obj, fbx, and 3ds on turbosquid: 3d models for games, architecture, videos. (1659284)
turbosquid
$15

Stage
...ty free 3d model stage for download as obj, fbx, skp, and stl on turbosquid: 3d models for games, architecture, videos. (1474331)
3d_export
$20

Pack Stage
...pack stage
3dexport
stage with furniture and complete scenography
turbosquid
$88

Stage
... available on turbo squid, the world's leading provider of digital 3d models for visualization, films, television, and games.
Quick
3ddd
$1

Quick-Step / Quadra
...quick-step / quadra
3ddd
quick step
ламинат quick-step, серия quadra. сайт источник -http://www.quick-step.com
3ddd
$1

Quick-Step / Lagune
...quick-step / lagune
3ddd
quick step
ламинат quick-step, серия lagune. сайт источник -http://www.quick-step.com
3ddd
$1

Quick-Step / Classic
...quick-step / classic
3ddd
quick step
ламинат quick-step, серия classic. сайт источник -http://www.quick-step.com
3ddd
$1

Quick-Step / Arte
...quick-step / arte
3ddd
quick step
ламинат quick-step, серия arte. сайт источник -http://www.quick-step.com
3ddd
$1

Quick-Step / Vogue
...quick-step / vogue
3ddd
quick step
ламинат quick-step, серия vogue. сайт источник -http://www.quick-step.com
3ddd
$1

Quick-Step / Rustic
...quick-step / rustic
3ddd
quick step
ламинат quick-step, серия rustic. сайт источник -http://www.quick-step.com
3ddd
$1

Quick-Step / Eligna
...quick-step / eligna
3ddd
quick step
ламинат quick-step, серия eligna. сайт источник -http://www.quick-step.com
turbosquid
$3

Quick Ball
...lty free 3d model quick ball for download as ma, obj, and fbx on turbosquid: 3d models for games, architecture, videos. (1521597)
3ddd
free

Quick-Step / Elite
... ламинат
ламинат quick-step, серия elite. сайт источник -http://www.quick-step.com
turbosquid
$10

Quick Chrome
... available on turbo squid, the world's leading provider of digital 3d models for visualization, films, television, and games.
Kit
turbosquid
$3

Bathroom Kit Baño kit
... available on turbo squid, the world's leading provider of digital 3d models for visualization, films, television, and games.
turbosquid
$19

Kit
... available on turbo squid, the world's leading provider of digital 3d models for visualization, films, television, and games.
3d_export
$20

Drift Kit
...drift kit
3dexport
turbosquid
$40

BitCoin Kit
...urbosquid
royalty free 3d model bitcoin kit for download as on turbosquid: 3d models for games, architecture, videos. (1519068)
turbosquid
$9

Industrial kit
...osquid
royalty free 3d model industrial kit for download as on turbosquid: 3d models for games, architecture, videos. (1144117)
turbosquid
$6

Kit Vases
...
turbosquid
royalty free 3d model kit vases for download as on turbosquid: 3d models for games, architecture, videos. (1285114)
turbosquid
free

Survival Kit
...rbosquid
royalty free 3d model survival kit for download as on turbosquid: 3d models for games, architecture, videos. (1637721)
turbosquid
$50

Ninja Kit
...rbosquid
royalty free 3d model ninja kit for download as fbx on turbosquid: 3d models for games, architecture, videos. (1672364)
turbosquid
$35

Brushes Kit
...osquid
royalty free 3d model brushes kit for download as max on turbosquid: 3d models for games, architecture, videos. (1216721)
turbosquid
$19
Medical kit
...osquid
royalty free 3d model medical kit for download as fbx on turbosquid: 3d models for games, architecture, videos. (1486089)