GrabCAD
Cryptex
by GrabCAD
Last crawled date: 1 year, 10 months ago
DESCRIPTION
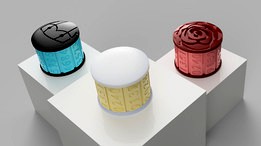
The cryptex is a customizable puzzle box. Give it as a gift, use it for storage, or simply put it up as decoration. You can customize the colors, passcode, and lid graphics based on your printing choices.
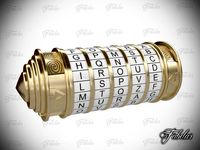
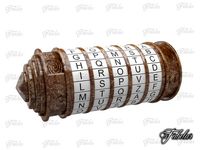
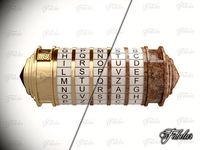
The code can be adjusted to any four-number combination through the rings that are printed and the order in which they are placed. There are three options for the graphics on the lid: a robot face, a rose, or plain. Since each piece can be printed individually, you’re free to get creative with color combinations.
To open the cryptex, line up the numbers of your passcode with the nub on the edge of the lid. Pull up on the lid, and your cryptex will slide open to reveal its internal compartment!
3.4" L x 3.45" W x 2.74" H
86.36 mm L x 87.51 mm W x 69.71 mm H
DESIGN PROCESS
The cryptex was created in 2017. I redesigned it in 2019 and then again in 2020.
It was first made as a gift for the graduating members of my high school robotics team (see image 8). The team wrote thank-you notes on pieces of paper and packed them into the cryptex to be given to the seniors at our end-of-the-year banquet. The robot lid design is our team mascot/logo, and the rings originally only spelled 1-3-5-1 (our team number) as the code.
I redesigned it in 2019 to be compatible with both FDM and MJF printing. In the original FDM version from 2017, the lid and the bottom had to be printed in two separate pieces. The separation of the pieces was to avoid supports, which would waste time and filament and increase the chance for error. The print time was still almost eight hours and required multiple runs to produce all the parts. In the 2019 redesign, the lid and the bottom are printed as one piece. Since SLA/SLS/MJF/PolyJet methods rely on powder/resin to support the structures, the concern over supports is gone.
In my 2020 redesign, I created the rest of the ring numbers, encompassing 0-9 for total customizability of the passcode. I added the plain and rose lid options to give people more control over the cryptex appearance. I've gifted the cryptex many times over the years. It works both as gift wrapping for small objects/notes and a gift itself as a practical storage piece.
I want the cryptex to continue on as a special gift. I hope others can customize it exactly as they wish for their loved ones.
MANUFACTURING
There are two versions available: glue (FDM) and no glue (SLA/SLS/MJF/PolyJet).
For the glue version, the top and bottom are printed as two pieces (Top_Lid + Top_Body, Bottom_Base + Bottom_Body). After printing, place the rings in the order you desire on the Bottom_Body. The rings will be sandwiched between the Bottom_Body and Bottom_Base. Align Bottom_Body and Top_Body to the indents in Bottom_Base and Top_Lid and glue the pieces together.
For the no glue version, simply print out the top and bottom as one part (Top, Bottom). After printing, squeeze the separated walls of the Bottom and fit the rings over the lip in the order you desire.
Materials Tested: PLA, ABS, Nylon, Nylon PA12
Methods Tested: FDM, MJF
Printers Used: Lulzbot Taz 6, Lulzbot Mini, HP Multi-Jet Fusion
In the photos, the purple/black model is Nylon PA12 (MJF) and the teal/black model is PLA (FDM). Hard plastics like ABS, PLA, and Nylon are best for this design. They lend durability and strength for a long-lasting piece.
Although I haven't been able to test it, I expect that the no glue version would work well with SLA, SLS, and PolyJet technologies. I'd love to be able to access any of those technologies so that I can try printing the cryptex as one unit rather than the separate Bottom, Top, and rings. Perhaps one day I'll have another redesign!
For more production instructions and details, check out the design on Thingiverse: https://www.thingiverse.com/thing:2792267
ADDITIONAL INFO:
Tiina Otala | otala001@umn.edu
University of Minnesota - Twin Cities
The cryptex is a customizable puzzle box. Give it as a gift, use it for storage, or simply put it up as decoration. You can customize the colors, passcode, and lid graphics based on your printing choices.
The code can be adjusted to any four-number combination through the rings that are printed and the order in which they are placed. There are three options for the graphics on the lid: a robot face, a rose, or plain. Since each piece can be printed individually, you’re free to get creative with color combinations.
To open the cryptex, line up the numbers of your passcode with the nub on the edge of the lid. Pull up on the lid, and your cryptex will slide open to reveal its internal compartment!
3.4" L x 3.45" W x 2.74" H
86.36 mm L x 87.51 mm W x 69.71 mm H
DESIGN PROCESS
The cryptex was created in 2017. I redesigned it in 2019 and then again in 2020.
It was first made as a gift for the graduating members of my high school robotics team (see image 8). The team wrote thank-you notes on pieces of paper and packed them into the cryptex to be given to the seniors at our end-of-the-year banquet. The robot lid design is our team mascot/logo, and the rings originally only spelled 1-3-5-1 (our team number) as the code.
I redesigned it in 2019 to be compatible with both FDM and MJF printing. In the original FDM version from 2017, the lid and the bottom had to be printed in two separate pieces. The separation of the pieces was to avoid supports, which would waste time and filament and increase the chance for error. The print time was still almost eight hours and required multiple runs to produce all the parts. In the 2019 redesign, the lid and the bottom are printed as one piece. Since SLA/SLS/MJF/PolyJet methods rely on powder/resin to support the structures, the concern over supports is gone.
In my 2020 redesign, I created the rest of the ring numbers, encompassing 0-9 for total customizability of the passcode. I added the plain and rose lid options to give people more control over the cryptex appearance. I've gifted the cryptex many times over the years. It works both as gift wrapping for small objects/notes and a gift itself as a practical storage piece.
I want the cryptex to continue on as a special gift. I hope others can customize it exactly as they wish for their loved ones.
MANUFACTURING
There are two versions available: glue (FDM) and no glue (SLA/SLS/MJF/PolyJet).
For the glue version, the top and bottom are printed as two pieces (Top_Lid + Top_Body, Bottom_Base + Bottom_Body). After printing, place the rings in the order you desire on the Bottom_Body. The rings will be sandwiched between the Bottom_Body and Bottom_Base. Align Bottom_Body and Top_Body to the indents in Bottom_Base and Top_Lid and glue the pieces together.
For the no glue version, simply print out the top and bottom as one part (Top, Bottom). After printing, squeeze the separated walls of the Bottom and fit the rings over the lip in the order you desire.
Materials Tested: PLA, ABS, Nylon, Nylon PA12
Methods Tested: FDM, MJF
Printers Used: Lulzbot Taz 6, Lulzbot Mini, HP Multi-Jet Fusion
In the photos, the purple/black model is Nylon PA12 (MJF) and the teal/black model is PLA (FDM). Hard plastics like ABS, PLA, and Nylon are best for this design. They lend durability and strength for a long-lasting piece.
Although I haven't been able to test it, I expect that the no glue version would work well with SLA, SLS, and PolyJet technologies. I'd love to be able to access any of those technologies so that I can try printing the cryptex as one unit rather than the separate Bottom, Top, and rings. Perhaps one day I'll have another redesign!
For more production instructions and details, check out the design on Thingiverse: https://www.thingiverse.com/thing:2792267
ADDITIONAL INFO:
Tiina Otala | otala001@umn.edu
University of Minnesota - Twin Cities
Similar models
thingiverse
free

Customizable Cryptex by tiinaotala
...pieces to remove the need for supports, and separated the bottom assembly in order to keep the rings in one place with superglue.
thingiverse
free

Dipawali Lamp ( Panti )
...wali lamp ( panti )
thingiverse
hi all,
this diwali lamp model for printing gift form 3d adda
print in bottom up
fdm/sla/dlp/sls
thingiverse
free

Dagger fit to lego by kuhnstoff
...er fit to lego by kuhnstoff
thingiverse
i print it on a formiga from eos
but i thing you can print it in sla or hp mjf or fdm
thingiverse
free

Vortex tube one piece 52°C difference by Hannes_v_d_B
... improve this design i would make the gap at the end 0.3 instead of 0.35mm and make the tube longer. if you try this let me know.
cg_trader
$15

Daisy ring | 3D
...sonal gadget
ideal for fdm / sla / polyjet printing. daisy ring fashion gadgets jewel wedding flowers jewelry rings jewelry rings
thingiverse
free

Luxury Ball, with magnetic clasp (In Parts) by random11
...ll percentage, around 40-50% and then all the other parts at 5-10%. that way it will be bottom heavy and not roll around as much.
cg_trader
$10

F16 3d Model Ready for 3d Printing | 3D
...f16 3d model ready for 3d printing | 3d
cg trader
f16 fixed file for 3d printing (sla, fdm, or pa12)
thingiverse
free

One piece Trestle
...one piece trestle
thingiverse
rather than having three separate pieces to glue together, i redesigned it as a one piece unit.
cg_trader
$5

Vase with Pattern 3D Printable | 3D
...vase with pattern 3d printable | 3d
cg trader
vase with unique pattern ready file for 3d print in fdm, sla, or pa12.
grabcad
free

Within Penta-Cube
... cool show piece to demonstrate the possibilities of 3d printing. ***sls printer recommended for printing. fdm would take forever
Cryptex
cg_studio
$32

Cryptex Collection3d model
...obj .dae .wrl .fbx .max .c4d .3ds - cryptex collection 3d model, royalty free license available, instant download after purchase.
cg_studio
$29

Cryptex New3d model
...udio
.obj .dae .wrl .fbx .c4d .max .3ds - cryptex new 3d model, royalty free license available, instant download after purchase.
3d_export
$29
Cryptex New 3D Model
...iddle game device encription leonardo italy renaissance clockwork mechanism security
cryptex new 3d model fabelar 101069 3dexport
3d_export
$29

Cryptex Clean 3D Model
...ame device encription leonardo italy renaissance clockwork mechanism security gear
cryptex clean 3d model fabelar 101107 3dexport
3d_export
$29
Cryptex Rusty 3D Model
...ame device encription leonardo italy renaissance clockwork mechanism security gear
cryptex rusty 3d model fabelar 101108 3dexport
3d_export
$32
Cryptex collection 3D Model
... encription leonardo italy collection clockwork mechanism security gear rusty
cryptex collection 3d model fabelar 101077 3dexport
3d_export
$32

Cryptex Collection 3D Model
... encription leonardo italy collection clockwork mechanism security gear rusty
cryptex collection 3d model fabelar 101109 3dexport
3d_export
$29

Cryptex Rusty 3D Model
...vice encription leonardo italy renaissance clockwork mechanism security gear rusty
cryptex rusty 3d model fabelar 101074 3dexport
3d_export
$15

Cryptex low-poly
...br>please note: this 3d model like all my other models cannot be used as nft, as is or modified<br>thank you for reading
thingiverse
free

Cryptex by haqnmaq
...cryptex by haqnmaq
thingiverse
this is a fully functional cryptex