Thingiverse
Creality Ender 3 Pi Cam Mount by Modmike
by Thingiverse
Last crawled date: 3 years, 1 month ago
Due to a popular uprising I've re-designed the PiCam 2 case to require less critical tolerances and used magic numbers to make it easier to print. Please let me know how it works for you.
Please use CHEP's Cura profiles linked below. I no longer use Simplify 3D and have no settings beyond layer height and speed.
IMPORTANT!!!!!!!!!
TEST FIT THE CASE BEFORE INSTALLING THE CAMERA OR YOU MAY BREAK IT. THE COVER SHOULD SLIDE ON WITH SOME RESISTANCE. IF IT IS TOO HARD YOU NEED TO CALIBRATE YOUR PRINER. REMOVE AND REINSTALL THE COVER 3 OR 4 TIMES TO MAKE SURE EVERYTHING FITS.
The case has many small features and tolerances need to be tight. I've had a few people complaining about tight tolerances and difficult fitment. Some of you even feel it is ok to be angry with me.
Your printer must be properly calibrated for proper fitment. In most cases this is simply a matter of adjusting the flow rate in your slicer. I would recommend a full calibration but this may be hard for those of you who are uncomfortable with compiling and flashing Marlin. This can be especially difficult on an Ender 3.
That being said you can probably get very close to perfection by adjusting the flow rate for every filament brand you get. Yes every brand. Despite their accuracy claims filament widths can vary wildly. I remember one roll varied from 1.6 to 1.9. Couldn't understand why my prints weren't working until I measured it in several places.
How to calibrate your flow rate for accurately sized prints
If you don't have digital callipers, you can always start by reducing your flow rate to 90% (or .9 in S3D) and see how that works.
This is probably the easiest Ender 3 based guide I've seen:
https://www.youtube.com/watch?v=3yIebnVjADM
Introduction
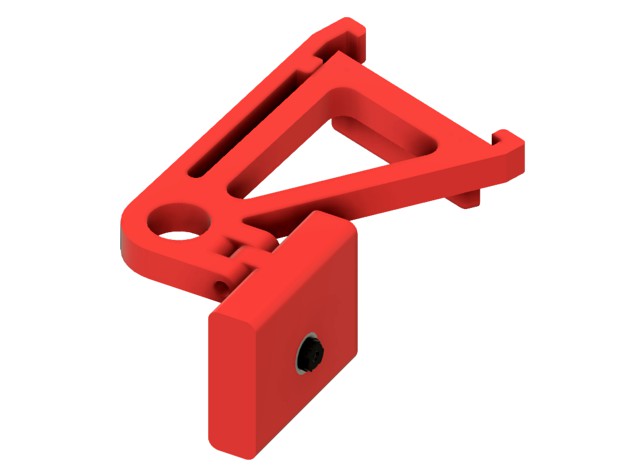
The Ender 3 features a new molded plastic cap for the X-axis stepper motor that replaces the previous acrylic one. This obsoletes previous mounts so I designed a new one I hope you will like.
Design goals:
Create a solid mount that is easy to attach and remove
Minimize printing time
Keep hardware requirements to a minimum
Create a solid Pi Cam housing that allows the focus to be set without ripping the base off
Hardware required:
Pi Cam 1, 2, or 2.1 (Be sure to use proper camera housing))
M3 15mm housing mounting bolt
M3 15mm arm locking bolt (optional)
Building:
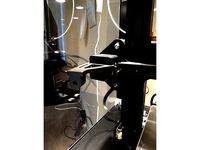
Attach the mount by hooking the right corner first and then clipping the left one on. You can slide the whole assembly up and down to adjust height, I installed mine in the middle.
The fit should be very tight but i've included a 15mm M4 bolt hole in the spring arm to secure it in place if you wish.
Mounting the Pi Cam:
Pi Cam camera sensors are attached with a flex cable and self adhesive glue, which Makes for unpredictable fitment. I recommend that you do not stick the sensor to the back or at least separate it before you insert it into the case so that it can line up with the built in sensor frame. The point of the tight frame is to provide support so it does not get twisted off the base when you focus it, which you will have to do.
Focusing the Pi Cam:
Pi Cam's are typically set to infinty focus at the factory and glued in place. Be patient and remove any obvious glue in between the lens and square lens mount, then fit it securely in the housing.
Use a focusing tool such as this one:
https://www.thingiverse.com/thing:1570865
to turn it clockwise. Make a quarter turn then test, repeat until happy. I recommend you have the head in the middle of the bed and hold the camera at the edge for your tests.
Comments:
There are many clones and vendors out there so dimensions will vary. I used the official Pi Cam 1 & 2 mechanical drawings, if yours does not fit, please let me know. I am not promising to fix it, I just will try to come up with a relaxed fit design.
Files
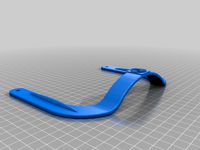
Bracket - Version 1 of the mount. Use this one if you do not need extra clearance.
Bracket Style 2 - A special version of the bracket for extra clearance.
Housing Front - PiCam 1 front housing
Housing Back - PiCam 1 rear housing
P2 Front housing - Fits standard PiCam 2
P2 Rear housing flipped - For a strange version of the PiCam that has front camera flipped 180 degrees.
PiCam 2 rear housing - Rear housing for PiCam 2 and PiCam 2 flipped
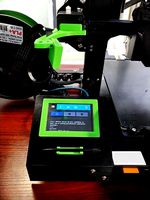
Raspberry Pi & Touchscreen
If you have an RPi with touch screen mounted on the left and need even more clearance, try this very nice derivative mount by Tronnic :
https://www.thingiverse.com/thing:3030160
Please note that I've specifically allowed this derivative and exempted it from the restrictions of my creative commons license.
Please use CHEP's Cura profiles linked below. I no longer use Simplify 3D and have no settings beyond layer height and speed.
IMPORTANT!!!!!!!!!
TEST FIT THE CASE BEFORE INSTALLING THE CAMERA OR YOU MAY BREAK IT. THE COVER SHOULD SLIDE ON WITH SOME RESISTANCE. IF IT IS TOO HARD YOU NEED TO CALIBRATE YOUR PRINER. REMOVE AND REINSTALL THE COVER 3 OR 4 TIMES TO MAKE SURE EVERYTHING FITS.
The case has many small features and tolerances need to be tight. I've had a few people complaining about tight tolerances and difficult fitment. Some of you even feel it is ok to be angry with me.
Your printer must be properly calibrated for proper fitment. In most cases this is simply a matter of adjusting the flow rate in your slicer. I would recommend a full calibration but this may be hard for those of you who are uncomfortable with compiling and flashing Marlin. This can be especially difficult on an Ender 3.
That being said you can probably get very close to perfection by adjusting the flow rate for every filament brand you get. Yes every brand. Despite their accuracy claims filament widths can vary wildly. I remember one roll varied from 1.6 to 1.9. Couldn't understand why my prints weren't working until I measured it in several places.
How to calibrate your flow rate for accurately sized prints
If you don't have digital callipers, you can always start by reducing your flow rate to 90% (or .9 in S3D) and see how that works.
This is probably the easiest Ender 3 based guide I've seen:
https://www.youtube.com/watch?v=3yIebnVjADM
Introduction
The Ender 3 features a new molded plastic cap for the X-axis stepper motor that replaces the previous acrylic one. This obsoletes previous mounts so I designed a new one I hope you will like.
Design goals:
Create a solid mount that is easy to attach and remove
Minimize printing time
Keep hardware requirements to a minimum
Create a solid Pi Cam housing that allows the focus to be set without ripping the base off
Hardware required:
Pi Cam 1, 2, or 2.1 (Be sure to use proper camera housing))
M3 15mm housing mounting bolt
M3 15mm arm locking bolt (optional)
Building:
Attach the mount by hooking the right corner first and then clipping the left one on. You can slide the whole assembly up and down to adjust height, I installed mine in the middle.
The fit should be very tight but i've included a 15mm M4 bolt hole in the spring arm to secure it in place if you wish.
Mounting the Pi Cam:
Pi Cam camera sensors are attached with a flex cable and self adhesive glue, which Makes for unpredictable fitment. I recommend that you do not stick the sensor to the back or at least separate it before you insert it into the case so that it can line up with the built in sensor frame. The point of the tight frame is to provide support so it does not get twisted off the base when you focus it, which you will have to do.
Focusing the Pi Cam:
Pi Cam's are typically set to infinty focus at the factory and glued in place. Be patient and remove any obvious glue in between the lens and square lens mount, then fit it securely in the housing.
Use a focusing tool such as this one:
https://www.thingiverse.com/thing:1570865
to turn it clockwise. Make a quarter turn then test, repeat until happy. I recommend you have the head in the middle of the bed and hold the camera at the edge for your tests.
Comments:
There are many clones and vendors out there so dimensions will vary. I used the official Pi Cam 1 & 2 mechanical drawings, if yours does not fit, please let me know. I am not promising to fix it, I just will try to come up with a relaxed fit design.
Files
Bracket - Version 1 of the mount. Use this one if you do not need extra clearance.
Bracket Style 2 - A special version of the bracket for extra clearance.
Housing Front - PiCam 1 front housing
Housing Back - PiCam 1 rear housing
P2 Front housing - Fits standard PiCam 2
P2 Rear housing flipped - For a strange version of the PiCam that has front camera flipped 180 degrees.
PiCam 2 rear housing - Rear housing for PiCam 2 and PiCam 2 flipped
Raspberry Pi & Touchscreen
If you have an RPi with touch screen mounted on the left and need even more clearance, try this very nice derivative mount by Tronnic :
https://www.thingiverse.com/thing:3030160
Please note that I've specifically allowed this derivative and exempted it from the restrictions of my creative commons license.
Similar models
thingiverse
free

Raspberry Pi Camera v2.1 Sleeve GoPro Mount by FullApature
...ats a concern of yours, again it will print fine without supports.
i printed with a brim since there isn't much surface area.
thingiverse
free

Raspberry Pi Infrared Camera Housing by strobel1x
...nt long bracket of this: https://www.thingiverse.com/thing:2886101.
the camera i'm using is this one: https://amzn.to/3dfcmdg
thingiverse
free

Sleeve Case for Raspberry Pi 2/B+ with Camera (remix) by galaxius
...ters, 3 top/bottom solid layers, 20% infill, supports as shown in the pic. the cap was printed with 2 perimeter and solid infill.
thingiverse
free

Ender 5 Pi Cam Mount
... read it at the link i left before. please note that there are no holes in the mount to connect to the case, i drilled it myself.
thingiverse
free

Ender 3 Raspberry Pi 3 Mount by derick90
...ngiverse.com/thing:4441076
added camera cable cut out to case.
i used supports when for camera slot since the tolerance is tight.
thingiverse
free

Skeletal ArduCam AutoFocus Pi Cam Cover by SerenityRanch
...f the "gopro-type" mounting arms, etc, can be found at hamker's make page:https://www.thingiverse.com/thing:2842300
thingiverse
free
Ender 3 Pi Cam Handle - Longer, Taller, Stiffer--GZ-Remix
...line -flat up)
2) & used supports
! ! warning ! !
1) test print the splineplate to ensure it fits the arms you're using.
thingiverse
free

Ender 3 - X-axis Pi Cam (v2) mount (camera re-positioned) by Taomyn
...am, so i remix the case from ender 3 pi cam mount by bartpla and used the ball-connector from this design to allow it to connect.
thingiverse
free

Pi Cam Mount Extension
...and this bed mount: https://www.thingiverse.com/thing:3547139
i printed at 65mm/s on ender 3 pro, it took around 45 mins or less.
thingiverse
free

My-Pi and camera case by paulcox
... on your printer, you will need to adjust the spacing tolerance for more/less of a tight fit around the board and its components.
Modmike
thingiverse
free

AUSDOM AW335 Shroud Pi Cam Mount by Nmiller77505
...shroud pi cam mount by nmiller77505 thingiverse remixed from modmike#39;s ender 3 pi cam model. retrofitted to mount an...
thingiverse
free

Camera holder for Waveshare 10299 RPi Camera (F) by Dream_Design_Print
...printing. this holder is made for the holder from modmike ...
thingiverse
free
Ender 3 X Axis GoPro Mount by SynJa
...by synja thingiverse this is a simple remix of modmike#39;s pi mount to accept gopro style prong mounts, i.e....
thingiverse
free

Auto-Level Mounts for Ender 3, CR-10, Tevo, etc. by Modmike
...nu back to first screen
lets double check our work:
13) g28 - home printer
14) g1 z0
15) now test your paper again.
you are done!
thingiverse
free

CR10V2 X-axis mount for picam v2 by schmooot
...me do it for some reason. so sorry modmike. https://www.thingiverse.com/modmikedesigns the arm has a flat spot right near the...
thingiverse
free

Creality Ender 3 Pi Cam Mount (with Neopixel Stick bracket) by 877
...bracket) by 877 thingiverse description this is remix of modmike great design found here: https://www.thingiverse.com/thing:2886101 i added support for...
thingiverse
free

Creality Ender 3 Pi Cam Extender Arm by SFLeBrun
...with the creality ender 3 pi cam mount by modmike which works good on my ender 3 pro with...
thingiverse
free

Pi Camera Arm With Cable Chain Clip
...was used from this file-https://www.thingiverse.com/thing:3781016 or you can use modmike camera case found here - https://www.thingiverse.com/thing:2886101 my file is...
thingiverse
free
Creality Ender / CR-6 SE Octopi Touchscreen Case & Mount by MaximumDude
...the pi camera body and mounting arm from michael (modmike triffon's creality ender 3 pi cam mount which fit...
Creality
turbosquid
$7

filament roller single print creality
...del filament roller single print creality for download as stl on turbosquid: 3d models for games, architecture, videos. (1619309)
3d_export
free

Creality ender enclosure webcam mount
...e creality enclosure. sure is better than a tripod. change it up if it helps. i printed pla with 50% infill on my dd ender 3 pro.
3d_export
free

ender 3 frame cavity covers
...3 inserts,<br>made these inserts for the framework of the creality ender 3 - makes it look a bit more...
3d_export
$42

excavator
...width is the original size. 0.12 mm printing surface creality ender-5...
3d_export
free

ender 3 3d print bed clips
...glass bed + normal aluminium bed frame of the creality ender 3 = 6mm (b) these clips are designed...
3d_export
free

ender 3 enclosure corners
...that i could build my enclosure frame for my creality ender 3 - so i printed them in a...
thingiverse
free

Toolbox Creality
...ingiverse
this is a toolbox for tools that comes with creality printers, with a guide to cut capricorn ptfe with a cutter blade.
thingiverse
free

Creality Hotend Plate
... from creality themselves as the ender 3 is open source. this means i did not create this design and all credit goes to creality.
thingiverse
free
Creality Cat by alexander125
...creality cat by alexander125
thingiverse
this is the cat that comes on the sd card for all creality 3d printers.
thingiverse
free

Creality Dog by alexander125
...creality dog by alexander125
thingiverse
this is the dog that comes on the sd card for all creality 3d printers.
Cam
archibase_planet
free

Cam
...cam
archibase planet
tv camera equipment
cam dolly - 3d model (*.gsm+*.3ds) for interior 3d visualization.
3d_export
$8

Cam and Follower
...ry to linear (reciprocating) motion. as the cam rotates, the follower rises and falls in a process known as reciprocating motion.
3d_ocean
$15
Studio Cam
...p. made in 3ds max 2013 1- 3dsmax with vray render included material and light 2- obj file 3- fbx file hope you like it please...
3d_export
$37

thermal cam
...thermal cam
3dexport
turbosquid
$19
Security cam
...oyalty free 3d model security cam for download as ige and obj on turbosquid: 3d models for games, architecture, videos. (1331128)
turbosquid
$40
Security Cam
...y free 3d model security cam for download as ma, fbx, and obj on turbosquid: 3d models for games, architecture, videos. (1601103)
3d_export
$40
security cam
...security cam
3dexport
home security camera
turbosquid
$280

cam-bot
... available on turbo squid, the world's leading provider of digital 3d models for visualization, films, television, and games.
turbosquid
$33

AT_minivan_(CAM)
... available on turbo squid, the world's leading provider of digital 3d models for visualization, films, television, and games.
turbosquid
$10

Security Cam
... available on turbo squid, the world's leading provider of digital 3d models for visualization, films, television, and games.
Ender
3ddd
$1

Enders / Elegance
...enders / elegance
3ddd
обогреватель
уличный газовый обогреватель enders elegance
высота: 2200 мм
3d_export
free
ender 3 frame cavity covers
... of the creality ender 3 - makes it look a bit more attractive it just slides into the open channels of the aluminium framework
turbosquid
$1

pen support for ender 3
...y free 3d model pen support for ender 3 for download as blend on turbosquid: 3d models for games, architecture, videos. (1611282)
3d_ocean
$9

Ender Dragon Minecraft
...ojang obj poly videogames
ender dragon minecraft created with cinema 4d r15 formats included: max 2013 – fbx 2012 – c4d r15 – obj
3d_export
free
Creality ender enclosure webcam mount
...e creality enclosure. sure is better than a tripod. change it up if it helps. i printed pla with 50% infill on my dd ender 3 pro.
3d_export
free
ender 3 enclosure corners
...er corners and 4 upper corners, using 25mmx25mm angled aluminium pieces that gets covered on inside of the frame with plexiglass
3d_export
free
ender 3 3d print bed clips
...ed + normal aluminium bed frame of the creality ender 3 = 6mm (b) these clips are designed for glass plate + aluminium bed = 4mm
3d_export
$5

GRUMPY CAT
...grumpy cat 3dexport grumpy cat to print in ender ...
3d_export
$5

Logs fire
...with one multi material for corona and vray r ender. albedo, normal, uvmap, roughness format jpg 4096x4096 models:...
3d_export
$42
excavator
...is the original size. 0.12 mm printing surface creality ender5 ...
Pi
design_connected
$11

Pi
...pi
designconnected
ligne roset pi chairs computer generated 3d model. designed by thibault desombre.
3d_export
$5

raspberry pi
...raspberry pi
3dexport
carcasa para la raspberry pi
turbosquid
$18

pied
... available on turbo squid, the world's leading provider of digital 3d models for visualization, films, television, and games.
3ddd
$1

Emme pi light
...emme pi light
3ddd
emme pi light
люста emme pi light
3ddd
$1

Emme pi light
...emme pi light
3ddd
emme pi light
бра классическое emme pi light
3ddd
$1

Emme Pi Light
...emme pi light
3ddd
emme pi light
3ddd
$1

Emme Pi Light
...emme pi light
3ddd
emme pi light
design_connected
$16

Pi-Air
...pi-air
designconnected
living divani pi-air lounge chairs computer generated 3d model. designed by harry & camila.
3d_ocean
$15

Manneken Pis
...picting a naked little boy urinating into a fountain’s basin. (wikipedia) the model was sculpted in blender 2.70a rendered wit...
3ddd
$1

Emme pi light
...emme pi light
3ddd
emme pi light
люстра классическая фирма: emme pi light
артикул: 3595/5/cot/12/wh
Mount
3d_export
free

mounting bracket
...mounting plate is the portion of a hinge that attaches to the wood. mounting plates can be used indoors, cabinetry and furniture.
turbosquid
$2

MOUNTING
... available on turbo squid, the world's leading provider of digital 3d models for visualization, films, television, and games.
turbosquid
free

Mounts
... available on turbo squid, the world's leading provider of digital 3d models for visualization, films, television, and games.
turbosquid
free

Mount Fuji
...fuji
turbosquid
free 3d model mount fuji for download as obj on turbosquid: 3d models for games, architecture, videos. (1579977)
3d_export
$5

Headphone mount LR
...headphone mount lr
3dexport
headphone mount l+r
turbosquid
$39

Mount rainier
...quid
royalty free 3d model mount rainier for download as fbx on turbosquid: 3d models for games, architecture, videos. (1492586)
turbosquid
$5

pipe mounting
...quid
royalty free 3d model pipe mounting for download as obj on turbosquid: 3d models for games, architecture, videos. (1293744)
turbosquid
$3

Mounting Tires
...uid
royalty free 3d model mounting tires for download as fbx on turbosquid: 3d models for games, architecture, videos. (1708511)
3d_export
$5

Magnetic GoPro Mount
...pro mount
3dexport
cool magnetic mount for gopro. allows you to mount the camera on flat metal surfaces and get exclusive shots.
turbosquid
$5

Stone Mount
...ty free 3d model stone mount for download as ma, obj, and fbx on turbosquid: 3d models for games, architecture, videos. (1370306)
3
turbosquid
$10

Mountain Bike 3 -3 of 3
...model mountain bike 3 (#3 of 3) for download as fbx and blend on turbosquid: 3d models for games, architecture, videos. (1438752)
turbosquid
$6

Rock 3-3
...urbosquid
royalty free 3d model rock 3-3 for download as obj on turbosquid: 3d models for games, architecture, videos. (1628065)
turbosquid
$29

Books 150 pieces 3-3-3
...books 150 pieces 3-3-3 for download as max, obj, fbx, and stl on turbosquid: 3d models for games, architecture, videos. (1384033)
turbosquid
$3

Genesis 3 Clothing 3
... available on turbo squid, the world's leading provider of digital 3d models for visualization, films, television, and games.
3d_export
$5

hinge 3
...hinge 3
3dexport
hinge 3
3ddd
$1

Розетка 3
...розетка 3
3ddd
розетка
розетка 3
turbosquid
$50

is-3
... available on turbo squid, the world's leading provider of digital 3d models for visualization, films, television, and games.
turbosquid
$10

Mountain Bike 3 -2 of 3
...model mountain bike 3 (#2 of 3) for download as fbx and blend on turbosquid: 3d models for games, architecture, videos. (1438750)
turbosquid
$10

Mountain Bike 1 -3 of 3
...model mountain bike 1 (#3 of 3) for download as fbx and blend on turbosquid: 3d models for games, architecture, videos. (1438743)
3d_export
$5

3 CATS
...3 cats
3dexport
3 cats pen holder