Thingiverse
Creality CR-6 SE Power Off Autoswitch by ThingsDesigner
by Thingiverse
Last crawled date: 3 years, 4 months ago
Für Deutsch bitte nach unten scrollen.
Automatic switch-off after printing, the simplest solution for the CR-6.
This is the useful accessory that is missing from the Creality CR-6 SE. A simple device to automatically turn off the printer after printing has finished.
If you don't trust yourself to solder this cable yourself, because you are working on a live cable, you can also buy a pre-assembled power cable in my shop, which is easy to attach without risk. Link is here:
http://www.keng.de/shop/product_info.php?products_id=18112
I do not assume any liability or guarantee for these self-assembly instructions. Everyone who works on live cables should be aware of the risk and what they are doing. Everything here is done at your own risk!
There are many expensive solutions out there involving relays, crafts, and accessories. This, on the other hand, is simple, inexpensive and quick to implement.
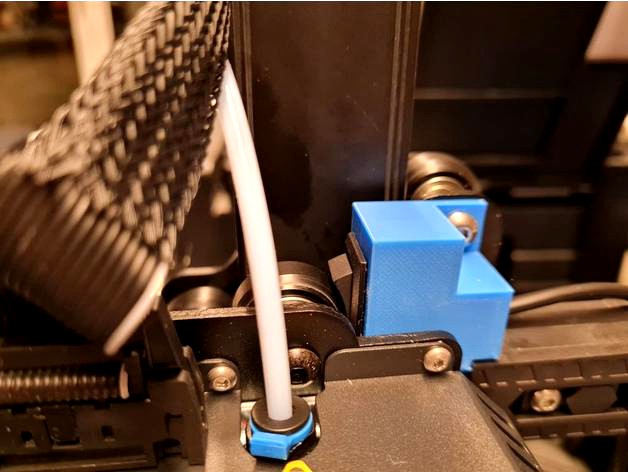
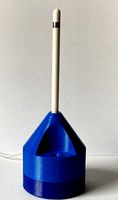
The idea behind it all was to put the on/off switch on the printer where it can turn itself off. The best place then turned out to be a point to the right of the X-axis that the printing carriage cannot normally reach due to the software end stops. This position is also more accessible for turning the printer on and off manually.
There are two possible solutions that I have already successfully implemented:
1) A modified power cable, which is connected instead of the supplied cable. This does not change anything on the printer itself and you can buy it in my shop, see above.
2) A short power cable, which is also connected to the on/off switch of the printer and can take over its task elsewhere. This solution is described below.
We need:
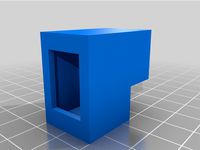
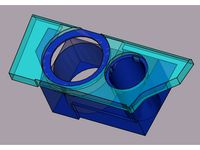
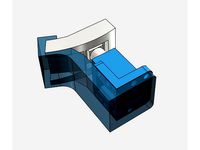
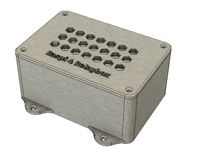
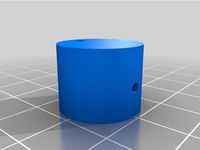
The housing from the STL here (please turn it in the slicer by 90 °, support is not necessary)
An approx. 60 cm long flat power cable (H03VV-F according to DIN VDE 0281)
An on/off switch (rocker switch) for 220V (e.g. from an old PC power supply, 21x15mm / 19x13mm)
Two matching cable lugs with lugs for connection to the existing switch
Soldering accessories and a steady hand
Method:
First the existing power cable is pulled out of the printer and the device is de-energized.
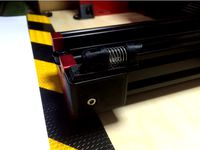
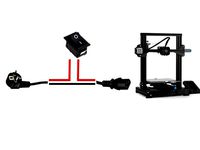
The two Allen screws that attach the housing with the on/off switch and power socket to the printer are loosened and the housing is carefully pulled forward. Now you can see two red wires going to the switch. Our additional cable is attached to this two wires. I decided on a solution with flat plugs with a branch, then I can still use the old switch. But you can also connect the new cable only with the two red cables and thus put the old switch out of operation, as you like.
On the other side, the cable is pulled through the new housing and soldered to the new switch (attach the switch with 0 down). The hole above the old switch, where the connection cable for the second Z-axis motor is also fed through, is the ideal cable passage.
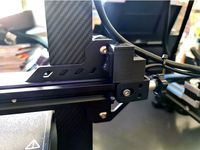
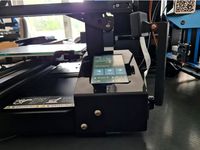
Now the new switch only needs to be attached to the X-axis at the top right. To do this, loosen the screw, ideally put an Allen key through it from the other side so that the roll holder does not fall apart, attach the switch and screw everything tight again.
So that the printer now switches itself off after printing, the G-code in the slicer has to be adjusted a little:
Here is my attitude towards Cura:
In the device settings for Cura, insert the following in the section "End G code" above the last command "M84 X Y E":
; Auto-OFF
G4 S120; Pause 120 sec.
G28 X; Home X for safety
M211 S0; SW end stop off
G1 X256; goto power-off position
; If not powered off:
M211 S1; SW end stop on
The entire end of G-code then looks like this:
G91; Relative positioning
G1 E-2 F2700; Retract a bit
G1 E-2 Z0.2 F2400; Retract and raise Z
G1 X5 Y5 F3000; Wipe out
G1 Z10; Raise Z more
G90; Absolute positionning
G1 X0 Y {machine_depth}; Present print
M106 S0; turn-off fan
M104 S0; Turn-off hotend
M140 S0; turn-off cond
; Auto-OFF
G4 S120; Pause 120 sec.
G28 X; Home X for safety
M211 S0; SW end stop off
G1 X256; goto power-off position
; If not powered off:
M211 S1; SW end stop on
M84 X Y E; Disable all steppers but Z
If necessary, the command G1 X256 must be adjusted somewhat if the printer does not hit the switch correctly (manufacturing tolerance) or if the whole thing is used with a different printer. Since the software end stops are deactivated, you should be particularly careful here, otherwise it will literally crash.
If everything has been done correctly, you can leave the old on/off switch in the 0 position and only switch the printer on and off with the new switch.
If you don't want the printer to switch itself off every time, e.g. because you sit next to it and want to start a new print immediately, then you can simply turn on the old switch and the printer will always stay on.
I hope you like this simple solution and that it finds many users.
DEUTSCH:
Automatisches Ausschalten nach dem Druckvorgang, die einfachste Lösung für den CR-6.
Dies ist das nützliche Zubehör, was beim Creality CR-6 SE fehlt. Eine einfache Vorrichtung, um den Drucker nach Beenden des Druckvorgangs automatisch auszuschalten.
Wer sich nicht zutraut, dieses Kabel selbst anzulöten, da man ja an einem stromführenden Kabel arbeitet, der kann auch in meinem Shop ein fertig konfektioniertes Stromkabel kaufen, welches ohne Risiko und einfach anzubringen ist. Link ist hier:
http://www.keng.de/shop/product_info.php?products_id=18112
Für diese Selbstbauanleitung hier übernehme ich keinerlei Haftung oder Garantie. Jeder, der an stromführenden Kabeln arbeitet, sollte sich des Risikos bewusst sein und wissen, was er macht. Alles hier geschieht auf eigene Gefahr!
Es gibt viele teure Lösungen mit Relais, Bastelarbeit und Zubehör. Diese hier dagegen ist einfach und preiswert und auch schnell umzusetzen.
Die Idee hinter dem ganzen war, den Ein-/Ausschalter dort am Drucker anzubringen, wo er sich selbst ausschalten kann. Als bester Platz hat sich dann eine Stelle rechts an der X-Achse herausgestellt, die der Druckschlitten normalerweise durch die Software-Endstops nicht erreichen kann. Diese Position ist auch besser zum manuellen Ein- und Ausschalten des Druckers erreichbar.
Hiefür gibt es zwei Lösungswege, die ich schon erfolgreich umgesetzt habe:
1) Ein modifiziertes Stromkabel, welches anstelle des mitgielieferten Kabels angeschlossen wird. Dies verändert nichts am Drucker selbst und man kann es bei mir im Shop kaufen, s.o..
2) Ein kurzes Stromkabel, welches an den Ein-/Ausschalter des Druckers zusätzlich angeschlossen wird und dessen Aufgabe an anderer Stelle übernehmen kann. Dies Lösung wird im folgenden beschrieben.
Wir benötigen:
Das Gehäuse von der STL hier (bitte im Slicer um 90° drehen, Support ist nicht nötig)
Ein ca. 60 cm langes flaches Stromkabel (H03VV-F nach DIN VDE 0281)
Einen Ein-/Ausschalter (Wippschalter) für 220V (z.B. von einem alten PC-Netzteil, 21x15mm / 19x13mm)
Zwei passende Kabelschuhe mit Lasche zum Anschluss an den vorhandenen Schalter
Löt-Zubehör und eine ruhige Hand
Vorgehensweise:
Zuerst wird das vorhandene Stromkabel aus dem Drucker gezogen und das Gerät stromlos gemacht.
Die zwei Imbus-Schrauben, die das Gehäuse mit dem Ein-/Ausschalter und Strombuchse am Drucker befestigen werden gelöst und das Gehäuse vorsichtig nach vorne gezogen. Jetzt sieht man zwei rote Kabel, die zum Schalter gehen. An diese Kabel wird unser zusätzliches Kabel befestigt. Ich habe mich für eine Lösung mit Flachsteckern mit Abzweig entschieden, dann kann ich den alten Schalter noch zusätzlich benutzen. Man kann aber auch das neue Kabel nur mit den zwei roten Kabeln verbinden und den alten Schalter somit außer Betrieb setzen, wie es einem beliebt.
Auf der anderen Seite wird das Kabel durch das neue Gehäuse gezogen und an den neuen Schalter angelötet (den Schalter mit 0 nach unten anbringen). Als Kabeldurchgang bietet sich das Loch oberhalb des alten Schalters an, wo auch das Anschlußkabel für den zweiten Z-Achsenmotor durchgeführt wird.
Jetzt muss der neue Schalter nur noch oben rechts an der X-Achse befestigt werden. Hierzu die Schraube lösen, am besten von der anderen Seite einen Imbußschlüssel durchstecken, damit die Rollenhalterung nicht auseinanderfällt, den Schalter anbringen und alles wieder fest schrauben.
Damit der Drucker sich nach dem Druck jetzt selbst ausschaltet, muss noch der G-Code im Slicer etwas angepasst werden:
Hier meine Einstellung für Cura:
In den Geräteeinstellungen für Cura fügt man in der Sektion "Ende G-Code" über dem letzten Befehl "M84 X Y E" folgendes ein:
; Auto-OFF
G4 S120 ; Pause 120 sec.
G28 X ; Home X for safety
M211 S0 ; SW-Endstop off
G1 X256 ; goto Power-Off-Position
; If not powered off:
M211 S1; SW end stop on
Der gesamte Ende G-Code sieht dann folgendermaßen aus:
G91 ;Relative positioning
G1 E-2 F2700 ;Retract a bit
G1 E-2 Z0.2 F2400 ;Retract and raise Z
G1 X5 Y5 F3000 ;Wipe out
G1 Z10 ;Raise Z more
G90 ;Absolute positionning
G1 X0 Y{machine_depth} ;Present print
M106 S0 ;Turn-off fan
M104 S0 ;Turn-off hotend
M140 S0 ;Turn-off bed
; Auto-OFF
G4 S120 ; Pause 120 sec.
G28 X ; Home X for safety
M211 S0 ; SW-Endstop off
G1 X256 ; goto Power-Off-Position
; If not powered off:
M211 S1 ; SW-Endstop on
M84 X Y E ;Disable all steppers but Z
Der Befehl G1 X256 ist nötigenfalls etwas anzupassen, falls der Drucker den Ausschalter nicht richtig trifft (Fertigungstoleranz) oder das ganze bei einem anderen Drucker eingesetzt wird. Da die Software-Endstops deaktiviert sind, sollte man hier besonders aufpassen, sonst kracht es im wahrsten Sinne des Wortes.
Wenn alles richtig gemacht wurde kann man den alten Ein-/Ausschalter in der 0-Stellung belassen und schaltet den Drucker nur noch mit dem neuen Schalter Ein und Aus.
Wenn man nicht möchte, dass sich der Drucker jedes mal selbst ausschaltet, weil man z.B. daneben sitzt und sofort einen neuen Druck starten möchte, dann kann man den alten Schalter einfach ebenfalls einschalten und der Drucker bleibt immer an.
Ich hoffe, diese simple Lösung gefällt und findet viele Nutzer.
Automatic switch-off after printing, the simplest solution for the CR-6.
This is the useful accessory that is missing from the Creality CR-6 SE. A simple device to automatically turn off the printer after printing has finished.
If you don't trust yourself to solder this cable yourself, because you are working on a live cable, you can also buy a pre-assembled power cable in my shop, which is easy to attach without risk. Link is here:
http://www.keng.de/shop/product_info.php?products_id=18112
I do not assume any liability or guarantee for these self-assembly instructions. Everyone who works on live cables should be aware of the risk and what they are doing. Everything here is done at your own risk!
There are many expensive solutions out there involving relays, crafts, and accessories. This, on the other hand, is simple, inexpensive and quick to implement.
The idea behind it all was to put the on/off switch on the printer where it can turn itself off. The best place then turned out to be a point to the right of the X-axis that the printing carriage cannot normally reach due to the software end stops. This position is also more accessible for turning the printer on and off manually.
There are two possible solutions that I have already successfully implemented:
1) A modified power cable, which is connected instead of the supplied cable. This does not change anything on the printer itself and you can buy it in my shop, see above.
2) A short power cable, which is also connected to the on/off switch of the printer and can take over its task elsewhere. This solution is described below.
We need:
The housing from the STL here (please turn it in the slicer by 90 °, support is not necessary)
An approx. 60 cm long flat power cable (H03VV-F according to DIN VDE 0281)
An on/off switch (rocker switch) for 220V (e.g. from an old PC power supply, 21x15mm / 19x13mm)
Two matching cable lugs with lugs for connection to the existing switch
Soldering accessories and a steady hand
Method:
First the existing power cable is pulled out of the printer and the device is de-energized.
The two Allen screws that attach the housing with the on/off switch and power socket to the printer are loosened and the housing is carefully pulled forward. Now you can see two red wires going to the switch. Our additional cable is attached to this two wires. I decided on a solution with flat plugs with a branch, then I can still use the old switch. But you can also connect the new cable only with the two red cables and thus put the old switch out of operation, as you like.
On the other side, the cable is pulled through the new housing and soldered to the new switch (attach the switch with 0 down). The hole above the old switch, where the connection cable for the second Z-axis motor is also fed through, is the ideal cable passage.
Now the new switch only needs to be attached to the X-axis at the top right. To do this, loosen the screw, ideally put an Allen key through it from the other side so that the roll holder does not fall apart, attach the switch and screw everything tight again.
So that the printer now switches itself off after printing, the G-code in the slicer has to be adjusted a little:
Here is my attitude towards Cura:
In the device settings for Cura, insert the following in the section "End G code" above the last command "M84 X Y E":
; Auto-OFF
G4 S120; Pause 120 sec.
G28 X; Home X for safety
M211 S0; SW end stop off
G1 X256; goto power-off position
; If not powered off:
M211 S1; SW end stop on
The entire end of G-code then looks like this:
G91; Relative positioning
G1 E-2 F2700; Retract a bit
G1 E-2 Z0.2 F2400; Retract and raise Z
G1 X5 Y5 F3000; Wipe out
G1 Z10; Raise Z more
G90; Absolute positionning
G1 X0 Y {machine_depth}; Present print
M106 S0; turn-off fan
M104 S0; Turn-off hotend
M140 S0; turn-off cond
; Auto-OFF
G4 S120; Pause 120 sec.
G28 X; Home X for safety
M211 S0; SW end stop off
G1 X256; goto power-off position
; If not powered off:
M211 S1; SW end stop on
M84 X Y E; Disable all steppers but Z
If necessary, the command G1 X256 must be adjusted somewhat if the printer does not hit the switch correctly (manufacturing tolerance) or if the whole thing is used with a different printer. Since the software end stops are deactivated, you should be particularly careful here, otherwise it will literally crash.
If everything has been done correctly, you can leave the old on/off switch in the 0 position and only switch the printer on and off with the new switch.
If you don't want the printer to switch itself off every time, e.g. because you sit next to it and want to start a new print immediately, then you can simply turn on the old switch and the printer will always stay on.
I hope you like this simple solution and that it finds many users.
DEUTSCH:
Automatisches Ausschalten nach dem Druckvorgang, die einfachste Lösung für den CR-6.
Dies ist das nützliche Zubehör, was beim Creality CR-6 SE fehlt. Eine einfache Vorrichtung, um den Drucker nach Beenden des Druckvorgangs automatisch auszuschalten.
Wer sich nicht zutraut, dieses Kabel selbst anzulöten, da man ja an einem stromführenden Kabel arbeitet, der kann auch in meinem Shop ein fertig konfektioniertes Stromkabel kaufen, welches ohne Risiko und einfach anzubringen ist. Link ist hier:
http://www.keng.de/shop/product_info.php?products_id=18112
Für diese Selbstbauanleitung hier übernehme ich keinerlei Haftung oder Garantie. Jeder, der an stromführenden Kabeln arbeitet, sollte sich des Risikos bewusst sein und wissen, was er macht. Alles hier geschieht auf eigene Gefahr!
Es gibt viele teure Lösungen mit Relais, Bastelarbeit und Zubehör. Diese hier dagegen ist einfach und preiswert und auch schnell umzusetzen.
Die Idee hinter dem ganzen war, den Ein-/Ausschalter dort am Drucker anzubringen, wo er sich selbst ausschalten kann. Als bester Platz hat sich dann eine Stelle rechts an der X-Achse herausgestellt, die der Druckschlitten normalerweise durch die Software-Endstops nicht erreichen kann. Diese Position ist auch besser zum manuellen Ein- und Ausschalten des Druckers erreichbar.
Hiefür gibt es zwei Lösungswege, die ich schon erfolgreich umgesetzt habe:
1) Ein modifiziertes Stromkabel, welches anstelle des mitgielieferten Kabels angeschlossen wird. Dies verändert nichts am Drucker selbst und man kann es bei mir im Shop kaufen, s.o..
2) Ein kurzes Stromkabel, welches an den Ein-/Ausschalter des Druckers zusätzlich angeschlossen wird und dessen Aufgabe an anderer Stelle übernehmen kann. Dies Lösung wird im folgenden beschrieben.
Wir benötigen:
Das Gehäuse von der STL hier (bitte im Slicer um 90° drehen, Support ist nicht nötig)
Ein ca. 60 cm langes flaches Stromkabel (H03VV-F nach DIN VDE 0281)
Einen Ein-/Ausschalter (Wippschalter) für 220V (z.B. von einem alten PC-Netzteil, 21x15mm / 19x13mm)
Zwei passende Kabelschuhe mit Lasche zum Anschluss an den vorhandenen Schalter
Löt-Zubehör und eine ruhige Hand
Vorgehensweise:
Zuerst wird das vorhandene Stromkabel aus dem Drucker gezogen und das Gerät stromlos gemacht.
Die zwei Imbus-Schrauben, die das Gehäuse mit dem Ein-/Ausschalter und Strombuchse am Drucker befestigen werden gelöst und das Gehäuse vorsichtig nach vorne gezogen. Jetzt sieht man zwei rote Kabel, die zum Schalter gehen. An diese Kabel wird unser zusätzliches Kabel befestigt. Ich habe mich für eine Lösung mit Flachsteckern mit Abzweig entschieden, dann kann ich den alten Schalter noch zusätzlich benutzen. Man kann aber auch das neue Kabel nur mit den zwei roten Kabeln verbinden und den alten Schalter somit außer Betrieb setzen, wie es einem beliebt.
Auf der anderen Seite wird das Kabel durch das neue Gehäuse gezogen und an den neuen Schalter angelötet (den Schalter mit 0 nach unten anbringen). Als Kabeldurchgang bietet sich das Loch oberhalb des alten Schalters an, wo auch das Anschlußkabel für den zweiten Z-Achsenmotor durchgeführt wird.
Jetzt muss der neue Schalter nur noch oben rechts an der X-Achse befestigt werden. Hierzu die Schraube lösen, am besten von der anderen Seite einen Imbußschlüssel durchstecken, damit die Rollenhalterung nicht auseinanderfällt, den Schalter anbringen und alles wieder fest schrauben.
Damit der Drucker sich nach dem Druck jetzt selbst ausschaltet, muss noch der G-Code im Slicer etwas angepasst werden:
Hier meine Einstellung für Cura:
In den Geräteeinstellungen für Cura fügt man in der Sektion "Ende G-Code" über dem letzten Befehl "M84 X Y E" folgendes ein:
; Auto-OFF
G4 S120 ; Pause 120 sec.
G28 X ; Home X for safety
M211 S0 ; SW-Endstop off
G1 X256 ; goto Power-Off-Position
; If not powered off:
M211 S1; SW end stop on
Der gesamte Ende G-Code sieht dann folgendermaßen aus:
G91 ;Relative positioning
G1 E-2 F2700 ;Retract a bit
G1 E-2 Z0.2 F2400 ;Retract and raise Z
G1 X5 Y5 F3000 ;Wipe out
G1 Z10 ;Raise Z more
G90 ;Absolute positionning
G1 X0 Y{machine_depth} ;Present print
M106 S0 ;Turn-off fan
M104 S0 ;Turn-off hotend
M140 S0 ;Turn-off bed
; Auto-OFF
G4 S120 ; Pause 120 sec.
G28 X ; Home X for safety
M211 S0 ; SW-Endstop off
G1 X256 ; goto Power-Off-Position
; If not powered off:
M211 S1 ; SW-Endstop on
M84 X Y E ;Disable all steppers but Z
Der Befehl G1 X256 ist nötigenfalls etwas anzupassen, falls der Drucker den Ausschalter nicht richtig trifft (Fertigungstoleranz) oder das ganze bei einem anderen Drucker eingesetzt wird. Da die Software-Endstops deaktiviert sind, sollte man hier besonders aufpassen, sonst kracht es im wahrsten Sinne des Wortes.
Wenn alles richtig gemacht wurde kann man den alten Ein-/Ausschalter in der 0-Stellung belassen und schaltet den Drucker nur noch mit dem neuen Schalter Ein und Aus.
Wenn man nicht möchte, dass sich der Drucker jedes mal selbst ausschaltet, weil man z.B. daneben sitzt und sofort einen neuen Druck starten möchte, dann kann man den alten Schalter einfach ebenfalls einschalten und der Drucker bleibt immer an.
Ich hoffe, diese simple Lösung gefällt und findet viele Nutzer.
Similar models
thingiverse
free

Creality Ender-3 Power Off Autoswitch by ThingsDesigner
...er einfach ebenfalls einschalten und der drucker bleibt immer an.
ich hoffe, diese simple lösung gefällt und findet viele nutzer.
thingiverse
free
Sovol SV01 SV02 SV03 Power Off Autoswitch by ThingsDesigner
...er einfach ebenfalls einschalten und der drucker bleibt immer an.
ich hoffe, diese simple lösung gefällt und findet viele nutzer.
thingiverse
free
BIQU BX Power Off Autoswitch by ThingsDesigner
...er.
deutsche user: bitte, wenn ihr mich unterstützen wollt, schaut doch auch einmal in meinen shophttps://www.3d-arbeitsplatz.de/
thingiverse
free

Oberwagenlaterne by stephanbrunker
... brücke über der öffnung halbwegs sauber gedruckt wird. die druckteile wurden danach abgeschliffen und mit acteon dampfbehandelt.
thingiverse
free

Kabeleinführung by da-Jimbo
...mkabel über einer laminatholzdecke zu haben.
das kabel wird inkl. stecker durch die klappe geführt und über der decke angesteckt.
thingiverse
free
Astra ashtray cover USB Panel / Opel Astra H USB Einsatz für Aschenbecher by DuWeisWer
...footwell.
!expertise and tools are required for the wireing!
!improper installation can lead to injury and damage to the vehicle!
thingiverse
free

Tronxy XY-2 Pro / XY2 Pro Wartungshalter Service Stellung by Flore84
...ht auf den druckerteilen liegt.
für den halterkopf ist eine unterstützung sinnvoll damit die aufnahme für den rahmen besser wird.
thingiverse
free

Cube LED Licht HPA 2000 Steckerschutz und Kabelklemmen by CBiker
...d
dabei vor schmutz geschützt.
waehrend der verwendung der lampe wird die abdeckung zur verwahrung
einfach an das kabel geklippt.
thingiverse
free
Penhalter für Apple Pencil by SirThommes
...ehörkabels (4mm).
so kann man jetzt das kabel seitlich herausführen. ich hoffe, das ich den einen oder anderen damit helfen kann.
thingiverse
free
Euchner CET - Betätiger-Halter by PredatorJr
....
ah-typen sind nur mit dem jeweils angelernten betätiger nutzbar. ch-typen funktionieren mit jedem betätiger der cet-a...-serie.
Autoswitch
thingiverse
free
Sovol SV01 SV02 SV03 Power Off Autoswitch by ThingsDesigner
...er einfach ebenfalls einschalten und der drucker bleibt immer an.
ich hoffe, diese simple lösung gefällt und findet viele nutzer.
thingiverse
free
Creality Ender-3 Power Off Autoswitch by ThingsDesigner
...er einfach ebenfalls einschalten und der drucker bleibt immer an.
ich hoffe, diese simple lösung gefällt und findet viele nutzer.
thingiverse
free

iSocket Autoswitch Under Table Mount
...t for the cables. mirror it horizontally in your slicing program if you want it to point the other direction and show the labels.
thingiverse
free
Dual Block outlet cover with support for Tool/Vac Autoswitch by mikeyroth
...tool/vac autoswitch by mikeyroth
thingiverse
i wanted an outlet cover to support a tool/vac auto switch. here is my design .
thingiverse
free
Autoswitch OFF for Tevo's Black Widow by guss67
.... * message me here
designed in inventor
if you enjoy and want to support my work you can donate me on the link below,
thank you!
thingiverse
free

Sovol SV02 Power Off Autoswitch Rev. by Ilmdruck
... everyone who works on live cables should be aware of the risk and what they are doing. everything here is done at your own risk!
thingiverse
free
BIQU BX Power Off Autoswitch by ThingsDesigner
...er.
deutsche user: bitte, wenn ihr mich unterstützen wollt, schaut doch auch einmal in meinen shophttps://www.3d-arbeitsplatz.de/
Thingsdesigner
thingiverse
free
Sovol SV01 SV02 SV03 Power Off Autoswitch by ThingsDesigner
...er einfach ebenfalls einschalten und der drucker bleibt immer an.
ich hoffe, diese simple lösung gefällt und findet viele nutzer.
thingiverse
free
Creality Ender-3 Power Off Autoswitch by ThingsDesigner
...er einfach ebenfalls einschalten und der drucker bleibt immer an.
ich hoffe, diese simple lösung gefällt und findet viele nutzer.
thingiverse
free

QR Code Cover for Creality Ender-3 by ThingsDesigner
...y ender-3 by thingsdesigner
thingiverse
i don´t like the qr code on my ender-3. so i designed a cover with the ender logo on it.
thingiverse
free

QR Code Cover for Sovol SV01 by ThingsDesigner
...l sv01 by thingsdesigner
thingiverse
i don´t want the qr code, so i replaced it with a cover like i do with my cr-6 and ender-3.
thingiverse
free
Creality CR-6 SE Raspberry Pi 4 Case by ThingsDesigner
...flat on my bed and the back part with cura tree support.
for the camera mount you need two m3 screws and nuts from the grave box.
thingiverse
free

Satsana Remix for Ender 3V2 and Ender 3 with All Metal Hotend, BLTouch / 5015 Fan by ThingsDesigner
...an the normal one (see pictures). so i shortened the satsana as well.
this is a remix ofhttps://www.thingiverse.com/thing:4647053
thingiverse
free
Ender 3 V2 Power Off Auto switch shutdown by omarhaasan
...3, ender 3 pro, cr6se and may others. ( thingsdesigner ) design very useful but required to un-screw bolt...
thingiverse
free
Sovol SV02 Power Off Autoswitch Rev. by Ilmdruck
...not be mounted on the rail as in the thingsdesigner solution, i changed the bracket. i just put the...
thingiverse
free
BIQU BX Power Off Autoswitch by ThingsDesigner
...er.
deutsche user: bitte, wenn ihr mich unterstützen wollt, schaut doch auch einmal in meinen shophttps://www.3d-arbeitsplatz.de/
Creality
thingiverse
free

A10, A10M, A10T, A20, A20M Tool Holder by BellOnWheels
...a remix of a remix i made of a creality tool holder. i have acquired a geeetech a10m and...
thingiverse
free

Creality mainboard case for Ender 5 by CovertPluto
... by covertpluto
thingiverse
smaller case to replace the massive stock e5 case
currently in testing, any improvements pls tell me
thingiverse
free
Pi 3B Case for 2020 V-Slot Extrusion Frame by lavamind
...frames such as those found on 3d printers from creality and other brands. the top lid is the same...
thingiverse
free

C920 creality enclosure tube mount by Scruces
...c920 creality enclosure tube mount by scruces
thingiverse
c920 tube mount
thingiverse
free

Creality CR-6 SE PTFE cable clip by davidhbrown
...stead of 1mm. these seemed wide enough to try printing without a brim, and i got 9/9 (no failures/detaching) in about 12 minutes.
thingiverse
free

Watch Link Bracelet by lcbv
...i designed from scratch. i printed in on my creality cr-6 se with no problems. each link has hole...
thingiverse
free

Creality Ender 3 Pro Lower Filament Guide (Simple) by DrFlow
...o fancy bearing required.
easy entry of filament yet does not come out.
unlike others, does not interfere with changing filament.
thingiverse
free

Creality Spool Bracket by bubbalunt
...unt
thingiverse
basic creality spool bracket. originally metal, petg and pla+ seem to hold up just as well to support the spool.
thingiverse
free

Creality Ender 3/5 MDD Extruder & Filament Guide by mnijph
...he stock spacer. it also fixes the stock spring overtension issue; altered springs may not work. removed to keep working on this.
thingiverse
free

PETG 220 C High Speed tower by lddavis72
...tower by lddavis72 thingiverse wanted to test what the creality cr6 se could do beyond 100. testing petg at...
Cr
thingiverse
free

Ender 3, CR-10 fan duct by small_tornado
...ender 3, cr-10 fan duct by small_tornado
thingiverse
optimized fan duct for stock ender 3.
thingiverse
free

Ender 3/CR-10 Extruder Tension Adjuster by 5284973
...ble spring tension. this is a simple insert that fits between the screw and the spring and allows for the spring to be tightened.
thingiverse
free

Ender 3 Raspberry Pi 4 Case by gspro
...the ender 3 from ksamuelsen pi 3 case for cr10 -https://www.thingiverse.com/thing:3079477 includes spot to hold 30mm fan, slit for...
thingiverse
free

TP Holder by ciredigital308
...without skirt/brim/raft. can be mounted to studs with wood scrws and washers. tips...
thingiverse
free

HEX Ring Fan Duct for CR-6 SE larger ports by kroffty
...hex ring fan duct for cr-6 se larger ports by kroffty
thingiverse
larger ports and runners to increase air flow.
thingiverse
free

Sunlu Fila Dryer Top Mount by youngjc
...or rubbing you'll need: m4 x 30mm socket head scrws m4...
thingiverse
free
Creality CR-6 SE PTFE cable clip by davidhbrown
...stead of 1mm. these seemed wide enough to try printing without a brim, and i got 9/9 (no failures/detaching) in about 12 minutes.
thingiverse
free
Watch Link Bracelet by lcbv
...designed from scratch. i printed in on my creality cr6 se with no problems. each link has hole to...
thingiverse
free

cr-10 Leg by killerbianchex
...cr-10 leg by killerbianchex
thingiverse
.
thingiverse
free

cr-10 z axis reinforcement by killerbianchex
...cr-10 z axis reinforcement by killerbianchex
thingiverse
it need 2 10mm x 50mm bar and 16 m3 bolt and nut
Power
thingiverse
free

Quiet control box for SKR 1.4 + cable mgmt layer. by Evilkoal
...management without dumping everything into the electronics of the power supply. let me know if anything is weird, but...
thingiverse
free

DC adapter for ActivEnergy 20V power tools Li-Ion battery pack by suromark
...thingiverse
a connector to use the activenergy xyz561/2019sud 20v power tools accumulator as dc power source for hobby projects.
thingiverse
free

Viking Wolf Riders by AtlanForge
...the wolves are covered in armour made of small power shields which consist of a thin sheet of plasteel...
thingiverse
free

USB-C Powerbank with 18W fast charging by LivingroomWorkbench
...'s best to use protected batteries.
please note that i'm not responsible if you break something with this diy solution :)
thingiverse
free

HP 65xxA/66xxA System PSU Fan braces. by NearFarMedia
...replace the standard fan brace in hp 66xx system power supplies and the like. the standard brace is made...
thingiverse
free

Brickworks Machinery by pdmarsh
...building for their "brickworks" and "northern light & power powerouse" kits. there is an interior kit for the latter...
thingiverse
free

Ender 5 LED Stripe holder for Alu frame X-Y by retronic
...support, 1.2 mm wide - 12v (ali xpress) i power the led stripes using a dc-dc step-down module connected...
thingiverse
free
Relaybox for Raspberry Pi/Arduino by Dslp
...sockets are attached to the side and the required power supply units can be connected. i also used m3...
thingiverse
free
Vixen GP Goto Conversion Using Meade DS Motors by wt808
...this point, you might want to connect both motors, power supply, and the autostar controller to the jack panel,...
thingiverse
free

Power Drill 1/4" Hex Extension by DiKoosh
...power drill 1/4" hex extension by dikoosh
thingiverse
3/8 hex shaft to 1/4 hex drive power drill adapter
6
thingiverse
free

VESA monitor mount French Cleat by Rockster160
...ing/using this you claim all responsibility due to damage. use at your own risk!
fastened them to the monitors using m4*12 bolts.
thingiverse
free

Box Divider Modules for PX12 KONGER drawers kit by LuisCRSousa
...designed multiple boxes that divide each unit to 2, 6 and 10 parts. it fits perfectly inside and is...
thingiverse
free

Holster for mk23 SOCOM TM/STTI by igdrassil
...через какие отвертия крепления пройдут винты. пропустить винты крепления (№6 в списке деталей) через крепление serpa, надеть на них...
thingiverse
free

MAZDA RX7 (1/x) / Turbo Accessories add-ons by dancan13f
...2 x m2x8mm shcs 2 x m2 jam nut 6 x m2 washer assembly look at...
thingiverse
free

Surfboard Softboard FCS Fin-Boxes by b3n3d1k7
...after some time), uses normal fin-screws and has a 6 degree angle outwards for the fins. i also attached...
thingiverse
free

Case transport Mobula 6 by yotta72
...or the mobula 6 (also hd version), hole for the uruav u1 charger, propellers (under the drone) and a hole for lipos, cables, etc.
thingiverse
free
Boton para potenciometros con eje de 6 mm by EA7GWD
...boton para potenciometros con eje de 6 mm by ea7gwd
thingiverse
boton para potenciometros con eje de 6 mm
thingiverse
free

PXI-like 15cm Rackmount Chassis by bpetterborg
...chassis by bpetterborg thingiverse rackmount chassis similar to the 6#39; mini-rack, which i chose not to use because imperial...
thingiverse
free

C20 motor 10x10 profile motor mount + parts Quad by TurboCinqy
...mount + parts quad by turbocinqy thingiverse made a 6quot;quad from ply. is also printable if your printer is...
thingiverse
free
*skull Magnet SW by imaicom
...pitch: approx. 6.5mm size: approx. 12 x 6 x 6m ...