Thingiverse
Creality CR-10 SMART V6 mount by smellyunory
by Thingiverse
Last crawled date: 3 years ago
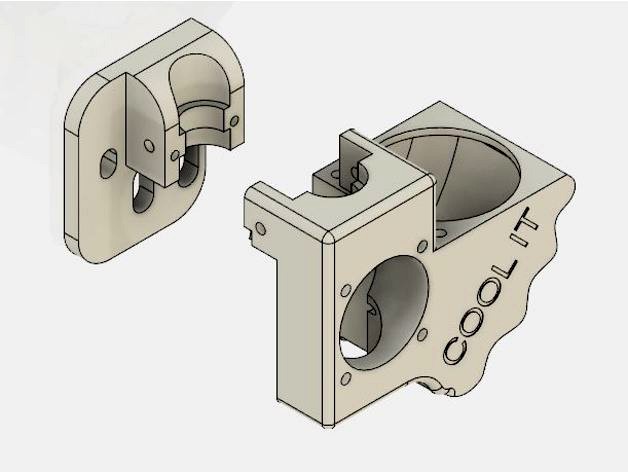
There's many design out there however, its kinda too big and long extended from the center point of the mounting holes. Here is my attempt on designing one.
===> Small compact effective
Any question feels free to send me message.
New version with improve size and quality available: UPDATE 12/10/2017
A.stl
B.stl
UPDATE 7/10/2017 Version 4: New version for 40mm SINGLE parts cooling fan
----------------------------------------------------NOTES ----------------------------------------------------------
The nozzle cooling fan is a 12v 30mm cooling fan ( i think the air flow on the 40mm STOCK is too much air for high temp on the E3D V6 => unnecessary)
The part cooling fan is the stock CR-10 cooling fan.
---------------------------------------------------- PARTS NEEDED ---------------------------------------------
4 x 6mm washer to add under the spring bed leveling
1 x 30mm fan
2 x 20mm M3 screw ( joining of 2 part)
4 x 15mm M3 screw ( heat sink fan)
--------------------------------------------------------FEATURES -------------------------------------------------
---------> Fully cover parts cooling fan
---------> Air redirect to right under nozzle
---------> Wiring re-directing holes for left parts cooling fan and nozzle fan
---------> Added a hole on top of Part 1 for zip ties
---------> Tighten up the holes for M3 screw where 2 part joint together!
-----------------------------------------STEPS -----------------------------------
DO NOT FORGOT TO DO PID TUNE,
easiest way to do this is:
Step 1: Download and print the parts needed
Step 2: Install the mount
Step 3: Add 6mm spacer on under each spring of the knob
Step 4: Download pointerface http://kliment.kapsi.fi/printrun/
Step 5: Download driver for your CR-10 ( stock driver is in the small micro SD card)
Step 6: Connect USB cable from CR-10 to your computer
Step 7: Open pointerface and choose the correct COM port
Step 8: Run M303 E0 S200 C8 in the Gcode command section and wait.....
Once that done it will return something like this
bias: 92 d: 92 min: 196.56 max: 203.75
Ku: 32.59 Tu: 54.92
Clasic PID
Kp: 19.56
Ki: 0.71
Kd: 134.26
PID Autotune finished ! Place the Kp, Ki and Kd constants in the configuration.h
Step 9: Once that is done. Go to your slicer and at this to your start script:
M301 Px Iy Dz
Where x, y, z are the value you obtain after PID tune with pointerface!
For more detailed follow this link: http://reprap.org/wiki/PID_Tuning
Similar models
thingiverse
free

Dual 40mm Cooling Fan Ring for E3D V6 Exruder by roadie3rd
...g fan ring for e3d v6 exruder
requires:
2x 40mm fans,
1x 30mm fan,
10x m3 x 16 screws
4x m3 x 8mm
2x m3 nylock nuts
2x m3 washers
thingiverse
free
Chimera Fan Mount for 40mm Hot end and 50mm Radial Part Cooling Fan by washout661
...n the stock 30mm) for the hot end and a 50mm radial fan for part cooling.
attaches using 2 m3 screws to the top of the heat sink.
thingiverse
free

CR6 40mm part cooling fan bracket by Fox429
...uot; bit to drill holes for the fan to mount to it.
uses 2 or 4 m3 x 12 screws to hold the fan. all other hardware used is stock.
thingiverse
free

E3D 40mm Fan Duct (.duct Remix) by keithluneau
...ve only printed pla. a regular 40mm fan should move a lot more air than this silent one, and still be quieter than the 30mm fans.
thingiverse
free

CR-10 Heavy Duty E3D V6 - STOCK COOLING FAN MOUNT by ebat
...ket allows you to use the stock cooling fan with the the cr-10 heavy duty mount by chitohttps://www.thingiverse.com/thing:2494642
thingiverse
free

E3D V6 Fan Shroud by carlol
... e3d v6
build of materials:
1x 40mm cooling fan
2x 30mm cooling fans
6x m3 x 16 bolts
easy print, no supports. print upside down
thingiverse
free

CR-10S/E3D-V6 Parts cooling fan using stock OEM fan by remberto
...11) very nicely.
anyways, if you've given several cr-10s part cooling fan shrouds a try with no luck like me - try this one!
thingiverse
free

cr-10 40mm cooling fan by dale360
...cr-10 40mm cooling fan by dale360
thingiverse
this is a cooling fan for the cr-10
thingiverse
free

Creality CR-10 easy-print hotend fan housing /fangs for axial fans (40mm, 50mm) by stevenfayers
...esigns:
a) 40mm fan for hotend cooling and 40mm fan for part cooling
b) 50mm fan for hotend cooling and 40mm fan for part cooling
thingiverse
free
Creality Ender-2 / CR-10 E3D v6 hotend assembly by swedishvaperuk
...ter. i may yet add a 40mm fan and clamp variant but it will stick out a bit.
prints lovely now, and the hotend is firmly mounted.
Smellyunory
thingiverse
free

Delta 60 degree corner for nema23 by smellyunory
... the nema23. so here is a scale up version that i design follow the original design of the kossel corner.
2020 aluminum extrude.
thingiverse
free
CR10-S E3D Clone Extruder Mount (Large & Small Nozzles) by Vektorz3D
...output sitting 3mm lower. this thing is remixed from smellyunory#39;s creality cr-10 smart v6 mount. found here: https://www.thingiverse.com/thing:2560599 and...
Creality
turbosquid
$7

filament roller single print creality
...del filament roller single print creality for download as stl on turbosquid: 3d models for games, architecture, videos. (1619309)
3d_export
free

Creality ender enclosure webcam mount
...e creality enclosure. sure is better than a tripod. change it up if it helps. i printed pla with 50% infill on my dd ender 3 pro.
3d_export
free

ender 3 frame cavity covers
...3 inserts,<br>made these inserts for the framework of the creality ender 3 - makes it look a bit more...
3d_export
$42

excavator
...width is the original size. 0.12 mm printing surface creality ender-5...
3d_export
free

ender 3 3d print bed clips
...glass bed + normal aluminium bed frame of the creality ender 3 = 6mm (b) these clips are designed...
3d_export
free

ender 3 enclosure corners
...that i could build my enclosure frame for my creality ender 3 - so i printed them in a...
thingiverse
free

Toolbox Creality
...ingiverse
this is a toolbox for tools that comes with creality printers, with a guide to cut capricorn ptfe with a cutter blade.
thingiverse
free

Creality Hotend Plate
... from creality themselves as the ender 3 is open source. this means i did not create this design and all credit goes to creality.
thingiverse
free
Creality Cat by alexander125
...creality cat by alexander125
thingiverse
this is the cat that comes on the sd card for all creality 3d printers.
thingiverse
free

Creality Dog by alexander125
...creality dog by alexander125
thingiverse
this is the dog that comes on the sd card for all creality 3d printers.
Cr
turbosquid
$15
Creazioni CR-673 CR-4461
... available on turbo squid, the world's leading provider of digital 3d models for visualization, films, television, and games.
3ddd
$1

Ravak CR 055.00
...ravak cr 055.00
3ddd
ravak , смеситель
ravak cr 055.00
turbosquid
$100

CR-002
...
turbosquid
royalty free 3d model cr-002 for download as stl on turbosquid: 3d models for games, architecture, videos. (1686037)
3ddd
$1

Ravak CR 012.00
...ravak cr 012.00
3ddd
ravak , смеситель
смеситель ravak cr 012.00
3ddd
free
Консоль CR Currin
...ь , cr currin
консоль cr currin
ширина - 1675 мм
глубина - 510 мм
общая высота - 810 мм
3ddd
$1
CR 39444
...0
диаметр: 100
тип патрона: gu5,3 gu10
количество ламп: 1
мощность: 35w
цвет: золото хрусталь
материал: металл хрусталь exclusive
3d_ocean
$89

Honda CR-Z
...www.youtube.com/watch?v=rrbb4d4lypk ` he honda cr-z‘s exterior styling is formed around a “one-motion wedge” concept with a lo...
3ddd
$1

Creazoni / STEFY CR-8901
...creazoni / stefy cr-8901
3ddd
creazoni
creazioni stefy cr-8901
turbosquid
$60

Chain-CR-001
...squid
royalty free 3d model chain-cr-001 for download as stl on turbosquid: 3d models for games, architecture, videos. (1680536)
turbosquid
$99

Honda CR-Z
... available on turbo squid, the world's leading provider of digital 3d models for visualization, films, television, and games.
V6
3d_export
$100

v6 engine
...engine
3dexport
complete v6 engine modeled on solidworks 2017 along with .stl, .sldprt and .sldasm of all th parts and assembly.
3d_export
$10

V6 engine
... the first v6 engines were designed and produced independently by marmon motor car company, deutz gasmotoren fabrik and delahaye.
3d_export
$35

v6 engine
...s a complete model of a v6 engine containing over 400 components. you can contact me for a video of all the components assembling
3d_export
$10

v6 engine
...v6 engine
3dexport
turbosquid
$25

Bed1001-v6
... available on turbo squid, the world's leading provider of digital 3d models for visualization, films, television, and games.
turbosquid
$22

Chair2-v6
... available on turbo squid, the world's leading provider of digital 3d models for visualization, films, television, and games.
turbosquid
$20

V6.mb
... available on turbo squid, the world's leading provider of digital 3d models for visualization, films, television, and games.
3d_export
$20

V6 engine
...rovided in this package is all the parts in sldprt format and assembly in sldasm format. i can also convert the format on demand.
3ddd
$1

Стол V6
...6" в стиле дизельпанк изготовлен из блока двигателя, 4х поршней и 4х шатунов.
столешница изготовлена из стекла толщиной 8мм.
cg_studio
$199

V6 VVTi3d model
...v6 vvti3d model
cgstudio
.3ds - v6 vvti 3d model, royalty free license available, instant download after purchase.
Smart
3ddd
$1

SMART
...smart
3ddd
стул smart
3d_export
$5

smart tv
...smart tv
3dexport
beautiful smart tv
turbosquid
$15

Smart
... available on turbo squid, the world's leading provider of digital 3d models for visualization, films, television, and games.
3ddd
$1
CTSsalotti / Smart
...ctssalotti / smart
3ddd
ctssalotti , угловой
ctssalotti smart 2800х1700
3ddd
$1
Gala Smart раковина
...gala smart раковина
3ddd
gala , smart
производитель gala
модель smart
design_connected
$13

Smart&Sleek
...smart&sleek
designconnected
wisteria smart&sleek computer generated 3d model.
3d_export
$5

Smart 3D Model
...smart 3d model
3dexport
smart car small mercedes
smart 3d model pio33d 67449 3dexport
3d_export
$15

Smart 3D Model
...smart 3d model
3dexport
smart auto car compact_car compat
smart 3d model savmart 95148 3dexport
3d_export
$12

samsung smart tv
...samsung smart tv
3dexport
samsung smart tv
3ddd
$1

Smart
...smart
3ddd
материалы вирей. модель не моя. переделал под вирей просто.
10
turbosquid
$25

10
... available on turbo squid, the world's leading provider of digital 3d models for visualization, films, television, and games.
turbosquid
$10

a-10
... available on turbo squid, the world's leading provider of digital 3d models for visualization, films, television, and games.
3ddd
$1

EX 10
...ex 10
3ddd
samsung , фотоаппарат
ex 10
3ddd
$1

Bed 10
...bed 10
3ddd
постельное белье
bed 10
evermotion
$25

Scene 10 Archinteriors vol. 10
...dering design interior
take a look at textured and shadered visualization scene ready to be rendered.. evermotion 3d models shop.
3ddd
$1

Curtains 10
...curtains 10
3ddd
curtains 10
3ds max 2011,fbx + textures
polys: 100355
3ddd
free

PLANTS 10
...plants 10
3ddd
цветок , горшок
plants 10,, with 3 different color planter boxes
turbosquid
$24

Chandelier MD 89310-10+10 Osgona
... chandelier md 89310-10+10 osgona for download as max and fbx on turbosquid: 3d models for games, architecture, videos. (1218762)
design_connected
$29

Nuvola 10
...nuvola 10
designconnected
gervasoni nuvola 10 computer generated 3d model. designed by navone, paola.
design_connected
$22

Kilt 10
...kilt 10
designconnected
zanotta kilt 10 computer generated 3d model. designed by progetti, emaf.
Mount
3d_export
free

mounting bracket
...mounting plate is the portion of a hinge that attaches to the wood. mounting plates can be used indoors, cabinetry and furniture.
turbosquid
$2

MOUNTING
... available on turbo squid, the world's leading provider of digital 3d models for visualization, films, television, and games.
turbosquid
free

Mounts
... available on turbo squid, the world's leading provider of digital 3d models for visualization, films, television, and games.
turbosquid
free

Mount Fuji
...fuji
turbosquid
free 3d model mount fuji for download as obj on turbosquid: 3d models for games, architecture, videos. (1579977)
3d_export
$5

Headphone mount LR
...headphone mount lr
3dexport
headphone mount l+r
turbosquid
$39

Mount rainier
...quid
royalty free 3d model mount rainier for download as fbx on turbosquid: 3d models for games, architecture, videos. (1492586)
turbosquid
$5

pipe mounting
...quid
royalty free 3d model pipe mounting for download as obj on turbosquid: 3d models for games, architecture, videos. (1293744)
turbosquid
$3

Mounting Tires
...uid
royalty free 3d model mounting tires for download as fbx on turbosquid: 3d models for games, architecture, videos. (1708511)
3d_export
$5

Magnetic GoPro Mount
...pro mount
3dexport
cool magnetic mount for gopro. allows you to mount the camera on flat metal surfaces and get exclusive shots.
turbosquid
$5

Stone Mount
...ty free 3d model stone mount for download as ma, obj, and fbx on turbosquid: 3d models for games, architecture, videos. (1370306)