GrabCAD

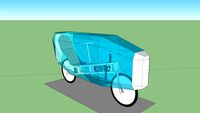
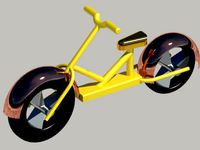
Crazy Bike
by GrabCAD
Last crawled date: 2 years ago
Drift on cart is great but drift on a bike is even more !
I did race a lot on pit bikes when I was a youngster so bikes are always in my mind.
Still a work in progress, I will update it daily.
Day 1: Created a test frame using the new ST7 3D sketch feature.
Day 2: Added front brake (moutain bike hidraulic brake), should make easy to do burnouts !; started to study position for battery. Will have to check about center of mass.
Day 3: Frame and Fork updated, electronic positioned, first fender style study (bluesurf mainly used).
Day 4: Shorter frame, added battery support. Motor support updated. First study of the seat (bluesurf mainly used).
Day 5: Added weldments on frame, using the weldment environment in SE found it slower than what I remembered. trying to render the welds with a specific bumbmap image (not happy with the result yet).
Day 6: Added feet pegs and edited the caliper (was fun to edit an imported model with syncrhonous technology) now fixed with the fork.
Day 7: Finished to edit the caliper (see the after and before comparison pictures, was good fun to use synch for editing), added the "dial" to control motor speed (still editing it). Chenged the tire pattern.
Day 8: Added main power switch and recharging plug, added a personalized "GRAB ME" plate.
Day 9: Added the bottom part to partially close the battery zone. Remade the front fender for a better smooth look (bluesurf used alot and a bluedot too).
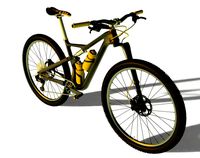
*** time to play with renders now ***
Day 10: created 5 "style" bikes using the keyshot new pattern tool. Styles are: Solid Edge, KeyShot, GrabCad, Gum and Flame.
Day 11: created a new "Combat ready" style with a black manequin standing in a burnout position. (didn't figure out how to render the smoke ).
Day 12: created a promo video
Day 13: updated seat as suggested by Kenneth Wong, thanks !
Day 14: added rear light and drive by wire cable: electronic repositioned.
I did upload an image that made me first thinking of this project. Inside the main ASM Solid Edge file there is a couple of sketches containing the "Blue Prints" of this pit bike. All started from there. ( http://www.diygokarts.com/bike-plans/pocket-bike-design.html )
Magura disc brake system downloaded from https://grabcad.com/library/magura-mt9-hydraulic-disk-brake-concept-1 then syncronous edited. Razor style disc made by me.
Stem, handle bar and grips are parts of this project syncronous edited by me: https://grabcad.com/library/freeride-mtb-1
Wish to have more time to spend with this great tools I'm getting addicted on them.
****** Final 3D model uploaded, download the V2 RAR archive and overwrite previous one ******
The core of Crazy Bike is in its elettronics. The Crazy Processor Unit "("CPU" in short) receive data from the on board inclinometer and from the drive by wire dial; process it hundres of time per second and instantly decide how much power transmit to the rear wheel. It's never been that safe to do terrific wheelie. With the drive by wire dial you can both accelerate and brake, push to accelerate and pull to brake. Rear brake is activated by request power from the electric motor and acting like a battery charger to save energy. Front brake is a powerful hydraulic brake that comes from the mountain bike market; use it to clamp the front wheel to the ground, balance your weight on the front wheel and do spectacular burn-outs again safety controlled by the CPU.
I did race a lot on pit bikes when I was a youngster so bikes are always in my mind.
Still a work in progress, I will update it daily.
Day 1: Created a test frame using the new ST7 3D sketch feature.
Day 2: Added front brake (moutain bike hidraulic brake), should make easy to do burnouts !; started to study position for battery. Will have to check about center of mass.
Day 3: Frame and Fork updated, electronic positioned, first fender style study (bluesurf mainly used).
Day 4: Shorter frame, added battery support. Motor support updated. First study of the seat (bluesurf mainly used).
Day 5: Added weldments on frame, using the weldment environment in SE found it slower than what I remembered. trying to render the welds with a specific bumbmap image (not happy with the result yet).
Day 6: Added feet pegs and edited the caliper (was fun to edit an imported model with syncrhonous technology) now fixed with the fork.
Day 7: Finished to edit the caliper (see the after and before comparison pictures, was good fun to use synch for editing), added the "dial" to control motor speed (still editing it). Chenged the tire pattern.
Day 8: Added main power switch and recharging plug, added a personalized "GRAB ME" plate.
Day 9: Added the bottom part to partially close the battery zone. Remade the front fender for a better smooth look (bluesurf used alot and a bluedot too).
*** time to play with renders now ***
Day 10: created 5 "style" bikes using the keyshot new pattern tool. Styles are: Solid Edge, KeyShot, GrabCad, Gum and Flame.
Day 11: created a new "Combat ready" style with a black manequin standing in a burnout position. (didn't figure out how to render the smoke ).
Day 12: created a promo video
Day 13: updated seat as suggested by Kenneth Wong, thanks !
Day 14: added rear light and drive by wire cable: electronic repositioned.
I did upload an image that made me first thinking of this project. Inside the main ASM Solid Edge file there is a couple of sketches containing the "Blue Prints" of this pit bike. All started from there. ( http://www.diygokarts.com/bike-plans/pocket-bike-design.html )
Magura disc brake system downloaded from https://grabcad.com/library/magura-mt9-hydraulic-disk-brake-concept-1 then syncronous edited. Razor style disc made by me.
Stem, handle bar and grips are parts of this project syncronous edited by me: https://grabcad.com/library/freeride-mtb-1
Wish to have more time to spend with this great tools I'm getting addicted on them.
****** Final 3D model uploaded, download the V2 RAR archive and overwrite previous one ******
The core of Crazy Bike is in its elettronics. The Crazy Processor Unit "("CPU" in short) receive data from the on board inclinometer and from the drive by wire dial; process it hundres of time per second and instantly decide how much power transmit to the rear wheel. It's never been that safe to do terrific wheelie. With the drive by wire dial you can both accelerate and brake, push to accelerate and pull to brake. Rear brake is activated by request power from the electric motor and acting like a battery charger to save energy. Front brake is a powerful hydraulic brake that comes from the mountain bike market; use it to clamp the front wheel to the ground, balance your weight on the front wheel and do spectacular burn-outs again safety controlled by the CPU.
Similar models
grabcad
free

Magura marta front disc brake for bicycles
...magura marta front disc brake for bicycles
grabcad
magura marta front disc brake model ~2003, measured from original part.
3dwarehouse
free

GQ Patrol Update.5
...3dwarehouse
__update__ rear and front doors added interior dash ad front seats added rear brake lights #mbzevasion for the parts
3dwarehouse
free

front and rear tire
...front and rear tire
3dwarehouse
updated tire #bike #brake #car #disc #motor #rim #tire
3dwarehouse
free

bike brakes Magura MT 7 Raceline
...ydraulic_bike_brakes #hydraulické_brzdy #magura #magura_mt_7_raceline #mountain_bike #mountain_bike_brakes #mt_7 #mtb #mtb_brakes
grabcad
free

Drive with Cloche like the F16 plane
...d quadricycle update 2023"
the cloche can be folded down to allow exit from the vehicle from both sides ;)
solidworks 2015
grabcad
free

Commuter Battery pack and lights
...or a commuter bike application, because the battery pack could charge while work or school, and ready to go for the commute home.
thingiverse
free

SRAM Red eTap Battery Block by criddle3
... as a remix on a coin battery holder mix in order to replace the stock sram battery with a coin battery holder away from the tire
cults
free

Blackout Mini H full bumper set
... thing. for 5" you can use these.
print with 100% infill.
the insanely cool led holder at the back can be downloaded here.
thingiverse
free

Blackout Mini H full bumper set by bjorntm
...thing. for 5" you can use these.
print with 100% infill.
the insanely cool led holder at the back can be downloaded here.
3dwarehouse
free
Channel and Coroplast Streamlined Bike
...el. it uses an existing 20' front fork. front wheel is stock, rear wheel and axle are custom. details haven't been added.
Crazy
3ddd
$1

Crazy Bunny
...crazy bunny
3ddd
кролик
crazy bunny
3d_export
$12

crazy fly
...crazy fly
3dexport
a shiny and amazing crazy fly.
3d_ocean
$12

Crazy Golf
...ni sports stroke
this set contains the basics for a crazy mini golf park. 6 different holes/strokes 6 different obstacles a flag
turbosquid
$12

Crazy House
...osquid
royalty free 3d model crazy house for download as 3ds on turbosquid: 3d models for games, architecture, videos. (1639894)
turbosquid
$2

Crazy Dave
...bosquid
royalty free 3d model crazy dave for download as fbx on turbosquid: 3d models for games, architecture, videos. (1178843)
turbosquid
$29

Crazy Bee
...ree 3d model crazy bee for download as max, obj, fbx, and dae on turbosquid: 3d models for games, architecture, videos. (1297202)
turbosquid
$63
Crazy Dog
... available on turbo squid, the world's leading provider of digital 3d models for visualization, films, television, and games.
turbosquid
$20
Crazy Cube
... available on turbo squid, the world's leading provider of digital 3d models for visualization, films, television, and games.
turbosquid
$15

Crazy orange
... available on turbo squid, the world's leading provider of digital 3d models for visualization, films, television, and games.
turbosquid
$1

Crazy TV
... available on turbo squid, the world's leading provider of digital 3d models for visualization, films, television, and games.
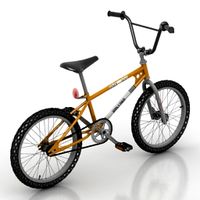
Bike
3d_ocean
$18
Bike
...bike
3docean
bicycles bike sports transport
3d model bike
3d_export
$5
bike
...bike
3dexport
bike
3d_export
$50
bike
...bike
3dexport
3d bike model
turbosquid
free
bike-bike-rack
... available on turbo squid, the world's leading provider of digital 3d models for visualization, films, television, and games.
archibase_planet
free

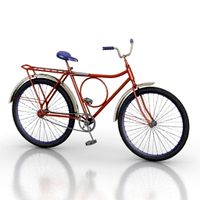
Bike
...bike
archibase planet
bike bicycle cycle
bike n161113 - 3d model (*.gsm+*.3ds+*.max) for exterior 3d visualization.
archibase_planet
free
Bike
...bike
archibase planet
bike bicycle cycle
bike and rack n220613 - 3d model (*.gsm+*.3ds+*.max) for exterior 3d visualization.
archibase_planet
free
Bike
...rchibase planet
bike bicycle cycle two-wheeled bicycle
bike n031213 - 3d model (*.gsm+*.3ds+*.max) for exterior 3d visualization.
archibase_planet
free
Bike
...rchibase planet
bike bicycle cycle two-wheeled bicycle
bike n180714 - 3d model (*.gsm+*.3ds+*.max) for exterior 3d visualization.
3d_ocean
$35
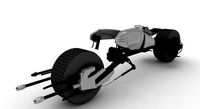
Batpod Bike
...cean
batman batman bike batpod bike bike motorcycle stylish bike
detailed model of a famous batpod bike used in the movie batman.
3d_export
$5
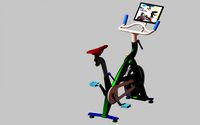
exercise bike
...exercise bike
3dexport
exercise bike, spin bike, bike, gym equipment, exerciser