Thingiverse
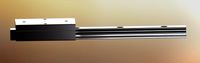
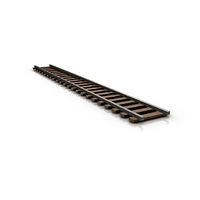
CR-6 SE Y-axis Linear rail and MGN12H carriage mount by Gx1400
by Thingiverse
Last crawled date: 3 years, 1 month ago
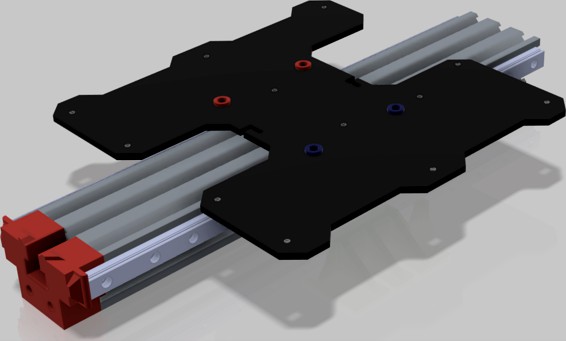
CR-6 SE Y-axis Linear rail and MGN12H carriage mount
THIS PROJECT IS UNDER DEVELOPMENT
This conversion method DOES require you to replace the Y-axis belt, but unlike some other projects doesn't require you to cut the rail.
Required Supplies:
2x 350mm long MGN rail with MGN12H carriage. I bought this because it was cheap and fast, I would recommend Hiwin.
GT2 timing belt (this solution requires longer belt. will have to crimp yourself as well).
2x M5x30 mm button head or socket head screws (attach spacer to tensioner)
4x M5x10 mm button head or socket head screws (attach build plate carriage to brackets)
4x M5 nut or nylock nut (I used nylock nut, press into left and right brackets with pliers)
20x M3x8mm button head or socket head screws (attach rails to extrusion & bracket to tensioner)
(optional) M3 nuts (for slide-in t-nuts if you choose to print your own, see notes. Press in with pliers)
(optional) Alignment blocks for linear rail to 2020 extrusion
Github Repo
https://github.com/gx1400/3dprint_cr6_yaxislinearrail
Printed parts
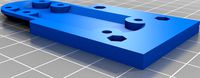
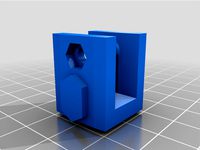
'plate bracket left.stl'
This part mounts to the left side carriage and interfaces with the build plate carriage. Need to press in M5 nuts or nylock nuts.
Suggested printing:
0.2mm layer
50% infill, Gyroid
4 walls
Top touching build plate. No supports.
'plate bracket right.stl'
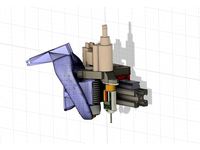
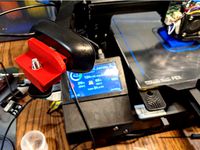
This part mounts to the right side carriage and interfaces with the build plate carriage. Need to press in M5 nuts or nylock nuts. This part interfaces with the y-axis end stop/homing switch.
Suggested printing:
0.2mm layer
50% infill, Gyroid
4 walls
Top touching build plate. No supports.
'spacer_5mm.stl'
This part provides proper spacing to make sure the left side M5x10 screws do not bottom out on the linear rail when tightened to connect carriage to bracket
Suggested printing:
0.12mm layer
100% infill
4 walls (should be pretty much all walls...)
No supports
'spacer_7mm.stl'
This part provides proper spacing to make sure the right side M5x10 screws do not bottom out on the linear rail when tightened to connect carriage to bracket. In addition, since these holes are larger to accomodate the eccentric hex spacer on stock install. This centers the screw to help remove slop.
Suggested printing:
0.12mm layer
100% infill
4 walls (should be pretty much all walls...)
Top touching build plate. No supports.
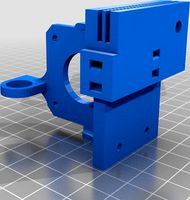
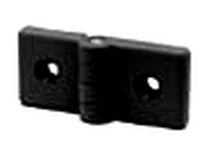
Tensioner adapter
Since the linear rails are readily available in lengths of 300 and 350 mm, but 300mm is too short and 350 is too long; this adapter allows you to mount 350 mm rail without cutting the rail. This part will also double as an end-stop for the front piecepart.
Suggested printing:
0.2mm layer
10-20% infill, Gyroid
3 walls
Front side touching build plate. Enable Supports (should just be the end stop sides that jut out, may not even be needed)
OPTIONAL: 'rail nut m3-2x.stl'
See notes. I used these to slide into extrusion. I had to make them very thin to fit into the OpenBuilds extrusion I was experimenting with at my desk, turns out when I went to Creality extrusion, there are significantly different extrusion dimensions. I ended up getting some plastic deformation when torquing down. I'm buying metal T-nuts.
I prefer the double nut version over the single nut version below. Your choice.
M3 nuts can be pressed in with pliers
Suggested printing:
0.12mm layer
100% infill
3 walls (should be pretty much all walls...)
Top touching build plate. No supports.
OPTIONAL: 'rail nut m3-1x.stl'
See notes and text above in 'rail nut m3-2x.stl.
OPTIONAL: 'vrail spacer m3.stl'
I used this to help keep the MGN rail out of the extrusion slot. Probably not needed.
Suggested printing:
0.12mm layer
100% infill
3 walls
Top touching build plate. No supports.
Notes
I used the printed t-nuts ('rail nut m3-2x.stl'), but found the plastic was pretty thin and gave under torque. I'm ordering some metal slide in t-nuts from amazon (This one and This one to see how they fit. I expect they will be more durable and secure.
License
Creative Commons - Attribution - Non-Commercial (CC BY-NC 3.0)
Changelog
2021/04/15 - Update readme instructions
2021/04/14 - Updated design files
2021/04/11 - Initial commit
Design
Autocad Fusion 360
Slicer
Ultimaker Cura 4.8.0
Printer: Creality CR6 SE
Layer Height: 0.x mm
Infill Density: xx%
Infill Pattern: Gyroid
Filament: Inland PLA+ 1.75mm Neon Green
Material: PLA+
Print Temperature: 215 degrees C
THIS PROJECT IS UNDER DEVELOPMENT
This conversion method DOES require you to replace the Y-axis belt, but unlike some other projects doesn't require you to cut the rail.
Required Supplies:
2x 350mm long MGN rail with MGN12H carriage. I bought this because it was cheap and fast, I would recommend Hiwin.
GT2 timing belt (this solution requires longer belt. will have to crimp yourself as well).
2x M5x30 mm button head or socket head screws (attach spacer to tensioner)
4x M5x10 mm button head or socket head screws (attach build plate carriage to brackets)
4x M5 nut or nylock nut (I used nylock nut, press into left and right brackets with pliers)
20x M3x8mm button head or socket head screws (attach rails to extrusion & bracket to tensioner)
(optional) M3 nuts (for slide-in t-nuts if you choose to print your own, see notes. Press in with pliers)
(optional) Alignment blocks for linear rail to 2020 extrusion
Github Repo
https://github.com/gx1400/3dprint_cr6_yaxislinearrail
Printed parts
'plate bracket left.stl'
This part mounts to the left side carriage and interfaces with the build plate carriage. Need to press in M5 nuts or nylock nuts.
Suggested printing:
0.2mm layer
50% infill, Gyroid
4 walls
Top touching build plate. No supports.
'plate bracket right.stl'
This part mounts to the right side carriage and interfaces with the build plate carriage. Need to press in M5 nuts or nylock nuts. This part interfaces with the y-axis end stop/homing switch.
Suggested printing:
0.2mm layer
50% infill, Gyroid
4 walls
Top touching build plate. No supports.
'spacer_5mm.stl'
This part provides proper spacing to make sure the left side M5x10 screws do not bottom out on the linear rail when tightened to connect carriage to bracket
Suggested printing:
0.12mm layer
100% infill
4 walls (should be pretty much all walls...)
No supports
'spacer_7mm.stl'
This part provides proper spacing to make sure the right side M5x10 screws do not bottom out on the linear rail when tightened to connect carriage to bracket. In addition, since these holes are larger to accomodate the eccentric hex spacer on stock install. This centers the screw to help remove slop.
Suggested printing:
0.12mm layer
100% infill
4 walls (should be pretty much all walls...)
Top touching build plate. No supports.
Tensioner adapter
Since the linear rails are readily available in lengths of 300 and 350 mm, but 300mm is too short and 350 is too long; this adapter allows you to mount 350 mm rail without cutting the rail. This part will also double as an end-stop for the front piecepart.
Suggested printing:
0.2mm layer
10-20% infill, Gyroid
3 walls
Front side touching build plate. Enable Supports (should just be the end stop sides that jut out, may not even be needed)
OPTIONAL: 'rail nut m3-2x.stl'
See notes. I used these to slide into extrusion. I had to make them very thin to fit into the OpenBuilds extrusion I was experimenting with at my desk, turns out when I went to Creality extrusion, there are significantly different extrusion dimensions. I ended up getting some plastic deformation when torquing down. I'm buying metal T-nuts.
I prefer the double nut version over the single nut version below. Your choice.
M3 nuts can be pressed in with pliers
Suggested printing:
0.12mm layer
100% infill
3 walls (should be pretty much all walls...)
Top touching build plate. No supports.
OPTIONAL: 'rail nut m3-1x.stl'
See notes and text above in 'rail nut m3-2x.stl.
OPTIONAL: 'vrail spacer m3.stl'
I used this to help keep the MGN rail out of the extrusion slot. Probably not needed.
Suggested printing:
0.12mm layer
100% infill
3 walls
Top touching build plate. No supports.
Notes
I used the printed t-nuts ('rail nut m3-2x.stl'), but found the plastic was pretty thin and gave under torque. I'm ordering some metal slide in t-nuts from amazon (This one and This one to see how they fit. I expect they will be more durable and secure.
License
Creative Commons - Attribution - Non-Commercial (CC BY-NC 3.0)
Changelog
2021/04/15 - Update readme instructions
2021/04/14 - Updated design files
2021/04/11 - Initial commit
Design
Autocad Fusion 360
Slicer
Ultimaker Cura 4.8.0
Printer: Creality CR6 SE
Layer Height: 0.x mm
Infill Density: xx%
Infill Pattern: Gyroid
Filament: Inland PLA+ 1.75mm Neon Green
Material: PLA+
Print Temperature: 215 degrees C
Similar models
thingiverse
free

CR-10 / 10s Y Carriage Dual Rails by Porksoduh
...ign is appreciated.
20200101 - added files for 2020 extrusion support of linear rail brackets. these help align the the rails.
thingiverse
free

Carriage for MGN12H and Bondtech BMG by 3ddruckqueck
...e carriage has lots of mounting points designed to take cheap 4mm x 3mm m3 bronze inserts.
i included a bltouch mounting bracket.
thingiverse
free

Tevo Flash Linear Mod (only with MGN12H) by GMein
...n't need to change anything else on the printer.
it should be easy to see what are each part is for. otherwise let me know ;)
thingiverse
free

Remixed Cr10s pro Y carriage linear rail plate by Leberwurst21
...d cr10s pro y carriage linear rail plate by leberwurst21
thingiverse
i remixed the plate so that 4 mgn12h carriages can be used.
thingiverse
free

CR6 SE Hot End Linear Rail MGN12H Mounting System by Gx1400
... 0.2mm
infill density: 50%
infill pattern: grid
filament: inland pla+ 1.75mm blue
material: pla+
print temperature: 215 degrees c
thingiverse
free

MGN12H Linear Rail Endstop
...for the mgn12 linear rail after converting my cr-10 y-axis to rails. secured the frame extrusion with an m3 screw and hammer nut.
thingiverse
free

Y guide - MGN12H linear rails (RedBot) by NickRimmer
...s, for aluminium profile
4 pcs - m5 square nuts
4 pcs - m5 washers
to mount each of rail i used 4pcs of m3x10 screws with t-nuts.
thingiverse
free
E3d V6 MGN12H X- Carriage for a Nimble & BLTouch by kuhnikuehnast
... everything is designed to use m3- screws and nuts.
as a fan mount, i used this design:
https://www.thingiverse.com/thing:2449326
thingiverse
free

MGN12H linear rail 20x20 adapter by Goretec
... linear rail 20x20 adapter by goretec
thingiverse
mgn12h linear rail adapter for mounting 20x20 extrusion to the linear guide.
thingiverse
free

Creality CR10 Linear Rail belt correction brackets by pjwedlake
...olts, 4xm3 tee slot nuts, 2x16mm m3 bolts and 2xm3 nylock nuts
sorry, i uploaded the wrong front bracket stl file, now corrected
Gx1400
thingiverse
free

Stackable storage trays for socket extensions and adapters by Gx1400
... purple, red, blue
material: pla+
print temperature: 215 degrees c
github repository
https://github.com/gx1400/3dprint_socketrack
thingiverse
free
BTT Smart Filament Sensor NEMA Mount for CR6 SE by Gx1400
...mm blue
material: pla+
print temperature: 215 degrees c
github repo
https://github.com/gx1400/3dprint_cr6_bttsmartsensornemamount
thingiverse
free
Logitech C310 1/4"-20 or M5 adapter by Gx1400
... inland pla+ 1.75mm blue
material: pla+
print temperature: 215 degrees c
github repo
https://github.com/gx1400/3dprint_c310_mount
thingiverse
free
CR6 Y Axis 20T toothed pulley adapter by Gx1400
...'m unimpressed with the results, but it works and it was made fast.
consider remixing and improving, all the files are there.
thingiverse
free

Park Tool TS-2 Wheel Size Knob by Gx1400
...5mm blue
material: pla+
print temperature: 215 degrees c
github repo
https://github.com/gx1400/3dprint_parktool_ts2_wheelsizeknob
thingiverse
free

Parametric SAE and Metric socket racks by Gx1400
... purple, red, blue
material: pla+
print temperature: 215 degrees c
github repository
https://github.com/gx1400/3dprint_socketrack
thingiverse
free

2020 Extrusion GT2 timing belt idler and tensioner by Gx1400
... 0.2mm
infill density: 50%
infill pattern: grid
filament: inland pla+ 1.75mm blue
material: pla+
print temperature: 215 degrees c
thingiverse
free

Racks for Crowsfoot & Flare Nut socket wrenches by Gx1400
... 10%
infill pattern: grid
filament: inland pla+ 1.75mm (red = sae, blue = metric)
material: pla+
print temperature: 215 degrees c
thingiverse
free
CR6 SE Hot End Linear Rail MGN12H Mounting System by Gx1400
... 0.2mm
infill density: 50%
infill pattern: grid
filament: inland pla+ 1.75mm blue
material: pla+
print temperature: 215 degrees c
Mgn12H
thingiverse
free

Mount 775 motor mgn12h by crazysova
...mount 775 motor mgn12h by crazysova
thingiverse
mount 775 motor mgn12h
thingiverse
free

Servo mount for MGN12H rail by Kieranod
...servo mount for mgn12h rail by kieranod
thingiverse
servo mount for mgn12h rail
thingiverse
free

MGN12H Titan Mount Vfire by 3DPrintingEverything
...mgn12h titan mount vfire by 3dprintingeverything
thingiverse
mgn12h mount for a titan e3d extuder
thingiverse
free

Kossel Mini carriage for MGN12H by gnahz
...kossel mini carriage for mgn12h by gnahz
thingiverse
kossel mini carriage for mgn12h with end stop
thingiverse
free

Tarantula Y carriage for MGN12H by ikong
...tarantula y carriage for mgn12h by ikong
thingiverse
tevo tarantula y carriage for mgn12h (of mgn12 rail).
thingiverse
free

MGN12H clamping V-slot by SviatoslavWolf
...mgn12h clamping v-slot by sviatoslavwolf
thingiverse
создал крепление для напрявляющих mgn12h под профиль v-slot
thingiverse
free
MGN12H aero p3steel v18 campy by maskeperro
...eperro
thingiverse
mgn12h aero p3steel v18 campy , pieza modificada para usar con mgn12h ....la original de campy es para mgn12c
thingiverse
free

MGN12H to 2020 and belt holder for x Axis by Kieranod
...epper.
mgn12h without belts.stl has no belt i used it on the side of the nema17 stepper.https://www.thingiverse.com/thing:2959042
thingiverse
free

MGN12C and MGN12H adapter plate by 3r4th
...h
thingiverse
i created a adapter plate for the y axis from mgn12c and mgn12h to a hole pattern of the sc8uu.
best regards 3r4th
thingiverse
free
MGN12H linear rail 20x20 adapter by Goretec
... linear rail 20x20 adapter by goretec
thingiverse
mgn12h linear rail adapter for mounting 20x20 extrusion to the linear guide.
Cr
turbosquid
$15
Creazioni CR-673 CR-4461
... available on turbo squid, the world's leading provider of digital 3d models for visualization, films, television, and games.
3ddd
$1
Ravak CR 055.00
...ravak cr 055.00
3ddd
ravak , смеситель
ravak cr 055.00
turbosquid
$100

CR-002
...
turbosquid
royalty free 3d model cr-002 for download as stl on turbosquid: 3d models for games, architecture, videos. (1686037)
3ddd
$1

Ravak CR 012.00
...ravak cr 012.00
3ddd
ravak , смеситель
смеситель ravak cr 012.00
3ddd
free
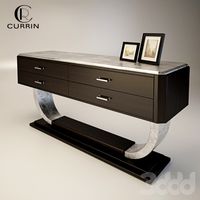
Консоль CR Currin
...ь , cr currin
консоль cr currin
ширина - 1675 мм
глубина - 510 мм
общая высота - 810 мм
3ddd
$1
CR 39444
...0
диаметр: 100
тип патрона: gu5,3 gu10
количество ламп: 1
мощность: 35w
цвет: золото хрусталь
материал: металл хрусталь exclusive
3d_ocean
$89

Honda CR-Z
...www.youtube.com/watch?v=rrbb4d4lypk ` he honda cr-z‘s exterior styling is formed around a “one-motion wedge” concept with a lo...
3ddd
$1

Creazoni / STEFY CR-8901
...creazoni / stefy cr-8901
3ddd
creazoni
creazioni stefy cr-8901
turbosquid
$60

Chain-CR-001
...squid
royalty free 3d model chain-cr-001 for download as stl on turbosquid: 3d models for games, architecture, videos. (1680536)
turbosquid
$99

Honda CR-Z
... available on turbo squid, the world's leading provider of digital 3d models for visualization, films, television, and games.
Carriage
archibase_planet
free

Carriage
...arriage
archibase planet
perambulator baby carriage pram
carriage n250908 - 3d model (*.gsm+*.3ds) for interior 3d visualization.
3d_export
free

carriage
...carriage
3dexport
old fashion carriage model, more files here:
turbosquid
$140

Carriage
...urbosquid
royalty free 3d model carriage for download as max on turbosquid: 3d models for games, architecture, videos. (1482052)
turbosquid
$25

Carriage
...urbosquid
royalty free 3d model carriage for download as max on turbosquid: 3d models for games, architecture, videos. (1285944)
3d_export
free

carriage
...carriage
3dexport
game cart
3d_ocean
$15

Barrel Carriage
...ieval oak old transport wheels wine wood
this model contains a barrel and a carriage. it is a medieval type of wood oak carriage.
turbosquid
$40

Carriage
...ty free 3d model carriage for download as obj, fbx, and blend on turbosquid: 3d models for games, architecture, videos. (1290094)
turbosquid
free

Carriage
...yalty free 3d model carriage for download as ma, obj, and fbx on turbosquid: 3d models for games, architecture, videos. (1239157)
3d_export
$5

Medieval carriage
...medieval carriage
3dexport
medieval carriage in fairy style
turbosquid
$58

Carriage
...d model carriage with scene for download as max, obj, and fbx on turbosquid: 3d models for games, architecture, videos. (1276262)
Linear
3ddd
$1
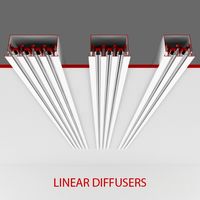
Linear Diffusers
...linear diffusers
3ddd
диффузор
set of linear diffusers for ceiling.
design_connected
$27
Linear Sofa
...linear sofa
designconnected
scp linear sofa computer generated 3d model.
design_connected
$18
Atlantis linear
...atlantis linear
designconnected
terzani atlantis linear pendant lights computer generated 3d model. designed by barlas baylar.
3d_export
$5
light linear unit
...light linear unit
3dexport
light linear unit
turbosquid
$5

Linear Actuator
...
royalty free 3d model linear actuator for download as blend on turbosquid: 3d models for games, architecture, videos. (1589061)
turbosquid
$29
Linear panel
...oyalty free 3d model linear panel for download as max and obj on turbosquid: 3d models for games, architecture, videos. (1391254)
turbosquid
$12
Linear Chandelier
...y free 3d model linear chandelier for download as max and obj on turbosquid: 3d models for games, architecture, videos. (1574289)
turbosquid
$10

Grohe Lineare
... available on turbo squid, the world's leading provider of digital 3d models for visualization, films, television, and games.
turbosquid
$10

Linear Axis
... available on turbo squid, the world's leading provider of digital 3d models for visualization, films, television, and games.
3d_export
$5
Linear Unit 3D Model
...linear unit 3d model
3dexport
linear unit force torque velocity
linear unit 3d model fau 71218 3dexport
Rail
3d_ocean
$5
rails
...rails
3docean
old rails rails sleepers
old rails
archibase_planet
free
Rail
...chibase planet
rail railing handrail guard-rail
rail forged fence n310814 - 3d model (*.gsm+*.3ds) for exterior 3d visualization.
archibase_planet
free
Rail
...rail
archibase planet
handrail railing guard-rail
rail n220914 - 3d model (*.gsm+*.3ds) for interior 3d visualization.
archibase_planet
free
Rail
...rail
archibase planet
railing hand-rail banisters
rail n130309 - 3d model (*.gsm+*.3ds) for interior 3d visualization.
archibase_planet
free
Rail
...rail
archibase planet
railing hand-rail banisters
rail n270510 - 3d model (*.gsm+*.3ds) for interior 3d visualization.
archibase_planet
free
Railing
...
archibase planet
railing handrail fence guard-rail
railing n140314 - 3d model (*.gsm+*.3ds+*.max) for exterior 3d visualization.
archibase_planet
free

Railing
...railing
archibase planet
railing
railing- 3d model (*.gsm+*.3ds) for interior 3d visualization.
archibase_planet
free
Railing
...railing
archibase planet
railing enclosure barrier
light railing - 3d model for interior 3d visualization.
archibase_planet
free
Rail
...rail
archibase planet
metal railing
rail n280608 - 3d model (*.gsm+*.3ds) for interior 3d visualization.
archibase_planet
free
Railing
...railing
archibase planet
railing kitchen ware
railing 1 - 3d model (*.gsm+*.3ds) for interior 3d visualization.
Axis
3ddd
$1

Мария Axis
...
3ddd
кухня , классическая , axis
модель кухни.
3d_export
$22

Axis robot 6-axis robotic arm
...ing parts drawings, standard parts purchased parts list, can be produced directly according to the drawings, welcome to download!
3ddd
free

Versatile Axis
...ddd
nexus , плитка
http://bvtileandstone.com/ceramic-porcelain/versatile-axis/
3d_export
$19

robot 2 axis
...robot 2 axis
3dexport
robot 2 axis
turbosquid
$40

Axis R5F
... available on turbo squid, the world's leading provider of digital 3d models for visualization, films, television, and games.
turbosquid
$40

Axis S5F
... available on turbo squid, the world's leading provider of digital 3d models for visualization, films, television, and games.
turbosquid
$30

Axis Athlon
... available on turbo squid, the world's leading provider of digital 3d models for visualization, films, television, and games.
turbosquid
$10
Linear Axis
... available on turbo squid, the world's leading provider of digital 3d models for visualization, films, television, and games.
3d_export
$15

drawing axis
...drawing axis
3dexport
simple rendering of the scene file
3ddd
$1

versatile axis ARC
...versatile axis arc
3ddd
versatile , плитка
versatile axis arc red dot design award
Y
turbosquid
$1

Tetera y Galletas y Caf
... available on turbo squid, the world's leading provider of digital 3d models for visualization, films, television, and games.
3ddd
$1

Смеситель Y-CON
...смеситель y-con
3ddd
смеситель , y-con
смеситель y-con
3ddd
$1

Y-Chair
...y-chair
3ddd
tom dixon
y-chair designed by tom dixon,
3ds max + obj, corona
3ddd
$1

Y Chair compilation
....net/products/us/y-chair-sled-base
y chair swivel basehttp://www.tomdixon.net/products/us/y-chair-swivel-base
turbosquid
$190

Y-8
...y-8
turbosquid
royalty free 3d model y-8 for download as max on turbosquid: 3d models for games, architecture, videos. (1658891)
turbosquid
$7

Bench Y
...turbosquid
royalty free 3d model bench y for download as obj on turbosquid: 3d models for games, architecture, videos. (1488746)
turbosquid
$15

bonePile Y
...oyalty free 3d model bonepile y for download as blend and obj on turbosquid: 3d models for games, architecture, videos. (1546374)
turbosquid
$7

Y for Yarn
...d
royalty free 3d model y for yarn model for download as max on turbosquid: 3d models for games, architecture, videos. (1699732)
turbosquid
$2

FONT Y
...quid
royalty free 3d model font y for download as ma and obj on turbosquid: 3d models for games, architecture, videos. (1549457)
3ddd
$1

WOOD-y
...wood-y
3ddd
wooden guy
6
3d_export
$18

tulip 6
...tulip 6
3dexport
tulip 6
3d_export
$5
hinge 6
...hinge 6
3dexport
hinge 6
3ddd
$1
MASIERO / FLASHWOOD STL 6 + 6
...6
3ddd
masiero
торшер flashwood stl 6 + 6 фабрики masiero
http://www.masierogroup.com/c87_697/it/flashwood%20stl%206%20+%206.ashx
turbosquid
$110

Atmos Cannon 2000 6*6
...yalty free 3d model atmos cannon 2000 6*6 for download as skp on turbosquid: 3d models for games, architecture, videos. (1528591)
turbosquid
$1
ae 6 6 electric locomotive
... free 3d model ae 6 6 electric locomotive for download as obj on turbosquid: 3d models for games, architecture, videos. (1707537)
turbosquid
$39

A-6
... available on turbo squid, the world's leading provider of digital 3d models for visualization, films, television, and games.
3ddd
$1
6 ковров
...6 ковров
3ddd
ковры , ковер
6 ковров
turbosquid
$12

Calligraphic Digit 6 Number 6
...hic digit 6 number 6 for download as max, obj, fbx, and blend on turbosquid: 3d models for games, architecture, videos. (1389336)
turbosquid
$19

Case For Phone 6 Girl 6
... available on turbo squid, the world's leading provider of digital 3d models for visualization, films, television, and games.
turbosquid
$35

Iphone 6 & 6 Plus All
... available on turbo squid, the world's leading provider of digital 3d models for visualization, films, television, and games.
Mount
3d_export
free

mounting bracket
...mounting plate is the portion of a hinge that attaches to the wood. mounting plates can be used indoors, cabinetry and furniture.
turbosquid
$2

MOUNTING
... available on turbo squid, the world's leading provider of digital 3d models for visualization, films, television, and games.
turbosquid
free

Mounts
... available on turbo squid, the world's leading provider of digital 3d models for visualization, films, television, and games.
turbosquid
free

Mount Fuji
...fuji
turbosquid
free 3d model mount fuji for download as obj on turbosquid: 3d models for games, architecture, videos. (1579977)
3d_export
$5

Headphone mount LR
...headphone mount lr
3dexport
headphone mount l+r
turbosquid
$39

Mount rainier
...quid
royalty free 3d model mount rainier for download as fbx on turbosquid: 3d models for games, architecture, videos. (1492586)
turbosquid
$5

pipe mounting
...quid
royalty free 3d model pipe mounting for download as obj on turbosquid: 3d models for games, architecture, videos. (1293744)
turbosquid
$3

Mounting Tires
...uid
royalty free 3d model mounting tires for download as fbx on turbosquid: 3d models for games, architecture, videos. (1708511)
3d_export
$5

Magnetic GoPro Mount
...pro mount
3dexport
cool magnetic mount for gopro. allows you to mount the camera on flat metal surfaces and get exclusive shots.
turbosquid
$5

Stone Mount
...ty free 3d model stone mount for download as ma, obj, and fbx on turbosquid: 3d models for games, architecture, videos. (1370306)