Thingiverse
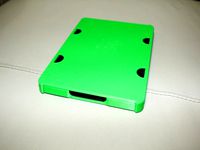
CR-10 table top enclosure frame by junaling
by Thingiverse
Last crawled date: 3 years, 1 month ago
https://youtu.be/Ok9uSThp73A
Update : 2019-07-15
1) Air filter / scrubber : https://www.thingiverse.com/thing:3749365
Update : 2018-03-12
1) 2 and 3 are 38mm short, uploaded correct files to match assembly guide
Update : 2018-01-02
1) handle_washer and handle_bracket added, use 1/2 inch aluminum tube
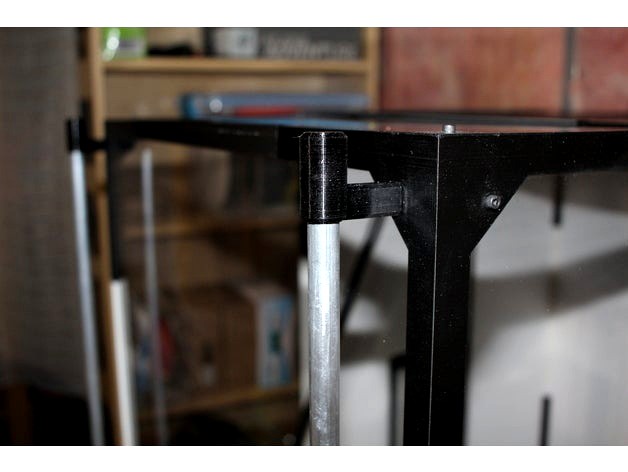
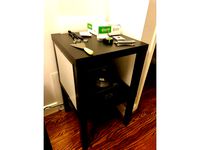
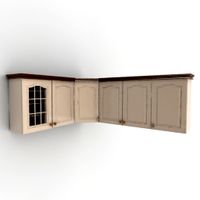
This is specifically sized to nicely fit a CR-10 (printer only). I wanted to build an enclosure that's light, from printed parts and from materials that are easy to work with. For panels you can use thin flexiglass, plywood, cardboard, foamboard, corrugated plastic, etc., or any combination. For plexiglass I used 2mm thick. The panel slots are 3mm wide. I used 4mm thick foam board and corrugated plastic for the back sections, just have to squish the sides to make them fit. The enclosure can be enlarged by scaling the frames (not the corners).
The 2 section design allows for easy access of the print, to distribute the weight and bulk for easy removal from the table.
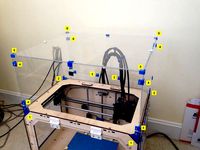
Before you embark on creating this thing, consider the following:
1) where to locate the controller box
2) are the cables long enough
3) are the moving cables going to cause any issues
4) where to put filament
5) is it big enough for your current setup and other mods
Materials:
1) printed parts
2) panels, your choice of material
3) bolts and nuts, m4 or 6-32 (locking nuts recommended, those with plastic inserts)
4) superglue, gel type recommended
5) foam sheets https://www.michaels.com/creatology-adhesive-foam-sheet/M10032002.html
Assembly tips :
1) print a pin and test the fit, scale accordingly
2) tap the pieces in place, don't force them in
3) don't over tighten the bolt / nuts
4) measure twice, cut/glue once
5) be patient :) and enjoy the build process, don't rush to eliminate mistakes
Assembly overview :
See PDF file and pictures for reference, scale in mm
1) using the pins, dry-fit the corners, frames and panels.
2) confirm the dimensions
3) when satisfied with measurements, pull the frame/corner apart just enough to expose the pin, apply a dab of superglue and press the parts together.
4) drill through the panels and bolt the panel to the frame, bolt latch where applicable
5) cut foam sheets and stick at the bottom of sections and opening of back section
6) cut opening for side access and install side access frame and door
Update : 2019-07-15
1) Air filter / scrubber : https://www.thingiverse.com/thing:3749365
Update : 2018-03-12
1) 2 and 3 are 38mm short, uploaded correct files to match assembly guide
Update : 2018-01-02
1) handle_washer and handle_bracket added, use 1/2 inch aluminum tube
This is specifically sized to nicely fit a CR-10 (printer only). I wanted to build an enclosure that's light, from printed parts and from materials that are easy to work with. For panels you can use thin flexiglass, plywood, cardboard, foamboard, corrugated plastic, etc., or any combination. For plexiglass I used 2mm thick. The panel slots are 3mm wide. I used 4mm thick foam board and corrugated plastic for the back sections, just have to squish the sides to make them fit. The enclosure can be enlarged by scaling the frames (not the corners).
The 2 section design allows for easy access of the print, to distribute the weight and bulk for easy removal from the table.
Before you embark on creating this thing, consider the following:
1) where to locate the controller box
2) are the cables long enough
3) are the moving cables going to cause any issues
4) where to put filament
5) is it big enough for your current setup and other mods
Materials:
1) printed parts
2) panels, your choice of material
3) bolts and nuts, m4 or 6-32 (locking nuts recommended, those with plastic inserts)
4) superglue, gel type recommended
5) foam sheets https://www.michaels.com/creatology-adhesive-foam-sheet/M10032002.html
Assembly tips :
1) print a pin and test the fit, scale accordingly
2) tap the pieces in place, don't force them in
3) don't over tighten the bolt / nuts
4) measure twice, cut/glue once
5) be patient :) and enjoy the build process, don't rush to eliminate mistakes
Assembly overview :
See PDF file and pictures for reference, scale in mm
1) using the pins, dry-fit the corners, frames and panels.
2) confirm the dimensions
3) when satisfied with measurements, pull the frame/corner apart just enough to expose the pin, apply a dab of superglue and press the parts together.
4) drill through the panels and bolt the panel to the frame, bolt latch where applicable
5) cut foam sheets and stick at the bottom of sections and opening of back section
6) cut opening for side access and install side access frame and door
Similar models
3dwarehouse
free

Warehouse Section
...ouse section
3dwarehouse
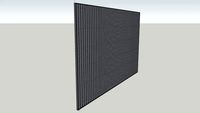
a section of a steel frame warehouse, the cladding materials are corrugated steel and plastic sheeting.
thingiverse
free

Simple Enclosure / Casing Corners by RossHaddow
.... wing nuts and bolts were used to assemble the corners to the acrylic sheet (finger tight only to avoid damaging the acrylic.).
thingiverse
free
Clips for corrugated plastic sheets by CJMind
...heets. i used these to hold the walls of my 3d printer enclosure in place between the 2 ikea lack tables for my ceiling and base.
grabcad
free

Universal Joint
...universal joint
grabcad
1.bolt
2.bush
3.fork
4.nut
5.pin
6.shaft
thingiverse
free

60 cm Cubic Enclosure with Easy Detaching Panels by tianyu_liu
...(or 3, if placed against wall) of the 600×600mm plastic sheet with (600 + x)×600mm ones.
x should be something like 150mm (15cm).
thingiverse
free

Panel/Corner Bracket by Taalan
...dded file for pins to hold the foam core panels. i would reduce the size to 95% to make sure they will fit easily into the holes.
thingiverse
free

Simple Delta 3D Printer Enclosure by Verohomie
...by notches and tape. use a box cutter or similar and cut through only one side of each corrugated...
3dwarehouse
free
Corrugated Panel Assembly
...corrugated panel assembly
3dwarehouse
corrugated panel assembly for profile builder 3 height: 3m
thingiverse
free

Shooting Target Auger Pin
...ppy shooting!
check out revere's riders for top-notch, affordable rifle marksmanship training: http://www.reveresriders.org
thingiverse
free
Brackets for assembling top enclosure for FlashForge Creator by speedy777
...he pieces fit in the pictures.
for details about the front door hinge and knob, go here:http://www.thingiverse.com/thing:731461
Junaling
thingiverse
free

Eyewear Stand by junaling
...eyewear stand by junaling
thingiverse
:)
thingiverse
free

40x40 fan guards by junaling
...40x40 fan guards by junaling
thingiverse
40 mm fan guards remixed from :https://www.thingiverse.com/thing:1244751
thingiverse
free

Face Mask Strap Extender by junaling
...face mask strap extender by junaling
thingiverse
quick release face mask extender / adaptor.
print a pair with petg(recommended)
thingiverse
free

Spool Roler by junaling
...k screw
designed for these cases:https://www.thingiverse.com/thing:2767924https://www.thingiverse.com/thing:3737157
or standalone
thingiverse
free
Kindle Paperwhite Case by junaling
...g
thingiverse
updates:
2019-02-06 : version 3, case and cover
2018-05-31 : version 2
case and cover for kindle pw 3rd generation
thingiverse
free
Secure GT2 Belt End Clip by junaling
... gt2 belt end clip by junaling
thingiverse
alternative to the metal crimp for cr-10 belts and similar printers. use petg or abs.
thingiverse
free

CR-10 Extruder with tube support by junaling
...tead : https://www.thingiverse.com/thing:3070890 **
added bowden tube support, modified for flexible filament without tube insert
thingiverse
free

CR-10 Chain Under Carriage Mount (Junaling ) Remix by Key0nee
...mounts under the carriage as opposed to the top. eliminating the need for a different sized spacer or differing spring tensions.
thingiverse
free

CR-10 quick release dual 30mm part blower by junaling
...version of this thing please see:
https://www.thingiverse.com/thing:2473423
please post your comments, makes and etc. in there.
thingiverse
free

Cable chain / cable tie by junaling
...dated braces
update 2017-oct-29:
added cable braces
secure cables to the chain using 4 inch cable ties, prints without supports
Cr
turbosquid
$15
Creazioni CR-673 CR-4461
... available on turbo squid, the world's leading provider of digital 3d models for visualization, films, television, and games.
3ddd
$1
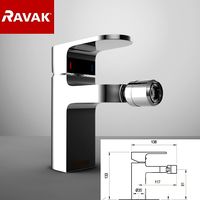
Ravak CR 055.00
...ravak cr 055.00
3ddd
ravak , смеситель
ravak cr 055.00
turbosquid
$100

CR-002
...
turbosquid
royalty free 3d model cr-002 for download as stl on turbosquid: 3d models for games, architecture, videos. (1686037)
3ddd
$1

Ravak CR 012.00
...ravak cr 012.00
3ddd
ravak , смеситель
смеситель ravak cr 012.00
3ddd
free
Консоль CR Currin
...ь , cr currin
консоль cr currin
ширина - 1675 мм
глубина - 510 мм
общая высота - 810 мм
3ddd
$1
CR 39444
...0
диаметр: 100
тип патрона: gu5,3 gu10
количество ламп: 1
мощность: 35w
цвет: золото хрусталь
материал: металл хрусталь exclusive
3d_ocean
$89

Honda CR-Z
...www.youtube.com/watch?v=rrbb4d4lypk ` he honda cr-z‘s exterior styling is formed around a “one-motion wedge” concept with a lo...
3ddd
$1

Creazoni / STEFY CR-8901
...creazoni / stefy cr-8901
3ddd
creazoni
creazioni stefy cr-8901
turbosquid
$60

Chain-CR-001
...squid
royalty free 3d model chain-cr-001 for download as stl on turbosquid: 3d models for games, architecture, videos. (1680536)
turbosquid
$99

Honda CR-Z
... available on turbo squid, the world's leading provider of digital 3d models for visualization, films, television, and games.
Enclosure
3d_export
free

electrical enclosure
...l enclosure where electrical devices like (relays, contactors, busbars ) are kept in order to protect from hazardous environment.
turbosquid
$100

GPU Enclosure
...yalty free 3d model gpu enclosure for download as obj and stl on turbosquid: 3d models for games, architecture, videos. (1381061)
3d_export
$5

Electrical Enclosure
...ed. also has tower lights attaced on the top.<br>file format that are available:<br>.step<br>.obj<br>.stl
archive3d
free

Enclosure 3D Model
...closure 3d model
archive3d
shower enclosure-acquarius- 3d model for interior 3d visualization.
archive3d
free

Enclosure 3D Model
...enclosure 3d model
archive3d
shower enclosure-omega- 3d model for interior 3d visualization.
archive3d
free

Enclosure 3D Model
...enclosure 3d model
archive3d
shower enclosure-vega - 3d model for interior 3d visualization.
archive3d
free

Enclosure 3D Model
...enclosure 3d model
archive3d
shower enclosure-zenith - 3d model for interior 3d visualization.
turbosquid
$20

shower enclosure
... available on turbo squid, the world's leading provider of digital 3d models for visualization, films, television, and games.
turbosquid
$14

Dumpster Enclosure
... available on turbo squid, the world's leading provider of digital 3d models for visualization, films, television, and games.
turbosquid
$25

3d printer enclosure
... model 3d printer enclosure for download as ipt, skp, and fbx on turbosquid: 3d models for games, architecture, videos. (1634310)
Frame
archibase_planet
free

Frame
...frame
archibase planet
frame photo frame
frame n190813 - 3d model (*.gsm+*.3ds) for interior 3d visualization.
archibase_planet
free

Frame
...frame
archibase planet
frame photo frame
frame n071113 - 3d model (*.gsm+*.3ds) for interior 3d visualization.
3ddd
$1

Frame
...frame
3ddd
frame
3ddd
free

Frame
...frame
3ddd
frame
archibase_planet
free

Frame
...frame
archibase planet
frame mirror frame ornament
frame n260113 - 3d model (*.gsm+*.3ds) for interior 3d visualization.
archibase_planet
free

Frame
...frame
archibase planet
frame photo frame
frame photo n190813 - 3d model (*.gsm+*.3ds) for interior 3d visualization.
archibase_planet
free

Frame
...frame
archibase planet
frame window window frame
frame 1 - 3d model (*.gsm+*.3ds) for interior 3d visualization.
archibase_planet
free

Frame
...frame
archibase planet
frame window frame window
frame 3 - 3d model (*.gsm+*.3ds) for interior 3d visualization.
archibase_planet
free

Frame
...frame
archibase planet
frame wall frame decoration
frame 1 - 3d model (*.gsm+*.3ds) for interior 3d visualization.
archibase_planet
free

Frame
...frame
archibase planet
frame window window frame
frame 2 - 3d model (*.gsm+*.3ds) for interior 3d visualization.
10
turbosquid
$25

10
... available on turbo squid, the world's leading provider of digital 3d models for visualization, films, television, and games.
turbosquid
$10

a-10
... available on turbo squid, the world's leading provider of digital 3d models for visualization, films, television, and games.
3ddd
$1

EX 10
...ex 10
3ddd
samsung , фотоаппарат
ex 10
3ddd
$1

Bed 10
...bed 10
3ddd
постельное белье
bed 10
evermotion
$25

Scene 10 Archinteriors vol. 10
...dering design interior
take a look at textured and shadered visualization scene ready to be rendered.. evermotion 3d models shop.
3ddd
$1

Curtains 10
...curtains 10
3ddd
curtains 10
3ds max 2011,fbx + textures
polys: 100355
3ddd
free

PLANTS 10
...plants 10
3ddd
цветок , горшок
plants 10,, with 3 different color planter boxes
turbosquid
$24

Chandelier MD 89310-10+10 Osgona
... chandelier md 89310-10+10 osgona for download as max and fbx on turbosquid: 3d models for games, architecture, videos. (1218762)
design_connected
$29

Nuvola 10
...nuvola 10
designconnected
gervasoni nuvola 10 computer generated 3d model. designed by navone, paola.
design_connected
$22

Kilt 10
...kilt 10
designconnected
zanotta kilt 10 computer generated 3d model. designed by progetti, emaf.
Top
archibase_planet
free
Top
...top
archibase planet
top
top - 3d model (*.gsm+*.3ds) for interior 3d visualization.
3ddd
free
Range Top V36C top
...range top v36c top
3ddd
гриль
проф. гриль range top v36c top
archibase_planet
free
Top
...top
archibase planet
dresser kitchen furniture
top - 3d model (*.gsm+*.3ds) for interior 3d visualization.
archibase_planet
free
Top
...top
archibase planet
bracket bar furniture
bar top - 3d model (*.gsm+*.3ds) for interior 3d visualization.
turbosquid
$5

Top
...lty free 3d model top for download as ma, max, blend, and obj on turbosquid: 3d models for games, architecture, videos. (1579951)
turbosquid
$39
Top
... available on turbo squid, the world's leading provider of digital 3d models for visualization, films, television, and games.
turbosquid
$30
Top
... available on turbo squid, the world's leading provider of digital 3d models for visualization, films, television, and games.
3d_export
$15

top knifle
...top knifle
3dexport
top knifle
design_connected
$11
Drop Top
...drop top
designconnected
plumen drop top computer generated 3d model.
3d_export
$245
top of the material
...top of the material
3dexport
top of the material,commercial ceiling ceiling material, metal material
Table
3ddd
free
Table
...table
3ddd
table
table
archibase_planet
free
Table
...table
archibase planet
table glass-table round table glass table
table n240311 - 3d model (*.3ds) for interior 3d visualization.
archibase_planet
free
Table
...e
archibase planet
table dining-room table dinner table round table
table - 3d model (*.gsm+*.3ds) for interior 3d visualization.
3d_export
$5

table
...table
3dexport
table classic-table
archibase_planet
free
Table
...se planet
table glass table round table glass-table
table tonin habitat n280111 - 3d model (*.3ds) for interior 3d visualization.
archibase_planet
free

Table
...table
archibase planet
table dining-room table dinner table
table - 3d model (*.3ds) for interior 3d visualization.
archibase_planet
free
Table
...table
archibase planet
table coffee table glass table
table - 3d model (*.gsm+*.3ds) for interior 3d visualization.
archibase_planet
free
Table
...table
archibase planet
table glass-table coffee table
table - 3d model (*.gsm+*.3ds) for interior 3d visualization.
archibase_planet
free
Table
...table
archibase planet
table writing table office table
table - 3d model (*.gsm+*.3ds) for interior 3d visualization.
3d_ocean
$5
Table
...table
3docean
dining table furniture home kitchen table
simple wooden table.