Thingiverse

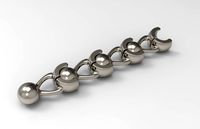
CR-10 Fine Z-Axis Endstop Adjustment by donnyb99
by Thingiverse
Last crawled date: 3 years, 1 month ago
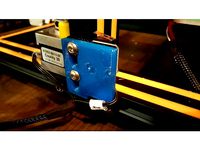
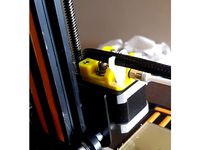
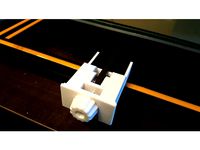
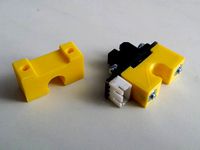
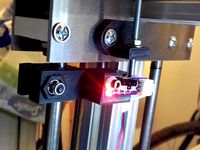
This is my crude Z-axis endstop adjustment that allows for a fairly fine adjustment of the height of your Z-axis on the CR-10.
BOM:
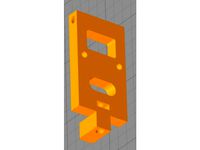
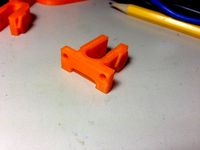
1x M4 x 5 brass threaded insert
1x M4 x 20
1x M4 hex nut
1x M4 locknut
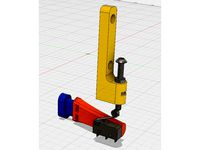
Use a soldering iron to press the threaded insert into 5mm hole provided for it. Be careful not to get any plastic inside the insert. The inserts I used have a 5mm outer diameter. If yours have a different OD, you will have to adjust the hole accordingly. I made a model using only hex nuts and it was not nearly as stable as this design.
Thread the hex nut all the way up on the M4 screw then thread the M4 through the threaded insert. Thread the locknut on the end of the M4.
Remove the 4 screws holding the plate that carries the X-axis limit switch.
Slide the endstop adjuster over the spacer bolts and screw the plate back on tightly.
You can adjust the height that the Z-axis limit switch will be engaged by loosening or tightening the M4 screw. Ensure to always tighten the hex nut down to the base to ensure the screw doesn't move with the vibrations of the printer.
BOM:
1x M4 x 5 brass threaded insert
1x M4 x 20
1x M4 hex nut
1x M4 locknut
Use a soldering iron to press the threaded insert into 5mm hole provided for it. Be careful not to get any plastic inside the insert. The inserts I used have a 5mm outer diameter. If yours have a different OD, you will have to adjust the hole accordingly. I made a model using only hex nuts and it was not nearly as stable as this design.
Thread the hex nut all the way up on the M4 screw then thread the M4 through the threaded insert. Thread the locknut on the end of the M4.
Remove the 4 screws holding the plate that carries the X-axis limit switch.
Slide the endstop adjuster over the spacer bolts and screw the plate back on tightly.
You can adjust the height that the Z-axis limit switch will be engaged by loosening or tightening the M4 screw. Ensure to always tighten the hex nut down to the base to ensure the screw doesn't move with the vibrations of the printer.
Similar models
thingiverse
free

cr-10 adjustable endstop by sfandersen
...or m4 screw, my printer came with extras that could be used.
the y-endstop does not need new hardware.
my printer is a cr-10 40s.
thingiverse
free
Z Axis Endstop Adjustment for CR-10 3D Printer by donnyb99
...orks fine in the meantime.
this requires no additional hardware to install as it uses the same screws that came with the printer.
thingiverse
free

TEVO Tarantula adjustable Z endstop mount by Kraemi
...6x m4 v-slot nut
6x m4 washers
normal endstop plate:
2x aditional m4x10mm screws
short endstop plate:
2x m4x16mm screws
have fun!
thingiverse
free

M4 Hex Nut Thumbscrew for Makergear M2 by Karl_Williams
...x 35mm hex cap screw threaded from the bottom, along with the m4 hex nut with the thumbscrew to make setting the z height easier.
thingiverse
free

Adjustable X Axis Endstop Mount for CR-10/CR-10S fixed for CR-10s by Night_Gryphon
...n from scratch. fixed endstop plate collision with x-axis stepper shaft. freecad source attached if you wish to adjust something.
thingiverse
free
Nereus Z Adjustment by testfly
...when the locknut is turned the screw turns to adjust the limit switch as the adjustment screw sits on the oem limit switch mount.
thingiverse
free

Fine adjustment for Z axis limit switch by stonedigger
...xis compatible to limit switch of anet a8.
additionaly you will need:
m4x15 with nut
m5x50 with nut
spring, d8 x 25mm
have fun!
thingiverse
free
Anet A8 Z Axis End Stop Adjuster by FredGenius
...a knob to make adjusting easier.
you will need:
2x m3x18mm screws
2x m3 nuts
2x m3x25mm screws
1x m5x40mm hex bolt
1x m5 half nut
thingiverse
free

Adjustable Z Endstop by FontMaker83
...base for the knob to spin freely.
hardware:
qty.2 15mm x m3 screw
qty.1 50mm x m4 screw
qty.1 m4 nut
qty.1 m4 wing nut (optional)
thingiverse
free

CR-10 Adjustable Z-limit switch
... adjustable z-stop, modified to allow adjustable placement of mount using existing screws, allowing more flexibility in z-height.
Donnyb99
thingiverse
free

CR-10 X-Axis Tensioner by donnyb99
...cr-10 x-axis tensioner by donnyb99
thingiverse
print and install. will need to remove x-axis belt from underneath carriage.
thingiverse
free
CR-10 Hotend Cable Management by donnyb99
...getting annoyed with my hotend cable coming into contact with the build plate so i made up this little cable management solution.
thingiverse
free

Hypercube Dual 5015 Blower Fan Setup by donnyb99
... has supports built in to the model. print the clamp with the large holes face down. print the ducts with the straight part down.
thingiverse
free

2020 LED Mount at 45° (great for Core XY) by donnyb99
...020 extrusion using m5 and hammer style t-nuts. i used these to mount an led strip all around the top of my hypercube 3d printer.
thingiverse
free

Glass Clip aka Binder Clip Replacement by donnyb99
...imilar configuration where the total height being retained is 7mm.
i printed mine in abs with a layer height of 0.3mm at 100mm/s
thingiverse
free
Z Axis Endstop Adjustment for CR-10 3D Printer by donnyb99
...orks fine in the meantime.
this requires no additional hardware to install as it uses the same screws that came with the printer.
thingiverse
free

Hypercube Evolution Fan Duct for Regular Hypercube by donnyb99
... of the air onto the printed part and off of the heat block.
i've been quite happy with the performance of this duct so far!
thingiverse
free

CR-10 E3D-V6 Mount by donnyb99
...d easier to deal with. they also have better supports. print with the flat back down. i uploaded one stl that contains both parts
thingiverse
free
CR-10 Y-Axis Belt Tensioner by donnyb99
...t" orientation.
update 03/28/17: uploaded both step and fusion360 achrive files for those who wish to build off this design.
thingiverse
free

1/2" Aluminium Rod/Tube parts for Hypercube by donnyb99
... axis to 10mm hardened stainless steel. i had to redesign a few parts to get that to work. i've uploaded all those parts now.
Endstop
thingiverse
free
Endstop-holder for endstop v1.2 by albiuz
...endstop-holder for endstop v1.2 by albiuz
thingiverse
endstop-holder designed for mech endstop v1.2
thingiverse
free
Endstop by 3dboxpro
...endstop by 3dboxpro
thingiverse
endstop
thingiverse
free
Endstop by 1sPiRe
...endstop by 1spire
thingiverse
endstop model for conceptions
thingiverse
free

Endstop holder for Opto or Mechanical endstops by LulzBot
... endstops by lulzbot
thingiverse
these are the standard 1.0 prusa endstops with an added mounting hole for mechanical endstops.
thingiverse
free

Endstop Holder by onurhamdiuzun
...endstop holder by onurhamdiuzun
thingiverse
endstop holder for makerbot endstop and other endstops
thingiverse
free

Endstop Cover
...endstop cover
thingiverse
cover for endstop boards for makerbot design.
thingiverse
free
Endstop Mount for optical Endstops by Whitehawk2000
...whitehawk2000
thingiverse
use two 20mm m3 screws and nuts to screw the endstop onto the mount and just clip it onto the 8mm rod.
thingiverse
free

C-beam endstop mount for Makerbot type endstops
...c-beam endstop mount for makerbot type endstops
thingiverse
c-beam endstop mount for makerbot type endstop boards.
thingiverse
free

Endstop Mount for MakerBot Mecanical Endstop. by nka
...v-slots carriage.
endstop is screw with m3 (8mm) tapped hole and the endstop hold on the extrusion using a m5 (8mm) and t-nuts.
thingiverse
free
ENDSTOP 10mm by desert500
...endstop 10mm by desert500
thingiverse
endstop
Cr
turbosquid
$15
Creazioni CR-673 CR-4461
... available on turbo squid, the world's leading provider of digital 3d models for visualization, films, television, and games.
3ddd
$1
Ravak CR 055.00
...ravak cr 055.00
3ddd
ravak , смеситель
ravak cr 055.00
turbosquid
$100
CR-002
...
turbosquid
royalty free 3d model cr-002 for download as stl on turbosquid: 3d models for games, architecture, videos. (1686037)
3ddd
$1

Ravak CR 012.00
...ravak cr 012.00
3ddd
ravak , смеситель
смеситель ravak cr 012.00
3ddd
free
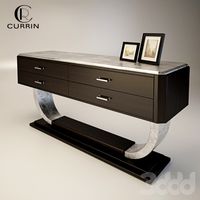
Консоль CR Currin
...ь , cr currin
консоль cr currin
ширина - 1675 мм
глубина - 510 мм
общая высота - 810 мм
3ddd
$1
CR 39444
...0
диаметр: 100
тип патрона: gu5,3 gu10
количество ламп: 1
мощность: 35w
цвет: золото хрусталь
материал: металл хрусталь exclusive
3d_ocean
$89

Honda CR-Z
...www.youtube.com/watch?v=rrbb4d4lypk ` he honda cr-z‘s exterior styling is formed around a “one-motion wedge” concept with a lo...
3ddd
$1

Creazoni / STEFY CR-8901
...creazoni / stefy cr-8901
3ddd
creazoni
creazioni stefy cr-8901
turbosquid
$60

Chain-CR-001
...squid
royalty free 3d model chain-cr-001 for download as stl on turbosquid: 3d models for games, architecture, videos. (1680536)
turbosquid
$99

Honda CR-Z
... available on turbo squid, the world's leading provider of digital 3d models for visualization, films, television, and games.
Fine
3ddd
$1

Fine Art
...fine art
3ddd
fine art lamps
торшер fine art
3ddd
$1
Fine Art_Chandelier
...fine art_chandelier
3ddd
fine art lamps
fine art_chandelier, crystal enchantment
3ddd
$1
Fine Art
...fine art
3ddd
fine art lamps
люстра и бра fine art
3ddd
$1
Fine Art
...fine art
3ddd
fine art lamps
люстра для бильярда fine art
3ddd
$1
Fine Art
...fine art
3ddd
fine art lamps
торшер и бра fine art
3ddd
$1
Fine Art
...fine art
3ddd
fine art lamps , сша
бра fine art lamps (сша)
3ddd
$1
Fine Art
...fine art
3ddd
fine art lamps , сша
люстра fine art lamps (сша)
3ddd
$1

Fine Art
...fine art
3ddd
fine art lamps , сша
настольная лампа fine art lamps (сша)
3ddd
$1
Fine Art
...fine art
3ddd
fine art lamps
светильники fine art
люстра и бра 750640
3ddd
$1
Fine Art
...fine art
3ddd
fine art lamps
светильники фирмы fine art
бра 429850
торшер 452230
люстра 429540
Axis
3ddd
$1

Мария Axis
...
3ddd
кухня , классическая , axis
модель кухни.
3d_export
$22

Axis robot 6-axis robotic arm
...ing parts drawings, standard parts purchased parts list, can be produced directly according to the drawings, welcome to download!
3ddd
free

Versatile Axis
...ddd
nexus , плитка
http://bvtileandstone.com/ceramic-porcelain/versatile-axis/
3d_export
$19

robot 2 axis
...robot 2 axis
3dexport
robot 2 axis
turbosquid
$40

Axis R5F
... available on turbo squid, the world's leading provider of digital 3d models for visualization, films, television, and games.
turbosquid
$40

Axis S5F
... available on turbo squid, the world's leading provider of digital 3d models for visualization, films, television, and games.
turbosquid
$30

Axis Athlon
... available on turbo squid, the world's leading provider of digital 3d models for visualization, films, television, and games.
turbosquid
$10

Linear Axis
... available on turbo squid, the world's leading provider of digital 3d models for visualization, films, television, and games.
3d_export
$15

drawing axis
...drawing axis
3dexport
simple rendering of the scene file
3ddd
$1

versatile axis ARC
...versatile axis arc
3ddd
versatile , плитка
versatile axis arc red dot design award
Z
3d_export
$5

nissan z
...nissan z
3dexport
nissan z
3ddd
$1

Vase Z
...vase z
3ddd
vase z
3ddd
$1

полотенцесушить Z
...полотенцесушить z
3ddd
полотенцесушитель
полотенцесушить z
design_connected
free

Z-Chair
...z-chair
designconnected
free 3d model of z-chair designed by karman, aleksei.
design_connected
$11

Z Lamp
...z lamp
designconnected
phillips z lamp computer generated 3d model. designed by kalff, louis.
3d_export
$5

Dragon balls z
...dragon balls z
3dexport
dragon ball z
turbosquid
$20

Fighter Z
...
turbosquid
royalty free 3d model fighter z for download as on turbosquid: 3d models for games, architecture, videos. (1292563)
turbosquid
$9

Pen Z
...pen z
turbosquid
free 3d model pen z for download as obj on turbosquid: 3d models for games, architecture, videos. (1686775)
turbosquid
free

z chair
...z chair
turbosquid
free 3d model z chair for download as max on turbosquid: 3d models for games, architecture, videos. (1410230)
turbosquid
$5

Letter Z
...urbosquid
royalty free 3d model letter z for download as max on turbosquid: 3d models for games, architecture, videos. (1408540)
Adjustment
3d_ocean
$7

Adjustable Wrench
...adjustable wrench
3docean
adjustable wrench highly detailed wrench
highly detailed adjustable wrench.
3ddd
$1
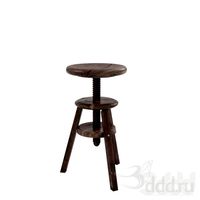
Adjustable Stool
...adjustable stool
3ddd
табурет
wooden adjustable stool.
3d_ocean
$20

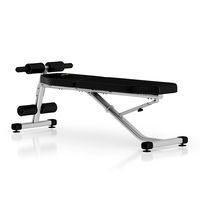
Adjustable Gym Bench
...st adjustable bench black equipement gym gymnastic indoor silver sport workout
3d model of black and silver adjustable gym bench.
3d_ocean
$20
Adjustable Gym Bench
...st adjustable bench black equipement gym gymnastic indoor silver sport workout
3d model of black and silver adjustable gym bench.
3d_ocean
$16

Adjustable Weight Bench
...arbell bench black equipement gym gymnastic indoor sport weight workout
3d model of black adjustable weight bench with a barbell.
turbosquid
$5

Adjustable wrench
...
royalty free 3d model adjustable wrench for download as fbx on turbosquid: 3d models for games, architecture, videos. (1313414)
3d_export
$5

adjustable tension lock
...adjustable tension lock
3dexport
adjustable tension lock
turbosquid
$1

Adjustable Wrench
...free 3d model adjustable wrench for download as obj and blend on turbosquid: 3d models for games, architecture, videos. (1446736)
turbosquid
$1

Adjustable Wrench
...y free 3d model adjustable wrench for download as c4d and fbx on turbosquid: 3d models for games, architecture, videos. (1379022)
3d_export
$5

Adjustable key
...adjustable key
3dexport
10
turbosquid
$25

10
... available on turbo squid, the world's leading provider of digital 3d models for visualization, films, television, and games.
turbosquid
$10

a-10
... available on turbo squid, the world's leading provider of digital 3d models for visualization, films, television, and games.
3ddd
$1

EX 10
...ex 10
3ddd
samsung , фотоаппарат
ex 10
3ddd
$1

Bed 10
...bed 10
3ddd
постельное белье
bed 10
evermotion
$25

Scene 10 Archinteriors vol. 10
...dering design interior
take a look at textured and shadered visualization scene ready to be rendered.. evermotion 3d models shop.
3ddd
$1

Curtains 10
...curtains 10
3ddd
curtains 10
3ds max 2011,fbx + textures
polys: 100355
3ddd
free

PLANTS 10
...plants 10
3ddd
цветок , горшок
plants 10,, with 3 different color planter boxes
turbosquid
$24

Chandelier MD 89310-10+10 Osgona
... chandelier md 89310-10+10 osgona for download as max and fbx on turbosquid: 3d models for games, architecture, videos. (1218762)
design_connected
$29

Nuvola 10
...nuvola 10
designconnected
gervasoni nuvola 10 computer generated 3d model. designed by navone, paola.
design_connected
$22

Kilt 10
...kilt 10
designconnected
zanotta kilt 10 computer generated 3d model. designed by progetti, emaf.