Thingiverse
Corne SpaceCase
by Thingiverse
Last crawled date: 4 years, 2 months ago
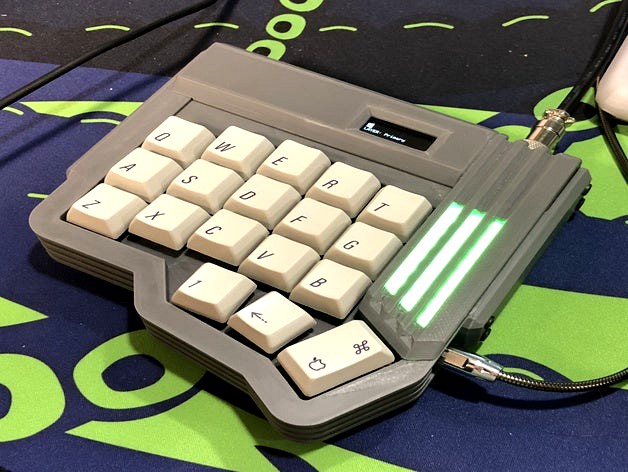
This is a fun modification of the Corne (CRKBD or Helidox) keyboard that relocates the OLED and the creates a new LED feature. This case is inspired by Star Wars spaceships, industrial machinery, and brutalist architecture.
The plate is 5mm and compatible with MX and ALPs switches; Choc switches will not work. It requires you to break off the last column on the outside of the Corne pcb. Alternatively, this could be handwired.
The case is made of 4 major components and two adjustable sleds per side. These should be printed right side up with the exception of the OLED covers (which are printed upside down to save on support material) and the LED sled (which is printed on it's side so that there are no supports). The LED "sled" is the only part printed in translucent or natural PLA. The LED "sled" acts as a light diffuser so you could use a white PLA as well. The rest of the prints are grey PLA but, you could use whatever color you like. The small "sled" prints are meant to be adjustable because there are differences in the OLED placement depending on manufacturer and orientation and differences in the LED specs as well. The LED sled is screwed in with one screw that's shared with the Acrylic piece that's above it and the OLED sled should be glued in place (I used hot glue so that I could move it if it wasn't just right). There is a picture of how I did the wiring for the relocated OLED and LEDs using jumper wires.
I've included a Fusion 360 file if you want to play around with it.
The parts (besides the 3D prints) needed are:
1x Corne kit (1 half per side, or this cold be handwired. You should purchase diodes, TRRS jacks, TRRS cable, and M2 screws. I used 10 screws) Link to kit below
4x Acrylic OLED covers (2 for each side, specifically the ones for the normal Corne. I sanded the clear acrylic to frost the ones covering the LEDs) Link below
36x MX or Alps type mechanical keyboard switches
2x Pro Micro or Elite C
2x OLED Link below
4x LED Strips (2 per side) Link below
2x Aviator Connectors Link below (you could use 4 pin, I used 5)
22x M3 screws with Allen / Hex head (I used 10mm or 8mm length bolts) Link below
1x USB micro cable (will be cut in half to patch pro micro to Aviator connector, this protects the Pro Micro USB micro connector. Could use separate connectors and solder custom cables from scratch)
Misc Patch cables, connectors, and heat shrink tubing
Note: This is a very DIY hack-job. You'll need to know or be willing to learn how to connect the OLEDs, LEDs, and aviator connectors via jumper wires. You will also need to work with QMK. This is not meant as a tutorial, just a resource for components and 3D files if you want to hack this thing together. Have fun!
If you do make this or modify it, let me know! If you feel like this design is worth it, buy me a coffee! Thanks!
LINKS
Corne kit, OLED, Acrylics misc parts Links:Keyhive
Elite C Link:SpaceCat
4x LED Strips (2 per side) Link:AliExpress
2x Aviator Connectors Link:AliExpress
M3 screws with Allen / Hex head Link:AliExpress
Similar models
thingiverse
free
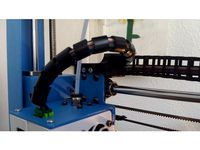
Anycubic I3 Mega Cable Chain by RTamer
...les that were already there. i also printed 25 links and it works well. no more squishing the cable between the extruder motor.
thingiverse
free

Handwired 60% Razer mechanical keyboard
...ated copper wire 18awg (or usual cables)
cables
2x ruthex rx-m3x5,7 bass inlets
2x m3x10
or
2x m3x16
2x m3 washers
2x m3 locknuts
thingiverse
free

Lily58 Pro Acrylic Case by jordi_id7
...x m2x9mm standoffs if no walls are used
(optional) bottom piece supports tenting legs, use m2x6mm screws and m2 nuts
-3mm acrylic
thingiverse
free
Let's Split Keyboard angled case by tsukaworks
...;s
48x diodes
48x switches (supports both cherry mx and alps/matias switches)
2x pro micros + spacers
2x trrs jacks
1 trrs cabble
thingiverse
free
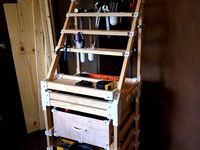
Toolcart with printed joint connectors by winkler
...ot;
2x 27.5" (these pieces need to be cut at an angle. it's a 3-4-5 triangle so the angles are: 53.13 and 36.87 degrees)
thingiverse
free

Baseplate for spindle clamp (52/55mm), CNC3018/CNC3018 Pro
...sher
4x m6 spring ring
optional:
4x m2x14mm (allen) screw
2x micro switch (print)
1x anti backlash nut
2x 5x56mm rod
2x linelaser
thingiverse
free

Losi LMT Stand by MadCat075
...om shadowfocus603
i wanted a connected stand and a bit lighter
parts to print: 2x base, 1x connector, 4x side
screws: 12x m3x12mm
thingiverse
free

Wemos OLED 0.66" inch display by jchurchward
...g so i could build the project on the link below.
https://community.oh-lalabs.com/t/security-status-using-tiny-wemos-oled-display
thingiverse
free

LED Light for Creality Ender 3
... led strip light connectors, 10x l shape 2 pin right angle corner connector, 10x strip to strip connectors, 2x dc connector"
thingiverse
free

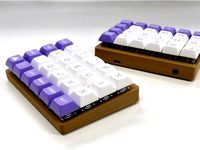
slimboi9001 - Easy To Print Ergonomic Keyboard by dout3
...board and use the json file for help. https://kbfirmware.com/
if the base plates are too loose, scale them down by a few percent.
Spacecase
thingiverse
free

SPACECASE by made3d
...e to adjust the click-connection with sandpaper 200
befor assembling the two inner parts. the upper part should be rotate easily.
grabcad
free

SPACECASE PELICAN 620x310x310
...spacecase pelican 620x310x310
grabcad
solidworks 2020 & stl
mockup for camper - weights and dimensions accurate
3dwarehouse
free

Storage Case Crate Bladder Box
...boxes, box, jerry cans, fuel bladder, army, footlocker, hardcase, spacecase 4x4 case, dog crate, dog...
Corne
3d_export
$18

corn
...corn
3dexport
turbosquid
$10
corn
...corn
turbosquid
royalty free 3d model corn for download as on turbosquid: 3d models for games, architecture, videos. (1665279)
turbosquid
$20

Corn
...squid
royalty free 3d model corn for download as fbx and upk on turbosquid: 3d models for games, architecture, videos. (1332700)
turbosquid
$49
Corn
... available on turbo squid, the world's leading provider of digital 3d models for visualization, films, television, and games.
turbosquid
free

Corn
... available on turbo squid, the world's leading provider of digital 3d models for visualization, films, television, and games.
3d_export
$20

candy corn
...candy corn
3dexport
this is a low poly candy corn 3d model
3d_export
$20

candy corn
...candy corn
3dexport
this is a low poly candy corn 3d model
3d_export
$5

pop corn
...pop corn
3dexport
3d_export
$5

corn maize
...corn maize
3dexport
turbosquid
free
Candy Corn
...corn
turbosquid
free 3d model candy corn for download as obj on turbosquid: 3d models for games, architecture, videos. (1448142)