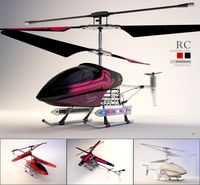
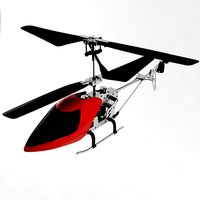
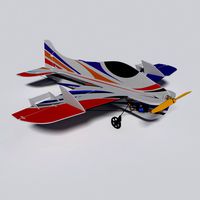
Cults
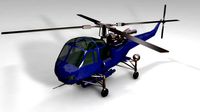
Conversion kit for making a flyable Revell 1:32 Westland Lynx kit.
by Cults
Last crawled date: 6 years, 2 months ago
NEWS:
New main blade uploaded. It's tapered, with a thinner tip and flies really well.
OLD NEWS:
I made a new main frame bottom piece and the part for the swash anti rotation bracket, for adjustment of the swash phase in 10° steps.
Disclaimer: This project has potential dangers. Use protective goggles to avoid injury should anything break. I have not experienced any failures myself, but different material manufacturers and printers can give different results. Proceed at your own risk.
Print the following from PLA:
Mainframe01.stl - Parts for the main frame for the Revell 1:32 Sea Lynx. (or PETG for motor heat resistance)
Micromaintotor02.STL - Main rotor pitch link rotation guide.
Tailrotor02.STL - Tail rotor and pitch change beam.
Swashlinks02.STL - Rod ends for the Blade CP swash plate ball ends.
Spacer.STL - Spacers for the main shaft.
Mainblade03.STL - Thicker main blade model. Stiffer, but more drag. Seems to fly about the same as the thinner blades, but is stiffer.Print if you have problems with blade flutter.
Mainblade05-tapered.STL - Tapered blade. Flies well. This is the recommended blade.
Print the following from Taulman 910:
Micromaintotor01.STL - Main rotor hub.
Scissor02.STL - Scissor links with flex hinges for the main landing gear.
Parts list:
Assorted M2 screws and M3 set screws.
2x ball bearings 3x6x2,5mm
3mm steel rod for main shaft.
3x servos Turnigy™ TGY-D56LV: https://hobbyking.com/en_us/turnigytm-tgy-d56lv-coreless-low-voltage-ds-mg-servo-0-89kg-0-10sec-5-6g.html
Main gear: 128-136 tooth Active Hobby 84 Pitch CNC Composite Spur Gear: https://hobbyking.com/en_us/active-hobby-132t-84-pitch-cnc-composite-spur-gear.html
Pinion: GWS 0,3 mod 10t brass pinion (or similar 0,3 mod/84 pitch).
Main motor: EH200 Brushless Outrunner 4100kv, or similar 3000-4000 kv motor: https://hobbyking.com/en_us/eh200-brushless-outrunner-4100kv.html
Tail motor: NTM Prop Drive 13-12 2400KV, or similar 2400-2600kv motor: https://hobbyking.com/en_us/ntm-prop-drive-13-12-2400kv-40w.html
I used an E-FLITE EFLH1152 Blade CP Swashplate. It needed to be modified by bending the outer ends inwards gently under heat to fit inside the top of the fuselage.
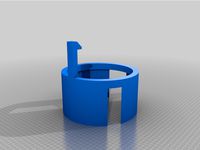
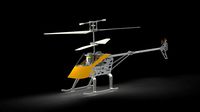
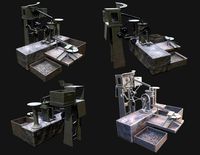
The illustration shows how the parts of the main frame and servos go together. Use 1,6 mm steel wire to make the anti rotation bracket. I recommend installing it in the pictured holes. That will put the rotor in the right phase for near vertical pitch links. Use your maker skills to assemble it to your liking. It's for advanced builders who understand how helicopters work and go together.
The main frame is assembled with #0x1/4 screws. Servos as well. Make the main shaft from steel and drill holes for a 1mm main gear locking pin, and a flat on the top for the main rotor set screws. I made the point of the rotor set screw into a pin that goes through a hole in the shaft for extra security.
After the main blades have been printed, bend the tips down about 20° to resemble the BERP tips of the full size helicopter.
After the tail rotor has been printed, gently twist the blades at the root to give the appropriate pitch, about 10-20° should be enough. I have made many tail rotors, and this works every time. They only fail if they hit something.
This video shows how the flight controls should operate. The swashplate is rotated 120° compared to the usual arrangement with two bladed rotors. When testing, rotate the main rotor pitch link rotation guide between flights until there is no coupling between roll and pitch:
https://youtu.be/VuhCTazcsxA
My Lynx now flies great at around 3200 RPM.
New main blade uploaded. It's tapered, with a thinner tip and flies really well.
OLD NEWS:
I made a new main frame bottom piece and the part for the swash anti rotation bracket, for adjustment of the swash phase in 10° steps.
Disclaimer: This project has potential dangers. Use protective goggles to avoid injury should anything break. I have not experienced any failures myself, but different material manufacturers and printers can give different results. Proceed at your own risk.
Print the following from PLA:
Mainframe01.stl - Parts for the main frame for the Revell 1:32 Sea Lynx. (or PETG for motor heat resistance)
Micromaintotor02.STL - Main rotor pitch link rotation guide.
Tailrotor02.STL - Tail rotor and pitch change beam.
Swashlinks02.STL - Rod ends for the Blade CP swash plate ball ends.
Spacer.STL - Spacers for the main shaft.
Mainblade03.STL - Thicker main blade model. Stiffer, but more drag. Seems to fly about the same as the thinner blades, but is stiffer.Print if you have problems with blade flutter.
Mainblade05-tapered.STL - Tapered blade. Flies well. This is the recommended blade.
Print the following from Taulman 910:
Micromaintotor01.STL - Main rotor hub.
Scissor02.STL - Scissor links with flex hinges for the main landing gear.
Parts list:
Assorted M2 screws and M3 set screws.
2x ball bearings 3x6x2,5mm
3mm steel rod for main shaft.
3x servos Turnigy™ TGY-D56LV: https://hobbyking.com/en_us/turnigytm-tgy-d56lv-coreless-low-voltage-ds-mg-servo-0-89kg-0-10sec-5-6g.html
Main gear: 128-136 tooth Active Hobby 84 Pitch CNC Composite Spur Gear: https://hobbyking.com/en_us/active-hobby-132t-84-pitch-cnc-composite-spur-gear.html
Pinion: GWS 0,3 mod 10t brass pinion (or similar 0,3 mod/84 pitch).
Main motor: EH200 Brushless Outrunner 4100kv, or similar 3000-4000 kv motor: https://hobbyking.com/en_us/eh200-brushless-outrunner-4100kv.html
Tail motor: NTM Prop Drive 13-12 2400KV, or similar 2400-2600kv motor: https://hobbyking.com/en_us/ntm-prop-drive-13-12-2400kv-40w.html
I used an E-FLITE EFLH1152 Blade CP Swashplate. It needed to be modified by bending the outer ends inwards gently under heat to fit inside the top of the fuselage.
The illustration shows how the parts of the main frame and servos go together. Use 1,6 mm steel wire to make the anti rotation bracket. I recommend installing it in the pictured holes. That will put the rotor in the right phase for near vertical pitch links. Use your maker skills to assemble it to your liking. It's for advanced builders who understand how helicopters work and go together.
The main frame is assembled with #0x1/4 screws. Servos as well. Make the main shaft from steel and drill holes for a 1mm main gear locking pin, and a flat on the top for the main rotor set screws. I made the point of the rotor set screw into a pin that goes through a hole in the shaft for extra security.
After the main blades have been printed, bend the tips down about 20° to resemble the BERP tips of the full size helicopter.
After the tail rotor has been printed, gently twist the blades at the root to give the appropriate pitch, about 10-20° should be enough. I have made many tail rotors, and this works every time. They only fail if they hit something.
This video shows how the flight controls should operate. The swashplate is rotated 120° compared to the usual arrangement with two bladed rotors. When testing, rotate the main rotor pitch link rotation guide between flights until there is no coupling between roll and pitch:
https://youtu.be/VuhCTazcsxA
My Lynx now flies great at around 3200 RPM.
Similar models
grabcad
free

Tail rotor with swash plate
...main constant and when a rotor shaft is rotating, you will see how is changing a angle of blades of tail rotor within one cycle.
grabcad
free

Helicopter Rotor
...arboxes along the tail boom. the blade pitch is typically controlled by a swashplate connected to the helicopter flight controls.
thingiverse
free

Fully Printable Fixed Pitch RC helicopter. by tahustvedt
...for the swash plate: https://www.banggood.com/fs-racing-fs-53910-fs-53625-6pcs-582002-roll-bearing-10x15x4mm-110-rc-car-parts-p-1153527.html?p=hd240528697332015103 assorted #0 screws or similar self tapping 1-1,5mm diameter screws and ~6mm (~1/4") length....
grabcad
free

HELICOPTER ROTOR BLADES
...ed by a swashplate connected to the helicopter flight controls. helicopters are one example of rotary-wing aircraft (rotorcraft).
cults
free

Fully Printable Fixed Pitch RC helicopter.
...for the swash plate: https://www.banggood.com/fs-racing-fs-53910-fs-53625-6pcs-582002-roll-bearing-10x15x4mm-110-rc-car-parts-p-1153527.html?p=hd240528697332015103 assorted #0 screws or similar self tapping 1-1,5mm diameter screws and ~6mm (~1/4") length....
cg_trader
$100

Helicopter Swash Plate | 3D
...l is fully mated to represent the motion of the swash-plate. the geometry is also true scale for rc planes and can be 3d printed.
thingiverse
free
Fully Printable Collective Pitch RC helicopter. by tahustvedt
...for the swash plate: https://www.banggood.com/fs-racing-fs-53910-fs-53625-6pcs-582002-roll-bearing-10x15x4mm-110-rc-car-parts-p-1153527.html?p=hd240528697332015103 assorted #0 screws or similar self tapping 1-1,5mm diameter screws and ~6mm (~1/4") length....
grabcad
free

DFC
...dfc
grabcad
connecting main rotor shaft to rotor blades and swash plate
thingiverse
free
Blade 180 CFX swash leveling tool by jwolfe138
...g tool for the blade 180 cfx helicopter. the center hole will need to be reamed out to 4mm to make a snug fit on the main shaft.
cults
free

Fully Printable Collective Pitch RC helicopter.
...for the swash plate: https://www.banggood.com/fs-racing-fs-53910-fs-53625-6pcs-582002-roll-bearing-10x15x4mm-110-rc-car-parts-p-1153527.html?p=hd240528697332015103 assorted #0 screws or similar self tapping 1-1,5mm diameter screws and ~6mm (~1/4") length....
Flyable
thingiverse
free
Modular Flyable Model Rocket
...igner ring with wiring through whole in the nose cone. parachute made from light textile 300mm in diameter. parts glued together.
thingiverse
free
motor clip for Flyable Rocket with 18mm Motor Mount by mhkaufman
... rocket. it holds the motor in place nicely. i used a mix of about 90% siraya fast resin and 10% siraya tenacious flexible resin.
thingiverse
free

Flyable RC Viggen - Flite Test by gunsett
...arts template and plans to build without having to hotwire any foam.https://www.flitetest.com/articles/ja-37-viggen-scratch-build
thingiverse
free

build able model rocket by tms4819
...able model rocket by tms4819 thingiverse this is a flyable model rocket...
thingiverse
free

Flyable Rocket with 18mm Motor Mount. by Aeth
...heir side or upside down in thingiview. i normally just rotate them with repetier before printing. i'll fix them here soon.
sketchfab
$5

A-10th Piglet
...a-10th piglet sketchfab a bobblehead that somehow became a flyable joke plane mod made for vtol vr - a-10th...
thingiverse
free

Micro Runcam Swift by CT_FPV
...ct_fpv thingiverse stilll under construction right now its total flyable just gotta fix the positioning of the holes for...
thingiverse
free

Pollux v3 345mm Hexacopter (3D printable) by flow
...infill of 100% is needed to make this thing flyable when 3d...
thingiverse
free

Mobula 7 frame by Shilskii
...mobula 7 frame. heavier, then original one, but still flyable also i make it little bigger for more stability....
thingiverse
free

Replacement arms for FROG lite frame by John28
...turned out quite stiff printed in pla. very much flyable but not that crash resistant of course. made those...
Westland
3d_export
$17

Agusta Westland AW169
...agusta westland aw169
3dexport
agusta westland aw169
turbosquid
$14

Westland Lynx
...quid
royalty free 3d model westland lynx for download as fbx on turbosquid: 3d models for games, architecture, videos. (1536565)
3d_export
$60

westland lynx
...r a dozen nations, primarily serving in the battlefield utility, anti-armour, search and rescue and anti-submarine warfare roles.
turbosquid
$59
Westland Seaking HAr3
... available on turbo squid, the world's leading provider of digital 3d models for visualization, films, television, and games.
turbosquid
$50

Westland Wyvern S4
... available on turbo squid, the world's leading provider of digital 3d models for visualization, films, television, and games.
turbosquid
$50

Westland Wyvern S4
... available on turbo squid, the world's leading provider of digital 3d models for visualization, films, television, and games.
turbosquid
$50

Westland Wyvern S4
... available on turbo squid, the world's leading provider of digital 3d models for visualization, films, television, and games.
turbosquid
$14

Westland Lynx AH-7
...
royalty free 3d model westland lynx ah-7 for download as fbx on turbosquid: 3d models for games, architecture, videos. (1536566)
turbosquid
$20
Westland Helicopter Low Poly
...estland helicopter low poly for download as obj, c4d, and fbx on turbosquid: 3d models for games, architecture, videos. (1372364)
cg_studio
$99

Westland Lynx Helicopter3d model
...c4d .lwo .ma .max .obj .xsi - westland lynx helicopter 3d model, royalty free license available, instant download after purchase.
Revell
3ddd
$1

Natuzzi / Revele
...natuzzi / revele
3ddd
natuzzi , revele
natuzzi / revele
corner sofa, 3110x2230
turbosquid
$19

Glue Revell
...osquid
royalty free 3d model glue revell for download as max on turbosquid: 3d models for games, architecture, videos. (1193773)
3d_ocean
$5

Revel F12 Speakers
... purchase includes: .obj, .max, .3ds formats 3 texture files including bump map pdf documented help file important: you will n...
3d_export
$5

christophe delcourt lek armchair
...arm and comfortable seating choice for any living room. the chair is available as a standard armchair, or with a 360 swivel base.
3d_export
$10

noctambule
...530mm low cylinders h 450mm<br>noctambule: the night owl or revellr. mostly invisible during the day, but coming to glamorous...
3ddd
$1

RH MODERN DESMOND BEDROOM SET
...san crafted and no two are alike. given their handwoven nature, slight variations in shading and size are inherent to the design.
3d_sky
free
Natuzzi / Revele
...natuzzi / revele
3dsky
natuzzi
natuzzi / revele corner sofa, 3110x2230
thingiverse
free

Revell Paint Organizer / Revell Farbhalter by froetz
... your revell-paint. you can also put your paintbrushs in.
german:
hier ist mein ordnungssystem für revellfarben mit pinselfach.
thingiverse
free

desktop holder for revell airbrush by wassi
...desktop holder for revell airbrush by wassi
thingiverse
simple holder for a revell airbrush
thingiverse
free

Guitar Revelation Guitar pick by Economy
...guitar revelation guitar pick by economy
thingiverse
a guitar pick made by me for my company guitar revelation.
Lynx
3d_export
$20

lion lynx
...lion lynx
3dexport
lion lynx
turbosquid
$150

lynx
... available on turbo squid, the world's leading provider of digital 3d models for visualization, films, television, and games.
turbosquid
$49

LYNX
... available on turbo squid, the world's leading provider of digital 3d models for visualization, films, television, and games.
3d_export
$8

keychain lynx
...keychain lynx
3dexport
turbosquid
$14
Westland Lynx
...quid
royalty free 3d model westland lynx for download as fbx on turbosquid: 3d models for games, architecture, videos. (1536565)
turbosquid
$9

totem lynx
...bosquid
royalty free 3d model totem lynx for download as obj on turbosquid: 3d models for games, architecture, videos. (1144850)
turbosquid
$5

Lynx Animal
...bosquid
royalty free 3d model lynx animal for download as ma on turbosquid: 3d models for games, architecture, videos. (1431611)
turbosquid
$5

LYNX CHANDELIER
...ee 3d model lynx chandelier for download as max, fbx, and obj on turbosquid: 3d models for games, architecture, videos. (1655778)
turbosquid
$209

Lynx Bust
...ree 3d model lynx bust for download as max, obj, fbx, and stl on turbosquid: 3d models for games, architecture, videos. (1226663)
turbosquid
$40
Lynx Juvenile
... available on turbo squid, the world's leading provider of digital 3d models for visualization, films, television, and games.
Helicopter
3d_export
free

Helicopter
...helicopter
3dexport
helicopter
archibase_planet
free

Helicopter
...planet
helicopter apache military helicopter aircraft
helicopter apache n100512 - 3d model (*.3ds) for exterior 3d visualization.
archibase_planet
free

Helicopter
...helicopter
archibase planet
helicopter aircraft
helicopter bellh13 n040612 - exterior 3d visualization.
3ddd
$1
helicopter
...helicopter
3ddd
вертолет
toy helicopter
archibase_planet
free
Helicopter
...helicopter
archibase planet
helicopter aircraft
helicopter n200214 - 3d model (*.gsm+*.3ds) for exterior 3d visualization.
archibase_planet
free

Helicopter
...helicopter
archibase planet
helicopter aircraft
helicopter n190214 - 3d model (*.gsm+*.3ds) for exterior 3d visualization.
archibase_planet
free

Helicopter
...helicopter
archibase planet
helicopter aircraft
helicopter n030414 - 3d model (*.gsm+*.3ds) for exterior 3d visualization.
archibase_planet
free
Helicopter
...helicopter
archibase planet
helicopter aircraft
helicopter n160714 - 3d model (*.gsm+*.3ds) for exterior 3d visualization.
archibase_planet
free

Helicopter
...helicopter
archibase planet
helicopter aircraft
helicopter an 12 n160312 - 3d model (*.3ds) for exterior 3d visualization.
archibase_planet
free

Helicopter
...helicopter
archibase planet
helicopter aircraft
helicopter n110412 - 3d model (*.gsm+*.3ds) for exterior 3d visualization.
Conversion
3ddd
$1

Conversation Seat
...шетка
the conversation seat made in englandhttp://www.squintlimited.com/products/the_conversation_seat/gold
+ max 2011
3d_export
$10

Converse 3D Model
...converse 3d model
3dexport
converse shoe pc unix mac
converse 3d model electropainter17075 38067 3dexport
turbosquid
$100

converse-shoe
...quid
royalty free 3d model converse-shoe for download as c4d on turbosquid: 3d models for games, architecture, videos. (1398427)
turbosquid
$10

Conversation Furniture
... available on turbo squid, the world's leading provider of digital 3d models for visualization, films, television, and games.
turbosquid
$7

Converse Allstars
... available on turbo squid, the world's leading provider of digital 3d models for visualization, films, television, and games.
design_connected
$16

Conversation Club Chair
...conversation club chair
designconnected
donghia conversation club chair chairs computer generated 3d model. designed by n/a.
design_connected
$27

Hemicycle Conversation Chair
...rsation chair
designconnected
ligne roset hemicycle conversation chair computer generated 3d model. designed by nigro, philippe.
3d_export
$24

Converse keds 3D Model
...converse keds 3d model
3dexport
converse all star ked shoe clothes sports
converse keds 3d model vermi1ion 26201 3dexport
3ddd
$1

Converse All-Star Shoes
...converse all-star shoes
3ddd
кеды , обувь
converse all-star shoes
design_connected
$18

CONVERSE Jack Purcell Sneakers
...converse jack purcell sneakers
designconnected
converse jack purcell sneakers computer generated 3d model.
Rc
3ddd
$1
RC Helicopter
...rc helicopter
3ddd
вертолет
mini rc helicopter
93.329 polys
3d_export
$7
rc helicopter model
...rc helicopter model
3dexport
rc helicopter model
3d_ocean
$25
RC F1
...rc f1
3docean
auto car control f1 formula race rc remote speed
remote control f1 car
turbosquid
$10
rc plane
...lane
turbosquid
free 3d model rc plane for download as blend on turbosquid: 3d models for games, architecture, videos. (1295828)
turbosquid
$100
RC Helicopter
...free 3d model rc helicopter for download as 3ds, max, and obj on turbosquid: 3d models for games, architecture, videos. (1298511)
turbosquid
$59
Drone with RC
...3d model drone with rc for download as 3ds, max, obj, and fbx on turbosquid: 3d models for games, architecture, videos. (1363601)
turbosquid
$75
RC buggy
... available on turbo squid, the world's leading provider of digital 3d models for visualization, films, television, and games.
turbosquid
$39

RC Plane001
... available on turbo squid, the world's leading provider of digital 3d models for visualization, films, television, and games.
turbosquid
$30
RC Jet
... available on turbo squid, the world's leading provider of digital 3d models for visualization, films, television, and games.
turbosquid
$30
Rc airplane
... available on turbo squid, the world's leading provider of digital 3d models for visualization, films, television, and games.
32
3ddd
$1
Ford 32
...ford 32
3ddd
ford
ford 32 tuning
turbosquid
$10

32
... available on turbo squid, the world's leading provider of digital 3d models for visualization, films, television, and games.
design_connected
$16

S 32
...s 32
designconnected
thonet s 32 computer generated 3d model. designed by breuer, marcel.
design_connected
$11
Grace 32
...grace 32
designconnected
bsweden belysningsbolaget grace 32 computer generated 3d model. designed by hederström, louise.
3ddd
free

Bed 32
...bed 32
3ddd
постельное белье
bed 32. i hope you like it. thank you very much
turbosquid
$12

building 32
...osquid
royalty free 3d model building 32 for download as max on turbosquid: 3d models for games, architecture, videos. (1362484)
turbosquid
$6
Bedcloth 32
...osquid
royalty free 3d model bedcloth 32 for download as max on turbosquid: 3d models for games, architecture, videos. (1522755)
turbosquid
$20

Curtains 32
...royalty free 3d model curtains 32 for download as max and obj on turbosquid: 3d models for games, architecture, videos. (1333949)
turbosquid
$23

Sofa 32
...yalty free 3d model sofa 32 for download as max, obj, and fbx on turbosquid: 3d models for games, architecture, videos. (1503052)
turbosquid
$15

Chair 32
...alty free 3d model chair 32 for download as max, obj, and fbx on turbosquid: 3d models for games, architecture, videos. (1497259)
Kit
turbosquid
$3

Bathroom Kit Baño kit
... available on turbo squid, the world's leading provider of digital 3d models for visualization, films, television, and games.
turbosquid
$19

Kit
... available on turbo squid, the world's leading provider of digital 3d models for visualization, films, television, and games.
3d_export
$20

Drift Kit
...drift kit
3dexport
turbosquid
$40

BitCoin Kit
...urbosquid
royalty free 3d model bitcoin kit for download as on turbosquid: 3d models for games, architecture, videos. (1519068)
turbosquid
$9

Industrial kit
...osquid
royalty free 3d model industrial kit for download as on turbosquid: 3d models for games, architecture, videos. (1144117)
turbosquid
$6

Kit Vases
...
turbosquid
royalty free 3d model kit vases for download as on turbosquid: 3d models for games, architecture, videos. (1285114)
turbosquid
free

Survival Kit
...rbosquid
royalty free 3d model survival kit for download as on turbosquid: 3d models for games, architecture, videos. (1637721)
turbosquid
$50

Ninja Kit
...rbosquid
royalty free 3d model ninja kit for download as fbx on turbosquid: 3d models for games, architecture, videos. (1672364)
turbosquid
$35

Brushes Kit
...osquid
royalty free 3d model brushes kit for download as max on turbosquid: 3d models for games, architecture, videos. (1216721)
turbosquid
$19
Medical kit
...osquid
royalty free 3d model medical kit for download as fbx on turbosquid: 3d models for games, architecture, videos. (1486089)
Making
3d_export
$5

make make planet
...make make planet
3dexport
turbosquid
$1

Make
...ke
turbosquid
royalty free 3d model make for download as obj on turbosquid: 3d models for games, architecture, videos. (1403181)
3ddd
free

make up
...make up
3ddd
косметика
makeup
turbosquid
$65
Make an interior
... available on turbo squid, the world's leading provider of digital 3d models for visualization, films, television, and games.
turbosquid
$5

Make Up Stand
...bosquid
royalty free 3d model make up stand for download as on turbosquid: 3d models for games, architecture, videos. (1542368)
turbosquid
$12

make up table
...quid
royalty free 3d model make up table for download as max on turbosquid: 3d models for games, architecture, videos. (1280789)
turbosquid
$1

Make up desk
...oyalty free 3d model make up desk for download as max and obj on turbosquid: 3d models for games, architecture, videos. (1222023)
turbosquid
$1
Make up desk
...oyalty free 3d model make up desk for download as max and obj on turbosquid: 3d models for games, architecture, videos. (1222007)
turbosquid
$29
Ammo making machine
...aking machine for download as max, unitypackage, fbx, and obj on turbosquid: 3d models for games, architecture, videos. (1572915)
turbosquid
$29
Making light Collection
... available on turbo squid, the world's leading provider of digital 3d models for visualization, films, television, and games.
1
turbosquid
$69

armchairs(1)(1)
... available on turbo squid, the world's leading provider of digital 3d models for visualization, films, television, and games.
turbosquid
$15

ring 1+1
... available on turbo squid, the world's leading provider of digital 3d models for visualization, films, television, and games.
turbosquid
$10

chair(1)(1)
... available on turbo squid, the world's leading provider of digital 3d models for visualization, films, television, and games.
turbosquid
$8

Chair(1)(1)
... available on turbo squid, the world's leading provider of digital 3d models for visualization, films, television, and games.
turbosquid
$2

RING 1(1)
... available on turbo squid, the world's leading provider of digital 3d models for visualization, films, television, and games.
turbosquid
$1

house 1(1)
... available on turbo squid, the world's leading provider of digital 3d models for visualization, films, television, and games.
turbosquid
$1

Table 1(1)
... available on turbo squid, the world's leading provider of digital 3d models for visualization, films, television, and games.
turbosquid
$59

Formula 1(1)
...lty free 3d model formula 1 for download as max, fbx, and obj on turbosquid: 3d models for games, architecture, videos. (1567088)
design_connected
$11

No 1
...no 1
designconnected
sibast no 1 computer generated 3d model. designed by sibast, helge.
turbosquid
$2

desert house(1)(1)
...3d model desert house(1)(1) for download as 3ds, max, and obj on turbosquid: 3d models for games, architecture, videos. (1055095)