Thingiverse
Colour Swatch for Resin Printers
by Thingiverse
Last crawled date: 4 years, 3 months ago
Problem:
Creating 'custom' resin colours without using CMYK pigments or buying custom coloured resin. Having the ability to see a range of colours in person rather than viewing on a computer screen. Experimenting with mixing resins without wasting excessive amounts.
Solution:
This colour swatch. All you need is an idea of what resin colours are readily available to you, and which of those you can mix to create your desired colour. Then using a 1ml syringe you can
Pros:
Quick and easy to print and assemble.
Files will fit Anycubic Photon & Elegoo Mars build plates.
Minimal resin needed - max of 22ml of each colour (full triangle swatch).
Can be cured in sunlight if UV curing light unavailable.
Hex insides are rounded at the bottom to stop colours getting stuck in corners.
Bottom edges are rounded to prevent elephants foot.
Cheap: You'll only need 3x 1ml syringes and a small instrument to mix with such as a toothpick.
Assemble as many hexes as you like. For a two colour swatch you only need to print 10 single hexes.
Cons:
Limited to the colours of resin readily available.
Your chosen base colours may not create the exact colour you desire. You need to be confident that you're base colours are capable of producing the colour you want, for example; a mix of white/blue/yellow resins will not produce purple.
Only the top 1mm (approximately) of resin is cured, therefore leaks/splashes could occur if the filled swatch is dropped.
How to:
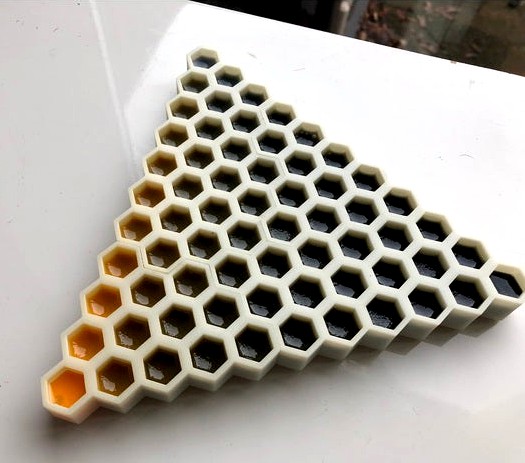
Decide how many hexes you want if you're not printing the full triangular swatch. Each hex or group of hexes can be glued together, superglue works fine. The fewer hexes in your swatch, the lesser your range of colours will be. The full triangular swatch yields 66 different colours.
For the full triangle use files: RCH V2 1 + RCH V2 2 + RCH V2 3.
If you are using solid resin colours then it is preferable that you print the hexes white, you could also print grey or black but avoid colours as it'll interfere with your perception of the colours in your finished swatch. For clear/translucent resins it may be better to print in a clear colourless resin. I can't say whether the colours from neighbouring hexes will interfere with other colours when viewing them as I haven't tried this with clear resins.
Get your hexes printed, post-cured, and glued together.
Next take one of your colours, and row by row drop in the required amount of resin using a 1ml syringe. Use the picture guide to understand what I mean by row by row and how much resin to put in each hex. I found it helpful to have the triangle pointing away from me, that way I wouldn't get confused with the rows.
Once you've done that it's time to do the same with your next colour(s). Again it was helpful to rotate the triangle so the 'new' point of it was pointing away from me.
When all the hexes are filled, use something small to mix each hex, I used a toothpick, be sure to scrape the edges and bottom of each hex.
Next, cure the resin under UV light. I exposed mine under a 24watt LED strip light for 30 minutes (I think, it could have been 15). You want to cure as much of the resin at the top of each hex to prevent accidental spills of the uncured resin underneath. You may want to balance this with the effect overcuring may have on your resin, for example white will brown the longer it is exposed.
With the curing done your swatch is ready!
Reading your swatch...
View the swatch under natural light where possible. Use a marker pen to mark your chosen colour. Now reference the guide, reading across each row one colour at a time. If you have printed the full triangle then the percentages are easy to calculate. Note the percentage of each colour use it to calculate how much of each colour you need for your print*. The percentage of all colours combined should equal 100%, if not, you need to read the swatch again.
I would advise that you mix a small amount first to be sure it is correct.
Happy printing!
Creating 'custom' resin colours without using CMYK pigments or buying custom coloured resin. Having the ability to see a range of colours in person rather than viewing on a computer screen. Experimenting with mixing resins without wasting excessive amounts.
Solution:
This colour swatch. All you need is an idea of what resin colours are readily available to you, and which of those you can mix to create your desired colour. Then using a 1ml syringe you can
Pros:
Quick and easy to print and assemble.
Files will fit Anycubic Photon & Elegoo Mars build plates.
Minimal resin needed - max of 22ml of each colour (full triangle swatch).
Can be cured in sunlight if UV curing light unavailable.
Hex insides are rounded at the bottom to stop colours getting stuck in corners.
Bottom edges are rounded to prevent elephants foot.
Cheap: You'll only need 3x 1ml syringes and a small instrument to mix with such as a toothpick.
Assemble as many hexes as you like. For a two colour swatch you only need to print 10 single hexes.
Cons:
Limited to the colours of resin readily available.
Your chosen base colours may not create the exact colour you desire. You need to be confident that you're base colours are capable of producing the colour you want, for example; a mix of white/blue/yellow resins will not produce purple.
Only the top 1mm (approximately) of resin is cured, therefore leaks/splashes could occur if the filled swatch is dropped.
How to:
Decide how many hexes you want if you're not printing the full triangular swatch. Each hex or group of hexes can be glued together, superglue works fine. The fewer hexes in your swatch, the lesser your range of colours will be. The full triangular swatch yields 66 different colours.
For the full triangle use files: RCH V2 1 + RCH V2 2 + RCH V2 3.
If you are using solid resin colours then it is preferable that you print the hexes white, you could also print grey or black but avoid colours as it'll interfere with your perception of the colours in your finished swatch. For clear/translucent resins it may be better to print in a clear colourless resin. I can't say whether the colours from neighbouring hexes will interfere with other colours when viewing them as I haven't tried this with clear resins.
Get your hexes printed, post-cured, and glued together.
Next take one of your colours, and row by row drop in the required amount of resin using a 1ml syringe. Use the picture guide to understand what I mean by row by row and how much resin to put in each hex. I found it helpful to have the triangle pointing away from me, that way I wouldn't get confused with the rows.
Once you've done that it's time to do the same with your next colour(s). Again it was helpful to rotate the triangle so the 'new' point of it was pointing away from me.
When all the hexes are filled, use something small to mix each hex, I used a toothpick, be sure to scrape the edges and bottom of each hex.
Next, cure the resin under UV light. I exposed mine under a 24watt LED strip light for 30 minutes (I think, it could have been 15). You want to cure as much of the resin at the top of each hex to prevent accidental spills of the uncured resin underneath. You may want to balance this with the effect overcuring may have on your resin, for example white will brown the longer it is exposed.
With the curing done your swatch is ready!
Reading your swatch...
View the swatch under natural light where possible. Use a marker pen to mark your chosen colour. Now reference the guide, reading across each row one colour at a time. If you have printed the full triangle then the percentages are easy to calculate. Note the percentage of each colour use it to calculate how much of each colour you need for your print*. The percentage of all colours combined should equal 100%, if not, you need to read the swatch again.
I would advise that you mix a small amount first to be sure it is correct.
Happy printing!
Similar models
thingiverse
free
Resin Cure Calibrate Time - 3mm Allen hex key
...he - signed holes need to add time to cure (about 1 second for each - hole sign).
central hole is the perfect fit (your target!).
thingiverse
free

Filament colour swatches for Ikea Skadis by xyren
...n360 source file as well (again, head over to prusaprinters), so if you feel like re-designing this, feel free and let me know :)
grabcad
free

Volvo 3D printed excavator arm with working hydraulic cylinder
...lvo 3d printed excavator arm with working hydraulic cylinder
grabcad
volvo ec360 arm model.
for full assembly 1ml syringe needed
thingiverse
free

UV curing station by douwe1230
...ion
i'm also participate in make a tool contest on instructables, if you realy like this a vote would be realy appreciated :)
3dwarehouse
free

1mL Syringe
...1ml syringe
3dwarehouse
1ml bd syringe to scale.
grabcad
free

1ml Syringe with locking tip
...1ml syringe with locking tip
grabcad
medical equipment 1ml syringe.
grabcad
free

Pneumatic Accessory for 3ml, 1ml syringe
...pneumatic accessory for 3ml, 1ml syringe
grabcad
pneumatic accessory for 3ml, 1ml syringe
cg_trader
$18

Syringe 1ml
... 1ml
cg trader
syringe 1ml 3d syringe 1ml ml 1 needle injection injections, formats max, obj, fbx, ready for 3d animation and ot
grabcad
free

CMYK WT 100 Patch Swatches
...validate 2 material color mixes
created using voxel print
30 swatches in total
versions uploaded: print on glass (full cure 705)
thingiverse
free

Star Trek Enterprise in a Bottle by Digiko
...hased, curing it smooth on the outside, making the bottle clear, but the interior cloudy thus showing off the ship in the bottle.
Swatch
3ddd
$1

swatch
...swatch
3ddd
наручные , часы
swatch by rafo3d
3d_export
$5

Swatch 3D Model
...swatch 3d model
3dexport
swatch
swatch 3d model artless 51698 3dexport
3ddd
$1

SWATCH
... наручные часы , наручные
модель сделана для близкого ракурса
turbosquid
$19

Swatch Bag
... available on turbo squid, the world's leading provider of digital 3d models for visualization, films, television, and games.
turbosquid
$49
![Swatch Irony [Gold]](/t/13416150.jpg)
Swatch Irony [Gold]
... available on turbo squid, the world's leading provider of digital 3d models for visualization, films, television, and games.
turbosquid
free

lighting material swatch
... available on turbo squid, the world's leading provider of digital 3d models for visualization, films, television, and games.
3ddd
$1
CMYK Color Swatch Calendar
...cmyk color swatch calendar
3ddd
cmyk
24000 poly
3d_export
$49

Swatch X Omega MoonSwatch Full collection Briefcase
...es, to make a scene unique, your way! this briefcase comes with all of the watches are in the collab collection! happy rendering!
3d_export
$19

Wrist Watch 3D Model
...wrist watch 3d model 3dexport watch swatch wristwatch leather band wrist watch 3d model dmtnt 36286...
3d_ocean
$5
Colourful Clock
...model of a children room wall clock. graphic colourful swatchs clock for children room. it was modelled and prepared...
Resin
turbosquid
$5

Resin table
...royalty free 3d model resin table for download as max and fbx on turbosquid: 3d models for games, architecture, videos. (1433351)
turbosquid
free
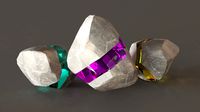
Resin Stone Free
...urbosquid
free 3d model resin stone free for download as max on turbosquid: 3d models for games, architecture, videos. (1521898)
turbosquid
$6

Epoxy Resin Table
...
royalty free 3d model epoxy resin table for download as max on turbosquid: 3d models for games, architecture, videos. (1425329)
turbosquid
$9

RESIN CHATEAU CHAIR
...sin chateau chair for download as max, max, 3ds, fbx, and obj on turbosquid: 3d models for games, architecture, videos. (1640415)
3d_export
$39

waraji resin statue sculpture
... sculpture
3dexport
waraji resin statue sculpture file 3dsmax 2014 max - fbx - stl - obj - 3ds polys : 163098 vertices : 85396
turbosquid
$10

Decorative Resin Decorative Box
...ree 3d model decorative resin decorative box for download as on turbosquid: 3d models for games, architecture, videos. (1341022)
turbosquid
$2

Resin Table LOW POLY
...oyalty free 3d model resin table-low poly for download as fbx on turbosquid: 3d models for games, architecture, videos. (1568798)
turbosquid
$1

Doll eye resin and molding
...ree 3d model doll eye (resin and molding) for download as stl on turbosquid: 3d models for games, architecture, videos. (1461887)
turbosquid
$1

Resin Ring - Epoxy Accessory
...odel resin ring - epoxy accessory for download as max and fbx on turbosquid: 3d models for games, architecture, videos. (1422041)
turbosquid
$7

Resin Wicker Dining Set
... available on turbo squid, the world's leading provider of digital 3d models for visualization, films, television, and games.
Colour
3d_export
$5

Diamons colours
...diamons colours
3dexport
diamons colours<br>.blend
design_connected
$16
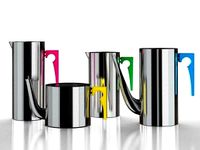
Add Colour
...add colour
designconnected
stelton add colour computer generated 3d model. designed by jacobsen, arne.
turbosquid
$4

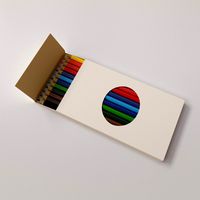
Coloured Pencils
...ty free 3d model coloured pencils for download as max and fbx on turbosquid: 3d models for games, architecture, videos. (1702123)
3d_export
free
colour pencils
...colour pencils
3dexport
turbosquid
$5

Colour Train
...ree 3d model colour train for download as obj, fbx, and blend on turbosquid: 3d models for games, architecture, videos. (1504572)
turbosquid
$12
Colour pencil
... available on turbo squid, the world's leading provider of digital 3d models for visualization, films, television, and games.
turbosquid
$10

Colour pen
...3d model colour pen for download as ma, ma, fbx, obj, and png on turbosquid: 3d models for games, architecture, videos. (1581204)
turbosquid
$9

Coloured vases
...loured vases for download as 3ds, max, obj, c4d, fbx, and skp on turbosquid: 3d models for games, architecture, videos. (1404182)
3ddd
$1

Colour square poufs
...colour square poufs
3ddd
пуф
four colour square poufs: violet, red, pink and yellow.
3ddd
free

KARE / Vintage Coloure
... настенные , часы
настенные часы vintage coloure, kare design
Printers
archibase_planet
free

Printer
...inter
archibase planet
printer laser printer pc equipment
printer n120614 - 3d model (*.gsm+*.3ds) for interior 3d visualization.
archibase_planet
free

Printer
...rchibase planet
laser printer office equipment computer equipment
printer - 3d model (*.gsm+*.3ds) for interior 3d visualization.
turbosquid
$100

Printer
...er
turbosquid
royalty free 3d model printer for download as on turbosquid: 3d models for games, architecture, videos. (1487819)
turbosquid
$3

Printer
...turbosquid
royalty free 3d model printer for download as max on turbosquid: 3d models for games, architecture, videos. (1670230)
turbosquid
$1

printer
...turbosquid
royalty free 3d model printer for download as max on turbosquid: 3d models for games, architecture, videos. (1595546)
turbosquid
$1

printer
...turbosquid
royalty free 3d model printer for download as max on turbosquid: 3d models for games, architecture, videos. (1595105)
turbosquid
$10

Printer
...id
royalty free 3d model printer for download as max and 3dm on turbosquid: 3d models for games, architecture, videos. (1607146)
turbosquid
$7

Printer
...royalty free 3d model printer for download as ma, ma, and obj on turbosquid: 3d models for games, architecture, videos. (1644580)
turbosquid
$30

Printer
... available on turbo squid, the world's leading provider of digital 3d models for visualization, films, television, and games.
turbosquid
$20

Printer
... available on turbo squid, the world's leading provider of digital 3d models for visualization, films, television, and games.