Thingiverse
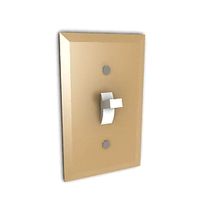
Child's Light Switch Helper by ldabkey
by Thingiverse
Last crawled date: 3 years ago
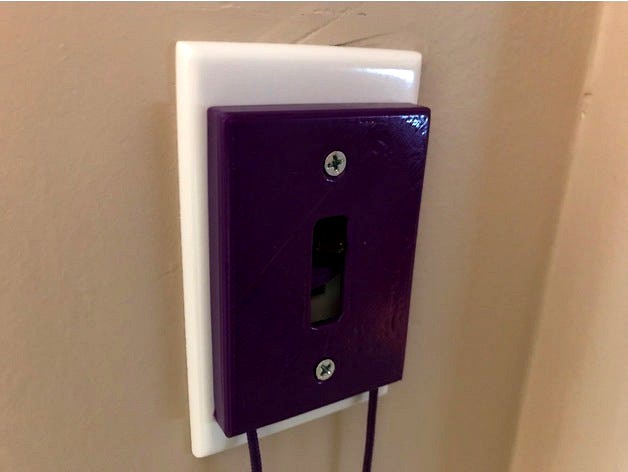
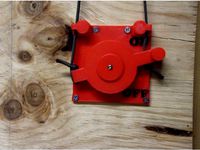
I sit for my grand-daughter and she loves turning the lights off and on. I remembered having a device that went on the light switchplate that allowed 'little ones' the opportunity to turn the lights on and off for themselves.
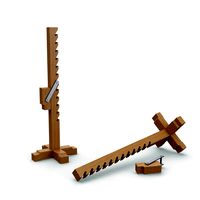
So, I modeled a faceplate that has an actuator that flips the light switch by pulling a cord. One cord to turn on the lights and the other cord to turn them off. NOTE: Files are in inches NOT mm.
Material list
1 - 48" 325 Paracord Available at Hobby Lobby in various colors. I used purple.
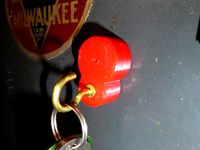
2 - wooden beads 3/4" or 20mm in diameter with through holes. I like different color beads for on and off. For those devoted to only using what you can print, I have included a file for printing beads. If you do decide to print the beads, it is highly suggested that you use a raft.
2 - 6-32 1" flat head screws. Longer screws will probably be needed to attach the faceplate. The ones supplied with a switchplate are usually very short and will most likely not work for you.
Instructions
1) Download and 3D print the pieces. I printed in ABS for strength.
2) Cut 48" of Paracord. Your length may vary as necessary. I singed the ends using a torch to prevent fraying.
3) Using 9/64" drill bit, drill through the mounting holes of the faceplate. This will insure easier installation.
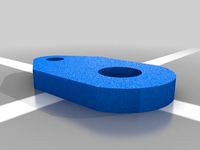
4) Using a 13/64" drill bit, drill the larger hole of the actuator. This will facilitate a smoother operation of the actuator.. Use a 5/32" drill for the smaller holes.
5) (optional) Using #400 sandpaper, sand the parts to smoothness. Wash with water after sanding. For shininess, give the parts an acetone vapor bath.
6) Fold the cord in half to determine the middle. Feed the cord through the actuator about 3 inches from the center as pictured.
7) Assemble the actuator to the faceplate as pictured draping the cord over the top track. The longer portion of the cord goes over the top track.
8) Remove the existing screws on the switchplate. Using the new screws, attach the faceplate and actuator being careful not to pinch the cord. Test to make sure the light goes on and off when pulling the cords.
9) After you are satisfied with the operation, thread the beads on the cords. Determine the best length for the cords and cut the cords off and tie a knot.
So, I modeled a faceplate that has an actuator that flips the light switch by pulling a cord. One cord to turn on the lights and the other cord to turn them off. NOTE: Files are in inches NOT mm.
Material list
1 - 48" 325 Paracord Available at Hobby Lobby in various colors. I used purple.
2 - wooden beads 3/4" or 20mm in diameter with through holes. I like different color beads for on and off. For those devoted to only using what you can print, I have included a file for printing beads. If you do decide to print the beads, it is highly suggested that you use a raft.
2 - 6-32 1" flat head screws. Longer screws will probably be needed to attach the faceplate. The ones supplied with a switchplate are usually very short and will most likely not work for you.
Instructions
1) Download and 3D print the pieces. I printed in ABS for strength.
2) Cut 48" of Paracord. Your length may vary as necessary. I singed the ends using a torch to prevent fraying.
3) Using 9/64" drill bit, drill through the mounting holes of the faceplate. This will insure easier installation.
4) Using a 13/64" drill bit, drill the larger hole of the actuator. This will facilitate a smoother operation of the actuator.. Use a 5/32" drill for the smaller holes.
5) (optional) Using #400 sandpaper, sand the parts to smoothness. Wash with water after sanding. For shininess, give the parts an acetone vapor bath.
6) Fold the cord in half to determine the middle. Feed the cord through the actuator about 3 inches from the center as pictured.
7) Assemble the actuator to the faceplate as pictured draping the cord over the top track. The longer portion of the cord goes over the top track.
8) Remove the existing screws on the switchplate. Using the new screws, attach the faceplate and actuator being careful not to pinch the cord. Test to make sure the light goes on and off when pulling the cords.
9) After you are satisfied with the operation, thread the beads on the cords. Determine the best length for the cords and cut the cords off and tie a knot.
Similar models
thingiverse
free

One strand paracord end bead by tudza
...tudza
thingiverse
bead to dress the end of one paracord strand. pull cord through, melt the end, and pull melted end into bead.
thingiverse
free
Skull Paracord Bead by ScarcelyLucid
...ngiverse
skull bead i modeled in blender for paracord bracelets, the hole in it is large enough for much thicker cording though.
thingiverse
free

Zipper Pull for 550 Paracord by nemokeine
...gether and then use a wire/string to pull the loop through the bead, the knot sitting snugly in the larger opening in the bottom.
thingiverse
free

1.5" Spherical beads by TwilightMagester
...out with 275 paracord you can also use them similar to astrojax (with 3 beads) monkeyknuckles (with 4 beads),...
thingiverse
free

Smaller two-strand paracord end bead by tudza
...t the ends making them as wide as possible, and pull the melted ends into the bead.
watch fob bead printed in gold colored steel.
thingiverse
free

Light Switch Extender by wookieden
...late screws (but not the faceplate), hold the standoffs in place, screw them on, then snap the slider bar on and you're done.
thingiverse
free
Zipper Pulls by armourcraft
...around and through itself (if that makes sense).
the begleri listing can be found here: https://www.thingiverse.com/thing:2964562
thingiverse
free
Mini Zipper Pull for 95 Paracord by nemokeine
...of cord, and the hole on the bottom holds the knot pretty snugly, so it may take some pulling to seat it fully. share and enjoy.
thingiverse
free
Remote Light Switch by 8SquareFeet
...ect, but it works great for me. now i don't have to walk all the way to the back of a dark room to turn the light on and off.
thingiverse
free

Valentine Heart Lanyard Bead for Lamp Pull, Shoelace, Pendant, Paracord by ricswika
...te.
it takes about 1/2 hour to print and uses less than 5 grams of material (on my printer). print them for all your sweethearts!
Ldabkey
thingiverse
free
Pinball Part by ldabkey
...pinball part by ldabkey
thingiverse
as requested...
thingiverse
free

Pinewood Derby Car by ldabkey
...pinewood derby car by ldabkey
thingiverse
a pinewood derby car with the standard wheelbase for cub scouts
thingiverse
free

The Holy Grail by ldabkey
...ldabkey
thingiverse
a nice cup....could be the holy grail or.....a goblet from game of thrones.....about 125 mm tall full scale.
thingiverse
free

Filament Sponge - Remix by ldabkey
... remix by ldabkey
thingiverse
jazzed it up a little with knurling and dual extrusion for top and nut. designed for replicator 2x
thingiverse
free

Superman Pinewood Derby Car by ldabkey
...superman pinewood derby car by ldabkey
thingiverse
a sample pinewood derby car using the superman logo.
thingiverse
free

Christmas Ornament - Santa Hat by ldabkey
...s the season for christmas ornaments. this one was re-mixed fromhttp://www.thingiverse.com/thing:220973
designed for giant legos.
thingiverse
free

Pinewood Derby Wheels by ldabkey
...ill. the wheel bores still will need to be reamed, polished and the wheels trued before racing. bsa wheels are scaled for inches.
thingiverse
free
Magnetic Hook by ldabkey
...om/
1/2" magnetic cup 99k32.53
1/2" high friction disc 99k34.52
1/2" magnet 99k31.03
brass cup holder (home depot)
thingiverse
free

Eagle Claw and Ball by ldabkey
...i found this eagle claw stl file somewhere but don't remember where. if someone wants to claim credit, i will give attribute.
thingiverse
free

London Arsenal Logo by ldabkey
...9;t know how that would go. if someone prints it, please post as a 'make. i'm going to use it for a 3d carving on my cnc.
Helper
turbosquid
$3
Helper Drone
...del helper drone for download as blend, blend, blend, and fbx on turbosquid: 3d models for games, architecture, videos. (1531142)
turbosquid
$10
Workbench Helper
... workbench helper for download as 3ds, obj, fbx, 3dm, and skp on turbosquid: 3d models for games, architecture, videos. (1411448)
turbosquid
$39
Helper 1 robot
... available on turbo squid, the world's leading provider of digital 3d models for visualization, films, television, and games.
turbosquid
$30
Santa Helper 3d Printable
...er 3d printable for download as max, obj, blend, stl, and ztl on turbosquid: 3d models for games, architecture, videos. (1472944)
turbosquid
free
Folding sticks walking helper
...lper for download as 3ds, obj, fbx, blend, dae, stl, and gltf on turbosquid: 3d models for games, architecture, videos. (1353089)
3d_export
free

Download free UV Tile Placement Helper 2048x2048 3D Model
...s max maya uv map tile checkered checker tools utility texture
uv tile placement helper 2048x2048 3d model timb120 63561 3dexport
turbosquid
$16

(Project) Food packing helper machine with holding clamp and press table driven by an actuator
... available on turbo squid, the world's leading provider of digital 3d models for visualization, films, television, and games.
3d_export
$8

decor-08
...elements, no groups / linked objects no lights, cameras, helper, layers, particle...
3ddd
$1
![Generic Interior Doors [Hinged]](/t/701005.jpg)
Generic Interior Doors [Hinged]
...and then you can wire the door to the helper. ...
3d_export
$5

armchair fast ikea
...totals: objects: 18 shapes: 0 cameras: 0 lights: 1 helper: 0 space warps: 0 total: 19 mesh totals: verts:...
Child
3d_export
$99

Child
...child
3dexport
child model which can be used in animation or game projects.
3ddd
$1
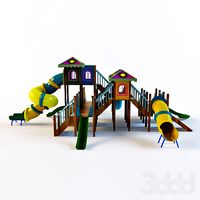
Childs slide
...childs slide
3ddd
childs slide , детская площадка
childs slide
3ddd
$1
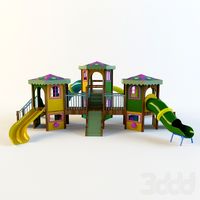
Childs slide
...childs slide
3ddd
childs slide , детская площадка
childs slide
3ddd
$1

Childs slide
...childs slide
3ddd
childs slide , детская площадка
childs slide
3ddd
$1

child bed
...child bed
3ddd
child bed , постельное белье
child bed
turbosquid
$1
child
...quid
royalty free 3d model child for download as obj and fbx on turbosquid: 3d models for games, architecture, videos. (1171026)
3d_export
$5

Bed for child
...bed for child
3dexport
bed for child boy
turbosquid
$10
Child
... free 3d model child for download as 3ds, obj, fbx, and blend on turbosquid: 3d models for games, architecture, videos. (1155901)
3d_ocean
$7
Child Park Area
...child park area
3docean
child child area child game child park area child park horse playgrounds
child park area ,playground
turbosquid
$150
child
... available on turbo squid, the world's leading provider of digital 3d models for visualization, films, television, and games.
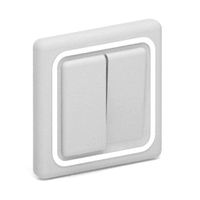
Switch
archibase_planet
free
Switch
...switch
archibase planet
switch cluster switch
light switch 1 - 3d model for interior 3d visualization.
archibase_planet
free
Switch
...switch
archibase planet
switches switch
switch 1 - 3d model (*.gsm+*.3ds) for interior 3d visualization.
archibase_planet
free
Switch
...switch
archibase planet
closer button switch cluster switch
switch - 3d model (*.3ds) for interior 3d visualization.
archibase_planet
free
Switch
...switch
archibase planet
switch closer
light switch 2 - 3d model for interior 3d visualization.
archibase_planet
free
Switch
...switch
archibase planet
closer button switch
switch n300808 - 3d model (*.gsm+*.3ds) for interior 3d visualization
archibase_planet
free
Switch
...switch
archibase planet
closer button switch
switch n141108 - 3d model (*.gsm+*.3ds) for interior 3d visualization.
archibase_planet
free

Switch
...switch
archibase planet
cluster switch closer
switch n260609 - 3d model (*.gsm+*.3ds) for interior 3d visualization.
archibase_planet
free

Switch
...switch
archibase planet
button switch closer
switch 2 - 3d model (*.gsm+*.3ds) for interior 3d visualization.
archibase_planet
free

Switch
...switch
archibase planet
button switch closer
switch n070510 - 3d model (*.gsm+*.3ds) for interior 3d visualization.
3d_export
$5

switch
...switch
3dexport
3d model of a low-poly switch
Light
archibase_planet
free

Light
...light
archibase planet
lamp lighting light
light - s2 - 3d model for interior 3d visualization.
archibase_planet
free

Light
...light
archibase planet
light luminaire lighting
light l0465 - 3d model (*.gsm+*.3ds) for interior 3d visualization.
3d_export
$5

lighting
...lighting
3dexport
lighting
3d_export
$5

lighting
...lighting
3dexport
lighting in livingroom
turbosquid
$3

Lighting Tree with Lights
...d model lighting tree with lights for download as max and 3ds on turbosquid: 3d models for games, architecture, videos. (1585507)
archibase_planet
free

Light
...light
archibase planet
luster lighting solution
light - s - 3d model for interior 3d visualization.
archibase_planet
free

Light
...light
archibase planet
luster lamp lighting
light 1 - 3d model for interior 3d visualization.
archibase_planet
free

Lights
...lights
archibase planet
surgical lights surgical lamp
surgical lights (floor) - 3d model for interior 3d visualization.
archibase_planet
free

Light
...light
archibase planet
lighting luminaire candlelight
light l0463 - 3d model (*.gsm+*.3ds) for interior 3d visualization.
3d_export
$18

street light-lighting-light-xia bing
...
3dexport
street light-lighting-light-xia bing<br>max 2015 v-ray 3 max 2015<br>textures<br>all files in zip...