Thingiverse
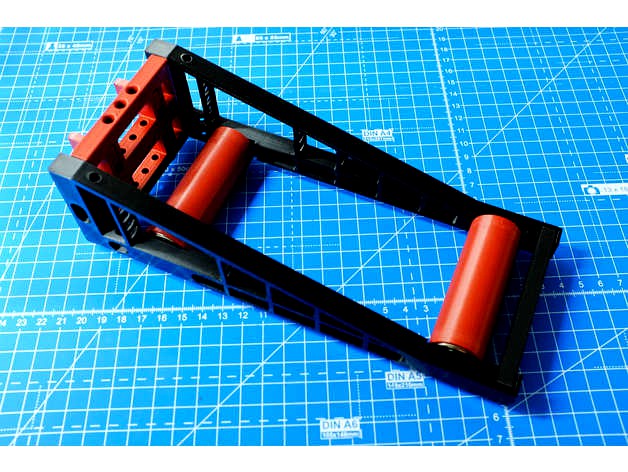
CheeseRoller - Ikea Skadis Spool Roller by sensorback
by Thingiverse
Last crawled date: 2 years, 11 months ago
Quick facts
Uses 4x 608ZZ bearings.
Designed for common 1 kg spools of 200 mm diameter, slightly larger up to
220 mm or smaller down to 180 mm should work well too.
Short version for 250 g spools of 140mm diameter is also included.
Practically tested with 1,1 kg spools weighing 1,4 kg in total.
The mm sizes are the spool width measured from outside to outside.
STLs provided in 5 mm steps and some common spool widths in between.
Easy print, can be printed in stages as it's split in several parts.
I want this, shut up and get me there, NOW!
PLA is fine, and I only tested with PLA.
0.2 mm layer height.
3 perimeters (1.2 mm wall width for a 0.4 mm nozzle).
20% infill for all parts, except the hooks and mounts which should be printed
with 100% infill.
All parts are oriented in the STLs the way they should be printed.
Choose between 2 or 3 Skadis slots height. It's designed for 2 slots. If you want to
add some strength to it for really large spools, go with the 3U version.
4x 608ZZ bearings needed. Either buy, or print one of the many options around.
See "Part selection" some lines below, and select the right parts.
Print!
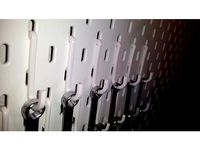
Assemble! See the pictured instructions for assembly on the bottom of this thing page.
Guide the filament through the holes in the mount plate.
See below for further details about things like mounting multiple CheeseRollers
above each other, or rendering for another spool width.
Part selection
Download the ZIP for your spool width measured from outside to outside, round up to the next 5 mm step if your spool width is between the available sizes. For example CheeseRoller 68mm.zip for a spool with 68 mm width, or CheeseRoller 55mm.zip for a spool with 52 mm spool width.
Each ZIP contains all parts for the variations that can be printed for the downloaded spool width. Select the parts inside the ZIP by the following guide, swap XX with your spool width:
1x Arm Left, print with 20% infill, choose between:
CheeseRoller Arm Standard 2U Left.stl: 200mm spools, 2 Skadis holes high
CheeseRoller Arm Short 2U Left.stl: 140mm spools, 2 Skadis holes high
CheeseRoller Arm Standard 3U Left.stl: 200mm spools, 3 Skadis holes high
CheeseRoller Arm Short 3U Left.stl: 140mm spools, 3 Skadis holes high
1x Arm Right, print with 20% infill, choose between:
CheeseRoller Arm Standard 2U Right.stl: 200mm spools, 2 Skadis holes high
CheeseRoller Arm Short 2U Right.stl: 140mm spools, 2 Skadis holes high
CheeseRoller Arm Standard 3U Right.stl: 200mm spools, 3 Skadis holes high
CheeseRoller Arm Short 3U Right.stl: 140mm spools, 3 Skadis holes high
2x Hook (4x for sizes larger than 123), print with 100% infill, choose between:
CheeseRoller Hook 2U.stl: 2 Skadis holes high
CheeseRoller Hook 3U.stl: 3 Skadis holes high
1x Mount, print with 100% infill, choose between:
CheeseRoller XXmm Mount 2U.stl: 2 Skadis holes high
CheeseRoller XXmm Mount 3U.stl: 3 Skadis holes high
2x Roll, print with 20% infill: CheeseRoller XXmm Roll.stl
2x Pin, print with 20% infill: CheeseRoller XXmm Pin.stl
1x Connector, print with 20% infill: CheeseRoller XXmm Connector.stl
4x 608ZZ bearings (either bought or find some printable bearings that are all around)
Example part list for a standard 1 kg spool, 68 mm wide, 200 mm diameter, being two Skadis holes high:
1x CheeseRoller Arm Standard 2U Left.stl
1x CheeseRoller Arm Standard 2U Right.stl
2x CheeseRoller Hook 2U.stl
1x CheeseRoller 68mm Mount 2U.stl
2x CheeseRoller 68mm Roll.stl
2x CheeseRoller 68mm Pin.stl
1x CheeseRoller 68mm Connector.stl
Example part list for a small 250 g spool, 42 mm wide, 140 mm diameter, being two Skadis holes high:
1x CheeseRoller Arm Short 2U Left.stl
1x CheeseRoller Arm Short 2U Right.stl
2x CheeseRoller Hook 2U.stl
1x CheeseRoller 45mm Mount 2U.stl
2x CheeseRoller 45mm Roll.stl
2x CheeseRoller 45mm Pin.stl
1x CheeseRoller 45mm Connector.stl
The print is started, I got a cup of tea, now tell me the story.
+++ Why another spool roller? +++
Filament is a fascinating material. I like to stroll through webshops, reviews and videos about filament. Every filament delivery that arrives, makes the day a slightly happier one.
To keep up that happiness, you have to have some ideas to get rid of the ugly little attachments that the workflow of a filament spool brings into the game:
You need to store them in a place, where you can reach them easily.
You want to see your current stock without scrabbling through cabinets
and drawers.
As your filament collection grows, your solution needs to be extensible.
Spools packed in their cover until their first usage, should be storable.
Loading filament should be a hassle-free task.
Unloading filament too.
You shouldn't care about tangling filament and stuffing the tip of the
filament somewhere, where it doesn't drive you crazy the next time you
grab the spool.
Actually you even shouldn't need to grab the spool and carry it around.
They should be where you use them, somewhere next to your printer.
3D Printing is about beauty and design. When storing the
filaments visibly, the storage should at least satisfy some degree of
beauty.
When designing parts to be printed, you also need to take care of the print process:
The print should use as less filament as possible.
It should be easy to print. So it shouldn't need supports, and the print
should be fast, or it should be possible to do in a couple of stages.
+++ The base for the idea +++
A widely used technique to store things are pegboards. A popular option for DIY crafters is Ikea's Skadis pegboard. It's cheap, easy to mount, comes in an unobtrusive white, and there are a ton of things to print for it. So I experimented with a couple of spool holders and rollers for the Skadis pegboard. All worked great for a single, or a couple of spools. They all solved some issues mentioned, but none solved them all.
+++ Analysis and inspirations +++
I wanted to solve all the mentioned issues. So I began to analyse all the options I tried, and the options I could find. The primary inspirations came from The Filler (https://www.thingiverse.com/thing:3020026), for which I even created a Skadis brace (https://www.thingiverse.com/thing:4810681), and the most simple Skadis spool roller I could find (https://www.thingiverse.com/thing:4193268), for which I created a printable hook (https://www.thingiverse.com/thing:4810695).
+++ The development +++
It took two months of designing, printing prototypes and testing stability, until the CheeseRoller was done. It's name came up when I started to cut holes and slots into it's main frame like if I wanted to make it look like Swiss Cheese. That was suitable, as holes in cheese appear, when it matures, just like the CheeseRoller did mature at this time. The holes and slots are a measure to save material, speed up print time, and make it sturdy enough for rotating filament spools, as all the holes and slots add perimeters that make it stiff.
+++ What about all the sizes? +++
You could use just one size that fits them all. If all your spools are between 60 and 70 mm wide, measured from outside to outside, you could just print a couple of 70 mm CheeseRollers. The 60 mm spool will fit right away in the 70 mm CheeseRoller as the spool just stands on the two rolls. The narrower the spool, the more it tends to tilt a bit when the filament is pulled, especially if the spool is nearly empty. For this case better use one that fits your spool width. If you have a 42 mm wide spool, take 45 mm.
To avoid that the spool is clamped between the arms of the frame, every size adds 2 mm on the left and on the right. The 60 mm size actually is 64 mm wide on the inside. So the spool can move freely and will not be slowed down by touching the frame. This additional 2 mm also give you the opportunity to place spools still packaged in a plastic bag. If you want to place spools not only packaged in it's bag but also in it's cardboard box, look if you have a free CheeseRoller of slightly bigger size, as the cardboard box usually takes some more than 4 millimeters.
+++ Available sizes +++
I rendered for spool sizes from 40 mm upwards in 5 mm steps, some common spool widths in between like 68 mm, and also 120 mm and 140 mm for even larger ones.
+++ Rendering custom sizes +++
If you need another size, the OpenSCAD Sources are attached. The arms and the hook are the same for all sizes, you can download the STLs here. For the other parts download CheeseRoller Sources.zip, unzip and load CheeseRoller Connector.scad, CheeseRoller Mount.scad, CheeseRoller Pin.scad and CheeseRoller Roll.scad in OpenSCAD, enter the SPOOL_WIDTH in the OpenSCAD customizer, render the parts with F6 and save the STL with F7.
+++ Tests +++
Note that I only tested with spools of up to 85 mm wide and 1.4 kg of weight. Double check when using heavy spools that need a 120 mm or even a 140 mm CheeseRoller, if the weight is carried safely by the CheeseRoller and also the Skadis board itself. Spools carrying way more than 1kg of filament usually also have a larger diameter than 220 mm and will be too large for the design. I also don't use spools of that size. So my intention wasn't designing and testing for those sizes.
+++ Printing duration +++
If you print infrequently, are a beginner or can't let the printer run for some hours, you probably embrace print projects that can be printed in parts. The parts that take the longest time are the arms, or above 70 mm size the roll. An arm takes about 2.5 hours on my Creality CR-10 V2 when printed with 0.2 mm layer height and a 0.4 nozzle. The roll for 68 mm size takes about the same time as a single arm. If you can spare another 30 minutes, print two rolls at once, it won't take twice as long, just about half an hour more for a 68 mm roll. Well, that's nothing I can be accounted for because of the design, that's just kinda print and slicer magic.
+++ Printing +++
Printing the parts is easy. I only used and tested with PLA. PETG or ABS may work well too, but test it before printing CheeseRollers for your whole wall.
The parts are all oriented the way they should be printed in the STL. Just load all the parts into your slicer and print it. The longest parts are the arms. They are just below 225 mm long. If your print volume is smaller, try to rotate them by the Z axis. They should fit a 200x200 mm buildplate when rotated so they are placed diagonally on the build plate.
+++ Print settings +++
The relevant recommended print settings:
0.2mm layer height
3 perimeters (1.2mm wall width for a 0.4mm nozzle)
20% infill for all parts, except the hooks and mounts which should be printed with 100% infill.
+++ What about the filament path? +++
To guide the filament from the spool it carries, there are vertical holes with rounded edges in the mount plates. Just guide the filament through them. If you want to give it some more guidance, you can run a regular PTFE tube with 4 mm outer diameter through the holes. Just be aware of the friction added by additional PTFE tubes on the filament's path to the printer.
When you unload the filament from the printer, roll the spool back, so the filament just stays out a bit from the bottom mount hole. The next time you load it, grab the filament and pull it to your printer. The roll takes care of itself and unwinds.
An alternative way without any further materials needed is to just pull the filament down between the mount and the back roll. When the feeder pulls, and the spool unwinds, the back roll also rotates in the same direction as it should to give the filament a good go downwards. Depending on the position of your printer, the filament needs to go sideways and wander on the bottom edge of one of the arms. The friction there should be low, depending on how far it needs to go sideways. Just check that path if under extrusion occurs.
+++ Placing multiple spools vertically +++
If you wonder why there is more than one path for filament, that's for guiding filament from multiple CheeseRollers mounted above each other. There are three hole paths in the mount plates. The middle one is intended to be used for the filament of the spool the CheeseRoller actually carries. The other two could be used to guide filament from CheeseRollers mounted above. Additionally, there are holes for filament in both arms. Look on the arms from the top, you see the holes about 15 mm inset from the back. On a standard Skadis board there is enough room to place three CheeseRollers vertically. So the three PTFE paths in the mounts should be enough if you create filament paths straight down across the whole Skadis board.
+++ Feedback and remixes welcome! +++
If you like the design and print one or two CheeseRollers or fill a whole Skadis board with CheeseRollers, feel free to give some feedback in the comments or post a make. Also feel free to remix it. All parts are designed using OpenSCAD, the source files are attached. If you find optimizations I'd be glad if you ping me in the comments and give me a hint about what could be optimized.
Uses 4x 608ZZ bearings.
Designed for common 1 kg spools of 200 mm diameter, slightly larger up to
220 mm or smaller down to 180 mm should work well too.
Short version for 250 g spools of 140mm diameter is also included.
Practically tested with 1,1 kg spools weighing 1,4 kg in total.
The mm sizes are the spool width measured from outside to outside.
STLs provided in 5 mm steps and some common spool widths in between.
Easy print, can be printed in stages as it's split in several parts.
I want this, shut up and get me there, NOW!
PLA is fine, and I only tested with PLA.
0.2 mm layer height.
3 perimeters (1.2 mm wall width for a 0.4 mm nozzle).
20% infill for all parts, except the hooks and mounts which should be printed
with 100% infill.
All parts are oriented in the STLs the way they should be printed.
Choose between 2 or 3 Skadis slots height. It's designed for 2 slots. If you want to
add some strength to it for really large spools, go with the 3U version.
4x 608ZZ bearings needed. Either buy, or print one of the many options around.
See "Part selection" some lines below, and select the right parts.
Print!
Assemble! See the pictured instructions for assembly on the bottom of this thing page.
Guide the filament through the holes in the mount plate.
See below for further details about things like mounting multiple CheeseRollers
above each other, or rendering for another spool width.
Part selection
Download the ZIP for your spool width measured from outside to outside, round up to the next 5 mm step if your spool width is between the available sizes. For example CheeseRoller 68mm.zip for a spool with 68 mm width, or CheeseRoller 55mm.zip for a spool with 52 mm spool width.
Each ZIP contains all parts for the variations that can be printed for the downloaded spool width. Select the parts inside the ZIP by the following guide, swap XX with your spool width:
1x Arm Left, print with 20% infill, choose between:
CheeseRoller Arm Standard 2U Left.stl: 200mm spools, 2 Skadis holes high
CheeseRoller Arm Short 2U Left.stl: 140mm spools, 2 Skadis holes high
CheeseRoller Arm Standard 3U Left.stl: 200mm spools, 3 Skadis holes high
CheeseRoller Arm Short 3U Left.stl: 140mm spools, 3 Skadis holes high
1x Arm Right, print with 20% infill, choose between:
CheeseRoller Arm Standard 2U Right.stl: 200mm spools, 2 Skadis holes high
CheeseRoller Arm Short 2U Right.stl: 140mm spools, 2 Skadis holes high
CheeseRoller Arm Standard 3U Right.stl: 200mm spools, 3 Skadis holes high
CheeseRoller Arm Short 3U Right.stl: 140mm spools, 3 Skadis holes high
2x Hook (4x for sizes larger than 123), print with 100% infill, choose between:
CheeseRoller Hook 2U.stl: 2 Skadis holes high
CheeseRoller Hook 3U.stl: 3 Skadis holes high
1x Mount, print with 100% infill, choose between:
CheeseRoller XXmm Mount 2U.stl: 2 Skadis holes high
CheeseRoller XXmm Mount 3U.stl: 3 Skadis holes high
2x Roll, print with 20% infill: CheeseRoller XXmm Roll.stl
2x Pin, print with 20% infill: CheeseRoller XXmm Pin.stl
1x Connector, print with 20% infill: CheeseRoller XXmm Connector.stl
4x 608ZZ bearings (either bought or find some printable bearings that are all around)
Example part list for a standard 1 kg spool, 68 mm wide, 200 mm diameter, being two Skadis holes high:
1x CheeseRoller Arm Standard 2U Left.stl
1x CheeseRoller Arm Standard 2U Right.stl
2x CheeseRoller Hook 2U.stl
1x CheeseRoller 68mm Mount 2U.stl
2x CheeseRoller 68mm Roll.stl
2x CheeseRoller 68mm Pin.stl
1x CheeseRoller 68mm Connector.stl
Example part list for a small 250 g spool, 42 mm wide, 140 mm diameter, being two Skadis holes high:
1x CheeseRoller Arm Short 2U Left.stl
1x CheeseRoller Arm Short 2U Right.stl
2x CheeseRoller Hook 2U.stl
1x CheeseRoller 45mm Mount 2U.stl
2x CheeseRoller 45mm Roll.stl
2x CheeseRoller 45mm Pin.stl
1x CheeseRoller 45mm Connector.stl
The print is started, I got a cup of tea, now tell me the story.
+++ Why another spool roller? +++
Filament is a fascinating material. I like to stroll through webshops, reviews and videos about filament. Every filament delivery that arrives, makes the day a slightly happier one.
To keep up that happiness, you have to have some ideas to get rid of the ugly little attachments that the workflow of a filament spool brings into the game:
You need to store them in a place, where you can reach them easily.
You want to see your current stock without scrabbling through cabinets
and drawers.
As your filament collection grows, your solution needs to be extensible.
Spools packed in their cover until their first usage, should be storable.
Loading filament should be a hassle-free task.
Unloading filament too.
You shouldn't care about tangling filament and stuffing the tip of the
filament somewhere, where it doesn't drive you crazy the next time you
grab the spool.
Actually you even shouldn't need to grab the spool and carry it around.
They should be where you use them, somewhere next to your printer.
3D Printing is about beauty and design. When storing the
filaments visibly, the storage should at least satisfy some degree of
beauty.
When designing parts to be printed, you also need to take care of the print process:
The print should use as less filament as possible.
It should be easy to print. So it shouldn't need supports, and the print
should be fast, or it should be possible to do in a couple of stages.
+++ The base for the idea +++
A widely used technique to store things are pegboards. A popular option for DIY crafters is Ikea's Skadis pegboard. It's cheap, easy to mount, comes in an unobtrusive white, and there are a ton of things to print for it. So I experimented with a couple of spool holders and rollers for the Skadis pegboard. All worked great for a single, or a couple of spools. They all solved some issues mentioned, but none solved them all.
+++ Analysis and inspirations +++
I wanted to solve all the mentioned issues. So I began to analyse all the options I tried, and the options I could find. The primary inspirations came from The Filler (https://www.thingiverse.com/thing:3020026), for which I even created a Skadis brace (https://www.thingiverse.com/thing:4810681), and the most simple Skadis spool roller I could find (https://www.thingiverse.com/thing:4193268), for which I created a printable hook (https://www.thingiverse.com/thing:4810695).
+++ The development +++
It took two months of designing, printing prototypes and testing stability, until the CheeseRoller was done. It's name came up when I started to cut holes and slots into it's main frame like if I wanted to make it look like Swiss Cheese. That was suitable, as holes in cheese appear, when it matures, just like the CheeseRoller did mature at this time. The holes and slots are a measure to save material, speed up print time, and make it sturdy enough for rotating filament spools, as all the holes and slots add perimeters that make it stiff.
+++ What about all the sizes? +++
You could use just one size that fits them all. If all your spools are between 60 and 70 mm wide, measured from outside to outside, you could just print a couple of 70 mm CheeseRollers. The 60 mm spool will fit right away in the 70 mm CheeseRoller as the spool just stands on the two rolls. The narrower the spool, the more it tends to tilt a bit when the filament is pulled, especially if the spool is nearly empty. For this case better use one that fits your spool width. If you have a 42 mm wide spool, take 45 mm.
To avoid that the spool is clamped between the arms of the frame, every size adds 2 mm on the left and on the right. The 60 mm size actually is 64 mm wide on the inside. So the spool can move freely and will not be slowed down by touching the frame. This additional 2 mm also give you the opportunity to place spools still packaged in a plastic bag. If you want to place spools not only packaged in it's bag but also in it's cardboard box, look if you have a free CheeseRoller of slightly bigger size, as the cardboard box usually takes some more than 4 millimeters.
+++ Available sizes +++
I rendered for spool sizes from 40 mm upwards in 5 mm steps, some common spool widths in between like 68 mm, and also 120 mm and 140 mm for even larger ones.
+++ Rendering custom sizes +++
If you need another size, the OpenSCAD Sources are attached. The arms and the hook are the same for all sizes, you can download the STLs here. For the other parts download CheeseRoller Sources.zip, unzip and load CheeseRoller Connector.scad, CheeseRoller Mount.scad, CheeseRoller Pin.scad and CheeseRoller Roll.scad in OpenSCAD, enter the SPOOL_WIDTH in the OpenSCAD customizer, render the parts with F6 and save the STL with F7.
+++ Tests +++
Note that I only tested with spools of up to 85 mm wide and 1.4 kg of weight. Double check when using heavy spools that need a 120 mm or even a 140 mm CheeseRoller, if the weight is carried safely by the CheeseRoller and also the Skadis board itself. Spools carrying way more than 1kg of filament usually also have a larger diameter than 220 mm and will be too large for the design. I also don't use spools of that size. So my intention wasn't designing and testing for those sizes.
+++ Printing duration +++
If you print infrequently, are a beginner or can't let the printer run for some hours, you probably embrace print projects that can be printed in parts. The parts that take the longest time are the arms, or above 70 mm size the roll. An arm takes about 2.5 hours on my Creality CR-10 V2 when printed with 0.2 mm layer height and a 0.4 nozzle. The roll for 68 mm size takes about the same time as a single arm. If you can spare another 30 minutes, print two rolls at once, it won't take twice as long, just about half an hour more for a 68 mm roll. Well, that's nothing I can be accounted for because of the design, that's just kinda print and slicer magic.
+++ Printing +++
Printing the parts is easy. I only used and tested with PLA. PETG or ABS may work well too, but test it before printing CheeseRollers for your whole wall.
The parts are all oriented the way they should be printed in the STL. Just load all the parts into your slicer and print it. The longest parts are the arms. They are just below 225 mm long. If your print volume is smaller, try to rotate them by the Z axis. They should fit a 200x200 mm buildplate when rotated so they are placed diagonally on the build plate.
+++ Print settings +++
The relevant recommended print settings:
0.2mm layer height
3 perimeters (1.2mm wall width for a 0.4mm nozzle)
20% infill for all parts, except the hooks and mounts which should be printed with 100% infill.
+++ What about the filament path? +++
To guide the filament from the spool it carries, there are vertical holes with rounded edges in the mount plates. Just guide the filament through them. If you want to give it some more guidance, you can run a regular PTFE tube with 4 mm outer diameter through the holes. Just be aware of the friction added by additional PTFE tubes on the filament's path to the printer.
When you unload the filament from the printer, roll the spool back, so the filament just stays out a bit from the bottom mount hole. The next time you load it, grab the filament and pull it to your printer. The roll takes care of itself and unwinds.
An alternative way without any further materials needed is to just pull the filament down between the mount and the back roll. When the feeder pulls, and the spool unwinds, the back roll also rotates in the same direction as it should to give the filament a good go downwards. Depending on the position of your printer, the filament needs to go sideways and wander on the bottom edge of one of the arms. The friction there should be low, depending on how far it needs to go sideways. Just check that path if under extrusion occurs.
+++ Placing multiple spools vertically +++
If you wonder why there is more than one path for filament, that's for guiding filament from multiple CheeseRollers mounted above each other. There are three hole paths in the mount plates. The middle one is intended to be used for the filament of the spool the CheeseRoller actually carries. The other two could be used to guide filament from CheeseRollers mounted above. Additionally, there are holes for filament in both arms. Look on the arms from the top, you see the holes about 15 mm inset from the back. On a standard Skadis board there is enough room to place three CheeseRollers vertically. So the three PTFE paths in the mounts should be enough if you create filament paths straight down across the whole Skadis board.
+++ Feedback and remixes welcome! +++
If you like the design and print one or two CheeseRollers or fill a whole Skadis board with CheeseRollers, feel free to give some feedback in the comments or post a make. Also feel free to remix it. All parts are designed using OpenSCAD, the source files are attached. If you find optimizations I'd be glad if you ping me in the comments and give me a hint about what could be optimized.
Similar models
thingiverse
free
universal spool holder by mer_at
... spools with an inner diameter of 50mm and above.
i used 2x 3.5x35mm spax.
1x spulenh.part1
1x spulenh.part2
2x haenger
2x klemme
thingiverse
free

Filament spool for samples by wim3d
...e arm is mounted with 1 bolt, so you can twist it to mount the filament.
the center hole is 32 mm.
the outher size is adjustable.
thingiverse
free

Cr-10 top spool holder by JannikSchulz
...use a file to for the + recess of the arm, because i designed it closely.
print:
1x base
1x axis
1x bolt
2x arm
2x nut
2x splint
thingiverse
free

Lack Enclosure Bullet-Proof Re-Mix by PHIZZIK
...p-corner.stl
2x top-hinge.stl
1x filament-pass-thru.stl optional
they'll have to take my printer from my cold clogged nozzle!
thingiverse
free

Filament Spool Arm by jesc
...ap.
requires:
2x m3 screws and nuts (optional: another 2x)
2x m8 nuts
1x m8 threaded rod (~10cm long)
1x m8 washer
1x 608 bearing
thingiverse
free

Filament roll by TeamM
...lament roll with bearings.
requires:
1x nut
1x back plate
1x filament_holder
1x roll
2x m5x25 bolt
2x m5 nut
2x bearing 5x13x4 mm
thingiverse
free

Universal Filament Spool Holder Light by Pitoo67
...tps://www.amazon.com/608-bearings/s?k=608+bearings
maximum spool width : 90 mm
gap between rolls : 80 mm
all parts are printable.
grabcad
free

Filamenttree
...ts:
1x foot
1x nutgrip
1x ball baring filler (first spool)
2x/spool supporter
2x/spool ball baring filler (second-, third spool)
thingiverse
free

spool hub by wertsnoker
... nut with washers between the nut and the printed hub. on top of these mounting arms :
www.thingiverse.com/thing:720603/#files.
thingiverse
free

Spool full wheel by IvoNovais31
...design is for 55mm width spool, but it can easly be edited for other widths in tinkercad.
-and the tire is printed in tpu.
Sensorback
thingiverse
free

Skadis Hook 90mm Type 1.3 enforced for spool roller by sensorback
.... so the spool roller https://www.thingiverse.com/thing:4193268 can be printed without the need to buy the original skadis hooks.
thingiverse
free

Knobby - Controller Stick Extension by sensorback
...free to remix it, or just tell me the diameter of the knob on the stick in the comments, then i'll happily add a ps5 version.
thingiverse
free

Filler Skadis Brace for Universal Hooks by sensorback
... and .fcstd (freecad) file in the thing files. i'd be grateful if you ping me, if you find an optimization or an alternation.
thingiverse
free

Squash Ball Foot Rectangular for 2040 Extrusion by sensorback
...and *.fcstd (freecad) file in the thing files. i'd be grateful if you ping me, if you find an optimization or an alternation.
thingiverse
free

Creality CR-10 V2 Filamentsensor PC4-M6 / PC4-M10 Pushfit Adapter by sensorback
...ent sensor too, take a look at the freecad fcstd files included in the source file zip, and check the dimensions of the sketches.
thingiverse
free

CR-10 V2 Light Bar for 12.5mm LED strips for Z-Axis support rods and Cover by sensorback
...y model. so feel free to modify to your own needs. i'd be glad if you ping me if you find some optimizations or alternations.
Skadis
thingiverse
free

Skadis bottleholder
...skadis bottleholder
thingiverse
skadis bottleholder.
inner diameter 49 mm.
thingiverse
free

Box for Skadis
...box for skadis
thingiverse
hello i build a tripple box for ikea skadis
thingiverse
free

Skadis Tray by TheGreatGreyFox
...skadis tray by thegreatgreyfox
thingiverse
simple tray for skadis, hooks can be little tight.
thingiverse
free

IKEA SKADIS hang by szarkadiusz
...ikea skadis hang by szarkadiusz
thingiverse
use for ikea skadis hook system instead buing skadis board
thingiverse
free

Ikea Skadis to Ordning
...ikea skadis to ordning
thingiverse
this is a mount to connect an ikea ordning utensil holder to a skadis pegboard.
thingiverse
free
Wiimote Skadis by ferhizzle
...wiimote skadis by ferhizzle
thingiverse
holder for a nintento wiimote compatible with the ikea skadis wall storage panels
thingiverse
free
Skadis Box Divider
...skadis box divider
thingiverse
divider to fit inside the boxes which clip to the ikea skadis pegboard.
thingiverse
free
Skadis Hook by CNC_Maker
...skadis hook by cnc_maker
thingiverse
i designed a hook for the ikea skadis pegboard following the original hook of ikea.
thingiverse
free

Battery holder for Skadis by vasakavasaka
...battery holder for skadis by vasakavasaka
thingiverse
battery holder for skadis
thingiverse
free
Skadis Small Drawer by beybi
...skadis small drawer by beybi
thingiverse
drawer for ikea skadis.
Roller
turbosquid
$26
Roller A
...urbosquid
royalty free 3d model roller a for download as fbx on turbosquid: 3d models for games, architecture, videos. (1350603)
turbosquid
$3
Roller
...oyalty free 3d model roller for download as 3ds, max, and obj on turbosquid: 3d models for games, architecture, videos. (1460818)
3ddd
$1
edilkamin roller
...edilkamin roller
3ddd
камин
edilkamin roller 360
3ddd
$1
Roller Blinds
...roller blinds
3ddd
рулонная
roller blinds black out finish
turbosquid
$50

Roller
... roller for download as max, max, c4d, max, max, fbx, and obj on turbosquid: 3d models for games, architecture, videos. (1700762)
3d_export
$10
rollers
...lers
3dexport
this is low-poly model of rollers.<br>model:<br>- low-poly<br>- textured<br>- uv unwrapped
3d_export
$28
Roller 3D Model
...roller 3d model
3dexport
roller construction boss evil
roller 3d model adagio15740837 50561 3dexport
3d_export
$6
hopper roller conveyor
...hopper roller conveyor
3dexport
hopper roller conveyor
3d_export
$12

roller skates
...roller skates
3dexport
3d_ocean
$19
roller skate
...can scanned skates skating sport
3d scan of roller skate. the model has been retopologized and made fully compatible with zbrush.
Spool
3ddd
$1

spool c53301
...spool c53301
3ddd
spool
spool c53301 650х350х145
turbosquid
$3

Cable Spool
...royalty free 3d model cable spool for download as max and fbx on turbosquid: 3d models for games, architecture, videos. (1457009)
turbosquid
free

Pallets and Spool
... available on turbo squid, the world's leading provider of digital 3d models for visualization, films, television, and games.
turbosquid
$10

Spool of String
...ol of string pink for download as c4d, 3ds, fbx, obj, and stl on turbosquid: 3d models for games, architecture, videos. (1647892)
3ddd
$1

Подвесные светильники Spool
...ye/podvesnoy_svetilnik_spool_d320/ http://www.cosmorelax.ru/catalog/podvesnyye/podvesnoy_svetilnik_spool_d420/
3ddd
free

Spool 001 sofa
...spool 001 sofa
3ddd
roda
roda
collection spool
design rodolfo dordoni
dimensions:
lenght 90 cm
depth 94 cm
height 79 cm
turbosquid
$15

Roda Spool Sofa
...ee 3d model roda spool sofa for download as max, obj, and fbx on turbosquid: 3d models for games, architecture, videos. (1502650)
turbosquid
$95
wire spools 3ds
... available on turbo squid, the world's leading provider of digital 3d models for visualization, films, television, and games.
turbosquid
$20
spool of TV wire
... available on turbo squid, the world's leading provider of digital 3d models for visualization, films, television, and games.
turbosquid
$3

Simple and Fast Spool Holder
...ree 3d model simple and fast spool holder for download as stl on turbosquid: 3d models for games, architecture, videos. (1548546)
Ikea
3ddd
$1
IKEA
...ikea
3ddd
ikea , стеллаж
ikea
3ddd
$1
IKEA
...ikea
3ddd
ikea
кухня ikea
3ddd
$1

IKEA
...ikea
3ddd
ikea
осторожно, тяжелая модель
ikea
3ddd
$1
IKEA
...ikea
3ddd
ikea
5 зеркал от ikea
3ddd
$1
IKEA
...ikea
3ddd
ikea , бойа
ikea светильник потолочный
3ddd
$1
IKEA
...ikea
3ddd
ikea , барный
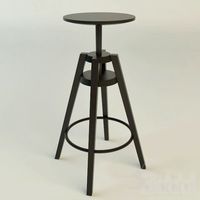
bar stool ikea
3ddd
$1

IKEA
...ikea
3ddd
ikea , зубная щетка , косметика
ikea
3ddd
free
IKEA
...ikea
3ddd
ikea , трюмо
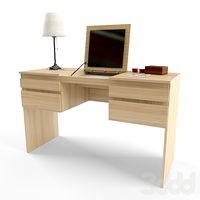
дамский столик ikea.
3ddd
$1

IKEA
...3ddd
ps , декоративный набор , ikea
ikea decor
3ddd
$1

Ikea
...ikea
3ddd
ikea , lagra
модель лампы от ikea