Thingiverse
Cheap and Easy Filament Out Sensor box by anhtien
by Thingiverse
Last crawled date: 3 years ago
Running out of filament in the middle of a print is annoying, especially when you are not around. This design will detect the filament out condition and pause the print for you to change filament. The whole implementation costs you next to nothing, assume you already use the Raspberry Pi and Octoprint to print your project.
Hardware:
A tact switch KW11-3Z 5A 250V micro switch 3Pin and two wires to the Raspberry Pi.
Wiring:
Solder the first wire to COM pin (marked with letter C) on the switch, this will be the ground wire to the Raspberry Pi.
Solder the second wire to the NO pin in the middle of the switch. This is the Normally Open pin and will connect to one of the GPIO pin on the Raspberry Pi.
I reused the wires off my old earphone that I no longer need. You can probably use 22gauge wires for this project. Make sure it's long enough to get to the Raspberry Pi with wire left to move around.
Assembly:
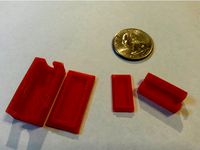
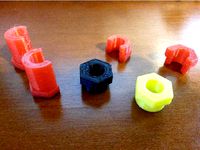
Pick out the location where you want to place the filament Sensor box and print the correct L2R or R2L box to select the filament moving from left to right or right to left of the box. It has the arrow direction to help you identify its direction too. Next is to choose the adapter (clip or x-carriage) and secure the box to the adapter.
If you choose the x-carriage adapter as shown in the picture, you need the R2L type of box which will eventually make the filament going top down since it will be attached sideway to the x-carriage adapter. You can now go to the testing and installing software steps.
Testing at system level to make sure your wiring is good:
In fact, you can use this step to test out the switch function even before printing anything out, just connect the switch's wire to the Raspberry Pi's ground and GPIO pin you want to use for this project.
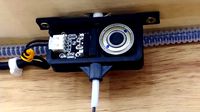
The X-carriage installation is used as example but the clip type is similar. First attach the R2L box to the X-carriage adapter using 2 x M3 screws and 2 nuts, then secure the adapter/box assembly to the X-carriage using the existing screws as shown in the picture.
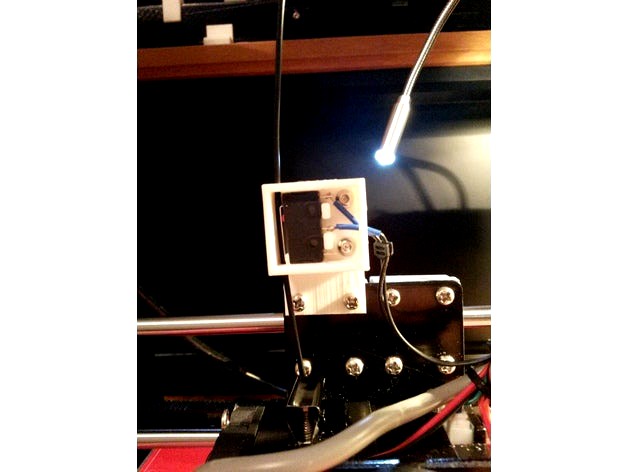
You can now run the stop switch's wires through the sensor box large hole to the Raspberry Pi. The COM wire goes to ground, the NO (Normally Open) goes to GPIO. For the Raspberry PI rev 2, the ground is pin header 9 and this example uses BCM GPIO 17, which is pin header 11. Note that this GPIO-17 is actually GPIO-0 when using wiringpi to test in this step. Next is to place the switch in correct position or else you will run into issue when pushing the filament into the box. For R2L box, the switch is placed with the open tab on the left and the ground wire on the right side (see the first picture). It’s reverse for the L2R box, i.e. the ground wire on the left side. Once done, snap the lid in the correct way to remind you which direction the filament will go (second picture).
Connect to the Raspberry Pi using SSH, username pi. Enter the following two commands to check the GPIO-0 in wiring pi mode (or your own GPIO wiring pi pin number):
gpio mode 0 up
gpio read 0
It should return the value 1 (high) to indicate there is no filament. Now cut a piece of filament and push through the hole and see it come out the other side. Repeat the second command (gpio read 0), this time it will report the value 0 (low). If you get to this point, you are done with the hardware installation. Go on to the software installation.
Software Installation:
Using the browser from another system, connect to the Octopi via http.
Click on the Setting icon (the wrench logo at the top right). Select Plugin Manager.
In the Plugin Manager screen, you should see the “Get More…” long button at the bottom, click that.
One the next screen, use the scroll bar to scroll down until you see “Filament Sensor Reloaded”. Click Install button next to that and let it complete the installation. Click Close when done.
REBOOT the Raspberry Pi to activate the software.
Proceed to the Software Configuration.
Software Configuration:
Once the Raspberry Pi is back, use the Browser to go OctoPrint Settings screen. This time you should see the “Filament Sensor Reloaded” under “PLUGINS”, click that link.
Enter 17 for Pin. Or another GPIO BCM pin you prefer.
Debounce Time should be default to 250ms. If not, type 250.
Switch Type should be default to Normally Open. If not, select it from the list by clicking on the up/down arrows at the end of the list.
Board Pin Mode - select BCM Mode.
Out of filament GCODE,enter the following lines (or copy/paste)
;pause
M600
Make sure the selection box for “Pause print when out of filament” is checked. Click Save button at the bottom right to complete the configuration. Next is the Configuration after clicking Resume steps.
Configuration GCODE scripts:
Go back to the Settings screen, this time click on the “GCODE Scripts” on the left side under “PRINTER”.
In the edit box for "After print job is paused", add the following lines:
G60 S0 ; save current position to S0
G91 ; set to relative positioning
G1 E-1 F300 ;retract the filament a bit before lifting the nozzle, to release some of the pressure
G1 Z+2 F{travel_speed} ;move Z up a bit
G28 X0 ;move X to min endstops, so the head is out of the way
M104 S0 ;extruder heater off
M140 S0 ;heated bed heater off (if you have it)
M84 ; disable motors
;Put printing message on LCD screen
M117 Change Filament
In the edit box for “Before print job is resumed”, enter the following lines:
G90 ; set to absolute positioning
G61 S0 ; restore position
Now you are really done with configuration, click Save
Move to the real test, you can do it as many times as you like to be sure the sensor switch is functioning properly.
The Real Test:
Run the filament through the box and to the extruder. My trick to always get the filament through is to heat the extruder to 200deg, then pull the old filament out. Do not cut the filament like a lot of people suggested, you need the extruder tube to be empty and pulling the filament out is the only way. If you get into the situation of having some filament stuck in the tube, the best way is to use a long thin hex Allen key and push the filament down. If you resource to Allen key to push old filament out and using the X-carriage adapter, you can remove the left screw of the adapter, rotate the sensor box clockwise to have room to work. Before pushing the new filament in you want to cut it diagonally such that its tip is as sharp as a needle, with the sharp tip you can be sure that it will go through the tube easily. The printer should be ready to print by now.
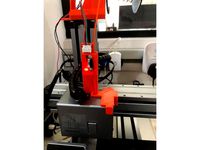
Start to print a test 20mm test cube, when it just started snip the filament above the sensor box (Not under the box) and see it slowly gone down the hole. The second picture actually shows the filament being cut before the print was started. When you hear the clicking sound from the sensor switch, the printer should also detect filament out condition and move the extruder head to the left and display "Change Filament".
At this point the motor is disabled and all heaters are off waiting for you to come to its rescue. I assume that you are normally not there next to the printer when the filament run out, this is a safety feature you might want to keep.
You need to go to the Octoprint's Temperature tab to manually heat the extruder hotend up to 200deg, heat bed to 60 deg (or the heat settings you desire).
Once the extruder temperature is reached, pull the old filament out and push the new filament through the box and into the hotend hole.
Click Resume to see the printer goes back to the old position and continue the print. The good part of this little Filament Sensor design is mostly for peace of mind, you don't want to have a 10 hours left of printing of the air with the hotend & heat bed still fuming at high temperature. Saving the print is also nice too.
I also uploaded my setup for other GCODE scripts from Octoprint in case you are interested.
Note: I provide the clip type of adapter so you can install the filament sensor box at various location but I did not try it out yet. The clip adapter lets you attach the box vertically or horizontally (two flavors), and each clip adapter allows the box to attach in two different directions.
If you choose to design a new type of adapter then make sure to have two holes with 1.75mm radius spaced 14mm apart, the two holes within the R2L or L2R boxes are 3.75mm from the edges.
Update 1: Added the improved top that presses the switch firmly inside. Also add a little side gap on the top to make its removal easier
Update 2: Added note about new pause scripts to resume at the same spot. It did not resume at the same spot earlier, hit & miss. The major change is the pause script section is moved to GCODE Script "After print job is paused". Refer to fun Snap Cubes thingi https://www.thingiverse.com/thing:2560893 to see photos of my Filament Out condition tests.
Hardware:
A tact switch KW11-3Z 5A 250V micro switch 3Pin and two wires to the Raspberry Pi.
Wiring:
Solder the first wire to COM pin (marked with letter C) on the switch, this will be the ground wire to the Raspberry Pi.
Solder the second wire to the NO pin in the middle of the switch. This is the Normally Open pin and will connect to one of the GPIO pin on the Raspberry Pi.
I reused the wires off my old earphone that I no longer need. You can probably use 22gauge wires for this project. Make sure it's long enough to get to the Raspberry Pi with wire left to move around.
Assembly:
Pick out the location where you want to place the filament Sensor box and print the correct L2R or R2L box to select the filament moving from left to right or right to left of the box. It has the arrow direction to help you identify its direction too. Next is to choose the adapter (clip or x-carriage) and secure the box to the adapter.
If you choose the x-carriage adapter as shown in the picture, you need the R2L type of box which will eventually make the filament going top down since it will be attached sideway to the x-carriage adapter. You can now go to the testing and installing software steps.
Testing at system level to make sure your wiring is good:
In fact, you can use this step to test out the switch function even before printing anything out, just connect the switch's wire to the Raspberry Pi's ground and GPIO pin you want to use for this project.
The X-carriage installation is used as example but the clip type is similar. First attach the R2L box to the X-carriage adapter using 2 x M3 screws and 2 nuts, then secure the adapter/box assembly to the X-carriage using the existing screws as shown in the picture.
You can now run the stop switch's wires through the sensor box large hole to the Raspberry Pi. The COM wire goes to ground, the NO (Normally Open) goes to GPIO. For the Raspberry PI rev 2, the ground is pin header 9 and this example uses BCM GPIO 17, which is pin header 11. Note that this GPIO-17 is actually GPIO-0 when using wiringpi to test in this step. Next is to place the switch in correct position or else you will run into issue when pushing the filament into the box. For R2L box, the switch is placed with the open tab on the left and the ground wire on the right side (see the first picture). It’s reverse for the L2R box, i.e. the ground wire on the left side. Once done, snap the lid in the correct way to remind you which direction the filament will go (second picture).
Connect to the Raspberry Pi using SSH, username pi. Enter the following two commands to check the GPIO-0 in wiring pi mode (or your own GPIO wiring pi pin number):
gpio mode 0 up
gpio read 0
It should return the value 1 (high) to indicate there is no filament. Now cut a piece of filament and push through the hole and see it come out the other side. Repeat the second command (gpio read 0), this time it will report the value 0 (low). If you get to this point, you are done with the hardware installation. Go on to the software installation.
Software Installation:
Using the browser from another system, connect to the Octopi via http.
Click on the Setting icon (the wrench logo at the top right). Select Plugin Manager.
In the Plugin Manager screen, you should see the “Get More…” long button at the bottom, click that.
One the next screen, use the scroll bar to scroll down until you see “Filament Sensor Reloaded”. Click Install button next to that and let it complete the installation. Click Close when done.
REBOOT the Raspberry Pi to activate the software.
Proceed to the Software Configuration.
Software Configuration:
Once the Raspberry Pi is back, use the Browser to go OctoPrint Settings screen. This time you should see the “Filament Sensor Reloaded” under “PLUGINS”, click that link.
Enter 17 for Pin. Or another GPIO BCM pin you prefer.
Debounce Time should be default to 250ms. If not, type 250.
Switch Type should be default to Normally Open. If not, select it from the list by clicking on the up/down arrows at the end of the list.
Board Pin Mode - select BCM Mode.
Out of filament GCODE,enter the following lines (or copy/paste)
;pause
M600
Make sure the selection box for “Pause print when out of filament” is checked. Click Save button at the bottom right to complete the configuration. Next is the Configuration after clicking Resume steps.
Configuration GCODE scripts:
Go back to the Settings screen, this time click on the “GCODE Scripts” on the left side under “PRINTER”.
In the edit box for "After print job is paused", add the following lines:
G60 S0 ; save current position to S0
G91 ; set to relative positioning
G1 E-1 F300 ;retract the filament a bit before lifting the nozzle, to release some of the pressure
G1 Z+2 F{travel_speed} ;move Z up a bit
G28 X0 ;move X to min endstops, so the head is out of the way
M104 S0 ;extruder heater off
M140 S0 ;heated bed heater off (if you have it)
M84 ; disable motors
;Put printing message on LCD screen
M117 Change Filament
In the edit box for “Before print job is resumed”, enter the following lines:
G90 ; set to absolute positioning
G61 S0 ; restore position
Now you are really done with configuration, click Save
Move to the real test, you can do it as many times as you like to be sure the sensor switch is functioning properly.
The Real Test:
Run the filament through the box and to the extruder. My trick to always get the filament through is to heat the extruder to 200deg, then pull the old filament out. Do not cut the filament like a lot of people suggested, you need the extruder tube to be empty and pulling the filament out is the only way. If you get into the situation of having some filament stuck in the tube, the best way is to use a long thin hex Allen key and push the filament down. If you resource to Allen key to push old filament out and using the X-carriage adapter, you can remove the left screw of the adapter, rotate the sensor box clockwise to have room to work. Before pushing the new filament in you want to cut it diagonally such that its tip is as sharp as a needle, with the sharp tip you can be sure that it will go through the tube easily. The printer should be ready to print by now.
Start to print a test 20mm test cube, when it just started snip the filament above the sensor box (Not under the box) and see it slowly gone down the hole. The second picture actually shows the filament being cut before the print was started. When you hear the clicking sound from the sensor switch, the printer should also detect filament out condition and move the extruder head to the left and display "Change Filament".
At this point the motor is disabled and all heaters are off waiting for you to come to its rescue. I assume that you are normally not there next to the printer when the filament run out, this is a safety feature you might want to keep.
You need to go to the Octoprint's Temperature tab to manually heat the extruder hotend up to 200deg, heat bed to 60 deg (or the heat settings you desire).
Once the extruder temperature is reached, pull the old filament out and push the new filament through the box and into the hotend hole.
Click Resume to see the printer goes back to the old position and continue the print. The good part of this little Filament Sensor design is mostly for peace of mind, you don't want to have a 10 hours left of printing of the air with the hotend & heat bed still fuming at high temperature. Saving the print is also nice too.
I also uploaded my setup for other GCODE scripts from Octoprint in case you are interested.
Note: I provide the clip type of adapter so you can install the filament sensor box at various location but I did not try it out yet. The clip adapter lets you attach the box vertically or horizontally (two flavors), and each clip adapter allows the box to attach in two different directions.
If you choose to design a new type of adapter then make sure to have two holes with 1.75mm radius spaced 14mm apart, the two holes within the R2L or L2R boxes are 3.75mm from the edges.
Update 1: Added the improved top that presses the switch firmly inside. Also add a little side gap on the top to make its removal easier
Update 2: Added note about new pause scripts to resume at the same spot. It did not resume at the same spot earlier, hit & miss. The major change is the pause script section is moved to GCODE Script "After print job is paused". Refer to fun Snap Cubes thingi https://www.thingiverse.com/thing:2560893 to see photos of my Filament Out condition tests.
Similar models
thingiverse
free

Filament Guide with Jam Sensor by anhtien
...anet a8 printer.
printing:
rotate x axis 270deg to print it upside down, use 50mms speed and 30% infill with support generation.
thingiverse
free

Runout Sensor Housing by 78tgu271
...of an upper filament guide from swisstoy (https://www.thingiverse.com/thing:3765501/remixes) to fit the runout sensor dimensions.
thingiverse
free
Craftbot filament sensor by rocker_bbert
...aftbot and resume the print on command.
part 3 needs to be clued on part 1. part2 (just a cover) can be scewed with the switches.
thingiverse
free

Cr-10 Filament Sensor Bracket & Tutorial by IsaacMDesigns
...r for the extruder opening
up-coming:
updated gcode
better lid design
fixed model hollow slicing issues
printing without supports
thingiverse
free

Filament Sensor optical sensor Runout Sensor by nosbiker
...up for the plugin.
works with all 1.75 mm filament (you should be able to drill it up to work with 3mm), except transparent ones.
thingiverse
free
Ender 3 / Pro Filament Runout Sensor using Limit Switch by nandogommez
...nterruption to my prints.
note: i recommend that you print in abs.
if you liked my work, maybe you might want to buy me a coffee
thingiverse
free

Filament Run Out Sensor Wanhao D6/ Monoprice Ultimate by Empiricus
...oop and the print will not resume. if someone has figured out a good gcode script for the d6 to use with the pi pins please post.
thingiverse
free
Snapmaker Filament Sensor (makerbot endstop) by Slyph
... "close"
helpful in cases when filament is running low and it might get stuck in the extruder if you leave it running!
thingiverse
free

Raspberry Pi GPIO Power Blocker for Prusa by Shwalamazula
...spberry-pi-zero-w-preparation-and-installation_2180
power pins are blocked as well. this is for externally-powered raspberry pis.
thingiverse
free

Raspberry Pi Case for Maker Select Plus and W GPIO access by Bmongar
...ns and i wanted to add a filament sensor that used gpio so i opened this in tinkercad and created a hole where the gpio pins are.
Anhtien
thingiverse
free

Tabletop 40mm Fan by anhtien
...y anhtien
thingiverse
this simple 40mm fan frame design comes with 2 flavors, nothing fancy. just clip it to the 12vdc adapter.
thingiverse
free

Android / iPhone stand by anhtien
...t a generic smart phone stand, the slot's width is 19mm. print with 50mms speed and 30% infill, support generation required.
thingiverse
free

Calibration Dice by anhtien
...e roman numerals version.
i printed it using the repetier default setup (60mms speed, 20% infill), 200deg extruder 50deg hot bed.
thingiverse
free

Spaceship Filament / Cable Guide by anhtien
...nt to be another filament guide but i made it large enough to be used as my usb cable guide. it kinda looks like a spaceship :-)
thingiverse
free

Screw Washers / Spacers by anhtien
...u just print the sizes you need.
add a brim of 5mm when printing if required
update1: added v1 with more clearance between copies
thingiverse
free

Big mouth Funnels by anhtien
...to the flask. one is 33mm wide, the other 43mm wide.
they were designed thin to save on filament.
update 1: added a 50mm funnel.
thingiverse
free
Teeny Tiny Boxes by anhtien
... for tight fit, once snapped in you might need a knife or flat screw driver to take those off. they certainly won't fly away.
thingiverse
free

Rod Support for the Spool Holder by anhtien
...erse.com/thing:2512609). this is probably more useful for the long rod holding many spools which might bend due to heavy weight.
thingiverse
free

360w 12vdc Power Supply Cover by anhtien
...upply. the screw holes are for m4 screws but i have #6-32 3/8 screws and nuts and they fit too (5 screws and 2 nuts are needed).
thingiverse
free
T8 threaded rod spacers by anhtien
...s good to snap in the middle of the rod, also comes with the extra long version. the full nut version is for the end of the rod.
Cheap
turbosquid
$10

Cheap Desk
...
royalty free 3d model cheap desk for download as c4d and fbx on turbosquid: 3d models for games, architecture, videos. (1602631)
turbosquid
$30

Cheap Apartment
... available on turbo squid, the world's leading provider of digital 3d models for visualization, films, television, and games.
turbosquid
$20

CHEAP PEN.c4d
... available on turbo squid, the world's leading provider of digital 3d models for visualization, films, television, and games.
turbosquid
$1

Cheap terrain
... available on turbo squid, the world's leading provider of digital 3d models for visualization, films, television, and games.
turbosquid
$3

Cheap Baseball Bat
... available on turbo squid, the world's leading provider of digital 3d models for visualization, films, television, and games.
turbosquid
$2

Basic Cheap Cellphone
... available on turbo squid, the world's leading provider of digital 3d models for visualization, films, television, and games.
turbosquid
$1

Cheap Ballpoint Pen
... available on turbo squid, the world's leading provider of digital 3d models for visualization, films, television, and games.
turbosquid
$12

Cheap looking table and chair
...del cheap looking table and chair for download as max and fbx on turbosquid: 3d models for games, architecture, videos. (1439884)
3d_export
$5

Cheap laser sword 3D Model
...cheap laser sword 3d model
3dexport
star wars
cheap laser sword 3d model gettinqdown 79283 3dexport
turbosquid
$45

Cheap-A$$-Guitar II.3dm
... available on turbo squid, the world's leading provider of digital 3d models for visualization, films, television, and games.
Sensor
3d_export
free

parking sensor
...parking sensor
3dexport
car parking sensor
turbosquid
$1

Sensor
... available on turbo squid, the world's leading provider of digital 3d models for visualization, films, television, and games.
3d_export
$5

Smoke sensor
...port
smoke sensor, can be an impressive element for your projects. easy to use, realistic image, low polygon, quality materials.
3d_export
$5

Air Quality Sensor v1
...air quality sensor v1
3dexport
air quality sensor v1
3d_export
$15

float sensor
...e up render. - all parts and materials are logically named. other formats ================= - collada (.dae) - autodesk fbx - obj
turbosquid
$26

Wind sensor C
...free 3d model wind sensor c for download as 3ds, obj, and fbx on turbosquid: 3d models for games, architecture, videos. (1328943)
turbosquid
$26

Wind sensor B
...free 3d model wind sensor b for download as 3ds, obj, and fbx on turbosquid: 3d models for games, architecture, videos. (1328168)
3d_export
$5

ultrasound sensor
...ivers convert ultrasound into electrical signals, and transceivers can both transmit and receive ultrasound. export in: -obj -fbx
3ddd
free

Вытяжка Shindo pallada sensor
... вытяжка
вытяжка shindo pallada sensor. в двух размерах - 600 и 900. текстуры в комплекте.
turbosquid
$52

Wind sensor A B C
...
royalty free 3d model wind sensor a b c for download as fbx on turbosquid: 3d models for games, architecture, videos. (1408406)
Filament
3ddd
$1

Filament Cage
...filament cage
3ddd
лофт , filament cage
модель бра, делалась по фото!
turbosquid
$3

FILAMENT COUNTER
...d
royalty free 3d model filament counter for download as stl on turbosquid: 3d models for games, architecture, videos. (1563049)
3d_export
$5

Filament lamp 3D Model
...filament lamp 3d model
3dexport
filament lamp 3d model kevin 54161 3dexport
3d_export
$5

Filament bulb candle 3D Model
...filament bulb candle 3d model
3dexport
filament bulb-candle
filament bulb candle 3d model kevin 54163 3dexport
3d_export
$5

Filament led light bulb
...filament led light bulb
3dexport
realistic 3d model of filament light bulb with v-ray materials.
3d_export
$5

Filament led light bulb
...filament led light bulb
3dexport
realistic 3d model of filament light bulb with v-ray materials.
3d_export
$5

Filament led light bulb
...filament led light bulb
3dexport
realistic 3d model of filament light bulb with v-ray materials.
3d_export
$5

Filament led light bulb
...filament led light bulb
3dexport
realistic 3d model of filament light bulb with v-ray materials.
3d_export
$5

Filament led light bulb
...filament led light bulb
3dexport
realistic 3d model of filament light bulb with v-ray materials.
3ddd
$1

Factory filament metal shade
...factory filament metal shade
3ddd
restoration hardware
restoration hardware. 20th c. factory filament metal shade.
Easy
design_connected
$16

Easy
...easy
designconnected
sollos easy computer generated 3d model. designed by almeida, jader.
design_connected
$20

Easy
...easy
designconnected
established & sons easy armchairs computer generated 3d model. designed by ed carpenter.
3d_ocean
$1

Easy Button
... it is accurate in close-ups. you can drop this model right into any setting. the textures are included as well as links to do...
design_connected
$16

Easy Armchair
...easy armchair
designconnected
easy armchair computer generated 3d model. designed by jeanneret, pierre.
3ddd
$1

Pouf EASY
... easy
3ds max 2010.v-ray 2.40.03.file formats fbx,obj. pouf desiree 2014 easy. dimensions 100x100x45 cm.
design_connected
$18

Easy Armchair
...easy armchair
designconnected
fsm easy armchair computer generated 3d model. designed by hartmann, markus.
design_connected
$16

Easy Chair
...easy chair
designconnected
magis easy chair computer generated 3d model. designed by seymour, jerszy.
design_connected
$16

Easy Rider
...easy rider
designconnected
bulo easy rider computer generated 3d model. designed by venlet, danny.
design_connected
$11

Easy Footstool
...easy footstool
designconnected
fsm easy footstool computer generated 3d model. designed by hartmann, markus.
design_connected
$18

Doda - Easy
...doda - easy
designconnected
molteni & c doda - easy computer generated 3d model. designed by laviani, ferruccio.
Box
archibase_planet
free

Box
...box
archibase planet
box carton cardboard box
box 2 - 3d model (*.3ds) for interior 3d visualization.
archibase_planet
free

Box
...box
archibase planet
carton cardboard box box
box 1 - 3d model (*.3ds) for interior 3d visualization.
3d_export
$6

box
...box
3dexport
box
3d_export
$5

Box
...box
3dexport
box
3d_export
$5

box
...box
3dexport
box
3d_export
$5

box
...box
3dexport
box
archibase_planet
free

Box
...box
archibase planet
box box for paper notebook pencil
box - 3d model (*.gsm+*.3ds) for interior 3d visualization.
archibase_planet
free

Box
...box
archibase planet
box carton cardboard box
box n170111 - 3d model (*.gsm+*.3ds) for interior 3d visualization.
archibase_planet
free

Box
...box
archibase planet
box carton cardboard box
box n050411 - 3d model (*.gsm+*.3ds) for interior 3d visualization.
archibase_planet
free

Boxes
...boxes
archibase planet
boxes box case bin
boxes n281213 - 3d model (*.gsm+*.3ds+*.max) for interior 3d visualization.