Thingiverse
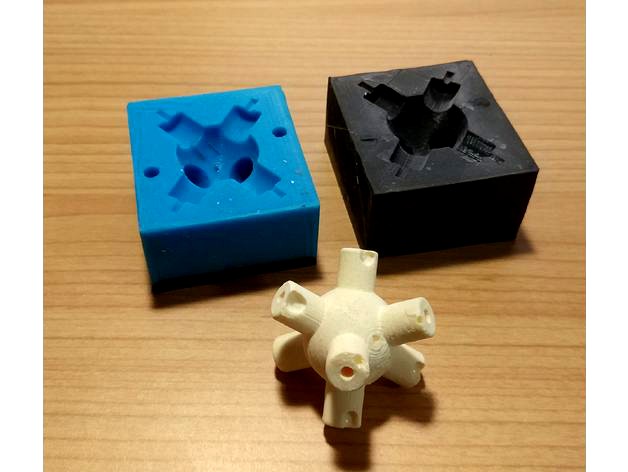
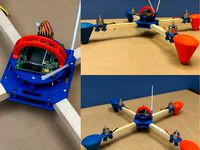
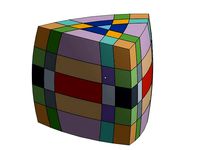
Casted 8-axis cube core by grafalex
by Thingiverse
Last crawled date: 3 years ago
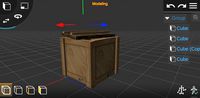
Although printing a Twisty puzzle core is relatively easy, regular home FDM printers do not produce parts strong enough. Printed pieces either crack on layers, or screws break their thread and pop out.
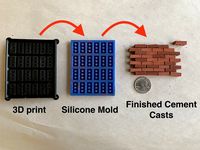
This time I decided to make the core by casting polyurethane in a silicone mold. Usually this technique is used to copy existing objects, but generally it is quite complicated - it requires a complex sequence of actions to get 2-part mold (there are plenty of videos on youtube describing this process)
In this thing I am printing a mold for a mold to simplify creation of a 2-part silicone mold. General idea is to cast silicone into printed mold, and then cast polyurethane into silicone.
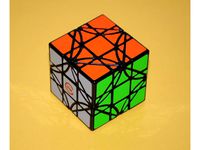
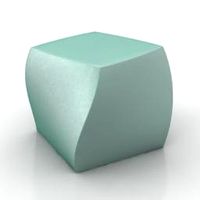
Core size is 44mm
Printing and assembly algorithm
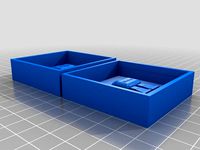
Part 1 - making a silicone mold:
Print Part 1 and Part 2 of the mold
Print 2 pcs of each wall type
Core is a hidden part, so no extensive post processing required. It is up to you whether to sand printed parts
Use 8 pcs of M3 6mm screws to assemble the mold
For one of the parts you should prepare channels to get polyurethane in and let air bubbles out of the mold. For this purposes I used short wooden sticks glued with a hot glue. Second half does not require this.
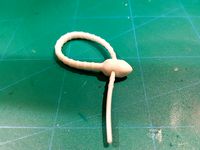
Put 15mm wooden sticks in 2 holes in the top - this is required to make a thread later (see picture)
Mix silicone and cast it into the mold
After silicone solidifies you can disassemble the mold and remove glued wooden sticks
Repeat for a second half
Part 2 - casting a polyurethane:
At this point you should get 2 halves of the second generation mold. They should be almost identical except for keys orientation and air/polyurethane channels in one of the halves.
It will be pretty hard to drill casted part and make thread there. Instead, it is much easier to make thread on this stage. Use 8 pieces of an M3 thread rod, each 15-20mm length, insert them into dedicated holes of the mold. For 4 of them I designed special chambers so you can use regular screws.
Fix 2 parts of the mold with rubber bands
Mix polyurethane and cast it into the mold via channels was made in one of the mold halves
After polyurethane solidifies you may get part out of the mold, unscrew thread rods and screws, and cut off material in channels.
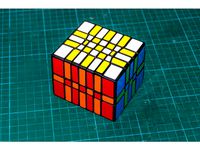
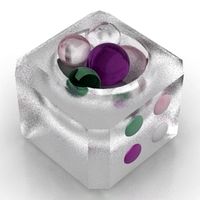
Core is ready to use
Bottom line
Attaching also a regular 3D model for the core. There is one for whole core. Other is a half - print 2 and then glue together.
Here is a model source. Feel free to learn, review, clone and make your adjustmentshttps://cad.onshape.com/documents/46fffb7b3854b23195036a9e/v/71facd1f5f256f872f48ed01/e/8b5e9c6d5f92229d873db161
This time I decided to make the core by casting polyurethane in a silicone mold. Usually this technique is used to copy existing objects, but generally it is quite complicated - it requires a complex sequence of actions to get 2-part mold (there are plenty of videos on youtube describing this process)
In this thing I am printing a mold for a mold to simplify creation of a 2-part silicone mold. General idea is to cast silicone into printed mold, and then cast polyurethane into silicone.
Core size is 44mm
Printing and assembly algorithm
Part 1 - making a silicone mold:
Print Part 1 and Part 2 of the mold
Print 2 pcs of each wall type
Core is a hidden part, so no extensive post processing required. It is up to you whether to sand printed parts
Use 8 pcs of M3 6mm screws to assemble the mold
For one of the parts you should prepare channels to get polyurethane in and let air bubbles out of the mold. For this purposes I used short wooden sticks glued with a hot glue. Second half does not require this.
Put 15mm wooden sticks in 2 holes in the top - this is required to make a thread later (see picture)
Mix silicone and cast it into the mold
After silicone solidifies you can disassemble the mold and remove glued wooden sticks
Repeat for a second half
Part 2 - casting a polyurethane:
At this point you should get 2 halves of the second generation mold. They should be almost identical except for keys orientation and air/polyurethane channels in one of the halves.
It will be pretty hard to drill casted part and make thread there. Instead, it is much easier to make thread on this stage. Use 8 pieces of an M3 thread rod, each 15-20mm length, insert them into dedicated holes of the mold. For 4 of them I designed special chambers so you can use regular screws.
Fix 2 parts of the mold with rubber bands
Mix polyurethane and cast it into the mold via channels was made in one of the mold halves
After polyurethane solidifies you may get part out of the mold, unscrew thread rods and screws, and cut off material in channels.
Core is ready to use
Bottom line
Attaching also a regular 3D model for the core. There is one for whole core. Other is a half - print 2 and then glue together.
Here is a model source. Feel free to learn, review, clone and make your adjustmentshttps://cad.onshape.com/documents/46fffb7b3854b23195036a9e/v/71facd1f5f256f872f48ed01/e/8b5e9c6d5f92229d873db161
Similar models
thingiverse
free

bee model for jelly molding
...ly molding, it is used to make a molding from silicone, then from silicone to make a jelly. thank you guys for sharing.guru4togel
thingiverse
free

Sand Casting Box Stabalizer by TenKTech
...d through to temporarily keep the 2 halfs from getting out of alignment. you print 4 and put 2 on opposite sides on both halves.
thingiverse
free
Silicone Zip tie mold
...s onto one half. fill both with silicone and then press both halves toghether. you can use ordinary silicone from hardware store.
thingiverse
free
Breathing Mask cast container by JohnvanderPol
...ront and back, or glue it.
apply mold release and place all back together minus the master
now you are ready to make a resin cast
thingiverse
free

Han Solo in Chocolate! by dentikhval
...port, but keep some not to get the tiny hands stuck in silicone
cast silicone, let it cure
melt some chocolate and cast it
enjoy!
thingiverse
free
Makey mold by sage19175
...after printing fill the print with silicon or a similar substance, i filled mine with a silicon and cornstarch...
thingiverse
free

Silicone dampers mold for printbed dampers. by FFranzmann
...h printed pillars for the holes and one with holes to put m4 screws in.
took 20 grams of silicone (make at least 25g to be sure)
grabcad
free

COVID-19 Mask Frame + 3D Printed molds
... molds to cast silicone/urethane parts.
3d printing is slowww. make parts faster may printing the molds and casting the parts!!!
thingiverse
free
BJB Quadcopter by BJB_Enterprises
...election of castable polyurethanes for making parts in the mold; from soft, flexible gels, tough rubber, on up to rigid plastics!
thingiverse
free
Miniature brick model for creating a silicone mold to cast resin or cement bricks
...thingiverse.com/thing:3968384
check out my youtube channel hobby factory for diy ideas and projects using 3d printing technology!
Grafalex
thingiverse
free

Сupboard сhild lock by grafalex
...lex
thingiverse
local shops sell child locks at insane price - $5-$10 for a small piece of plastic. i decided just to print one.
thingiverse
free
Master Skewb Stickers by grafalex
...oks well
source: https://cad.onshape.com/documents/bf620f19befda45965c3b88f/w/a652c79033dd85bf928e33fc/e/18066d97c332f2f99e90df4a
thingiverse
free
3x3x5 half proportional cuboid stickers by grafalex
... cuboid
sources: https://cad.onshape.com/documents/261a753cbbfccd8d1ff4df16/w/3a70cd35292cc1b0bde3a153/e/528b26b56a86904c466742f3
thingiverse
free
LimCube Dreidel 3x3x3 Cube Stickers by grafalex
...3x3 cube
source: https://cad.onshape.com/documents/b74f4cb2e6c06592a678dbf2/w/68fd0f7b6f6beea6d52efacc/e/3d017182177cb30c25f69202
thingiverse
free
Megaminx and Megamoid Stickers by grafalex
...stickers source: https://cad.onshape.com/documents/e78db50eb56cfcf97c969d0a/w/38ae2b66ddbcf4f0a68afa47/e/a69a394166ba51ff0a2032a8
thingiverse
free
DaYan Gem VI replacement stickers by grafalex
...al side.
source: https://cad.onshape.com/documents/ba90487a6e5115952c960fd6/w/e5827596d82df56964c27490/e/76221b41403208178f638429
thingiverse
free

Moyu Devil's Eye II Stickers by grafalex
... ii cube
source: https://cad.onshape.com/documents/6a142c09f914eff6f736217e/w/f6b355214ce0a18a3d82e3d7/e/f50568933b108d04202c2f77
thingiverse
free
6x6x4 Cuboid and Normal 6x6x6 Cube stickers by grafalex
...ttached.
source: https://cad.onshape.com/documents/58720979e3815217dc90ff22/w/ce45e869934a81676ba5808e/e/9f4cdc30da205abfc6289736
thingiverse
free
5x5x5 Pentahedron by grafalex
.... sources are at https://cad.onshape.com/documents/b03b208e338872ad860f2162/w/13c97839372d10b3223f95ef/e/80d438cc3b960f58d989e7a0
thingiverse
free
3x5x7 Ultimate Shape Shifter Stickers by grafalex
...document source: https://cad.onshape.com/documents/09201cf100ec7dfaa9a6bf11/w/bb8bc52e7458ddaf8417900f/e/c6cae6f81cbb889be105177c
Casted
3ddd
free

Sebastian Cast
...sebastian cast
3ddd
sebastian cast
карикатуры от себастьяна каста
3ddd
$1
Cast mini
...cast mini
3ddd
present time
подвесной светильник cast mini
материал: керамика
размер: 20x166
производитель: present time
turbosquid
$19

Cast Iron
...rbosquid
royalty free 3d model cast iron for download as max on turbosquid: 3d models for games, architecture, videos. (1609108)
3d_export
$6

Design of die casting machine
...design of die casting machine
3dexport
design of die casting machine
3ddd
$1

Wood Casting by Hilla Shamia
...wood casting by hilla shamia
3ddd
wood casting by hilla shamia
turbosquid
$30

Cast iron fenceClassic
...alty free 3d model cast iron fenceclassic for download as max on turbosquid: 3d models for games, architecture, videos. (1630755)
turbosquid
$15

Cast-iron bench
...id
royalty free 3d model cast-iron bench for download as max on turbosquid: 3d models for games, architecture, videos. (1239993)
turbosquid
$15
Cast-iron bench
...id
royalty free 3d model cast-iron bench for download as max on turbosquid: 3d models for games, architecture, videos. (1239991)
turbosquid
$13
Ring with 2 casts
...
royalty free 3d model ring with 2 casts for download as 3dm on turbosquid: 3d models for games, architecture, videos. (1375610)
turbosquid
free

Caste Room with pillars
... 3d model caste room with pillars for download as xsi and fbx on turbosquid: 3d models for games, architecture, videos. (1305991)
Cube
3d_ocean
$5
Cubes
...cubes
3docean
children cube cubes model paint toy toys wooden
old wooden children’s cubes.
3d_export
$5
cube
...cube
3dexport
cube
3d_export
$5

cube
...cube
3dexport
cube
3d_export
free

Chemistry cube - cube chimique
...chemistry cube - cube chimique
3dexport
chemistry cube - cube chimique
3d_export
$10

Cube
...cube
3dexport
cube deco
3d_export
free

cube
...cube
3dexport
invented the cube
archibase_planet
free
Cube
...cube
archibase planet
cube
g4 cube - 3d model for interior 3d visualization.
3d_export
$6
cube
...cube
3dexport
cube gamel location
archibase_planet
free
Cube
...cube
archibase planet
home furniture cube
cube - 3d model (*.gsm+*.3ds) for interior 3d visualization.
archibase_planet
free
Cube
...cube
archibase planet
cube block die
cube eazelcom n050113 - 3d model (*.gsm+*.3ds) for interior 3d visualization.
Core
3ddd
$1
Skandiform Core
...skandiform core
3ddd
skandiform
кресло фирмы skandiform, модель core.
габаритные размеры (шхвхг): 530х700х510 мм
turbosquid
$8
Chandelier CORE
...id
royalty free 3d model chandelier core for download as max on turbosquid: 3d models for games, architecture, videos. (1673910)
turbosquid
free

Planet Core
... available on turbo squid, the world's leading provider of digital 3d models for visualization, films, television, and games.
3ddd
$1

Samsung Galaxy Core 2
...samsung galaxy core 2
3ddd
телефон
samsung galaxy core 2
turbosquid
$10
cable 2 core
... available on turbo squid, the world's leading provider of digital 3d models for visualization, films, television, and games.
turbosquid
$10

cable 1 core
... available on turbo squid, the world's leading provider of digital 3d models for visualization, films, television, and games.
3ddd
$1

Кондиционер ICE CORE
...кондиционер ice core
3ddd
кондиционер
37 000 полигонов
turbosquid
$65

Insulated Multi Core Cable
... available on turbo squid, the world's leading provider of digital 3d models for visualization, films, television, and games.
turbosquid
$29

Samsung Galaxy Core Advance
... available on turbo squid, the world's leading provider of digital 3d models for visualization, films, television, and games.
turbosquid
$25

Samsung Galaxy Core II
... available on turbo squid, the world's leading provider of digital 3d models for visualization, films, television, and games.
Axis
3ddd
$1

Мария Axis
...
3ddd
кухня , классическая , axis
модель кухни.
3d_export
$22

Axis robot 6-axis robotic arm
...ing parts drawings, standard parts purchased parts list, can be produced directly according to the drawings, welcome to download!
3ddd
free

Versatile Axis
...ddd
nexus , плитка
http://bvtileandstone.com/ceramic-porcelain/versatile-axis/
3d_export
$19

robot 2 axis
...robot 2 axis
3dexport
robot 2 axis
turbosquid
$40

Axis R5F
... available on turbo squid, the world's leading provider of digital 3d models for visualization, films, television, and games.
turbosquid
$40

Axis S5F
... available on turbo squid, the world's leading provider of digital 3d models for visualization, films, television, and games.
turbosquid
$30

Axis Athlon
... available on turbo squid, the world's leading provider of digital 3d models for visualization, films, television, and games.
turbosquid
$10

Linear Axis
... available on turbo squid, the world's leading provider of digital 3d models for visualization, films, television, and games.
3d_export
$15

drawing axis
...drawing axis
3dexport
simple rendering of the scene file
3ddd
$1

versatile axis ARC
...versatile axis arc
3ddd
versatile , плитка
versatile axis arc red dot design award
8
3ddd
$1
Italamp 387/8+8
...italamp 387/8+8
3ddd
italamp
люстра italamp 387/8+8
размеры 92x71h
3ddd
$1
8 марта
...8 марта
3ddd
8 марта
кресло 8 марта
design_connected
$16
No 8
...nected
photo-realistic 3d models of the sibast no 8 armchair from sibast for 3d architectural and interior design presentations.
3d_export
$5
hinge 8
...hinge 8
3dexport
hinge 8
3d_export
$5

iphone 8
...iphone 8
3dexport
iphone 8
turbosquid
$69

iPhone 8 and iPhone 8 Plus
... free 3d model iphone 8 and iphone 8 plus for download as max on turbosquid: 3d models for games, architecture, videos. (1202442)
turbosquid
$12

Calligraphic Digit 8 Number 8
...hic digit 8 number 8 for download as max, obj, fbx, and blend on turbosquid: 3d models for games, architecture, videos. (1389341)
3ddd
free

PLANTS 8
...plants 8
3ddd
цветок , горшок
plant 8,,, hope u all like it
3ddd
$1
8 Марта / Amadey
...8 марта / amadey
3ddd
8 марта
8 marta amadey
3d_export
$5

8 trees
...8 trees
3dexport
8 different trees with textures. the polygons refer to all trees together