Thingiverse

Case for DROK Amp by Velocitasfortis
by Thingiverse
Last crawled date: 3 years, 1 month ago
This is a protective case for the 50w x 2 mini-amp by DROK, as listed at the following link:
https://www.amazon.com/gp/product/B074FR4B7H
It is unknown if it will fit any other amps.
Wall o' Text follows...
First things first: The buttons are more of a basic "proof-of-concept" than actual functional buttons. They do work, but they are difficult to use because of the tight spacing. However, all of the buttons beyond the + and - are superfluous, since most people will be controlling their music playlist from their media device (cell phone, tablet, PC, etc..). The exercise in design for the buttons was actually centered around how to make an effective and cheap sprung pushrod control assembly. Specifics to be detailed in the appropriate section below.
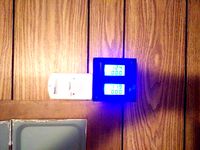
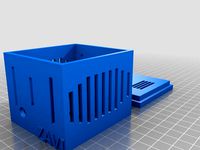
I needed a case for the amp so that it could live outside without becoming stuffed full of dust and other weather-effects. The case is designed around the limitations of ABS/ASA in regards to overhangs and layer adhesion. Walls are fairly thin, but should be printable by most machines, and using most Styrene filaments. Example print pictured was made using a .4mm nozzle, with some very specific pieces being printed using .35mm extrusion width. Extra consideration was given to case-to-component clearances, to reduce and/or eliminate body gap for external openings. Some post-process trimming is likely to be required for a proper fit. Additionally, due to tolerance variation between the (admittedly cheap) amp board and the completed print, sanding/filing for fitment may be necessary. To this end, the "shim" part is designed so that in case of extra-tight vertical clearance, it can be easily flat-sanded on the bottom to give those last few tenths.
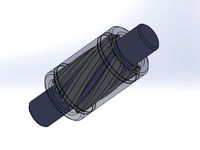
The amp that this case was designed for comes with two plexi panels - top and bottom - which I have integrated into this design. The bottom plexi panel is kept for rigidity, while the top plexi panel is kept to act as a window for the components. I have to give credit where credit is due here, and say that this cheap amp has some of the best soldering I've seen for products at any price, so I wanted to let it shine through the top window.
Now to the nitty-gritty...
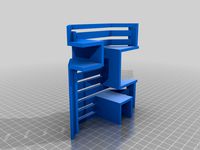
The top, bottom, and corner parts are straightforward. Nothing special required, other than a good print bed to keep that ABS/ASA locked down tight while printing the top - it likes to warp, due to the narrow contact patches.
The shim is asymmetric, having a bit of a cutout on one end to accommodate a thin rubber sheet (more in a bit...). The cutout aligns with the back-end of the top (where the screw terminals are located).
The "terminal bar" piece is primarily a beauty ring for the edge, but it also overlaps the shim around the channel opening so that it can pinch a membrane between the shim and the top and terminal bar pieces. As a dust guard, I designed just enough clearance between parts at the terminal end to accommodate a thin piece of rubber - in my case, this was a rectangle cut from an old motorcycle tire tube. Cut the rectangle, line it up between the pieces, punch two holes for the bolts, affix everything together, then cut a slit down the middle of the membrane. You can't see the slit in the photos, but it's there - good for keeping out dust.
Now, on to the buttons...
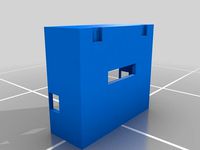
For most purposes, I would actually recommend using the "terminal bar" piece as a cover for the buttons. Most of the buttons serve no functional purpose for most applications, so you would lose nothing by taking the easy road and going with a membrane cover. The "button bar" piece has some very thin walls in places, due to the unfortunate placement of the surface-mount buttons on the PCB and their relation to the cutout in the plexi. Using a narrow print nozzle is the best solution, but if that is not an option, reducing the extrusion width is required. I saw good success going with .35mm extrusion on a .40mm nozzle, using KISSlicer to take advantage of the "crown" functionality (fills in tight spaces that a normal path would skip). I also had to trim the top plexi by approximately 4mm on either side of the slot, to account for the clearance of the "Volume Down" button (it's really tight to the standoff). The easiest way to know how much to cut is to simply attach the top cover to the amp over top the plexi panel, then mark it off with sharpie where the plexi sticks out into the slot.
For the buttons themselves, due to the tight space, it is recommended to print with a smaller nozzle, or print using no larger than .35mm extrusion width.
Now the fun part!
The holes in the button bar are sized to fit your typical cheap clicky ball-point pen spring and pen well. If you've got some dead clicky pens kicking around, gut them for their springs and the (hopefully empty) pen well tubes. Cut the tubes to length (apologies, I did not take measurements of the pen tubes prior to gluing - I cut them all to relative length for my board), glue one end into the "Button Pad" recess, insert up through the bottom of the "Button Bar", slide the spring over the tube, then glue the button caps onto the tube (inner surfaces of the socket on the buttons are sized to fit easily but not loosely onto the pen well tubes). This likely sounds more confusing than it is, but should make sense when the pieces are in front of you. Dry-fit all pieces prior to gluing, so you can dial in the correct length of the pen tubes to the buttons. Also, the "Button NextBack" is used for both the "Back" and "Next" button pads, just reversed to point in the appropriate directions for their function.
I'm going to iterate on the overall button design, to try making them truly functional. However, this is a very low priority, so it will be a while before I revisit the design. Kinda burnt out on this project at the moment.
I'll re-read these paragraphs for omissions and errors after a few beers.
https://www.amazon.com/gp/product/B074FR4B7H
It is unknown if it will fit any other amps.
Wall o' Text follows...
First things first: The buttons are more of a basic "proof-of-concept" than actual functional buttons. They do work, but they are difficult to use because of the tight spacing. However, all of the buttons beyond the + and - are superfluous, since most people will be controlling their music playlist from their media device (cell phone, tablet, PC, etc..). The exercise in design for the buttons was actually centered around how to make an effective and cheap sprung pushrod control assembly. Specifics to be detailed in the appropriate section below.
I needed a case for the amp so that it could live outside without becoming stuffed full of dust and other weather-effects. The case is designed around the limitations of ABS/ASA in regards to overhangs and layer adhesion. Walls are fairly thin, but should be printable by most machines, and using most Styrene filaments. Example print pictured was made using a .4mm nozzle, with some very specific pieces being printed using .35mm extrusion width. Extra consideration was given to case-to-component clearances, to reduce and/or eliminate body gap for external openings. Some post-process trimming is likely to be required for a proper fit. Additionally, due to tolerance variation between the (admittedly cheap) amp board and the completed print, sanding/filing for fitment may be necessary. To this end, the "shim" part is designed so that in case of extra-tight vertical clearance, it can be easily flat-sanded on the bottom to give those last few tenths.
The amp that this case was designed for comes with two plexi panels - top and bottom - which I have integrated into this design. The bottom plexi panel is kept for rigidity, while the top plexi panel is kept to act as a window for the components. I have to give credit where credit is due here, and say that this cheap amp has some of the best soldering I've seen for products at any price, so I wanted to let it shine through the top window.
Now to the nitty-gritty...
The top, bottom, and corner parts are straightforward. Nothing special required, other than a good print bed to keep that ABS/ASA locked down tight while printing the top - it likes to warp, due to the narrow contact patches.
The shim is asymmetric, having a bit of a cutout on one end to accommodate a thin rubber sheet (more in a bit...). The cutout aligns with the back-end of the top (where the screw terminals are located).
The "terminal bar" piece is primarily a beauty ring for the edge, but it also overlaps the shim around the channel opening so that it can pinch a membrane between the shim and the top and terminal bar pieces. As a dust guard, I designed just enough clearance between parts at the terminal end to accommodate a thin piece of rubber - in my case, this was a rectangle cut from an old motorcycle tire tube. Cut the rectangle, line it up between the pieces, punch two holes for the bolts, affix everything together, then cut a slit down the middle of the membrane. You can't see the slit in the photos, but it's there - good for keeping out dust.
Now, on to the buttons...
For most purposes, I would actually recommend using the "terminal bar" piece as a cover for the buttons. Most of the buttons serve no functional purpose for most applications, so you would lose nothing by taking the easy road and going with a membrane cover. The "button bar" piece has some very thin walls in places, due to the unfortunate placement of the surface-mount buttons on the PCB and their relation to the cutout in the plexi. Using a narrow print nozzle is the best solution, but if that is not an option, reducing the extrusion width is required. I saw good success going with .35mm extrusion on a .40mm nozzle, using KISSlicer to take advantage of the "crown" functionality (fills in tight spaces that a normal path would skip). I also had to trim the top plexi by approximately 4mm on either side of the slot, to account for the clearance of the "Volume Down" button (it's really tight to the standoff). The easiest way to know how much to cut is to simply attach the top cover to the amp over top the plexi panel, then mark it off with sharpie where the plexi sticks out into the slot.
For the buttons themselves, due to the tight space, it is recommended to print with a smaller nozzle, or print using no larger than .35mm extrusion width.
Now the fun part!
The holes in the button bar are sized to fit your typical cheap clicky ball-point pen spring and pen well. If you've got some dead clicky pens kicking around, gut them for their springs and the (hopefully empty) pen well tubes. Cut the tubes to length (apologies, I did not take measurements of the pen tubes prior to gluing - I cut them all to relative length for my board), glue one end into the "Button Pad" recess, insert up through the bottom of the "Button Bar", slide the spring over the tube, then glue the button caps onto the tube (inner surfaces of the socket on the buttons are sized to fit easily but not loosely onto the pen well tubes). This likely sounds more confusing than it is, but should make sense when the pieces are in front of you. Dry-fit all pieces prior to gluing, so you can dial in the correct length of the pen tubes to the buttons. Also, the "Button NextBack" is used for both the "Back" and "Next" button pads, just reversed to point in the appropriate directions for their function.
I'm going to iterate on the overall button design, to try making them truly functional. However, this is a very low priority, so it will be a while before I revisit the design. Kinda burnt out on this project at the moment.
I'll re-read these paragraphs for omissions and errors after a few beers.
Similar models
thingiverse
free

Big Bird Case by serki39
...he surface of round object better.
for example the surface of the "top" part.
you can compare it in layer view in cura.
thingiverse
free

Lucky Extrusion Gauge by Kwaad2
...her, place the "top, to the top" and push together. (so the "bottom" of the print, never goes into the slot).
thingiverse
free

Nissan Leaf Battery Pack Terminal Cover by ryanpriore
... i added a bottom-middle combo piece that may be printed as a single piece as opposed to the 2 separate bottom and middle pieces.
thingiverse
free

Kato Tunnel by DarkBushido
...e top piece.
i set these up to be split and printed as separate pieces with the "top" piece being printed upside down.
thingiverse
free

Sovol SV03 Diagonal Bracing Parts by BSA-LLC
...ur #6 machine screws to hold the eye bolts to the eye bolt plates. you can add super glue to the eye bolts to insure a tight fit.
thingiverse
free

Game and Watch NES Style Buttons by esotericsean
...kay if your settings are dialed in perfectly.
you'll need to cut the tops off your rubber membrane buttons for these to work.
thingiverse
free
4mm PTFE LM8UU replacement by austingeorge
...y less than ideal bridging on the inside of the bearing casing
slide onto an 8mm linear rod and run up and down to check movement
thingiverse
free

Pi Gaming Rig Case by deanbip
...ut window top and use a taller piece of plexi glass.
hint: you may need to shave the lid hinge balls a little to get it in place.
thingiverse
free

Onemix 1s+ netbook case by KimoH
...used a soldering iron to heat up the snap pieces so the prongs would easily penetrated the side wall to make it easier to attach.
thingiverse
free

Solidoodle 3 case clip 1/4" plexi by chuddly
...worked for 1/4" plexi so i made my own.
edit: the original ones were a bit thin so i made them stronger in the new version
Velocitasfortis
thingiverse
free
Paint Palette by Velocitasfortis
...paint palette by velocitasfortis
thingiverse
simple palette with brush holder. mixing pockets are 2mm deep.
thingiverse
free

Coaster Caddy by Velocitasfortis
...ephant's foot.
model updated with different base dimensions to improve rigidity. should still hold the same vertical volume.
thingiverse
free

Paint Caddy for Testors Jars by Velocitasfortis
...ell as assorted items (brushes, glue, etc.).
bottom of model has 0.20mm chamfer and pockets to ease release from the build plate.
thingiverse
free

Drafting Caddy by Velocitasfortis
...ottom of model is lightly chamfered and pocketed to ease release from the build plate, and to compensate for elephant's foot.
thingiverse
free

Printer Belt Lock by Velocitasfortis
...o be spinning the motor all over, generating current into your driver board. slips into place and prevents the axis from moving.
thingiverse
free

Toilet Seat Replacement Pads by Velocitasfortis
...the seat or lid from more than an inch or two. no physical danger, but quite annoying. pla will shatter and should not be used.
thingiverse
free

Gift Box Ornaments by Velocitasfortis
...inor overhangs w/filleting, simple flower-bow with moderate rise angle. prints well in pla and asa (other filaments not tested).
thingiverse
free
Window Security Rod Hardware by Velocitasfortis
...ailable 3/4" square stock. pla does work, but abs/asa or nylon are recommended, as window jambs can get very hot in summer.
thingiverse
free

Filament Calibration Jig for Prusa i3 Mk3 by Velocitasfortis
...e irrelevant, as my test results showed that prusa has the extruder tuned bang-on from the factory, but i figured i'd share.
thingiverse
free

Allen Key Socket Adapter by Velocitasfortis
... for turning by hand.
filament costs pennies, while long-reach 3/8" drive allen wrenches cost dollars. ;)
update: 3mm added
Drok
thingiverse
free
DROK LCD Case by GREGORYCN
...e by gregorycn
thingiverse
a simple housing for the drok multimeter lcd to have it at the same height as the hall effect sensor.
thingiverse
free
Drok enclosure 900W
...k, add hot glue, assemble, done.
https://www.amazon.com/gp/product/b01gfvi6r6/ref=ppx_yo_dt_b_search_asin_title?ie=utf8&psc=1
thingiverse
free

DROK PZEM-011 Enclosure by 2manytoyz
...drok pzem-011 enclosure by 2manytoyz
thingiverse
stand alone box for drok panel meter
thingiverse
free

Drok Buck converter 200217 mount by MikiePSU
...drok buck converter 200217 mount by mikiepsu
thingiverse
this is a basic mount for the drok buck converter model number 200217
thingiverse
free

DROK Multimeter mount for SurRon
... in this case the mounts are fitted for the stock stem of the surron electric bike.
https://www.amazon.com/gp/product/b07b4cwkrj
thingiverse
free

Drok LM2596 Voltage Converter Base by SirTangent
...tps://www.amazon.com/gp/product/b00bytehqo/ref=oh_aui_detailpage_o00_s00?ie=utf8&th=1
part no: drok 090029
upc: 0619397026748
thingiverse
free

DROK XH-W1301 Thermostat by toxiccrack
...drok xh-w1301 thermostat by toxiccrack
thingiverse
a case for the 12v temperature regulator xh-w1301
thingiverse
free
DROK multimeter x2 mounting plate by giantpune
...4x4in electrical box. my use case is for wiring a generator to supply power to my house. 1 multimeter for each of the two legs.
thingiverse
free

Drok DCDC converter mount by YuTR0N
...drok dcdc converter mount by yutr0n
thingiverse
for dcdc converter
2021/06/05
added upper cover
thingiverse
free
Box for Drok step down voltage regulator by tirolerpatriot
...wn voltage regulator in tinkercad. this regulator will be placed in my car to power a playstation 2 and a super nintendo console.
Case
3d_export
$1

case
...case
3dexport
case
archibase_planet
free

Case
...case
archibase planet
showcase show-case glass case
glass-case + cakes - 3d model for interior 3d visualization.
archibase_planet
free

Case
...case
archibase planet
showcase show-case glass case
glass-case for chips - 3d model for interior 3d visualization.
archibase_planet
free

Case
...case
archibase planet
case shelving drawer
case - 3d model for interior 3d visualization.
archibase_planet
free

Case
...case
archibase planet
case rack locker
case - 3d model for interior 3d visualization.
archibase_planet
free

Case
...case
archibase planet
case drawer kitchen furniture
case - 3d model for interior 3d visualization.
archibase_planet
free

Case
...case
archibase planet
case cupboard shelving
glass case - 3d model for interior 3d visualization.
archibase_planet
free

Case
...case
archibase planet
case handbag suitcase
case - 3d model (*.gsm+*.3ds) for interior 3d visualization.
archibase_planet
free

Case
...case
archibase planet
case suitcase
case 5 - 3d model (*.gsm+*.3ds) for interior 3d visualization.
archibase_planet
free

Case
...case
archibase planet
locker case dresser
case - 3d model (*.gsm+*.3ds) for interior 3d visualization.
Amp
design_connected
$16
Amp
...amp
designconnected
normann copenhagen amp computer generated 3d model. designed by legald, simon.
3ddd
$1

amp
...amp
3ddd
:-o
3ddd
free
A&X
...a&x
3ddd
a&x
современная кровать фабрики a&x;
3ddd
$1

Molteni & C Night & Day
...molteni & c night & day
3ddd
molteni&c
molteni & c night & day nel248a
3ddd
$1

Molteni & C - Night & Day
...mp;amp; day
3ddd
molteni&c , кушетка
molteni & c - night & day ncl 126/a
3ddd
$1
Villeroy & Boch / Loop & Friends & L'Aura
...op & friends & l'aura
3ddd
villeroy&boch
loop & friends раковина для установки на столешницу
3ddd
free
barovier&toso
...ddd
классическая люстра barovier&toso , barovier&toso
barovier&toso;
3ddd
$1

Стул A&D
...стул a&d
3ddd
a&d
chair a&d;
3ddd
$1

Night&Day
...p;c , night&day
http://www.formul.ru/products/mebel_dlja_spalni/196588
3ddd
$1
B&B
...b&b
3ddd
b&b italia
statue b&b italy