Thingiverse
Car Audio 2DIN to 1DIN mounting kit by tmartin
by Thingiverse
Last crawled date: 3 years ago
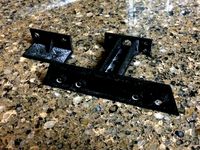
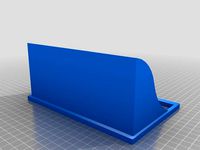
This part is designed to allow you to mount a 1-DIN car stereo into a 2-Din slot. DIN is generally defined as 180X50mm, so a 2-DIN is 180X100mm. Many cars come with a 2-DIN sized manufacturer radio, while many aftermarket radios are 1-Din, necessitating a part to fill the gap in the front panel. In my case the car in question is a 1996 ford explorer with a 2-DIN radio slot. After the stock radio broke a few years ago I got a new radio that came with a mounting kit. After that radio got stolen the insurance sent us a radio that came with a mediocre mounting kit that promptly broke, so I designed and printed my own. The adapter mounts a Pioneer P5100UB head unit into the slot of a 1996 Ford Explorer, however DIN sizes tend to be standardized, making it possible that this unit will work for other vehicles, which is why I decided to post it.
Features:
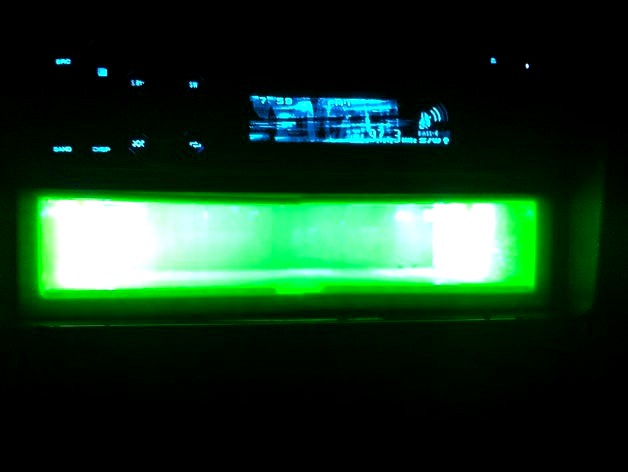
The adapter has a large opening in the front to allow you to store CDs, remotes, papers, etc. There is a little lip on the front to prevent stuff from sliding out when you accelerate. The coolest feature is the three 5mm holes and channel on each side. These are intended for you to insert 3 LEDs and run the wiring through the channel so as to create a neat lighting effect. I found the coolest effect to be from producing the plastic parts entirely in Nuclear Green ABS: http://store.makerbot.com/nuclear-green-abs-1kg-spool-3mm-filament.html
The LEDs were UV: http://www.radioshack.com/product/index.jsp?productId=3107633
This creates an effect where the lighting comes almost entirely from the fluorescence of the plastic and is thus much more diffuse and less likely to glare into your eye while driving at night. It's also just very unique looking.
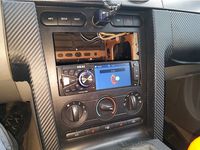
Note: In the third image from bottom the apparent double image of the 3 LEDs is caused by reflection off the top plastic surface, showing how shiny it is after treatment with acetone.
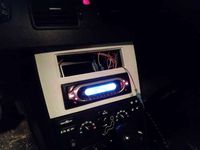
The bottom image is how the radio/lighting setup would appear from the vantage point of the driver looking down at night.
The top image of course looks straight in and is far brighter than the driver would see. Still it is important for safety reasons to wire it to an external switch rather than just wiring it to the ignition or the instrument light control so that it can be switched off manually if it becomes too bright or distracting.
Features:
The adapter has a large opening in the front to allow you to store CDs, remotes, papers, etc. There is a little lip on the front to prevent stuff from sliding out when you accelerate. The coolest feature is the three 5mm holes and channel on each side. These are intended for you to insert 3 LEDs and run the wiring through the channel so as to create a neat lighting effect. I found the coolest effect to be from producing the plastic parts entirely in Nuclear Green ABS: http://store.makerbot.com/nuclear-green-abs-1kg-spool-3mm-filament.html
The LEDs were UV: http://www.radioshack.com/product/index.jsp?productId=3107633
This creates an effect where the lighting comes almost entirely from the fluorescence of the plastic and is thus much more diffuse and less likely to glare into your eye while driving at night. It's also just very unique looking.
Note: In the third image from bottom the apparent double image of the 3 LEDs is caused by reflection off the top plastic surface, showing how shiny it is after treatment with acetone.
The bottom image is how the radio/lighting setup would appear from the vantage point of the driver looking down at night.
The top image of course looks straight in and is far brighter than the driver would see. Still it is important for safety reasons to wire it to an external switch rather than just wiring it to the ignition or the instrument light control so that it can be switched off manually if it becomes too bright or distracting.
Similar models
thingiverse
free

Car radio mount DIN slot adaptor (Chevrolet Lacetti) by rbs90
...car radio mount din slot adaptor (chevrolet lacetti) by rbs90
thingiverse
single din radio adaptor for chevrolet lacetti (2006)
thingiverse
free

Roof & Fog light LED kit for Radio Control models by 3dxl
...uch as car, trucks and 4x4 off-road models. it can mount generic led strips popularly use in both households and other diy usage.
thingiverse
free
Light brackets for Traxxas Rustler by slowjoe170
...with hot glue to protect from vibration and moisture. all three files have been run through netfabb to correct any errors. enjoy.
thingiverse
free

3D Light Chess by RAVI3D
...nds after some hard work i try to design a 3d chess set with led effect board.
looks so cool
you need-
led strip
wire
12v shocket
thingiverse
free

Mightex LED Driver DIN Rail Mount Clip by Wildseyed
...mightex led driver din rail mount clip by wildseyed
thingiverse
i needed one, so i made it.
thingiverse
free

Front bike light mount by femoral
...al
thingiverse
i recently created this mount for my front light on my bike. all the bought ones broke after half an year in use.
grabcad
free

DIN Rail Mount for IBT-2 Driver
...din rail mount for ibt-2 driver
grabcad
din rail mount for linear actuator driver ibt-2
thingiverse
free

LED Strip Mount for Artist-D Pro by TownDrunk
...ut had to lengthen the wire by about 2 ft.
i tucked my wires under the blue plastic strip that houses the filament runout wiring.
thingiverse
free

Volvo S40 1995-2004 single DIN cover plate
... wall that is inserted tightly 4.5cm inside the slot.
print with petg (or abs in a well heated chamber) if you have hot summers.
thingiverse
free

frame_lower_plate_no_cam_ledmount by thooijer
...so there is more space inside.http://www.banggood.com/5pcs-cjmcu-8-bit-ws2812-5050-rgb-led-driver-development-board-p-961344.html
Tmartin
thingiverse
free

B2 Spirit Stealth Bomber by tmartin
...ound here (not produced by me):http://sketchup.google.com/3dwarehouse/details?mid=9b58b33d3953ecdc605b692dc0f7565&prevstart=0
thingiverse
free

Cheap-and-easy model rocket by tmartin
...rance from the hot gasses, but nevertheless may present some fire hazard although this hasn't been observed in any tests yet.
thingiverse
free

Titanium Conveyor For Makerbot ABP and raftless printing by tmartin
...t. as far as i know this is still the only metal build surface that rotates and functions like the original conveyor belt though.
thingiverse
free

Steel Conveyor Belt for ABP (raftless) by Tunell
...steel is a great belt medium because: (borrowed from tmartin 1) unlike aluminum foil and paper, it does not...
1Din
thingiverse
free

Volvo 240 1DIN 52mm Gauge
...volvo 240 1din 52mm gauge
thingiverse
volvo 240 52mm gauge fits 1din spot
thingiverse
free
Car radio 2din to 1din adapter Ford Mustang by gimik91
...io 2din to 1din adapter ford mustang by gimik91
thingiverse
adapter for insert 1din radio to 2din slot in ford mustang 2005-2014
thingiverse
free

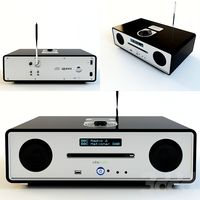
1DIN car radio case for desktop music player by ephestione
...sy management of power and audio cables, left some space in the front of top surface in case you want to emboss your custom text.
thingiverse
free

1 din вставка для Optim Corsair by tustDP
...1 din вставка для optim corsair by tustdp thingiverse 1din рамка для установки рации optim corsair в гнездо магнитолы...
thingiverse
free

2 Din Box by juhan
...that has two din slots. you can install two 1din devices or one 2din device like i did in...
thingiverse
free
1din car stereo front plate for volvo xc90 I (2006) by jhkoivis
...es for mounting brackets to the lower back side)
no mounting supports: commented out in .scad as they don't fit to print area
thingiverse
free

Obturateur pour panneau électrique 1 DIN - obturator electric panel 1 DIN by N-co
...din. an obturator, 9 mm width, for electric panel 1din ...
thingiverse
free

Opel Astra H CID Frame for Dashboard by Th3oRy
...the radio mount. i made this to fit a 1din 9" android radio on the top. printed in two...
thingiverse
free

52mm_Gauge_Bracket by NunoJRibeiro
...to glue on dash compartment wihout loossing an entire 1din space. may need to adjust holes with file or...
2Din
thingiverse
free

Frame 2din Alfa Romeo 159
...frame 2din alfa romeo 159
thingiverse
2din radio frame for alfa romeo 159.
thingiverse
free

RADIO 2DIN TRAFIC VIVARO PRIMASTAR FRAME by dlphotosport
...vivaro primastar frame by dlphotosport
thingiverse
this is a frame to radio 2din to a renault trafic , vivaro and primastar van.
thingiverse
free

2din android frame peugeot boxe / fiat ducato
...2din android frame peugeot boxe / fiat ducato
thingiverse
mounting frame for 2din radio on peugeot boxer and fiat ducato
thingiverse
free

Skoda Octavia / Vw Golf IV 2din frame by Matimon
...skoda octavia / vw golf iv 2din frame by matimon
thingiverse
skoda octavia fl 2din radio frame.
thingiverse
free

Mostrina Stereo 2DIN Alfa Romeo 159 by vegeth1985
...stereo 2din alfa romeo 159 by vegeth1985
thingiverse
mostrina - cover per stereo 2din alfa romeo 159 da me disegnato e stampato.
thingiverse
free
Car radio 2din to 1din adapter Ford Mustang by gimik91
...io 2din to 1din adapter ford mustang by gimik91
thingiverse
adapter for insert 1din radio to 2din slot in ford mustang 2005-2014
thingiverse
free
Peugeot 2DIN frame by Gimpy
...y needfoorspeed... then you need this. :d
perfect fit for 2006 peugeot 307cc and most likely work fine in other models as well.
thingiverse
free

multimedia 9'' bracet 2din for BMW vehicle
...hi,
i made bracet for 2din 9'' multimedia for bmw e90 rhl
please use support infil 50
please support me: paypal.me/snedim
thingiverse
free

2DIN frame of Mitsubishi Eclipse radio by Drucha2002
...2din frame of mitsubishi eclipse radio by drucha2002
thingiverse
two frames. m2 width of the lower part is narrower.
thingiverse
free

Kia Ceed faceplate for 2din car audio by taronen
...kia ceed faceplate for 2din car audio by taronen
thingiverse
this a face-plate for android 2 din car audio (178.5mm*102mm)
Audio
archibase_planet
free

Audio
...audio
archibase planet
home equipment audio
audio n170109 - 3d model (*.gsm+*.3ds) for interior 3d visualization.
3ddd
$1
Beats Audio
...beats audio
3ddd
наушники
наушники beats audio
3ddd
$1
колонки Monitor Audio
...колонки monitor audio
3ddd
monitor audio , monitor
колонки monitor audio - platinum
3d_ocean
$7
Audio speaker
...peakers stereo studio sub sub-woofer
high quality audio speakers. created in cinema4d but comes in various other formats as well.
3ddd
free

Clear Audio / Innovation
...clear audio / innovation
3ddd
clear audio / innovation
archive3d
free

Audio 3D Model
...ve3d
home equipment audio
audio n170109 - 3d model (*.gsm+*.3ds) for interior 3d visualization.
3ddd
$1
Vita Audio R4i
...vita audio r4i
3ddd
радио
vita audio r4i
turbosquid
$10

Audio Spectrum
...d
royalty free 3d model audio spectrum for download as blend on turbosquid: 3d models for games, architecture, videos. (1568428)
turbosquid
free

Audio Speaker
...quid
royalty free 3d model audio speaker for download as max on turbosquid: 3d models for games, architecture, videos. (1405286)
3d_export
$9
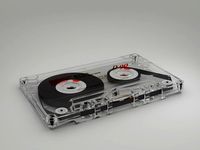
vintage audio cassette
...vintage audio cassette
3dexport
vintage audio cassette 3d model
Kit
turbosquid
$3

Bathroom Kit Baño kit
... available on turbo squid, the world's leading provider of digital 3d models for visualization, films, television, and games.
turbosquid
$19

Kit
... available on turbo squid, the world's leading provider of digital 3d models for visualization, films, television, and games.
3d_export
$20

Drift Kit
...drift kit
3dexport
turbosquid
$40

BitCoin Kit
...urbosquid
royalty free 3d model bitcoin kit for download as on turbosquid: 3d models for games, architecture, videos. (1519068)
turbosquid
$9

Industrial kit
...osquid
royalty free 3d model industrial kit for download as on turbosquid: 3d models for games, architecture, videos. (1144117)
turbosquid
$6

Kit Vases
...
turbosquid
royalty free 3d model kit vases for download as on turbosquid: 3d models for games, architecture, videos. (1285114)
turbosquid
free

Survival Kit
...rbosquid
royalty free 3d model survival kit for download as on turbosquid: 3d models for games, architecture, videos. (1637721)
turbosquid
$50

Ninja Kit
...rbosquid
royalty free 3d model ninja kit for download as fbx on turbosquid: 3d models for games, architecture, videos. (1672364)
turbosquid
$35

Brushes Kit
...osquid
royalty free 3d model brushes kit for download as max on turbosquid: 3d models for games, architecture, videos. (1216721)
turbosquid
$19
Medical kit
...osquid
royalty free 3d model medical kit for download as fbx on turbosquid: 3d models for games, architecture, videos. (1486089)
Car
3d_export
$5

car
...car
3dexport
luxury car high quality car
3d_export
$5

car
...car
3dexport
luxury car high quality car
3d_export
$5

car
...car
3dexport
luxury car high quality car
3d_export
$5

car
...car
3dexport
luxury car high quality car
3d_export
$5

car
...car
3dexport
luxury car high quality car
archibase_planet
free
Car
...
archibase planet
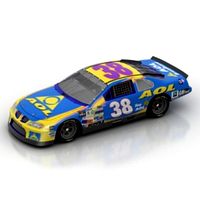
car sports car motor-car sportster
car nascar#1 n300114 - 3d model (*.gsm+*.3ds) for exterior 3d visualization.
archibase_planet
free

Car
...ibase planet
car motor-car sportster sports car
car gablota xform n190214 - 3d model (*.gsm+*.3ds) for exterior 3d visualization.
archibase_planet
free

Car
...car
archibase planet
car motor car transport
car vaz 2104- 3d model for interior 3d visualization.
3d_export
$15

car
...car
3dexport
car
3d_export
free

car
...car
3dexport
car
Mounting
3d_export
free

mounting bracket
...mounting plate is the portion of a hinge that attaches to the wood. mounting plates can be used indoors, cabinetry and furniture.
turbosquid
$2

MOUNTING
... available on turbo squid, the world's leading provider of digital 3d models for visualization, films, television, and games.
turbosquid
free

Mounts
... available on turbo squid, the world's leading provider of digital 3d models for visualization, films, television, and games.
turbosquid
free

Mount Fuji
...fuji
turbosquid
free 3d model mount fuji for download as obj on turbosquid: 3d models for games, architecture, videos. (1579977)
3d_export
$5

Headphone mount LR
...headphone mount lr
3dexport
headphone mount l+r
turbosquid
$39

Mount rainier
...quid
royalty free 3d model mount rainier for download as fbx on turbosquid: 3d models for games, architecture, videos. (1492586)
turbosquid
$5

pipe mounting
...quid
royalty free 3d model pipe mounting for download as obj on turbosquid: 3d models for games, architecture, videos. (1293744)
turbosquid
$3

Mounting Tires
...uid
royalty free 3d model mounting tires for download as fbx on turbosquid: 3d models for games, architecture, videos. (1708511)
3d_export
$5

Magnetic GoPro Mount
...pro mount
3dexport
cool magnetic mount for gopro. allows you to mount the camera on flat metal surfaces and get exclusive shots.
turbosquid
$5

Stone Mount
...ty free 3d model stone mount for download as ma, obj, and fbx on turbosquid: 3d models for games, architecture, videos. (1370306)