Thingiverse
Borg Ship Assembly Brackets and Stand
by Thingiverse
Last crawled date: 4 years, 3 months ago
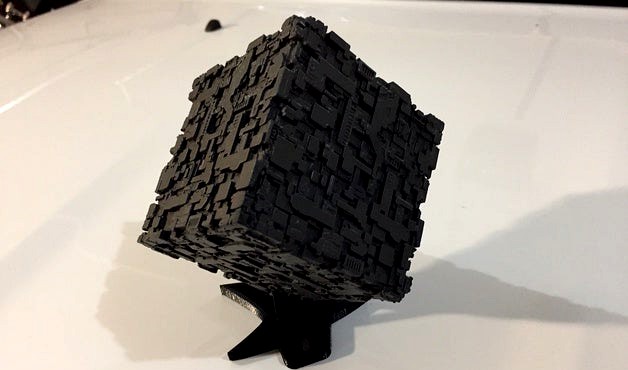
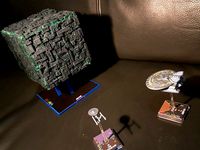
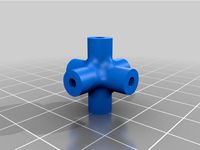
This is an assembly bracket and display stand for the original Borg Cube design. I found the ship parts difficult to assemble so I designed and printed these brackets. Print two of them for one cube. Also is a display stand to show off your finished project.
So, the original design was too large for my printer, so I reduced it by 50%. These brackets fit a 50% reduction in size. If you print the cube at its original size, scale these brackets to 200% when you print them. Same with the stand. Actually, the stand you may have to play around with the scale to get it to whatever size you like. Just eyeball it in your printer program.
The original design has the parts numbered. Take a close look at the included files and match up each numbered part with how they are laid out in the master file. I put a piece of tape on each one and numbered them accordingly. Then, I drew arrows so I could remember their orientation when I glued them together. Even doing this, I ended up grinding off the little extra bits that overlapped the adjacent pieces. Made assembling the parts easier.
I started off hot gluing the side pieces to one bracket. Work quickly if you use hot glue. Try to minimize the gaps. As soon as you get a bead of glue down, squeeze the side onto the bracket so it it a tight fit. Square it up on the bracket and hold it in place until the glue cools. Repeat with the other three sides. Then, glue the bottom. I used a 2-part epoxy so I had some working time. Used some clamps to hold it while the epoxy cured.
Install the final top piece the same way.
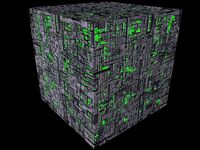
Your next step is to spray the cube with some primer. High build auto primer is ideal, but whatever you have. The grey primer will help you see all the gaps. It will also make visible all the filament hairs you need to clean up,
Now, your cube is assembled and primed, but there will be gaps no doubt. They will be easier to see when primed. I used some wood glue (white glue is fine too) in a glue syringe and squeezed glue into all the seams between the parts. I let the glue set for about 5 min, then I used a disposable brush to "tamp" the glue down into the seams. Just sort of dabbed at it. I didn't want to see glue beads along the seams.
When the glue is dried, spray another coat of primer. Repeat until you are satisfied that all the seams are filled and the cube looks like a solid piece.
I then used a dremel with a soft bristle brush tool to buff down as much as the brush could reach. It took away excess glue and little filament hairs I missed during the cleanup process. Its a step that is worth doing. Even a little roughing with some 220 grit paper on the outside to smooth out all the exterior surfaces may improve the final appearance.
Finally, I mixed up some grey and black paint in my airbrush to give it a flat gun metal color. Finished product looks great. Print the stand and you are done.
Hope this helps anyone wanting to assemble this model. I am really happy with the results.
So, the original design was too large for my printer, so I reduced it by 50%. These brackets fit a 50% reduction in size. If you print the cube at its original size, scale these brackets to 200% when you print them. Same with the stand. Actually, the stand you may have to play around with the scale to get it to whatever size you like. Just eyeball it in your printer program.
The original design has the parts numbered. Take a close look at the included files and match up each numbered part with how they are laid out in the master file. I put a piece of tape on each one and numbered them accordingly. Then, I drew arrows so I could remember their orientation when I glued them together. Even doing this, I ended up grinding off the little extra bits that overlapped the adjacent pieces. Made assembling the parts easier.
I started off hot gluing the side pieces to one bracket. Work quickly if you use hot glue. Try to minimize the gaps. As soon as you get a bead of glue down, squeeze the side onto the bracket so it it a tight fit. Square it up on the bracket and hold it in place until the glue cools. Repeat with the other three sides. Then, glue the bottom. I used a 2-part epoxy so I had some working time. Used some clamps to hold it while the epoxy cured.
Install the final top piece the same way.
Your next step is to spray the cube with some primer. High build auto primer is ideal, but whatever you have. The grey primer will help you see all the gaps. It will also make visible all the filament hairs you need to clean up,
Now, your cube is assembled and primed, but there will be gaps no doubt. They will be easier to see when primed. I used some wood glue (white glue is fine too) in a glue syringe and squeezed glue into all the seams between the parts. I let the glue set for about 5 min, then I used a disposable brush to "tamp" the glue down into the seams. Just sort of dabbed at it. I didn't want to see glue beads along the seams.
When the glue is dried, spray another coat of primer. Repeat until you are satisfied that all the seams are filled and the cube looks like a solid piece.
I then used a dremel with a soft bristle brush tool to buff down as much as the brush could reach. It took away excess glue and little filament hairs I missed during the cleanup process. Its a step that is worth doing. Even a little roughing with some 220 grit paper on the outside to smooth out all the exterior surfaces may improve the final appearance.
Finally, I mixed up some grey and black paint in my airbrush to give it a flat gun metal color. Finished product looks great. Print the stand and you are done.
Hope this helps anyone wanting to assemble this model. I am really happy with the results.
Similar models
thingiverse
free
Star Trek attack wing Borg Cube Base(Fan version) by llpp
... on pdf ,and put it on the plate(basepartc.stl).
final, put the 3d cube on basepartb.stl. (you may use the hot glue gun, too. )
thingiverse
free

Mini Ballista by Jdawg
... you can use the thingview to look at them. also, there are some offsets on some constraints, if you can't find them tell me.
thingiverse
free

Borg-cube by Simakrima
...ther to a cube. the picture is without glueing them together.
it is also printed with a scale of 66%, to save a little filament.
grabcad
free

Companion Cube
... 6 centers, 8 corners, and 12 edges to assemble the cube. they should all be to scale. if you print them let me know how it went.
thingiverse
free

Gaslands Gates by BalladBlack
...slands, use those unused bits for decoration, that's what im planning on doing with the pile of hot wheels tires ive cut off.
thingiverse
free
3x3 Rubiks Cube Blind Pieces and Parts by 344026653
...der: red opposite green, blue opposite orange and yellow opposite purple. also, red, blue and yellow share a common corner piece.
thingiverse
free

Dungeons & Dragons Weapon Rack by Trynn
...ake sure that the sections being inserted into the stands are clean of any extra material. after that, paint as needed and enjoy.
thingiverse
free

Kraken for Table Top DND by darkside501st
...ble to get those to stand up by adding some weights to the bases.
i printed these parts in abs so that i could vapor smooth them.
thingiverse
free

Cube Puzzle (YACP) by Geekdad_3D
...ssembled correctly. there are 240 different ways to put it together to form a cube! i included a plate with all the pieces on it.
thingiverse
free

Miniature headphones by ttreis
... it to hide the seam. glue knob on the outside of the speaker parts (i printed mine in a different colour as a highlight).
cheers
Borg
3ddd
$1

Borge
...borge
3ddd
круглый
borge table
3ddd
$1

Полка Borges Bookcase
...олка borges bookcase от итальянской фабрики baxter. размеры 150х35 см, h180 см.http://www.baxter.it/en/product/borges-2
3ddd
$1

Кресло Borge Mogensen
...кресло borge mogensen
3ddd
borge mogensen
дизайнер: borge mogensen
ширина: 87 см
высот: 102 см
глубина: 73 см
3ddd
free

Armchair Borge Mogensen
..., borge mogensen
3ds max 2010.v-ray 2.40.03.file formats fbx,obj.armchair borge mogensen
turbosquid
$333

Spacecraft: BORG
... available on turbo squid, the world's leading provider of digital 3d models for visualization, films, television, and games.
turbosquid
free

borg Assimilator.sit
... available on turbo squid, the world's leading provider of digital 3d models for visualization, films, television, and games.
turbosquid
free

borg Sfere.sit
... available on turbo squid, the world's leading provider of digital 3d models for visualization, films, television, and games.
turbosquid
free
borg Kubus.sit
... available on turbo squid, the world's leading provider of digital 3d models for visualization, films, television, and games.
turbosquid
free

Borg Cube
... available on turbo squid, the world's leading provider of digital 3d models for visualization, films, television, and games.
cg_studio
$20

Borg Guitar3d model
...odel
cgstudio
music guitar electric
.c4d - borg guitar 3d model, royalty free license available, instant download after purchase.
Brackets
archibase_planet
free

Bracket
...bracket
archibase planet
bracket corbel holder
bracket 1 - 3d model (*.gsm+*.3ds) for interior 3d visualization.
archibase_planet
free

Bracket
...bracket
archibase planet
bracket corbel console
bracket 5 - 3d model (*.gsm+*.3ds) for interior 3d visualization.
archibase_planet
free

Bracket
...bracket
archibase planet
corbel holder bracket
bracket 6 - 3d model (*.gsm+*.3ds) for interior 3d visualization.
archibase_planet
free

Bracket
...bracket
archibase planet
bracket corbel console
bracket 8 - 3d model (*.gsm+*.3ds) for interior 3d visualization.
archibase_planet
free

Bracket
...bracket
archibase planet
bracket corbel holder
bracket n280911 - 3d model (*.gsm+*.3ds) for interior 3d visualization.
archibase_planet
free

Bracket
...bracket
archibase planet
holder corbel bracket
bracket 9 - 3d model (*.gsm+*.3ds) for interior 3d visualization.
archibase_planet
free

Bracket
...bracket
archibase planet
corbel holder bracket
bracket 10 - 3d model (*.gsm+*.3ds) for interior 3d visualization.
archibase_planet
free

Bracket
...bracket
archibase planet
corbel console bracket
bracket 11 - 3d model (*.gsm+*.3ds) for interior 3d visualization.
archibase_planet
free

Bracket
...bracket
archibase planet
holder console bracket
bracket 12 - 3d model (*.gsm+*.3ds) for interior 3d visualization.
archibase_planet
free

Bracket
...bracket
archibase planet
bracket corbel holder
bracket 13 - 3d model (*.gsm+*.3ds) for interior 3d visualization.
Ship
3d_export
$5

ship
...ship
3dexport
ship
3d_export
$5
Ship
...ship
3dexport
ship
archibase_planet
free

Ship
...ship
archibase planet
ship
ship n280909 - 3d model (*.gsm+*.3ds) for 3d visualization.
3d_export
$5

ship
...ship
3dexport
the ship is well suited for games.
3d_export
free
ship
...ship
3dexport
a lowpoly ship similar to the titanic...
archibase_planet
free
Ship
...ship
archibase planet
cruiser cruise ship
cruise ship n010807 - 3d model for interior 3d visualization.
archibase_planet
free

Ship
...ship
archibase planet
sailing vessel ship
ship n140110 - 3d model (*.gsm+*.3ds) for interior 3d visualization.
archibase_planet
free
Ship
...ship
archibase planet
cutter launch ship
ship n010710 - 3d model (*.gsm+*.3ds) for exterior 3d visualization.
archibase_planet
free

Ship
...ship
archibase planet
sailing vessel ship vehicle of the sea
ship n010708 - 3d model (*.gsm+*.3ds) for interior 3d visualization.
turbosquid
$15

ship destroyer
...ip,frigate ship,ship,corvette ship for download as ma and fbx on turbosquid: 3d models for games, architecture, videos. (1435217)
Assembly
3d_export
$7
Electronic product assembly machine assembly machine
...electronic product assembly machine assembly machine
3dexport
electronic product assembly machine assembly machine
3d_export
$15
generator assembly line
...ced and assembled in the form of module block. it is a demonstration project of generator assembly. welcome to download and learn
3d_export
$10
elevator traction machine assembly line motor assembly process
... traction machine assembly line motor assembly process
3dexport
elevator traction machine assembly line (motor assembly process)
3d_export
$16
pin assembly machine
...pin assembly machine
3dexport
pin assembly machine
3d_export
$7
tower-crane-assembly
...tower-crane-assembly
3dexport
tower-crane-assembly
turbosquid
$100

Engine Assembly
...id
royalty free 3d model engine assembly for download as stl on turbosquid: 3d models for games, architecture, videos. (1658296)
turbosquid
$100
Engine Assembly
...id
royalty free 3d model engine assembly for download as stl on turbosquid: 3d models for games, architecture, videos. (1658291)
turbosquid
$100

Engine Assembly
...id
royalty free 3d model engine assembly for download as stl on turbosquid: 3d models for games, architecture, videos. (1658293)
turbosquid
$75
Platform Assembly
...royalty free 3d model platform assembly for download as blend on turbosquid: 3d models for games, architecture, videos. (1472939)
turbosquid
$15
generator assembly
...y free 3d model generator assembly for download as and sldas on turbosquid: 3d models for games, architecture, videos. (1469469)
Stand
turbosquid
$50
stand watermelon stand
...yalty free 3d model stand watermelon stand for download as ma on turbosquid: 3d models for games, architecture, videos. (1528284)
archibase_planet
free
Stand
...stand
archibase planet
stand post pole
stand - 3d model for interior 3d visualization.
archibase_planet
free
Stand
...stand
archibase planet
stand sport barbell
stand kettler - 3d model for interior 3d visualization.
archibase_planet
free
Stand
...stand
archibase planet
locker drawer stand
stand 897810 - 3d model for interior 3d visualization.
archibase_planet
free
Stand
...stand
archibase planet
stand rack post
stand 2 - 3d model for interior 3d visualization.
archibase_planet
free
Stand
...stand
archibase planet
stand storefront shelving
stand 3 - 3d model for interior 3d visualization.
archibase_planet
free
Stand
...stand
archibase planet
stand shelf shelving
stand 4 - 3d model for interior 3d visualization.
archibase_planet
free
Stand
...stand
archibase planet
stand post stall
stand 5 - 3d model for interior 3d visualization.
archibase_planet
free
Stand
...stand
archibase planet
stand post stall
stand 6 - 3d model for interior 3d visualization.
archibase_planet
free
Stand
...stand
archibase planet
stand post shelving
stand 7 - 3d model for interior 3d visualization.