Thingiverse
Bondtech BMG for the Cocoon Create Touch by dkselw
by Thingiverse
Last crawled date: 4 years, 1 month ago
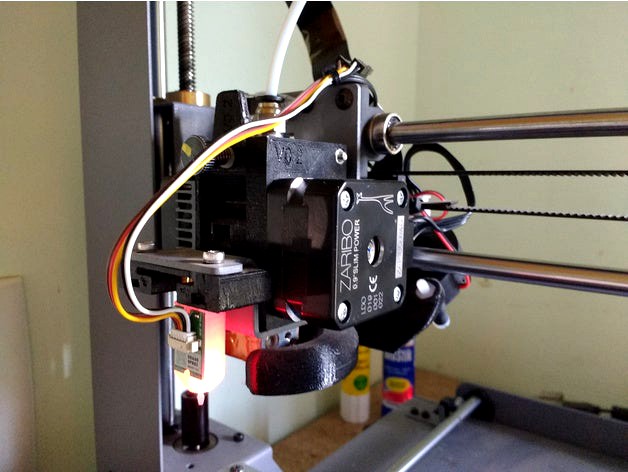
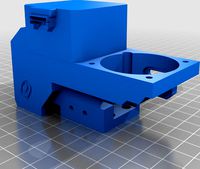
Geared Bondtech extruder for the Cocoon Create Touch/ Wanhao I3 Plus.
This extruder uses the existing heatbreak, in my case the Micro Swiss all metal heatbreak. I wanted to try the geared Bondtech drive, but did not want to have to purchase another heatbreak, as I had already installed the Micro Swiss all metal heatbreak.
I used this https://www.thingiverse.com/thing:2669164 for the model of the existing printer.
The Bondtech dimensions and clearances were measured using models from here https://github.com/BondtechAB/Bondtech_Prusa_i3/tree/master/CAD-Files
Hardware
I used the gears and bearings from inside a Bondtech BMG extruder.
Zaribo Pancake Extruder Motor https://zaribo.com/electronics/126-zaribo-pancake-motor-by-ldo.html . I believe this is the same as the LDO-42STH25-1404MAC . The Stepperonline 17HS10-0704S should also work and is recommended for other geared extruders, such as the "Bunny and Bear Geared MK3 Extruder".
3mm thick aluminium spacer for the heatsink. Trace around the side of the heatbreak cooling block for dimensions.
PC4-M10 Straight Pneumatic Fitting (supposed to have a M10 thread, but mine ended up being 1/8 NPT).
4mm OD Capricorn Bowden PTFE Tubing for between the heatbreak and just below the drive gears.
4mm OD PTFE for the reverse bowden tubing.
1 x PEM IUBB-M3-1 heat-set insert. I used the Lulzbot Heat-Set Insert Tapered, M3-0.5mm Internal Thread, 3.8mm L. A longer heat-set insert would be better.
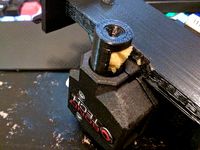
The filament path in the model is 1.75mm diameter. This will need to be drilled out to 2mm after printing.
I ended up having to use a reamer to get the bearings to fit nicely as my printer was printing the holes too small.
Use a 4mm drill to clean out the holes for the PTFE tubing.
Use a 4.2mm drill to clean the hole before inserting the heat-set insert.
Depending on how well your existing printer is calibrated, you may need to drill out other holes to size as required.
I did not have screws long enough to go all the way through the fan, extruder and spacer to the motor, so I used the existing screws to attach the heatsink to the spacer, extruder and the motor. The fan was then attached to the heatsink with short 3mm screws.
If you use the hinge pivot shaft from the Bondtech extruder, you will need to shorten it so that it does not protude past the outside face of the case. I used a piece of 3mm shaft from an old CDROM drive.
The white Bondtech gear protrudes out the back of the extruder. Check the clearance between the gear and the x-axis bearing screws. You may need to slide the heatbreak towards the front along the sheet metal bracket and/or shorten the x-axis screw. Mine had just over 1mm clearance without moving anything.
If you use the specified pancake stepper, you will loose about 5mm of the X travel. If you use the existing stepper, a bit more.
I printed the parts using the amf files, not the stl files.
Slicer settings:
0.2mm layer height
20% Gyroid infill
10 layers top and bottom
5 perimeters
This extruder uses the existing heatbreak, in my case the Micro Swiss all metal heatbreak. I wanted to try the geared Bondtech drive, but did not want to have to purchase another heatbreak, as I had already installed the Micro Swiss all metal heatbreak.
I used this https://www.thingiverse.com/thing:2669164 for the model of the existing printer.
The Bondtech dimensions and clearances were measured using models from here https://github.com/BondtechAB/Bondtech_Prusa_i3/tree/master/CAD-Files
Hardware
I used the gears and bearings from inside a Bondtech BMG extruder.
Zaribo Pancake Extruder Motor https://zaribo.com/electronics/126-zaribo-pancake-motor-by-ldo.html . I believe this is the same as the LDO-42STH25-1404MAC . The Stepperonline 17HS10-0704S should also work and is recommended for other geared extruders, such as the "Bunny and Bear Geared MK3 Extruder".
3mm thick aluminium spacer for the heatsink. Trace around the side of the heatbreak cooling block for dimensions.
PC4-M10 Straight Pneumatic Fitting (supposed to have a M10 thread, but mine ended up being 1/8 NPT).
4mm OD Capricorn Bowden PTFE Tubing for between the heatbreak and just below the drive gears.
4mm OD PTFE for the reverse bowden tubing.
1 x PEM IUBB-M3-1 heat-set insert. I used the Lulzbot Heat-Set Insert Tapered, M3-0.5mm Internal Thread, 3.8mm L. A longer heat-set insert would be better.
The filament path in the model is 1.75mm diameter. This will need to be drilled out to 2mm after printing.
I ended up having to use a reamer to get the bearings to fit nicely as my printer was printing the holes too small.
Use a 4mm drill to clean out the holes for the PTFE tubing.
Use a 4.2mm drill to clean the hole before inserting the heat-set insert.
Depending on how well your existing printer is calibrated, you may need to drill out other holes to size as required.
I did not have screws long enough to go all the way through the fan, extruder and spacer to the motor, so I used the existing screws to attach the heatsink to the spacer, extruder and the motor. The fan was then attached to the heatsink with short 3mm screws.
If you use the hinge pivot shaft from the Bondtech extruder, you will need to shorten it so that it does not protude past the outside face of the case. I used a piece of 3mm shaft from an old CDROM drive.
The white Bondtech gear protrudes out the back of the extruder. Check the clearance between the gear and the x-axis bearing screws. You may need to slide the heatbreak towards the front along the sheet metal bracket and/or shorten the x-axis screw. Mine had just over 1mm clearance without moving anything.
If you use the specified pancake stepper, you will loose about 5mm of the X travel. If you use the existing stepper, a bit more.
I printed the parts using the amf files, not the stl files.
Slicer settings:
0.2mm layer height
20% Gyroid infill
10 layers top and bottom
5 perimeters
Similar models
thingiverse
free

Sapphire Plus direct extruder mount and other mods by pit21
...e ptfe coupling holder is modified of pc4-m10 ptfe coupler 2020 mount by modestandroid https://www.thingiverse.com/thing:3703529
thingiverse
free

1Pc. Flexion Extruder Adapter for the Robo R1 and the Robo R1+ by oldfarmhand
...g socket head screws
2 3mm 05 20mm long flat socket head screws
if you use the adapter with fan bracket you will need a 40 mm fan
thingiverse
free

Extruder Motor Spacer for 3DFused Direct Drive mount by Critterninja
...ere, just a 3mm thick spacer, set to the same shape of the standard 42x42mm motor and a hole in the middle to fit over the shaft.
thingiverse
free

reverse bowden for Prusa MK3, Bear Upgrade and Zaribo on IKEA Lack enclosure by uepsie
...n be found here:https://github.com/gregsaun/bear_extruder_and_x_axis/tree/master/optional_parts/reverse_bowden
happy printing :-)
thingiverse
free

One Piece Simple Direct Drive Extruder by Tobeca
...geared extruder) and a 608zz bearing (+ screw and nut).
no springs, you have to adjust the pressure at the mounting of the motor.
thingiverse
free

think&have torque extruder by thinkandhave
... a flat screwdriver and a quick clamp. the gear has to run smooth and the filament has to pass through the center of the hobbing.
thingiverse
free

Tevo Black Widow extruder spacer by tuxcat
...d line up with the holes in the extruder. moving the extruder here gives the added benefit of another 18mm~ of printable height!
thingiverse
free

BMG Direct Drive Adapter for Ender 3 V2 with Hero Me Gen5 by scaryPug
... endstop.
you also might need to cut the original hero me cable management tube to install this.
.step file added for easy tweak.
grabcad
free

Motor Spacer for SCUTTLE 12v DC motor
...
if you add this spacer, you must verify your m3x10mm screws are still long enough to engage the motor threads at least by 3mm.
thingiverse
free

Dual Drive Gear Ninjaflex extruder hole drilling template by OrdSolutions
...a/etc...)
http://www.ordsolutions.com/ninjaflex-extruder/https://www.facebook.com/ordsolutionsinchttps://twitter.com/ordsolutions

Bondtech
thingiverse
free

x5s bondtech
...x5s bondtech
thingiverse
this allow using a bondtech dual drive on x5s machines
thingiverse
free

Bondtech mount by Nicoande99
...bondtech mount by nicoande99
thingiverse
custom bondtech mount for my velleman k8200 3d printer.
thingiverse
free

Trex2+ Bondtech adpter by fong504
...trex2+ bondtech adpter by fong504
thingiverse
bondtech makerbot 2 clone adapter for the trex2+.
thingiverse
free

Bondtech PTFE tube Holder
...bondtech ptfe tube holder
thingiverse
adjusted a bit to fit my bondtech clone.
thingiverse
free
Bondtech DDX by sebbzor
...of the ddx incase you want to build adapters for it. original stepfile can be found on bondtechs website, all credits go to them.
thingiverse
free

Support BONDTECH Anet_A8 By SergioFPV by SergioFPV
...support bondtech anet_a8 by sergiofpv by sergiofpv
thingiverse
support bondtech anet_a8
thingiverse
free

CR-10S-Bondtech-Mosquito_Mount_Bl_Touch by enoblk
...cr-10s-bondtech-mosquito_mount_bl_touch by enoblk
thingiverse
cr-10s-bondtech-mosquitomount-_bl_touch
thingiverse
free

Bondtech Flying mount by Yakandu
...du
thingiverse
lightweight flying extruder mount for the bondtech bmg with design centred around filament path.
this is a remix.
thingiverse
free
Bondtech Oiler by bamhm182
...t a piece of sponge and put it in the hole. oil it up and you're good to go! been using it for a few months with no problems.
thingiverse
free

RatRig V-Core Pro Bondtech Carriage (Prusa MK3S Bondtech Extruder)
...dtech can be mounted 1:1 :)
i have the mk3s with bondtech and mosquito magnum. i'll try out if my ratrig arrives...
have fun!
Cocoon
turbosquid
$29

cocoon
...y free 3d model cocoon for download as c4d, obj, fbx, and 3ds on turbosquid: 3d models for games, architecture, videos. (1559035)
3ddd
$1

Cocoon
...cocoon
3ddd
roche bobois
1600x1600
3ddd
$1
Heal Cocoon Chair
...heal cocoon chair
3ddd
heal , cocoon
heal cocoon chair
3d_export
$6

COCOON - PURIST BATH
...cocoon - purist bath
3dexport
inspired by cocoon -
3d_export
$6

COCOON - ZEN BATH
...- zen bath
3dexport
bathtub from cocoon ( bycocoon ) with cocoon jp collection faucets. manufacturer : preview renders - corona
archive3d
free

Cocoon 3D Model
...hive3d
cocoon seat canopy
cocoon canopy - 3d model (*.gsm+*.3ds) for interior 3d visualization.
3ddd
$1

MacMaster Cocoon Pendant Light
...macmaster cocoon pendant light
3ddd
macmaster , cocoon
подвесная люстра от серии cocoon
turbosquid
$14
Cocoon armchair
...ee 3d model cocoon armchair for download as max, obj, and fbx on turbosquid: 3d models for games, architecture, videos. (1396538)
3ddd
$1

Eglo / Cocoon Pinneti 91903
...03
3ddd
eglo
eglo cocoon pinneti 91903http://www.eglo.com/international/produkte/interior-lighting/cocoon/pinneti/91903
3ddd
$1

Cocoon Couture
...cocoon couture
3ddd
вешалка
https://www.cocooncouture.com/room_accessories.php
Bmg
turbosquid
$3

.50 BMG
... available on turbo squid, the world's leading provider of digital 3d models for visualization, films, television, and games.
turbosquid
$2

.50 BMG
... available on turbo squid, the world's leading provider of digital 3d models for visualization, films, television, and games.
turbosquid
$25
50 BMG Cartridge
...e 3d model 50 bmg cartridge for download as 3ds, max, and obj on turbosquid: 3d models for games, architecture, videos. (1303035)
turbosquid
$30

Sniper 50 bmg
... available on turbo squid, the world's leading provider of digital 3d models for visualization, films, television, and games.
turbosquid
free

Cal 50 BMG
... available on turbo squid, the world's leading provider of digital 3d models for visualization, films, television, and games.
cg_studio
$25
.50 BMG Cartridge3d model
...odel
cgstudio
.3ds .max .obj .wrl - .50 bmg cartridge 3d model, royalty free license available, instant download after purchase.
3d_export
$5
50 caliber BMG round 3D Model
...d 3d model
3dexport
50cal caliber 50 round bullet bmg cartridge browning rifle
50 caliber bmg round 3d model csw92 27660 3dexport
3d_export
$22
.50 BMG Cartridge 3D Model
...ectile rifle round pistol cartridge m2 hb 127x99mm nato browning barrett m82a1
.50 bmg cartridge 3d model plutonius 8091 3dexport
turbosquid
free

LAR Grizzly .50 BMG Sniper
... available on turbo squid, the world's leading provider of digital 3d models for visualization, films, television, and games.
3d_export
$8
cartrige m50 bmg
...aterials are logically named<br>the main format is in 3ds max 2009.<br>satisfcation garranteed..<br>thank you !
Touch
3ddd
$1

Touch
...touch
3ddd
touch , альфа банк
электронный терминал для очереди
3ddd
$1

GSG / Touch
... ванна
http://www.ceramicagsg.com/sanitaryware-touch/bathtub-touch-free-standing.html
turbosquid
$10

Oculus Touch
...squid
royalty free 3d model oculus touch for download as skp on turbosquid: 3d models for games, architecture, videos. (1462433)
turbosquid
$64

iPod Touch
...ty free 3d model ipod touch for download as 3ds, max, and obj on turbosquid: 3d models for games, architecture, videos. (1299603)
3ddd
$1

iPod Touch 5
...ipod touch 5
3ddd
apple , плеер
модель ipod touch 5
3ddd
$1

Asnaghi "Touch"
...asnaghi "touch"
3ddd
asnaghi , touch
фабрика: asnaghi
модель: touch
3ddd
free

Japanese stone touch
...japanese stone touch
3ddd
фонарь
japanese stone garden touch
японский садовый фонарь
икеокоми-гата
3d_ocean
$15

IPOD TOUCH 5
...apple blender ipad iphone ipod mp3 nano player touch
3d model of ipod touch 5 in 3 colours. available in .3ds, .blend, .obj, .x3d
3d_ocean
$12

iPod touch 5G
...pod jobs nano steve touch
ipod touch 3d model. formats, fbx, obj, max(2010) textures and materials with multiple colors included.
3ddd
$1
HTC Touch HD
...http://www.gsmarena.com/htc_touch_hd-2525.php фото:http://i.smartphone.ua/img/phones/htc-touch-hd/foto_001.jpg
Create
turbosquid
free

creates
... available on turbo squid, the world's leading provider of digital 3d models for visualization, films, television, and games.
turbosquid
free

creat
... available on turbo squid, the world's leading provider of digital 3d models for visualization, films, television, and games.
3ddd
$1
Диван Create Classics
...диван create classics
3ddd
диван create classics
3d_export
$5

Blank for creating a robot
...blank for creating a robot
3dexport
a blank for creating a female robot, or an anthropomorphic creature.
turbosquid
$38

Create a snow scene
...royalty free 3d model create a snow scene for download as fbx on turbosquid: 3d models for games, architecture, videos. (1493726)
turbosquid
$30

Create a tropical scene
...lty free 3d model create a tropical scene for download as fbx on turbosquid: 3d models for games, architecture, videos. (1493052)
turbosquid
$10

Ammo Create Set
...lty free 3d model ammo create set for download as max and fbx on turbosquid: 3d models for games, architecture, videos. (1349983)
turbosquid
$4

Hand Painted Create
...free 3d model hand painted create for download as max and fbx on turbosquid: 3d models for games, architecture, videos. (1304173)
turbosquid
$15
Sculptural Twists And Turns Create
... model sculptural twists and turns create for download as max on turbosquid: 3d models for games, architecture, videos. (1449864)
turbosquid
$30

Wacom Bamboo Create Tablet
... available on turbo squid, the world's leading provider of digital 3d models for visualization, films, television, and games.