Thingiverse
BNC Dock for Retrotink 5X-Pro by TheJeffChen
by Thingiverse
Last crawled date: 2 years, 11 months ago
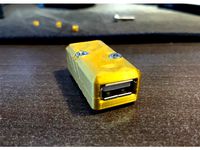
A dock for the Retrotink 5X-Pro that passively breaks out the SCART jack into individual BNC connectors for RGBs or composite video signals, besides stereo audio.
!!!!!WARNING FIRST!!!!!
Retrotink 5X-Pro DOES NOT support TTL-level sync signal.
You MUST put a 470 ohm inline attenuation resistor on the sync line if your source device is outputting TTL-level sync.
Not doing so will very likely damage your 5X in the long run, even if it appears to work initially.
Printing
Print is straight forward. Models are placed in their respective print orientation already. Print with support. Logo-less body is provided for you purists. Bottom piece has dimples if you wish to put in some rubber feet, but a completely flat dimpleless version is also provided.
I printed this at 0.48 line width and 0.44 wall line width at 0.2mm height, and it turned out ok. Going down to 0.16mm layer height and 0.4mm line width will give you much better results.
Note if you know how to, slow down top/bottom layers so the tip of the model isn't printed too fast and look droopy. Limiting the shortest layer time might also help.
Electronic parts list
75 ohm BNC (proper):
Digi-Key Part Number: ARF1664-ND
50ohm BNC (cheaper):
Digi-Key Part Number: A97548-ND
Stereo Jack:
Digi-Key Part Number: 839-1411-ND
SCART Plug:https://www.aliexpress.com/item/32985585670.html
Cheap Aliexpress 75 ohm BNC headers (not verified):https://www.aliexpress.com/item/1005001874117483.html
It is recommended to use 75 ohm BNC headers.
You do not have to buy from DigiKey, if you can find physically compatible parts in the same dimensions.
The SCART header comes from any cheap SCART cable you can buy. They all seem to come from the same design. Or simply buy a lot of 10 from Aliexpress. It's not expensive.
Assembly
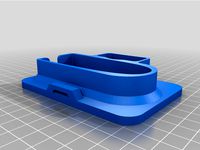
Solder wires to the SCART header before you install it. Pinout is attached in the pictures. Remember to leave enough length for the BNC and stereo jacks.
Drop the SCART header into the slot and push it inwards, and then insert the stopper piece to hold it in place.
Pre-tin the solder cups and GND rings of the BNC jacks before screwing them to the shell. Install all the BNC jacks first, and then install the stereo jack. The space is tight but should be enough. IMO this makes it less likely to overtighten them.
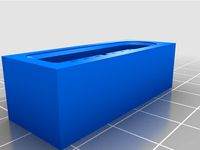
The bottom piece is not required but I assume some of you might not appreciate a piece of hardware with exposed innards. You could attach some rubber feet to its bottom to stop the whole thing from potential sliding.
!!!!!WARNING FIRST!!!!!
Retrotink 5X-Pro DOES NOT support TTL-level sync signal.
You MUST put a 470 ohm inline attenuation resistor on the sync line if your source device is outputting TTL-level sync.
Not doing so will very likely damage your 5X in the long run, even if it appears to work initially.
Printing
Print is straight forward. Models are placed in their respective print orientation already. Print with support. Logo-less body is provided for you purists. Bottom piece has dimples if you wish to put in some rubber feet, but a completely flat dimpleless version is also provided.
I printed this at 0.48 line width and 0.44 wall line width at 0.2mm height, and it turned out ok. Going down to 0.16mm layer height and 0.4mm line width will give you much better results.
Note if you know how to, slow down top/bottom layers so the tip of the model isn't printed too fast and look droopy. Limiting the shortest layer time might also help.
Electronic parts list
75 ohm BNC (proper):
Digi-Key Part Number: ARF1664-ND
50ohm BNC (cheaper):
Digi-Key Part Number: A97548-ND
Stereo Jack:
Digi-Key Part Number: 839-1411-ND
SCART Plug:https://www.aliexpress.com/item/32985585670.html
Cheap Aliexpress 75 ohm BNC headers (not verified):https://www.aliexpress.com/item/1005001874117483.html
It is recommended to use 75 ohm BNC headers.
You do not have to buy from DigiKey, if you can find physically compatible parts in the same dimensions.
The SCART header comes from any cheap SCART cable you can buy. They all seem to come from the same design. Or simply buy a lot of 10 from Aliexpress. It's not expensive.
Assembly
Solder wires to the SCART header before you install it. Pinout is attached in the pictures. Remember to leave enough length for the BNC and stereo jacks.
Drop the SCART header into the slot and push it inwards, and then insert the stopper piece to hold it in place.
Pre-tin the solder cups and GND rings of the BNC jacks before screwing them to the shell. Install all the BNC jacks first, and then install the stereo jack. The space is tight but should be enough. IMO this makes it less likely to overtighten them.
The bottom piece is not required but I assume some of you might not appreciate a piece of hardware with exposed innards. You could attach some rubber feet to its bottom to stop the whole thing from potential sliding.
Similar models
thingiverse
free

Plas Ti Key by KB9ENS
... tape and becu. becu finger stock is super glued down then wrapped (whipped) with kevlar string (any thin strong string will do).
thingiverse
free

RetroTINK 5X Pro Vertical Stand by ToddsNerdCave
...on the bottom of the stand to keep it from sliding around.
if you are unable to print this, i sell them at https://retrofrog.net/
grabcad
free

TE Tactile Momentary Switches
...t-no 0.05a 24v
digi-key part number
450-1131-nd
te 1825910-6
switch tactile spst-no 0.05a 24v
digi-key part number
450-1650-nd
grabcad
free

Bourns 3590S-291-103L Potentiometer
...linear
digi-key part number
3590s-291-103l-nd
mouser part number
652-3590s-291-103l
manufacturer product number
3590s-291-103l
grabcad
free

CWI310-ND CW Industries Toggle Switch Rubber Boot
...cwi310-nd cw industries toggle switch rubber boot
grabcad
cwi310-nd digi key part number. cannot find this on the cw site.
grabcad
free

Flange Mount SMA Connector
...flange mount sma connector
grabcad
manufacturer product number:9376-9113-001
digi-key part number:2201-9376-9113-001-nd
thingiverse
free

RetroTink-5X cradle by arekuse
...retrotink-5x cradle by arekuse
thingiverse
here is my take for a cradle for retrotink-5x.
grabcad
free

Flange Mount(4 hole) SMA Connector
...flange mount(4 hole) sma connector
grabcad
manufacturer product number:9376-9113-001
digi-key part number:2201-9376-9113-001-nd
grabcad
free

Electronic_component_ED350-3_Bloques_de _terminales_Cable_placa_Horizontal_5.00mm
...50-3
bloques_de _terminales_cable_placa_horizontal_5.00mm
fabricante: on shore technology inc.
digi-key part number: ed1931-nd
grabcad
free

BNC JACK B-021 (COSMTEC)
...bnc jack b-021 (cosmtec)
grabcad
50 ohm
Retrotink
thingiverse
free
RetroTink-5X cradle by arekuse
...retrotink-5x cradle by arekuse
thingiverse
here is my take for a cradle for retrotink-5x.
thingiverse
free
RetroTINK 5X Pro Vertical Stand by ToddsNerdCave
...on the bottom of the stand to keep it from sliding around.
if you are unable to print this, i sell them at https://retrofrog.net/
thingiverse
free
RetroTINK 5X Pro Vertical Stand with Stronger Loop by damcoole
...inal versions and the loop broke immediately both times.
this version is thicker and is much stronger, so i can actually use it.
thingiverse
free

FamiCoun - Famicom Front Expansion for NES & SNES Controller by TheJeffChen
...nesdev wiki:https://wiki.nesdev.com mike chi (creator of the very famous retrotinkhttps://www.retrotink.com ...
thingiverse
free

TwinDiamond - Twin Famicom Expansion A to NES & SNES Controller by TheJeffChen
...nesdev wiki:https://wiki.nesdev.com mike chi (creator of the very famous retrotinkhttps://www.retrotink.com ...
grabcad
free

Arduino UNO
...arduino uno model in original size. great thanks @ retrotinkr - dirk wouters for his usb...
Thejeffchen
thingiverse
free

Toothpaste Squeezer by TheJeffChen
...by thejeffchen
thingiverse
my neighbor wanted one, so i designed it. no moving parts means no chance to break. hope you like it.
thingiverse
free
Nintendo Console Ports STEP by TheJeffChen
...nintendo console ports step by thejeffchen
thingiverse
nintendo console ports i designed for my own projects.
thingiverse
free

PlayStation 2 Slim Stand by TheJeffChen
...tation 2 slim stand by thejeffchen
thingiverse
created a while ago.
attaches to ps2 slim with one m3 screw.
nothing complicated.
thingiverse
free
Famicom Front Expansion Port Cover by TheJeffChen
...amicom front expansion port cover by thejeffchen
thingiverse
famicom front expansion port cover for those who lost the original.
thingiverse
free
USB Coupler by TheJeffChen
...sed:https://www.amazon.com/gp/product/b07np7jryx/https://www.amazon.ca/gp/product/b07np7jryx/
pins used: 2.54mm pitch pin header.
thingiverse
free

IKEA MAMMUT Table Leg Extension 10cm by TheJeffChen
...s piece of cheap furniture. print 4 of them and you are good to go.
i used pla and it's holding up fine. no need for support.
thingiverse
free
GDEMU Mount Button Flat & Raised Logo by TheJeffChen
...go file.
if your printer is as dumb as mine, you can print the flat button and the swirl logo separated, then glue them together.
thingiverse
free

iPhone 12 MagSafe Add-on for Belkin Charge + Sync Dock by TheJeffChen
...ly.
choose the one you like.
use m2 screws and nuts to assemble.
if interests are high, i can make a stand-alone version as well.
thingiverse
free

Apple Remote Bundle Shell with AirTag by TheJeffChen
...for a snug installation.
however the front facing version was my original idea and it doesn't feel that bad either.
have fun!
thingiverse
free

GBS Control Case for GBS 8220 with BNC for RGBs by TheJeffChen
...ckets use m38mm (11mm total length) ones.
bnc connector should be rear-threaded. flange diameter should be no bigger than 12.4mm.
Bnc
turbosquid
free

BNC jack.3ds
... available on turbo squid, the world's leading provider of digital 3d models for visualization, films, television, and games.
turbosquid
free

BNC plug locking.3ds
... available on turbo squid, the world's leading provider of digital 3d models for visualization, films, television, and games.
thingiverse
free

Banshee BNC-3S
...banshee bnc-3s
thingiverse
banshee bnc-3s.
thingiverse
free
BANSHEE BNC-7S
...banshee bnc-7s
thingiverse
banshee bnc-7s
thingiverse
free

BANSHEE BNC-6S
...banshee bnc-6s
thingiverse
banshee bnc-6s
thingiverse
free

Banshee BNC-3MC
...banshee bnc-3mc
thingiverse
banshee bnc-3mc
thingiverse
free

Banshee BNC-9S
...banshee bnc-9s
thingiverse
banshee bnc-9s
thingiverse
free

BANSHEE BNC-9S2
...banshee bnc-9s2
thingiverse
banshee bnc-9s2
thingiverse
free

BNC Buster by joekovach
...bnc buster by joekovach
thingiverse
bnc nut remover with hex tip
thingiverse
free

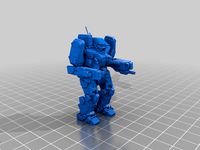
Banshee BNC-3M
...banshee bnc-3m
thingiverse
battletech battlemech, banshee bnc-3m
5X
turbosquid
$100

Nectarines 5x pack
...
royalty free 3d model nectarines 5x pack for download as obj on turbosquid: 3d models for games, architecture, videos. (1195833)
turbosquid
$14

Acento 5X Lamp
... available on turbo squid, the world's leading provider of digital 3d models for visualization, films, television, and games.
turbosquid
free

LG Nexus 5x
... available on turbo squid, the world's leading provider of digital 3d models for visualization, films, television, and games.
3d_export
$20

Wheel tires 5X 3D Model
...wheel tires 5x 3d model
3dexport
wheels rims tire cars justtomas
wheel tires 5x 3d model justtomas 62006 3dexport
turbosquid
$9

5x classical street lights
...eet lights for download as 3ds, obj, fbx, blend, dae, and stl on turbosquid: 3d models for games, architecture, videos. (1159635)
humster3d
$40

3D model of LG Nexus 5X Ice
...y a detailed 3d model of lg nexus 5x ice in various file formats. all our 3d models were created maximally close to the original.
humster3d
$40

3D model of LG Nexus 5X Quartz
... detailed 3d model of lg nexus 5x quartz in various file formats. all our 3d models were created maximally close to the original.
humster3d
$40
3D model of LG Nexus 5X Carbon
... detailed 3d model of lg nexus 5x carbon in various file formats. all our 3d models were created maximally close to the original.
turbosquid
$29

E3D - Xiaomi Mi 5X Black 3D model
...xiaomi mi 5x black 3d model for download as max, obj, and c4d on turbosquid: 3d models for games, architecture, videos. (1273116)
3d_ocean
$15

Element3D - LG Nexus 5X Black
...l, you may want to visit my online store at: http://beemaxx.com/ do not hesitate to send me one email to: hoangkim.nuce.vn@gma...
Dock
design_connected
$20
Docks
...docks
designconnected
gandia blasco docks computer generated 3d model. designed by romero vallejo.
turbosquid
$5

Dock
...squid
royalty free 3d model dock for download as 3ds and fbx on turbosquid: 3d models for games, architecture, videos. (1159328)
turbosquid
$20

Dock
... available on turbo squid, the world's leading provider of digital 3d models for visualization, films, television, and games.
turbosquid
$10

Dock
... available on turbo squid, the world's leading provider of digital 3d models for visualization, films, television, and games.
turbosquid
$10
Dock
... available on turbo squid, the world's leading provider of digital 3d models for visualization, films, television, and games.
turbosquid
$2
dock
... available on turbo squid, the world's leading provider of digital 3d models for visualization, films, television, and games.
3d_export
$65

dock
...dock
3dexport
simple rendering of the scene file
design_connected
$16

Dry-Dock
...dry-dock
designconnected
restoration hardware dry-dock computer generated 3d model.
3d_ocean
$6
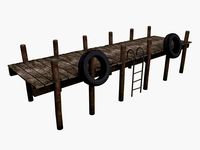
The Boat Dock
...s you see are separate, so you can remove the tyres and ladder and extend out the main section of the dock to make a long section
3ddd
$1
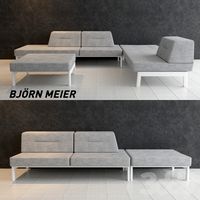
Bjorn Meier docks
... docks , модульный
bjorn meier docks
vray+corona
Pro
turbosquid
$29

Pro
...ree 3d model mac pro for download as obj, c4d, fbx, and blend on turbosquid: 3d models for games, architecture, videos. (1505782)
turbosquid
$15

Apple Mac Pro and Pro Display
...ee 3d model apple mac pro and pro display for download as max on turbosquid: 3d models for games, architecture, videos. (1417078)
3d_export
$5

iphone 13 pro max and pro
...3 pro max and 13 pro the model is made in four colors (graphite, gold, silver, and blue), all of which are attached in the files.
3d_export
free

sapphire pro
...sapphire pro
3dexport
sapphire pro 3d printer head mask
3d_export
$4

macbook pro
...macbook pro
3dexport
macbook pro 13" inch 2020 years model
3ddd
free

GentleLase Pro
... syneron , candela
gentlelase pro аппарат для лазерной эпиляции
turbosquid
$25

PRO frame
...rbosquid
royalty free 3d model pro frame for download as max on turbosquid: 3d models for games, architecture, videos. (1148329)
turbosquid
$5

Alien pro
...osquid
royalty free 3d model alien pro for download as blend on turbosquid: 3d models for games, architecture, videos. (1678446)
turbosquid
$5

iphone11 pro
...uid
royalty free 3d model iphone11 pro for download as blend on turbosquid: 3d models for games, architecture, videos. (1562707)
3ddd
$1

Mac Pro (appel)
...mac pro (appel)
3ddd
компьютер , apple
mac pro