Thingiverse
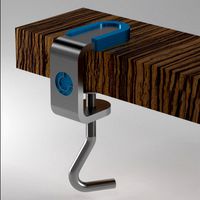
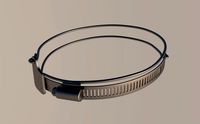
Blade Clamp for Black & Decker KS890E Scorpion Saw by merlin49152
by Thingiverse
Last crawled date: 3 years, 1 month ago
Hi guys;
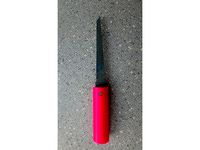
I recently trashpicked a Black & Decker KS890E Scorpion Saw that had the same usual fault that these saws always seem to have - ie. the blade clamp was broken off. This seems to be a weak point in all reciprocating saws and is a particular problem with this model, with some users reporting that the blade clamp had sheared off after only relatively light work.
Replacement parts are available, but at a relatively high price - this particular part was listed at £12.99 (roughly $18 US), which is more money than I was prepared to spend on a trashpicked tool, so I set about designing a blade clamp that would be easy to print in one piece (for strength) and without supports (for ease of cleanup) and that would be safe a reliable in operation.
ATTACHMENT TO THE TOOL
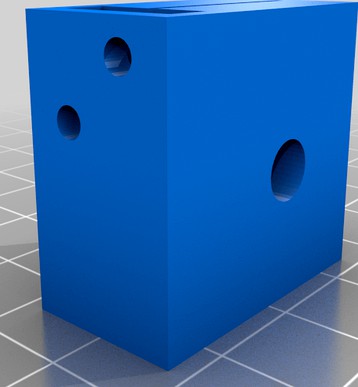
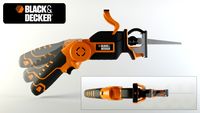
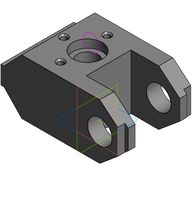
As with the official part, this attaches to the reciprocating drive shaft with 2 bolts. I've designed this part to work with 20mm M3 bolts as they are the closest to the original that I was able to find here. The blade fits into a 1mm wide slot, shaped to accept the back of the blade and hold it securely. An M6 bolt passes through the mounting hole in the blade to hold it really securely and prevent it from falling out in use. An M6 hex nut fits into a recess on the other side of the clamp. As is usual with printed parts like this, the easiest way to fit the nut is to thread it onto the bolt and tighten it in order to pull it tight into the recess which should then hold it firmly in place, with the intention of allowing the blade to be changed without dismantling the saw.
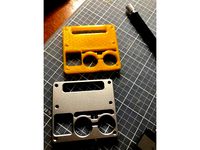
PRINTING THE CLAMP
For best results, print supportless with the rear surface of the part on the print bed. As the clamp needs to be strong, I would recomment a relatively high amount of infill (I used 0.1mm layer height at 60% infill and it seems to be OK, but if it ever fails in use I may try increasing the infill but it seems to be very sturdy as it is)
I used PLA although ABS should work too (though in my experience, ABS tends to shrink a bit, making it less suitable for precision parts). This part is not subjected to high temperatures under normal workloads, although of course the blade will get hot in use and this may be enough to soften the material, though this has not been an issue for me yet as it doesn't get particularly heavy use in my shop - If you're using this sort of tool in a more heavy-use / commercial environment, then I'll wager that you're not using consumer-grade Black & Decker products anyway :)
If your printer is working nicely, the part should not require any cleaning up before fitting to the tool.
FITTING THE CLAMP
Press an M6 hex nut into the recess on one side of the clamp. The easiest way to do this is to push the M6 bolt into the clamp from the other
side and tighten so as to pull the nut tightly into the recess. You can then unscrew the bolt and the nut will stay firmly in place without the
need for glue.
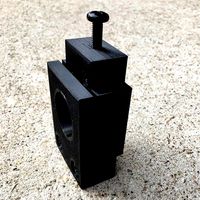
Slide the clamp over the reciprocating shaft with the two small screw holes towards the front, and facing the top of the saw.
Use 2 M3 bolts to secure the clamp to the shaft - I've sized the holes on the part to be tight enough that an M3 bolt will self-tap a thread
into the part for a firm hold.
Push the back of the saw blade into the slot in the clamp until it hits the back stop. At this point the mounting hole in the saw blade will be
aligned with the M6 bolt hole.
Screw in the M6 bolt and tighten securely.
Reassemble the saw casing. If the M6 bolt you used has a suitably sized head, then you should be able to unscrew it via the oddly-shaped hole
in the side of the casing, in order to replace the saw blade without dismantling the tool.
SAFETY
The big question that many people will have is the most obvious one - Is it safe to hold a powered saw blade with a 3D-printed clamp? Well I guess that depends on the level of use and abuse that the tool gets subjected to, but consider that the clamp totally wraps around the reciprocating shaft, and the screws pass through two sections of the clamp and the shaft, and that the blade itself has a 6mm steel bolt passing through it, so it's pretty hard to imagine the blade breaking loose from the clamp (Less likely than in the original part design) and even if, in the worst-case scenario, the clamp totally shattered / snapped / melted etc, the whole thing is enclosed within the body of the saw so it would ne next to impossible for the blade or any part of the clamp to break loose and fly away from the tool.
If I didn't think that this part was safe to use, then I wouldn't be uploading it here (and certainly wouldn't be using it on my own saw), but as with all things, you use this at your own risk :)
CONCLUSION
When I first printed this part, I wasn't sure how well it would hold up in use, so I conducted a few tests before attempting to do any real work with it. First of all, I cut through a heavy-duty cardboard tube, of the kind that rolls of carpet come on. This had around 7mm thick walls and the saw cut it without any issues. Next up was an offcut of laminate flooring (8mm thick MDF) and again it cut perfectly well. The final test was a scrap of 18mm thick chipboard ("particle board" in the US), and again it went through like a dose of salts. After these tests, I dismantled the saw to check that everything was still rigid and undamaged and found that to be the case. Since then, I've cut through several lengths of 2x4 as well as laminated chipboard and sheets of 12mm plywood, again without any issues or loosening of the clamp or its mounting hardware. I've not tried cutting plastic or metal with it though, as I don't have the right blades for these materials, but with the correct blade fitted, I don't see any reason why it shouldn't work. At this point I became confident enough in the design to upload it here.
I recently trashpicked a Black & Decker KS890E Scorpion Saw that had the same usual fault that these saws always seem to have - ie. the blade clamp was broken off. This seems to be a weak point in all reciprocating saws and is a particular problem with this model, with some users reporting that the blade clamp had sheared off after only relatively light work.
Replacement parts are available, but at a relatively high price - this particular part was listed at £12.99 (roughly $18 US), which is more money than I was prepared to spend on a trashpicked tool, so I set about designing a blade clamp that would be easy to print in one piece (for strength) and without supports (for ease of cleanup) and that would be safe a reliable in operation.
ATTACHMENT TO THE TOOL
As with the official part, this attaches to the reciprocating drive shaft with 2 bolts. I've designed this part to work with 20mm M3 bolts as they are the closest to the original that I was able to find here. The blade fits into a 1mm wide slot, shaped to accept the back of the blade and hold it securely. An M6 bolt passes through the mounting hole in the blade to hold it really securely and prevent it from falling out in use. An M6 hex nut fits into a recess on the other side of the clamp. As is usual with printed parts like this, the easiest way to fit the nut is to thread it onto the bolt and tighten it in order to pull it tight into the recess which should then hold it firmly in place, with the intention of allowing the blade to be changed without dismantling the saw.
PRINTING THE CLAMP
For best results, print supportless with the rear surface of the part on the print bed. As the clamp needs to be strong, I would recomment a relatively high amount of infill (I used 0.1mm layer height at 60% infill and it seems to be OK, but if it ever fails in use I may try increasing the infill but it seems to be very sturdy as it is)
I used PLA although ABS should work too (though in my experience, ABS tends to shrink a bit, making it less suitable for precision parts). This part is not subjected to high temperatures under normal workloads, although of course the blade will get hot in use and this may be enough to soften the material, though this has not been an issue for me yet as it doesn't get particularly heavy use in my shop - If you're using this sort of tool in a more heavy-use / commercial environment, then I'll wager that you're not using consumer-grade Black & Decker products anyway :)
If your printer is working nicely, the part should not require any cleaning up before fitting to the tool.
FITTING THE CLAMP
Press an M6 hex nut into the recess on one side of the clamp. The easiest way to do this is to push the M6 bolt into the clamp from the other
side and tighten so as to pull the nut tightly into the recess. You can then unscrew the bolt and the nut will stay firmly in place without the
need for glue.
Slide the clamp over the reciprocating shaft with the two small screw holes towards the front, and facing the top of the saw.
Use 2 M3 bolts to secure the clamp to the shaft - I've sized the holes on the part to be tight enough that an M3 bolt will self-tap a thread
into the part for a firm hold.
Push the back of the saw blade into the slot in the clamp until it hits the back stop. At this point the mounting hole in the saw blade will be
aligned with the M6 bolt hole.
Screw in the M6 bolt and tighten securely.
Reassemble the saw casing. If the M6 bolt you used has a suitably sized head, then you should be able to unscrew it via the oddly-shaped hole
in the side of the casing, in order to replace the saw blade without dismantling the tool.
SAFETY
The big question that many people will have is the most obvious one - Is it safe to hold a powered saw blade with a 3D-printed clamp? Well I guess that depends on the level of use and abuse that the tool gets subjected to, but consider that the clamp totally wraps around the reciprocating shaft, and the screws pass through two sections of the clamp and the shaft, and that the blade itself has a 6mm steel bolt passing through it, so it's pretty hard to imagine the blade breaking loose from the clamp (Less likely than in the original part design) and even if, in the worst-case scenario, the clamp totally shattered / snapped / melted etc, the whole thing is enclosed within the body of the saw so it would ne next to impossible for the blade or any part of the clamp to break loose and fly away from the tool.
If I didn't think that this part was safe to use, then I wouldn't be uploading it here (and certainly wouldn't be using it on my own saw), but as with all things, you use this at your own risk :)
CONCLUSION
When I first printed this part, I wasn't sure how well it would hold up in use, so I conducted a few tests before attempting to do any real work with it. First of all, I cut through a heavy-duty cardboard tube, of the kind that rolls of carpet come on. This had around 7mm thick walls and the saw cut it without any issues. Next up was an offcut of laminate flooring (8mm thick MDF) and again it cut perfectly well. The final test was a scrap of 18mm thick chipboard ("particle board" in the US), and again it went through like a dose of salts. After these tests, I dismantled the saw to check that everything was still rigid and undamaged and found that to be the case. Since then, I've cut through several lengths of 2x4 as well as laminated chipboard and sheets of 12mm plywood, again without any issues or loosening of the clamp or its mounting hardware. I've not tried cutting plastic or metal with it though, as I don't have the right blades for these materials, but with the correct blade fitted, I don't see any reason why it shouldn't work. At this point I became confident enough in the design to upload it here.
Similar models
thingiverse
free
Steer Tube Cutting Guide by jonseejon
...nsert.
use a flat blade screwdriver to prevent the retainer from rotating.
finish threading the m6 x 35mm bolt into the retainer.
thingiverse
free
Mini Hack Saw Handle by jmcskixc
...hatever size just fits through the hole in the end of the saw blade.
printed with several shells and solid infill for strength.
thingiverse
free
Robo R2 Hotend Clamp by Tramadog
... clamping bolt instead of being threaded. i tested the mounting holes to just thread the bolts through and it seems to hold well
thingiverse
free

Bosch Handle for Reciprocating Saw Blades
...osch handle for reciprocating saw blades
thingiverse
bosch handle for reciprocating saw blades.
you need a m3x20 bolt and a nut.
thingiverse
free
Black and Decker Reciprocating Saw handle. by Johnny_verhoeven
...thingiverse
this is a handle for a black and decker reciprocating saw. it turns the blade into a draw saw (like a japanese saw).
thingiverse
free
3/8" Hex Hold-Down by BraedenYoung
...3/8" hex bolts. knobs with a through hole for t-channel clamping, without for table clamping using a t-nut on the underside.
thingiverse
free
Celestron PowerSeeker 70EQ Dovetail Clamp by dkrnet
...ex head of the m6 x 70mm bolt is completely pressed into the hex-shaped recess
loosen the wing nut to permit attaching a dovetail
thingiverse
free

Blade Caddy for 6.5" Circular Saw Blade by robwand
...e clean, the nut threads on without issue.
i might update to include a hanging hole so this can be mounted on a wall in my shop.
thingiverse
free

Pinewood Derby Axle Bender by cpoutre
...erby worx tool, but i didn't find that to be necessary. it seems to bend consistently around 2.5 degrees without the stopper.
thingiverse
free

Adjustable Stanley blade holder for a film slitting machine by VinceHall
... locknut and a couple of washer to fix the threaded adjuster in place.
feel free to use it if it's useful to you in some way.
Decker
3ddd
$1

Шуруповерт Black Decker
... black decker , инструмент
модель шуруповерта black & decker
3ddd
free

Перфоратор Black Decker
... black decker , дрель
аккамуляторная дрель-перфоратор black decker
3ddd
$1

Iron BLACK & DECKER
...iron black & decker
3ddd
утюг , black&decker
iron black & decker
3ddd
$1

Black & Decker шуруповерт
...ерт
3ddd
black decker , шуруповерт
модель шуруповерта black & decker, материалы vray
3ddd
$1
Black & Decker электропила
... электропила , лобзик
модель электропилы black & decker, материалы vray
turbosquid
$5

Pouf Yachtline decker
...
royalty free 3d model pouf yachtline decker for download as on turbosquid: 3d models for games, architecture, videos. (1604045)
turbosquid
$5

Double Decker Bus
...royalty free 3d model double decker bus for download as blend on turbosquid: 3d models for games, architecture, videos. (1713921)
turbosquid
$12

Black and Decker Drill
...model black and decker drill for download as ma, obj, and fbx on turbosquid: 3d models for games, architecture, videos. (1207759)
turbosquid
$10

Decker Flannel Chair
... model decker flannel chair for download as max, obj, and fbx on turbosquid: 3d models for games, architecture, videos. (1253441)
3ddd
$1

Black & Decker ударная дрель
... дрель , сверло
моделька ударной дрели black & decker, материалы vray
Scorpion
3d_ocean
$14

Scorpion
...scorpion
3docean
3d model scorpion
scorpion 3d model
3d_export
$5

Scorpion
...scorpion
3dexport
glass scorpion
turbosquid
$24

scorpion / wood scorpion
...lty free 3d model scorpion / wood scorpion for download as ma on turbosquid: 3d models for games, architecture, videos. (1319761)
archibase_planet
free

Scorpion
...scorpion
archibase planet
scorpion arachnida animals
scorpio - 3d model for interior 3d visualization.
archibase_planet
free

Scorpion
...scorpion
archibase planet
scorpion arachnida
scorpio n050808 - 3d model (*.gsm+*.3ds) for interior 3d visualization.
turbosquid
$59

Scorpion
...urbosquid
royalty free 3d model scorpion for download as max on turbosquid: 3d models for games, architecture, videos. (1378471)
turbosquid
$1

scorpion
...urbosquid
royalty free 3d model scorpion for download as c4d on turbosquid: 3d models for games, architecture, videos. (1288349)
turbosquid
free

Scorpion
...d
royalty free 3d model scorpion for download as obj and fbx on turbosquid: 3d models for games, architecture, videos. (1298317)
turbosquid
$69

Scorpion
... available on turbo squid, the world's leading provider of digital 3d models for visualization, films, television, and games.
turbosquid
$59

Scorpion
... available on turbo squid, the world's leading provider of digital 3d models for visualization, films, television, and games.
Saw
turbosquid
$1

Saw
...d
royalty free 3d model saw for download as ma, obj, and fbx on turbosquid: 3d models for games, architecture, videos. (1390033)
turbosquid
$7
Saw
...alty free 3d model saw for download as obj, fbx, dae, and stl on turbosquid: 3d models for games, architecture, videos. (1481343)
turbosquid
$30

saw
... available on turbo squid, the world's leading provider of digital 3d models for visualization, films, television, and games.
turbosquid
$25

Saw
... available on turbo squid, the world's leading provider of digital 3d models for visualization, films, television, and games.
turbosquid
$20

saw
... available on turbo squid, the world's leading provider of digital 3d models for visualization, films, television, and games.
turbosquid
$20
saw
... available on turbo squid, the world's leading provider of digital 3d models for visualization, films, television, and games.
turbosquid
$20

Saw
... available on turbo squid, the world's leading provider of digital 3d models for visualization, films, television, and games.
turbosquid
$14

Saw
... available on turbo squid, the world's leading provider of digital 3d models for visualization, films, television, and games.
turbosquid
$10

saw
... available on turbo squid, the world's leading provider of digital 3d models for visualization, films, television, and games.
turbosquid
$4
Saw
... available on turbo squid, the world's leading provider of digital 3d models for visualization, films, television, and games.
Blade
3d_export
$20

cossack blades
...
3dexport
cossack blades. the set contains 10 blades with a scabbard. each object (blade + scabbard) has a texture of 2048x2048.
3d_export
free

Blade Katarina
...blade katarina
3dexport
blade
turbosquid
free

Blades
...urbosquid
royalty free 3d model blades for download as blend on turbosquid: 3d models for games, architecture, videos. (1544896)
turbosquid
$40

Blade
...royalty free 3d model blade for download as max, obj, and dwg on turbosquid: 3d models for games, architecture, videos. (1222665)
turbosquid
$35

blade
... available on turbo squid, the world's leading provider of digital 3d models for visualization, films, television, and games.
turbosquid
$32

blade
... available on turbo squid, the world's leading provider of digital 3d models for visualization, films, television, and games.
turbosquid
$20

Blade
... available on turbo squid, the world's leading provider of digital 3d models for visualization, films, television, and games.
turbosquid
$15

Blade
... available on turbo squid, the world's leading provider of digital 3d models for visualization, films, television, and games.
turbosquid
$3

Blade
... available on turbo squid, the world's leading provider of digital 3d models for visualization, films, television, and games.
turbosquid
$2

blade
... available on turbo squid, the world's leading provider of digital 3d models for visualization, films, television, and games.
Clamp
3d_export
$11
clamp
...clamp
3dexport
clamp
3ddd
free

Clamp
... enricо zanolla , капитоне
дизайнерenrico zanollмодель clamp
3ddd
$1

Clamp
...ricо zanolla , капитоне
дизайнеры
enrico zanolla
andrea di filippo
модель clamp
dzstudio
3d_export
free
clamp
...clamp
3dexport
simple clamp model, more free 3d models here:
3d_export
$5
clamping handle
...clamping handle
3dexport
clamping handle
3ddd
$1

Clamp / DZstudio
... dzstudio , капитоне
люстра clamp от dzstudio/enrico zanolla(италия).
3ddd
$1
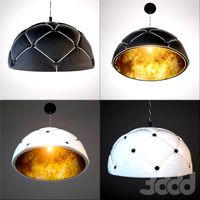
Светильник Clamp
...светильник clamp
3ddd
clamp
стеганый светильник clamp в двух цветах в черном и белом.
turbosquid
$29
clamp
...ty free 3d model clamp for download as 3ds, obj, c4d, and fbx on turbosquid: 3d models for games, architecture, videos. (1442049)
turbosquid
$29
clamp
...ty free 3d model clamp for download as 3ds, obj, c4d, and fbx on turbosquid: 3d models for games, architecture, videos. (1442041)
3d_export
$5
Clamp-14
...clamp-14
3dexport
3d model of clamp name 14
Black
turbosquid
$25

Black Mamba black snake
...ck mamba black snake for download as blend, stl, fbx, and obj on turbosquid: 3d models for games, architecture, videos. (1672843)
turbosquid
$3

Black
...turbosquid
royalty free 3d model black for download as blend on turbosquid: 3d models for games, architecture, videos. (1278842)
3d_export
$5

Black Piano
...black piano
3dexport
black piano
3d_export
$5

Black Oven
...black oven
3dexport
black oven
3ddd
$1

Black curtain
...black curtain
3ddd
black curtain
3d_export
$5

Black coffe
...black coffe
3dexport
sweet black coffe
3d_export
$5

Black Sofa
...black sofa
3dexport
black velvet sofa
3d_export
$5
Black Chair
...black chair
3dexport
black velvet chair
3d_export
free
black desk
...black desk
3dexport
black desk for bedroom
3d_export
free

Black Chair
...black chair
3dexport
black velvet chair