Thingiverse
Black Widow Z-Axis G2T Belt Relocation by ShadowWeaver2067
by Thingiverse
Last crawled date: 3 years ago
Black Widow Z-Axis G2T Belt Relocation
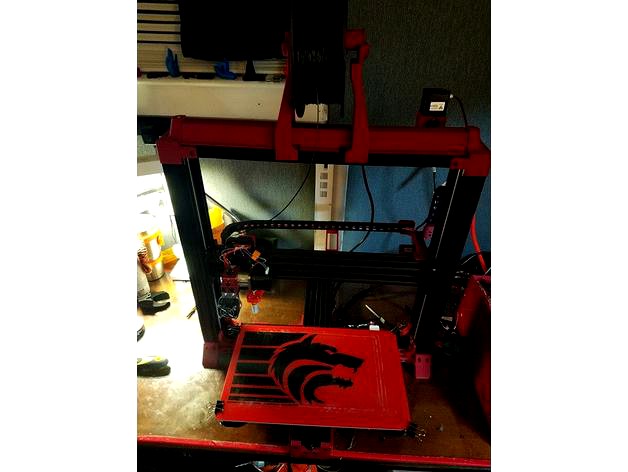
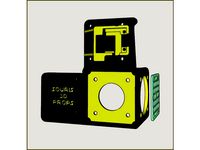
This Mod was designed to increase the Height of the Black Widow Printer by incorporating printed corner blocks to change the location of the z axis belt from below the top cross beam to above the top cross beam. I have included a few add on’s that are not needed for the mod but do make the printer look better and protects the new belt location.
Unfortunately, this mod does require some extra screws and t-nuts. Listed below are parts that are recommended to purchase or obtain before beginning.
1 M4 x 8mm Hex Cap Screws QTY=70 ( Can be bought on Amazon or Ebay or any hardware source that supplies metric screws)
2 M4 drop in T-Nuts QTY=70 ( Can be bought on Amazon or Ebay or any hardware source that supplies metric screws)
3 M5 x 30 Hex Flat Head Screws QTY=16 ( Can be bought on Amazon or Ebay or any hardware source that supplies metric screws) Used with Top and Bottom Z-Axis Caps
4 M3 x 45mm Hex Cap Screws QTY=4 ( Can be bought on Amazon or Ebay or any hardware source that supplies metric screws) Mine were obtained from OpenBuilds Parts Store. Used with z-Axis Motor Mount.
5 8mm ID Lock Collar with grub screw QTY=2 Purchased from Open Builds Parts Store.
Optional Parts: While the printed Upper top cap has a location for a 16OD x 8mmID bearing it can be used or left off and just use the existing 4 that came with the Black Widow.
Parts you need to Print:
SWD_Bottom_Plate Qty=2
Install at bottom of each Z-Axis C-Channel
(Each=Uses 8-M4 Screws & T-nuts Also Uses 4-M5x30 hex Flat Head Screw)
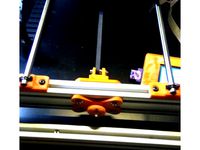
SWD_Top_Plate_Frame_Mount Qty=2
Install at top of each Z-Axis C-Channel
(Each=Uses 1-M5 x 30mm Hex Flat Head Screws)
SWD_Top_Plate_Frame_Mount Cover Qty=2
Install at the top of the Top Plate Frame Mount
(Each=Uses 3-M5 x 30mm Hex Flat Head Screws)
SWD_Center_Base_Corner QTY=4
Install in the 4 corners where the Y Axis and X Axis Join
(Each=Uses 2-M4 Screws & T-nuts)
SWD_Leg_Base Qty=8
Install 2 on each section of the Y/X legs
(Each=Uses 2-M4 Screws & T-nuts)
SWD_Corner_Brace_Large Qty=8
Install 2 per each corner of the Z-Axis Frame
(Each=Uses 2-M4 Screws & T-nuts)
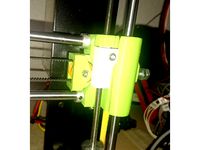
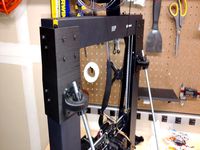
SWD_z-AXIS_MOTOR_MOUNT Qty=1
Install using existing Z-axis Mounting Plate
(Uses 4-M3 x 45mm Screws)
Please note all the frame brackets are designed to overlap the existing BW metal L-Brackets. They are used as a secondary lock down for the existing brackets.
Secondary Add-Ons:
Belt Shield Covers-Snap fit.
SWD_Top_Belt_Shield_Center Qty=1
SWD_Top_Belt_Shield_Left Qty=1
SWD_Top_Belt_Shield_Motor Qty=1
Spool Holder and Spool Rods
SWD_Spool_Holder_Tower Qty=2
(Each=Uses 2-M4 Screws & T-nuts)
SWD_Spool_Holder_Rod101 Qty=1
SWD_Spool_Holder_Rod121 Qty=1
Please note I distribute these freely but request that you do not Sell or Profit from these files as they were created from scratch by me. Also I ask that if you make and appreciate these files for your Black Widow Printer that you post your make as I would love to see what others have done with their machines.
Additional Notes:
To make this mod fully functional 3 additional things are required.
1 BL-Touch Leveling Sensor installed.
With the BL Touch installed you can remove the springs from your bed screws and replace with m-3 lock nuts. By doing so you can reduce the height of your heated bed to ½” or 13mm above the y axis gantry. This will gain 15mm of z height.
2 http://www.thingiverse.com/thing:1777681 Install the horizontal drag chain Mod from the thingiverse link.
This will gain 18mm Z-Height.
(note the top brackets move the top brace rail up 17mm and moving the GT2 Belt above the top Brace gains an additional 20mm. Total change in Height from stock-17+20+18+15=70mm)
3 reflash firmware to adjust total z-height from existing setting to 320mm (Note as you level your bed after level you can set this higher and manually move your z up until it maxes out by stopping on the corner blocks. At that point revise and adjust your max z-height to 2mm less than where your upper most z stopped.)
Be Warned first I am publishing this in good faith that those that download this have the skills to install and assemble this mod. I take no responsibility if your machine is damaged and is solicited as a use at your own risk statement.
Update 2-May-2017 The top cap does not align well with the rest of the z-axis lead screw. Please do not use a 3rd bearing in the top cap let the top of the lead screw turn free without a bearing. I will update this soon but currently the easy fix is to not use a bearing and just use the cap to support the belt shield.
As a Final Note Good Luck and hope the build goes well for you.
If you like this mod please "LIKE" as this puts it close to the top of the search to make it easier for your friends to find.
Sincerely, Shadowweaver2067
AKA Anthony Harmon
This Mod was designed to increase the Height of the Black Widow Printer by incorporating printed corner blocks to change the location of the z axis belt from below the top cross beam to above the top cross beam. I have included a few add on’s that are not needed for the mod but do make the printer look better and protects the new belt location.
Unfortunately, this mod does require some extra screws and t-nuts. Listed below are parts that are recommended to purchase or obtain before beginning.
1 M4 x 8mm Hex Cap Screws QTY=70 ( Can be bought on Amazon or Ebay or any hardware source that supplies metric screws)
2 M4 drop in T-Nuts QTY=70 ( Can be bought on Amazon or Ebay or any hardware source that supplies metric screws)
3 M5 x 30 Hex Flat Head Screws QTY=16 ( Can be bought on Amazon or Ebay or any hardware source that supplies metric screws) Used with Top and Bottom Z-Axis Caps
4 M3 x 45mm Hex Cap Screws QTY=4 ( Can be bought on Amazon or Ebay or any hardware source that supplies metric screws) Mine were obtained from OpenBuilds Parts Store. Used with z-Axis Motor Mount.
5 8mm ID Lock Collar with grub screw QTY=2 Purchased from Open Builds Parts Store.
Optional Parts: While the printed Upper top cap has a location for a 16OD x 8mmID bearing it can be used or left off and just use the existing 4 that came with the Black Widow.
Parts you need to Print:
SWD_Bottom_Plate Qty=2
Install at bottom of each Z-Axis C-Channel
(Each=Uses 8-M4 Screws & T-nuts Also Uses 4-M5x30 hex Flat Head Screw)
SWD_Top_Plate_Frame_Mount Qty=2
Install at top of each Z-Axis C-Channel
(Each=Uses 1-M5 x 30mm Hex Flat Head Screws)
SWD_Top_Plate_Frame_Mount Cover Qty=2
Install at the top of the Top Plate Frame Mount
(Each=Uses 3-M5 x 30mm Hex Flat Head Screws)
SWD_Center_Base_Corner QTY=4
Install in the 4 corners where the Y Axis and X Axis Join
(Each=Uses 2-M4 Screws & T-nuts)
SWD_Leg_Base Qty=8
Install 2 on each section of the Y/X legs
(Each=Uses 2-M4 Screws & T-nuts)
SWD_Corner_Brace_Large Qty=8
Install 2 per each corner of the Z-Axis Frame
(Each=Uses 2-M4 Screws & T-nuts)
SWD_z-AXIS_MOTOR_MOUNT Qty=1
Install using existing Z-axis Mounting Plate
(Uses 4-M3 x 45mm Screws)
Please note all the frame brackets are designed to overlap the existing BW metal L-Brackets. They are used as a secondary lock down for the existing brackets.
Secondary Add-Ons:
Belt Shield Covers-Snap fit.
SWD_Top_Belt_Shield_Center Qty=1
SWD_Top_Belt_Shield_Left Qty=1
SWD_Top_Belt_Shield_Motor Qty=1
Spool Holder and Spool Rods
SWD_Spool_Holder_Tower Qty=2
(Each=Uses 2-M4 Screws & T-nuts)
SWD_Spool_Holder_Rod101 Qty=1
SWD_Spool_Holder_Rod121 Qty=1
Please note I distribute these freely but request that you do not Sell or Profit from these files as they were created from scratch by me. Also I ask that if you make and appreciate these files for your Black Widow Printer that you post your make as I would love to see what others have done with their machines.
Additional Notes:
To make this mod fully functional 3 additional things are required.
1 BL-Touch Leveling Sensor installed.
With the BL Touch installed you can remove the springs from your bed screws and replace with m-3 lock nuts. By doing so you can reduce the height of your heated bed to ½” or 13mm above the y axis gantry. This will gain 15mm of z height.
2 http://www.thingiverse.com/thing:1777681 Install the horizontal drag chain Mod from the thingiverse link.
This will gain 18mm Z-Height.
(note the top brackets move the top brace rail up 17mm and moving the GT2 Belt above the top Brace gains an additional 20mm. Total change in Height from stock-17+20+18+15=70mm)
3 reflash firmware to adjust total z-height from existing setting to 320mm (Note as you level your bed after level you can set this higher and manually move your z up until it maxes out by stopping on the corner blocks. At that point revise and adjust your max z-height to 2mm less than where your upper most z stopped.)
Be Warned first I am publishing this in good faith that those that download this have the skills to install and assemble this mod. I take no responsibility if your machine is damaged and is solicited as a use at your own risk statement.
Update 2-May-2017 The top cap does not align well with the rest of the z-axis lead screw. Please do not use a 3rd bearing in the top cap let the top of the lead screw turn free without a bearing. I will update this soon but currently the easy fix is to not use a bearing and just use the cap to support the belt shield.
As a Final Note Good Luck and hope the build goes well for you.
If you like this mod please "LIKE" as this puts it close to the top of the search to make it easier for your friends to find.
Sincerely, Shadowweaver2067
AKA Anthony Harmon
Similar models
thingiverse
free

M4 Hex Nut Thumbscrew for Makergear M2 by Karl_Williams
...x 35mm hex cap screw threaded from the bottom, along with the m4 hex nut with the thumbscrew to make setting the z height easier.
thingiverse
free

Adjustable Z Endstop by FontMaker83
...base for the knob to spin freely.
hardware:
qty.2 15mm x m3 screw
qty.1 50mm x m4 screw
qty.1 m4 nut
qty.1 m4 wing nut (optional)
thingiverse
free
Prusa i3 3D Printer Anti Backlash v2.0 by StevenQ-NE-UK
...screw, you will need,
2 x m5 hex nuts
1 x spring with a 5mm bore
1 x m3 hex nut
1 x m3 bolt (i used an m3 x 10mm socket cap head)
thingiverse
free

CR-10 X Axis Belt Tensioner by bglover
... cap screws
2 x m4 lock nuts
2 x m4 flat washers
1 x m4 nut
check back often. i will be uploading my y axis belt tensioner soon.
thingiverse
free

Anycubic i3 Mega X Belt Tensioner Mod by mdmiko
....
warning
you need to drill a 5mm (at last) hole in the right x axis holder.
i used:
2x m4x60 screw
2x m4x25 hex nut
6x m4 nuts
thingiverse
free

CR10-S Adjustable Y-Axis motor mount by grdesign
...in place by the top screw.
you will need 1 x m4 hex nut, 1 x m4 t-nut, 2 x m4 20mm machine screws and 2 x m3 40mm machine screws.
thingiverse
free

Anet A8 X-Axis belt tensioner with Logitech C270 Camera Mount by thaug29
...0mm cap screw 1 m3x20mm cap screw 2 m3 washers if you like. the camera is mounted to z-axis so it will go up as the z-axis does.
thingiverse
free
Y belt tensioner for 2020 and 2040 aluminum extrusion by FFranzmann
...f prusa and haribo mod designs
you need to drill a hole for the m4 in your extrusion
added a version for 2020 although untested.
thingiverse
free
Z Axis Extension - Monoprice Maker Select Plus
...motion rods/shafts/guides
x4 - m3 8mm hex socket head cap screws
x8 - m3 12mm hex socket head cap screws
x12 - m3 hex flange nuts
thingiverse
free

CR-10 Fine Z-Axis Endstop Adjustment by donnyb99
...w. ensure to always tighten the hex nut down to the base to ensure the screw doesn't move with the vibrations of the printer.
G2T
thingiverse
free

G2T Hanger by MeplusHobby
...g2t hanger by meplushobby
thingiverse
this design is for hanging the g2t electric scarf
thingiverse
free

G2T Pulleys Assortment 3mm hole to 22mm by gustofusion
...anging from 3mm center hole size up to 22mm center hole size. get your pulley on guys and gals! all are of the 42 tooth variety.
thingiverse
free

Tensioner Base For Ender 3 by KindaHazardous
...stepper setup so i made one for my 618mm g2t belt. used in conjunction with this idler cover for...
thingiverse
free

i3 X Axis Linear Rail System by Kureigu
...rails and 2x h (long) blocks. 16/20t 5mm bore g2t gear and idler pulley 1x m5x20 bolt + nut...
thingiverse
free

N20 geared motor continuous rotation servo with AS5600 magnetic sensor
...bellow) to make a servo with a 40 teeth g2t belt, there are two versions for the pulley for...
3dwarehouse
free

Bungalow
...2 gangen en een garage met nistang. #bungalow #drnassaucollege #g2t #huis...
3dwarehouse
free

Belt Mount Plate
...the belt as a second clip is attached. both g2t and gt3 belts can be secured using these belt...
Shadowweaver2067
thingiverse
free

Black Widow Dual Power Supply Control Box by ShadowWeaver2067
...good luck and message if you have any questions or possible needs. i will get back to you each evening when i get home from work.
thingiverse
free

Elevator Bolt Wrench, 7mm by Finktrain
...for wanhao duplicator i3 / monoprice maker select by shadowweaver2067. ...
thingiverse
free

SWD2 Rear - Clean by tcalmighty
...first layer adhesion. all credit goes to original maker: shadowweaver2067 set scale to 10% for most...
thingiverse
free

1/4in Elevator Bolt Thumb Wheel by mrsim0ns
...the elevator bolts i'm using for leveling feet on shadowweaver2067#39;s awesome z-axis mod for wanhao i3 duplicator. it fits...
thingiverse
free

SWD1 KIT Z-AXIS FOR WANHAO DUPLICATOR I3 / MONOPRICE MAKER SELECT by ShadowWeaver2067
...ll the top z axis sleeve to the bottom two screws on the top z axis tower connector screws. adjust and level machine accordingly.
thingiverse
free

SWD2 KIT Z-AXIS REAR MOUNT FOR WANHAO DUPLICATOR I3 / MONOPRICE MAKER SELECT by ShadowWeaver2067
...reciation for making your printer a rock solid printing monster drop me a dime or two here..https://www.paypal.me/shadowweavr2067
thingiverse
free

Duplicator Z axis brace top cover filament guide tubing mod by Plastic_Innovations
...from the z-axis mod for wanhao i3 duplicator by shadowweaver2067 and wanhao duplicator i3 filament guide tube adapter by...
thingiverse
free

SWD3 KIT Z-AXIS REAR MOUNT FOR WANHAO DUPLICATOR I3 PLUS / MONOPRICE MAKER SELECT PLUS by ShadowWeaver2067
...reciation for making your printer a rock solid printing monster drop me a dime or two here..https://www.paypal.me/shadowweavr2067
thingiverse
free

Z extension of Z brace by redxeth
...remixes). anyway, here's my version of the merge of shadowweaver2067#39;s z-axis rear mount and azza's z-extensions. my first thing...
Widow
turbosquid
$19

widows
...
turbosquid
royalty free 3d model widows for download as max on turbosquid: 3d models for games, architecture, videos. (1203233)
3ddd
$1

Henge Black Widow
...henge black widow
3ddd
henge , black widow
henge black widow
3d_ocean
$6

Black Widow
...pider venon widow
elegant,realistic and high quality black widow 3d model. perfect for cartoon scenes, animations or still image.
3ddd
$1

black Widow
...black widow
3ddd
мебель для ванной комнаты «black widow» моделил по фото.
форматы: max 2012, fbx с материалами и текстурами.
turbosquid
$10

Widow Voxel
...ee 3d model widow voxel for download as ma, max, obj, and fbx on turbosquid: 3d models for games, architecture, videos. (1362423)
turbosquid
$18

Black Widow
...del black widow for download as 3ds, fbx, blend, dae, and stl on turbosquid: 3d models for games, architecture, videos. (1318971)
turbosquid
$79

Northern Black Widow
...oyalty free 3d model northern black widow for download as max on turbosquid: 3d models for games, architecture, videos. (1232214)
3d_export
$80

black widow monster
... rigged verts:568731 polygons:852965 created in blender and rendered in cycles comes in blend 3ds max collada fbx and obj formats
turbosquid
$45

Spider- Black-Widow
... available on turbo squid, the world's leading provider of digital 3d models for visualization, films, television, and games.
turbosquid
$20

Black Widow Spider
... available on turbo squid, the world's leading provider of digital 3d models for visualization, films, television, and games.
Relocation
3d_export
$5

watering can
...equest i can relocate on origin on handle.<br>polygons: 30156<br>vertices: 15161<br>i hope you enjoy the model.
3d_export
$20

stylish black metal x chair
...built for long-lasting use and fold up for constant relocation and ease of seating. made for long-lasting comfort. easily...
3d_export
$110

stug iii ausf g
...ompleted 50 mm armour existed. for those, a 30 mm additional armour plate still had to be welded or bolted on until october 1943.
3d_export
$7

astronaut
... you like that model don't forget to excellent rate product as it is important for me.<br>-regards my wish -thanks.....
thingiverse
free
Extruder Relocation by ketchu13
...xed from
cr-10s extruder relocation plate and filament sensor housing by xxfreshxx
cr-10 extruder relocation bracket by wayneuk
thingiverse
free

Power switch relocation by Georgero
...witch relocation by georgero
thingiverse
20/20 power button relocation. i made this for my tronxy but can be adapted for others.
thingiverse
free

Ender 5 screen relocation
... 5 screen to lay flat on the control box while making it easier to install and maintain access to the usb and micro sd card slot.
thingiverse
free
Ender 3 Screen relocation by BogdanS96
...ns96
thingiverse
this is a mount for the ender 3 screen to be relocated on the left of the extrusion to save some lateral space.
thingiverse
free
Eachine Wizard X220S Antenna Relocation
...rd x220s antenna relocation
thingiverse
relocates the antenna to a much more crash resistant location.
print in tpu, petg or abs
thingiverse
free

Endstop X relocation bracket by dvjcodec
...rse
this simple relocation bracket is dedicated for:http://www.thingiverse.com/thing:15156http://www.thingiverse.com/thing:31021
Belt
turbosquid
$9
Belt conveyor belt
...t conveyor belt for download as 3ds, ige, obj, stl, and sldas on turbosquid: 3d models for games, architecture, videos. (1226546)
3d_export
$6

belt
...d then comes off and fastens at the front of the seat. version: 2015 units: millimetres x-form: yes polys: 120 950 verts: 163 944
3d_export
$7
belt grinder
...belt grinder
3dexport
belt grinder
3d_export
$5
Belt conveyor
...belt conveyor
3dexport
belt conveyor
3ddd
$1
column belt
...column belt
3ddd
колонна
column belt
turbosquid
$5

Belt
... available on turbo squid, the world's leading provider of digital 3d models for visualization, films, television, and games.
3d_ocean
$5
Leather Belt
...ather belt is created in 3dsmax 2011 and rendered with vray 1.5 and it has all the texture included with the multiple obj format.
3d_ocean
$5

Belt Ring
...belt ring
3docean
belt jewelry ring
belt ring 3d model. total weight 3.5 gram & 1.1 stone size. 3dm and obj file format.
design_connected
$11
Belt Round
...belt round
designconnected
meridiani belt round computer generated 3d model. designed by parisio, andrea.
design_connected
$11
Belt Oval
...belt oval
designconnected
meridiani belt oval computer generated 3d model. designed by parisio, andrea.
Axis
3ddd
$1

Мария Axis
...
3ddd
кухня , классическая , axis
модель кухни.
3d_export
$22

Axis robot 6-axis robotic arm
...ing parts drawings, standard parts purchased parts list, can be produced directly according to the drawings, welcome to download!
3ddd
free

Versatile Axis
...ddd
nexus , плитка
http://bvtileandstone.com/ceramic-porcelain/versatile-axis/
3d_export
$19

robot 2 axis
...robot 2 axis
3dexport
robot 2 axis
turbosquid
$40

Axis R5F
... available on turbo squid, the world's leading provider of digital 3d models for visualization, films, television, and games.
turbosquid
$40

Axis S5F
... available on turbo squid, the world's leading provider of digital 3d models for visualization, films, television, and games.
turbosquid
$30

Axis Athlon
... available on turbo squid, the world's leading provider of digital 3d models for visualization, films, television, and games.
turbosquid
$10

Linear Axis
... available on turbo squid, the world's leading provider of digital 3d models for visualization, films, television, and games.
3d_export
$15

drawing axis
...drawing axis
3dexport
simple rendering of the scene file
3ddd
$1

versatile axis ARC
...versatile axis arc
3ddd
versatile , плитка
versatile axis arc red dot design award
Z
3d_export
$5

nissan z
...nissan z
3dexport
nissan z
3ddd
$1

Vase Z
...vase z
3ddd
vase z
3ddd
$1

полотенцесушить Z
...полотенцесушить z
3ddd
полотенцесушитель
полотенцесушить z
design_connected
free

Z-Chair
...z-chair
designconnected
free 3d model of z-chair designed by karman, aleksei.
design_connected
$11

Z Lamp
...z lamp
designconnected
phillips z lamp computer generated 3d model. designed by kalff, louis.
3d_export
$5

Dragon balls z
...dragon balls z
3dexport
dragon ball z
turbosquid
$20

Fighter Z
...
turbosquid
royalty free 3d model fighter z for download as on turbosquid: 3d models for games, architecture, videos. (1292563)
turbosquid
$9

Pen Z
...pen z
turbosquid
free 3d model pen z for download as obj on turbosquid: 3d models for games, architecture, videos. (1686775)
turbosquid
free

z chair
...z chair
turbosquid
free 3d model z chair for download as max on turbosquid: 3d models for games, architecture, videos. (1410230)
turbosquid
$5

Letter Z
...urbosquid
royalty free 3d model letter z for download as max on turbosquid: 3d models for games, architecture, videos. (1408540)
Black
turbosquid
$25

Black Mamba black snake
...ck mamba black snake for download as blend, stl, fbx, and obj on turbosquid: 3d models for games, architecture, videos. (1672843)
turbosquid
$3

Black
...turbosquid
royalty free 3d model black for download as blend on turbosquid: 3d models for games, architecture, videos. (1278842)
3d_export
$5
Black Piano
...black piano
3dexport
black piano
3d_export
$5

Black Oven
...black oven
3dexport
black oven
3ddd
$1

Black curtain
...black curtain
3ddd
black curtain
3d_export
$5

Black coffe
...black coffe
3dexport
sweet black coffe
3d_export
$5

Black Sofa
...black sofa
3dexport
black velvet sofa
3d_export
$5
Black Chair
...black chair
3dexport
black velvet chair
3d_export
free
black desk
...black desk
3dexport
black desk for bedroom
3d_export
free

Black Chair
...black chair
3dexport
black velvet chair