Thingiverse
BIQU BX Power Off Autoswitch by ThingsDesigner
by Thingiverse
Last crawled date: 2 years, 10 months ago
Für Deutsch bitte nach unten scrollen.
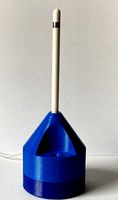
Automatic switch-off after printing, the simplest solution for the BIQU BX.
This is the useful accessory that is missing from the BIQU BX. A simple device to automatically turn off the printer after printing has finished.
If you don't trust yourself to solder this cable yourself, because you are working on a live cable, you can also buy a pre-assembled power cable in my shop, which is easy to attach without risk. Link is here:
https://www.3d-arbeitsplatz.de/
I do not assume any liability or guarantee for these self-assembly instructions. Everyone who works on live cables should be aware of the risk and what they are doing. Everything here is done at your own risk!
There are many expensive solutions out there involving relays, crafts, and accessories. This, on the other hand, is simple, inexpensive and quick to implement.
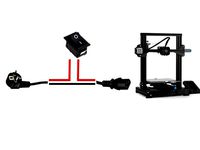
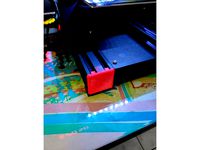
The idea behind it all was to put the on/off switch on the printer where it can turn itself off. The best place then turned out to be a point to the right of the X-axis that the printing carriage cannot normally reach due to the software end stops. This position is also more accessible for turning the printer on and off manually.
There are two possible solutions that I have already successfully implemented:
1) A modified power cable, which is connected instead of the supplied cable. This does not change anything on the printer itself and you can buy it in my shop, see above.
2) A short power cable, which is also connected to the on/off switch of the printer and can take over its task elsewhere. This solution is described below.
We need:
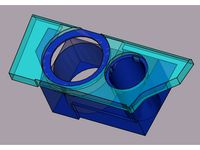
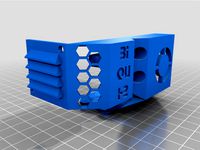
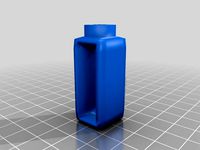
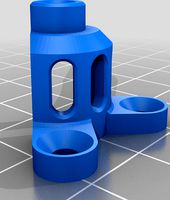
The housing from the STL here (support is only necessary for the clips)
An approx. 120 cm long flat power cable (H03VV-F according to DIN VDE 0281)
An on/off switch (rocker switch) for 220V (e.g. from an old PC power supply, 21x15mm / 19x13mm)
Two matching cable lugs with lugs for connection to the existing switch
Soldering accessories and a steady hand
Method:
First the existing power cable is pulled out of the printer and the device is de-energized.
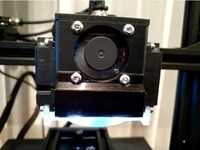
The two Allen screws that attach the housing with the on/off switch to the printer are loosened and the housing is carefully pulled forward. Now you can see two red wires and two black wires going to the switch. To switch a device on and off, it is sufficient to switch only one phase. The short black cable is actually superfluous and the black cable that goes to the power supply can be plugged directly into the power plug, where the short black cable was attached. Now there are only two red cables on the switch. Our additional cable is attached to this two wires. I decided on a solution with flat plugs with a branch, then I can still use the old switch. But you can also connect the new cable only with the two red cables and thus put the old switch out of operation, as you like.
To get to the underside of the printer, it must be tilted back on its side. The cover for the power supply is only held by 5 screws. When these are loosened and the cover has been removed, the cable can easily be routed past the power supply unit. So that I can attach it better to the switch, I loosened the short red cable that goes to the power supply. When the switch has been installed again, it can easily be reassembled and the housing screwed together.
On the other side, the cable is pulled through the new housing and soldered to the new switch (attach the switch with 0 down).
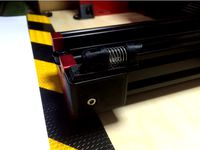
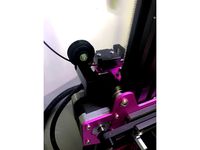
Now the new switch only needs to be attached to the X-axis at the top right. To do this, it is simply clipped in with the tabs. (If it doesn't fit, your printer may not be properly calibrated and the housing needs to be enlarged or reduced a few percent.)
So that the printer now switches itself off after printing, the G-code in the slicer has to be adjusted a little:
Here is my attitude towards Cura:
In the device settings for Cura, insert the following in the section "End G code" at the end":
; Auto-OFF
G4 S120; Pause 120 sec.
G28 X; Home X for safety
M211 S0; SW end stop off
G1 X254; goto power-off position
; If not powered off:
M211 S1; SW end stop on
M84 X Y E ;Disable all steppers but Z
The entire end of G-code then looks like this:
;BIQU Default End Gcode
G91 ;Relative positioning
G1 E-2 F2700 ;Retract a bit
G1 E-2 Z0.2 F2400 ;Retract a bit more and raise Z
G1 X5 Y5 F3000 ;Wipe out
G1 Z10 ;Raise Z by 10mm
G90 ;Return to absolute positioning
G1 X0 Y{machine_depth} ;TaDaaaa
M106 S0 ;Turn-off fan
M104 S0 ;Turn-off hotend
M140 S0 ;Turn-off bed
M84 X Y E ;Disable all steppers but Z
; Auto-OFF
G4 S120 ; Pause 120 sec.
G28 X ; Home X for safety
M211 S0 ; SW-Endstop off
G1 X254 ; goto Power-Off-Position
; If not powered off:
M211 S1
M84 X Y E ;Disable all steppers but Z
If necessary, the command G1 X254 must be adjusted somewhat if the printer does not hit the switch correctly (manufacturing tolerance) or if the whole thing is used with a different printer. Since the software end stops are deactivated, you should be particularly careful here, otherwise it will literally crash.
If everything has been done correctly, you can leave the old on/off switch in the 0 position and only switch the printer on and off with the new switch.
If you don't want the printer to switch itself off every time, e.g. because you sit next to it and want to start a new print immediately, then you can simply turn on the old switch and the printer will always stay on.
I hope you like this simple solution and that it finds many users.
DEUTSCH:
Automatisches Ausschalten nach dem Druckvorgang, die einfachste Lösung für den BIQU BX.
Dies ist das nützliche Zubehör, was beim BIQU BX fehlt. Eine einfache Vorrichtung, um den Drucker nach Beenden des Druckvorgangs automatisch auszuschalten.
Wer sich nicht zutraut, dieses Kabel selbst anzulöten, da man ja an einem stromführenden Kabel arbeitet, der kann auch in meinem Shop ein fertig konfektioniertes Stromkabel kaufen, welches ohne Risiko und einfach anzubringen ist. Link ist hier:
https://www.3d-arbeitsplatz.de/
Für diese Selbstbauanleitung hier übernehme ich keinerlei Haftung oder Garantie. Jeder, der an stromführenden Kabeln arbeitet, sollte sich des Risikos bewusst sein und wissen, was er macht. Alles hier geschieht auf eigene Gefahr!
Es gibt viele teure Lösungen mit Relais, Bastelarbeit und Zubehör. Diese hier dagegen ist einfach und preiswert und auch schnell umzusetzen.
Die Idee hinter dem ganzen war, den Ein-/Ausschalter dort am Drucker anzubringen, wo er sich selbst ausschalten kann. Als bester Platz hat sich dann eine Stelle rechts an der X-Achse herausgestellt, die der Druckschlitten normalerweise durch die Software-Endstops nicht erreichen kann. Diese Position ist auch besser zum manuellen Ein- und Ausschalten des Druckers erreichbar.
Hiefür gibt es zwei Lösungswege, die ich schon erfolgreich umgesetzt habe:
1) Ein modifiziertes Stromkabel, welches anstelle des mitgelieferten Kabels angeschlossen wird. Dies verändert nichts am Drucker selbst und man kann es bei mir im Shop kaufen, s.o..
2) Ein kurzes Stromkabel, welches an den Ein-/Ausschalter des Druckers zusätzlich angeschlossen wird und dessen Aufgabe an anderer Stelle übernehmen kann. Diese Lösung wird im folgenden beschrieben.
Wir benötigen:
Das Gehäuse von der STL hier (Support ist nur nötig an der Seite mit den Clips)
Ein ca. 120 cm langes flaches Stromkabel (H03VV-F nach DIN VDE 0281)
Einen Ein-/Ausschalter (Wippschalter) für 220V (z.B. von einem alten PC-Netzteil, 21x15mm / 19x13mm)
Zwei passende Kabelschuhe mit Lasche zum Anschluss an den vorhandenen Schalter
Löt-Zubehör und eine ruhige Hand
Vorgehensweise:
Zuerst wird das vorhandene Stromkabel aus dem Drucker gezogen und das Gerät stromlos gemacht.
Die zwei Schrauben, die das Gehäuse mit dem Ein-/Ausschalter am Drucker befestigen werden gelöst und das Gehäuse vorsichtig nach vorne gezogen. Jetzt sieht man zwei rote und zwei schwarze Kabel, die zum Schalter gehen. Um ein Gerät an und aus zu schalten ist es ausreichend, nur eine Phase zu schalten. Das kurze schwarze Kabel ist also eigentlich überflüssig und das schwarze Kabel, welches zum Netzteil geht, kann direkt an den Stromstecker eingesteckt werden, dort, wo das kurze schwarze Kabel befestigt war. Jetzt sind am Schalter nur noch zwei rote Kabel. An diese Kabel wird unser zusätzliches Kabel befestigt. Ich habe mich für eine Lösung mit Flachsteckern mit Abzweig entschieden, dann kann ich den alten Schalter noch zusätzlich benutzen. Man kann aber auch das neue Kabel nur mit den zwei roten Kabeln verbinden und den alten Schalter somit außer Betrieb setzen, wie es einem beliebt.
Um an die Unterseite des Druckers zu gelangen muss er nach hinten auf die Seite gekippt werden. Die Abdeckung für das Netzteil wird nur von 5 Schrauben gehalten. Wenn diese gelöst sind und die Abdeckung entfernt wurde, kann man das Kabel leicht am Netzteil vorbeiführen. Damit ich es am Schalter besser befestigen kann, habe ich das kurze rote Kabel, welches zum Netzteil geht, gelöst. Wenn der Schalter dann wieder fertig eingebaut wurde, kann man es leicht wieder montieren und das Gehäuse verschrauben.
Auf der anderen Seite wird das Kabel durch das neue Gehäuse gezogen und an den neuen Schalter angelötet (den Schalter mit 0 nach unten anbringen).
Jetzt muss der neue Schalter nur noch oben rechts an der X-Achse befestigt werden. Hierzu wird er einfach mit den Laschen eingeklipst. (Falls es nicht passen sollte ist Euer Drucker vielleicht nicht richtig kallibriert und das Gehäuse muss wenige Prozent vergrößert oder verkleinert werden.)
Damit der Drucker sich nach dem Druck jetzt selbst ausschaltet, muss noch der G-Code im Slicer etwas angepasst werden:
Hier meine Einstellung für Cura:
In den Geräteeinstellungen für Cura fügt man in der Sektion "Ende G-Code" am Ende folgendes ein:
; Auto-OFF
G4 S120 ; Pause 120 sec.
G28 X ; Home X for safety
M211 S0 ; SW-Endstop off
G1 X254 ; goto Power-Off-Position
; If not powered off:
M211 S1; SW end stop on
M84 X Y E ;Disable all steppers but Z
Der gesamte Ende G-Code sieht dann folgendermaßen aus:
;BIQU Default End Gcode
G91 ;Relative positioning
G1 E-2 F2700 ;Retract a bit
G1 E-2 Z0.2 F2400 ;Retract a bit more and raise Z
G1 X5 Y5 F3000 ;Wipe out
G1 Z10 ;Raise Z by 10mm
G90 ;Return to absolute positioning
G1 X0 Y{machine_depth} ;TaDaaaa
M106 S0 ;Turn-off fan
M104 S0 ;Turn-off hotend
M140 S0 ;Turn-off bed
M84 X Y E ;Disable all steppers but Z
; Auto-OFF
G4 S120 ; Pause 120 sec.
G28 X ; Home X for safety
M211 S0 ; SW-Endstop off
G1 X254 ; goto Power-Off-Position
; If not powered off:
M211 S1
M84 X Y E ;Disable all steppers but Z
Der Befehl G1 X254 ist nötigenfalls etwas anzupassen, falls der Drucker den Ausschalter nicht richtig trifft (Fertigungstoleranz) oder das ganze bei einem anderen Drucker eingesetzt wird. Da die Software-Endstops deaktiviert sind, sollte man hier besonders aufpassen, sonst kracht es im wahrsten Sinne des Wortes.
Wenn alles richtig gemacht wurde kann man den alten Ein-/Ausschalter in der 0-Stellung belassen und schaltet den Drucker nur noch mit dem neuen Schalter Ein und Aus.
Wenn man nicht möchte, dass sich der Drucker jedes mal selbst ausschaltet, weil man z.B. daneben sitzt und sofort einen neuen Druck starten möchte, dann kann man den alten Schalter einfach ebenfalls einschalten und der Drucker bleibt immer an.
Ich hoffe, diese simple Lösung gefällt und findet viele Nutzer.
Deutsche User: Bitte, wenn Ihr mich unterstützen wollt, schaut doch auch einmal in meinen Shophttps://www.3d-arbeitsplatz.de/
Automatic switch-off after printing, the simplest solution for the BIQU BX.
This is the useful accessory that is missing from the BIQU BX. A simple device to automatically turn off the printer after printing has finished.
If you don't trust yourself to solder this cable yourself, because you are working on a live cable, you can also buy a pre-assembled power cable in my shop, which is easy to attach without risk. Link is here:
https://www.3d-arbeitsplatz.de/
I do not assume any liability or guarantee for these self-assembly instructions. Everyone who works on live cables should be aware of the risk and what they are doing. Everything here is done at your own risk!
There are many expensive solutions out there involving relays, crafts, and accessories. This, on the other hand, is simple, inexpensive and quick to implement.
The idea behind it all was to put the on/off switch on the printer where it can turn itself off. The best place then turned out to be a point to the right of the X-axis that the printing carriage cannot normally reach due to the software end stops. This position is also more accessible for turning the printer on and off manually.
There are two possible solutions that I have already successfully implemented:
1) A modified power cable, which is connected instead of the supplied cable. This does not change anything on the printer itself and you can buy it in my shop, see above.
2) A short power cable, which is also connected to the on/off switch of the printer and can take over its task elsewhere. This solution is described below.
We need:
The housing from the STL here (support is only necessary for the clips)
An approx. 120 cm long flat power cable (H03VV-F according to DIN VDE 0281)
An on/off switch (rocker switch) for 220V (e.g. from an old PC power supply, 21x15mm / 19x13mm)
Two matching cable lugs with lugs for connection to the existing switch
Soldering accessories and a steady hand
Method:
First the existing power cable is pulled out of the printer and the device is de-energized.
The two Allen screws that attach the housing with the on/off switch to the printer are loosened and the housing is carefully pulled forward. Now you can see two red wires and two black wires going to the switch. To switch a device on and off, it is sufficient to switch only one phase. The short black cable is actually superfluous and the black cable that goes to the power supply can be plugged directly into the power plug, where the short black cable was attached. Now there are only two red cables on the switch. Our additional cable is attached to this two wires. I decided on a solution with flat plugs with a branch, then I can still use the old switch. But you can also connect the new cable only with the two red cables and thus put the old switch out of operation, as you like.
To get to the underside of the printer, it must be tilted back on its side. The cover for the power supply is only held by 5 screws. When these are loosened and the cover has been removed, the cable can easily be routed past the power supply unit. So that I can attach it better to the switch, I loosened the short red cable that goes to the power supply. When the switch has been installed again, it can easily be reassembled and the housing screwed together.
On the other side, the cable is pulled through the new housing and soldered to the new switch (attach the switch with 0 down).
Now the new switch only needs to be attached to the X-axis at the top right. To do this, it is simply clipped in with the tabs. (If it doesn't fit, your printer may not be properly calibrated and the housing needs to be enlarged or reduced a few percent.)
So that the printer now switches itself off after printing, the G-code in the slicer has to be adjusted a little:
Here is my attitude towards Cura:
In the device settings for Cura, insert the following in the section "End G code" at the end":
; Auto-OFF
G4 S120; Pause 120 sec.
G28 X; Home X for safety
M211 S0; SW end stop off
G1 X254; goto power-off position
; If not powered off:
M211 S1; SW end stop on
M84 X Y E ;Disable all steppers but Z
The entire end of G-code then looks like this:
;BIQU Default End Gcode
G91 ;Relative positioning
G1 E-2 F2700 ;Retract a bit
G1 E-2 Z0.2 F2400 ;Retract a bit more and raise Z
G1 X5 Y5 F3000 ;Wipe out
G1 Z10 ;Raise Z by 10mm
G90 ;Return to absolute positioning
G1 X0 Y{machine_depth} ;TaDaaaa
M106 S0 ;Turn-off fan
M104 S0 ;Turn-off hotend
M140 S0 ;Turn-off bed
M84 X Y E ;Disable all steppers but Z
; Auto-OFF
G4 S120 ; Pause 120 sec.
G28 X ; Home X for safety
M211 S0 ; SW-Endstop off
G1 X254 ; goto Power-Off-Position
; If not powered off:
M211 S1
M84 X Y E ;Disable all steppers but Z
If necessary, the command G1 X254 must be adjusted somewhat if the printer does not hit the switch correctly (manufacturing tolerance) or if the whole thing is used with a different printer. Since the software end stops are deactivated, you should be particularly careful here, otherwise it will literally crash.
If everything has been done correctly, you can leave the old on/off switch in the 0 position and only switch the printer on and off with the new switch.
If you don't want the printer to switch itself off every time, e.g. because you sit next to it and want to start a new print immediately, then you can simply turn on the old switch and the printer will always stay on.
I hope you like this simple solution and that it finds many users.
DEUTSCH:
Automatisches Ausschalten nach dem Druckvorgang, die einfachste Lösung für den BIQU BX.
Dies ist das nützliche Zubehör, was beim BIQU BX fehlt. Eine einfache Vorrichtung, um den Drucker nach Beenden des Druckvorgangs automatisch auszuschalten.
Wer sich nicht zutraut, dieses Kabel selbst anzulöten, da man ja an einem stromführenden Kabel arbeitet, der kann auch in meinem Shop ein fertig konfektioniertes Stromkabel kaufen, welches ohne Risiko und einfach anzubringen ist. Link ist hier:
https://www.3d-arbeitsplatz.de/
Für diese Selbstbauanleitung hier übernehme ich keinerlei Haftung oder Garantie. Jeder, der an stromführenden Kabeln arbeitet, sollte sich des Risikos bewusst sein und wissen, was er macht. Alles hier geschieht auf eigene Gefahr!
Es gibt viele teure Lösungen mit Relais, Bastelarbeit und Zubehör. Diese hier dagegen ist einfach und preiswert und auch schnell umzusetzen.
Die Idee hinter dem ganzen war, den Ein-/Ausschalter dort am Drucker anzubringen, wo er sich selbst ausschalten kann. Als bester Platz hat sich dann eine Stelle rechts an der X-Achse herausgestellt, die der Druckschlitten normalerweise durch die Software-Endstops nicht erreichen kann. Diese Position ist auch besser zum manuellen Ein- und Ausschalten des Druckers erreichbar.
Hiefür gibt es zwei Lösungswege, die ich schon erfolgreich umgesetzt habe:
1) Ein modifiziertes Stromkabel, welches anstelle des mitgelieferten Kabels angeschlossen wird. Dies verändert nichts am Drucker selbst und man kann es bei mir im Shop kaufen, s.o..
2) Ein kurzes Stromkabel, welches an den Ein-/Ausschalter des Druckers zusätzlich angeschlossen wird und dessen Aufgabe an anderer Stelle übernehmen kann. Diese Lösung wird im folgenden beschrieben.
Wir benötigen:
Das Gehäuse von der STL hier (Support ist nur nötig an der Seite mit den Clips)
Ein ca. 120 cm langes flaches Stromkabel (H03VV-F nach DIN VDE 0281)
Einen Ein-/Ausschalter (Wippschalter) für 220V (z.B. von einem alten PC-Netzteil, 21x15mm / 19x13mm)
Zwei passende Kabelschuhe mit Lasche zum Anschluss an den vorhandenen Schalter
Löt-Zubehör und eine ruhige Hand
Vorgehensweise:
Zuerst wird das vorhandene Stromkabel aus dem Drucker gezogen und das Gerät stromlos gemacht.
Die zwei Schrauben, die das Gehäuse mit dem Ein-/Ausschalter am Drucker befestigen werden gelöst und das Gehäuse vorsichtig nach vorne gezogen. Jetzt sieht man zwei rote und zwei schwarze Kabel, die zum Schalter gehen. Um ein Gerät an und aus zu schalten ist es ausreichend, nur eine Phase zu schalten. Das kurze schwarze Kabel ist also eigentlich überflüssig und das schwarze Kabel, welches zum Netzteil geht, kann direkt an den Stromstecker eingesteckt werden, dort, wo das kurze schwarze Kabel befestigt war. Jetzt sind am Schalter nur noch zwei rote Kabel. An diese Kabel wird unser zusätzliches Kabel befestigt. Ich habe mich für eine Lösung mit Flachsteckern mit Abzweig entschieden, dann kann ich den alten Schalter noch zusätzlich benutzen. Man kann aber auch das neue Kabel nur mit den zwei roten Kabeln verbinden und den alten Schalter somit außer Betrieb setzen, wie es einem beliebt.
Um an die Unterseite des Druckers zu gelangen muss er nach hinten auf die Seite gekippt werden. Die Abdeckung für das Netzteil wird nur von 5 Schrauben gehalten. Wenn diese gelöst sind und die Abdeckung entfernt wurde, kann man das Kabel leicht am Netzteil vorbeiführen. Damit ich es am Schalter besser befestigen kann, habe ich das kurze rote Kabel, welches zum Netzteil geht, gelöst. Wenn der Schalter dann wieder fertig eingebaut wurde, kann man es leicht wieder montieren und das Gehäuse verschrauben.
Auf der anderen Seite wird das Kabel durch das neue Gehäuse gezogen und an den neuen Schalter angelötet (den Schalter mit 0 nach unten anbringen).
Jetzt muss der neue Schalter nur noch oben rechts an der X-Achse befestigt werden. Hierzu wird er einfach mit den Laschen eingeklipst. (Falls es nicht passen sollte ist Euer Drucker vielleicht nicht richtig kallibriert und das Gehäuse muss wenige Prozent vergrößert oder verkleinert werden.)
Damit der Drucker sich nach dem Druck jetzt selbst ausschaltet, muss noch der G-Code im Slicer etwas angepasst werden:
Hier meine Einstellung für Cura:
In den Geräteeinstellungen für Cura fügt man in der Sektion "Ende G-Code" am Ende folgendes ein:
; Auto-OFF
G4 S120 ; Pause 120 sec.
G28 X ; Home X for safety
M211 S0 ; SW-Endstop off
G1 X254 ; goto Power-Off-Position
; If not powered off:
M211 S1; SW end stop on
M84 X Y E ;Disable all steppers but Z
Der gesamte Ende G-Code sieht dann folgendermaßen aus:
;BIQU Default End Gcode
G91 ;Relative positioning
G1 E-2 F2700 ;Retract a bit
G1 E-2 Z0.2 F2400 ;Retract a bit more and raise Z
G1 X5 Y5 F3000 ;Wipe out
G1 Z10 ;Raise Z by 10mm
G90 ;Return to absolute positioning
G1 X0 Y{machine_depth} ;TaDaaaa
M106 S0 ;Turn-off fan
M104 S0 ;Turn-off hotend
M140 S0 ;Turn-off bed
M84 X Y E ;Disable all steppers but Z
; Auto-OFF
G4 S120 ; Pause 120 sec.
G28 X ; Home X for safety
M211 S0 ; SW-Endstop off
G1 X254 ; goto Power-Off-Position
; If not powered off:
M211 S1
M84 X Y E ;Disable all steppers but Z
Der Befehl G1 X254 ist nötigenfalls etwas anzupassen, falls der Drucker den Ausschalter nicht richtig trifft (Fertigungstoleranz) oder das ganze bei einem anderen Drucker eingesetzt wird. Da die Software-Endstops deaktiviert sind, sollte man hier besonders aufpassen, sonst kracht es im wahrsten Sinne des Wortes.
Wenn alles richtig gemacht wurde kann man den alten Ein-/Ausschalter in der 0-Stellung belassen und schaltet den Drucker nur noch mit dem neuen Schalter Ein und Aus.
Wenn man nicht möchte, dass sich der Drucker jedes mal selbst ausschaltet, weil man z.B. daneben sitzt und sofort einen neuen Druck starten möchte, dann kann man den alten Schalter einfach ebenfalls einschalten und der Drucker bleibt immer an.
Ich hoffe, diese simple Lösung gefällt und findet viele Nutzer.
Deutsche User: Bitte, wenn Ihr mich unterstützen wollt, schaut doch auch einmal in meinen Shophttps://www.3d-arbeitsplatz.de/
Similar models
thingiverse
free

Creality Ender-3 Power Off Autoswitch by ThingsDesigner
...er einfach ebenfalls einschalten und der drucker bleibt immer an.
ich hoffe, diese simple lösung gefällt und findet viele nutzer.
thingiverse
free
Sovol SV01 SV02 SV03 Power Off Autoswitch by ThingsDesigner
...er einfach ebenfalls einschalten und der drucker bleibt immer an.
ich hoffe, diese simple lösung gefällt und findet viele nutzer.
thingiverse
free
Creality CR-6 SE Power Off Autoswitch by ThingsDesigner
...er einfach ebenfalls einschalten und der drucker bleibt immer an.
ich hoffe, diese simple lösung gefällt und findet viele nutzer.
thingiverse
free

Oberwagenlaterne by stephanbrunker
... brücke über der öffnung halbwegs sauber gedruckt wird. die druckteile wurden danach abgeschliffen und mit acteon dampfbehandelt.
thingiverse
free

Tronxy XY-2 Pro / XY2 Pro Wartungshalter Service Stellung by Flore84
...ht auf den druckerteilen liegt.
für den halterkopf ist eine unterstützung sinnvoll damit die aufnahme für den rahmen besser wird.
thingiverse
free
Euchner CET - Betätiger-Halter by PredatorJr
....
ah-typen sind nur mit dem jeweils angelernten betätiger nutzbar. ch-typen funktionieren mit jedem betätiger der cet-a...-serie.
thingiverse
free
Penhalter für Apple Pencil by SirThommes
...ehörkabels (4mm).
so kann man jetzt das kabel seitlich herausführen. ich hoffe, das ich den einen oder anderen damit helfen kann.
3dwarehouse
free

Blache Design - Mercedes-Benz Penthaus
... die solarpanele im verbrauch von strom deutlich effizienter und bietet platz für alle zu tätigenden arbeiten in der bürobranche.
thingiverse
free
Astra ashtray cover USB Panel / Opel Astra H USB Einsatz für Aschenbecher by DuWeisWer
...footwell.
!expertise and tools are required for the wireing!
!improper installation can lead to injury and damage to the vehicle!
thingiverse
free

Sovol SV02 Power Off Autoswitch Rev. by Ilmdruck
... everyone who works on live cables should be aware of the risk and what they are doing. everything here is done at your own risk!
Autoswitch
thingiverse
free

iSocket Autoswitch Under Table Mount
...t for the cables. mirror it horizontally in your slicing program if you want it to point the other direction and show the labels.
thingiverse
free
Dual Block outlet cover with support for Tool/Vac Autoswitch by mikeyroth
...tool/vac autoswitch by mikeyroth
thingiverse
i wanted an outlet cover to support a tool/vac auto switch. here is my design .
thingiverse
free
Autoswitch OFF for Tevo's Black Widow by guss67
.... * message me here
designed in inventor
if you enjoy and want to support my work you can donate me on the link below,
thank you!
thingiverse
free
Sovol SV02 Power Off Autoswitch Rev. by Ilmdruck
... everyone who works on live cables should be aware of the risk and what they are doing. everything here is done at your own risk!
thingiverse
free
Creality Ender-3 Power Off Autoswitch by ThingsDesigner
...er einfach ebenfalls einschalten und der drucker bleibt immer an.
ich hoffe, diese simple lösung gefällt und findet viele nutzer.
thingiverse
free
Sovol SV01 SV02 SV03 Power Off Autoswitch by ThingsDesigner
...er einfach ebenfalls einschalten und der drucker bleibt immer an.
ich hoffe, diese simple lösung gefällt und findet viele nutzer.
thingiverse
free
Creality CR-6 SE Power Off Autoswitch by ThingsDesigner
...er einfach ebenfalls einschalten und der drucker bleibt immer an.
ich hoffe, diese simple lösung gefällt und findet viele nutzer.
3dwarehouse
free
Kramer VP 211 Autoswitch
...kramer vp 211 autoswitch
3dwarehouse
kramer vp 211 autoswitch #211 #autoswitch #kramer #vp
Thingsdesigner
thingiverse
free
QR Code Cover for Sovol SV01 by ThingsDesigner
...l sv01 by thingsdesigner
thingiverse
i don´t want the qr code, so i replaced it with a cover like i do with my cr-6 and ender-3.
thingiverse
free

QR Code Cover for Creality Ender-3 by ThingsDesigner
...y ender-3 by thingsdesigner
thingiverse
i don´t like the qr code on my ender-3. so i designed a cover with the ender logo on it.
thingiverse
free

Satsana Remix for Ender 3V2 and Ender 3 with All Metal Hotend, BLTouch / 5015 Fan by ThingsDesigner
...an the normal one (see pictures). so i shortened the satsana as well.
this is a remix ofhttps://www.thingiverse.com/thing:4647053
thingiverse
free
Creality CR-6 SE Raspberry Pi 4 Case by ThingsDesigner
...flat on my bed and the back part with cura tree support.
for the camera mount you need two m3 screws and nuts from the grave box.
thingiverse
free
Creality Ender-3 Power Off Autoswitch by ThingsDesigner
...er einfach ebenfalls einschalten und der drucker bleibt immer an.
ich hoffe, diese simple lösung gefällt und findet viele nutzer.
thingiverse
free
Sovol SV02 Power Off Autoswitch Rev. by Ilmdruck
...not be mounted on the rail as in the thingsdesigner solution, i changed the bracket. i just put the...
thingiverse
free
Sovol SV01 SV02 SV03 Power Off Autoswitch by ThingsDesigner
...er einfach ebenfalls einschalten und der drucker bleibt immer an.
ich hoffe, diese simple lösung gefällt und findet viele nutzer.
thingiverse
free
Creality CR-6 SE Power Off Autoswitch by ThingsDesigner
...er einfach ebenfalls einschalten und der drucker bleibt immer an.
ich hoffe, diese simple lösung gefällt und findet viele nutzer.
thingiverse
free
Ender 3 V2 Power Off Auto switch shutdown by omarhaasan
...3, ender 3 pro, cr6se and may others. ( thingsdesigner ) design very useful but required to un-screw bolt...
Biqu
thingiverse
free

BIQU B1 Air Guide by BADCO2k
...biqu b1 air guide by badco2k
thingiverse
printed on biqu b1
thingiverse
free

BiQU BX Printer Upgrade by MaXx0110
...biqu bx printer upgrade by maxx0110
thingiverse
biqu bx upgrades
thingiverse
free
BiQu H2 cover by jayfraser
...by jayfraser
thingiverse
this is a cover for the biqu h2. it allows the use of a bl touch and a standard ender part cooling fan.
thingiverse
free
BIQU BX 4040 FACE by devilcorp
...biqu bx 4040 face by devilcorp
thingiverse
front face for 4040 extrusion of biqu bx
thingiverse
free
BIQU B1 COVER by milekitic
...n biqu b1 extruder that prevents light from shining directly into the eyes when looking at the first layer :)
happy printing :)
thingiverse
free
Biqu Delta Stiff Structure Upgrade by tatubias
...biqu delta stiff structure upgrade by tatubias
thingiverse
biqu delta stiff structure upgrade
thingiverse
free
Biqu B1 UM2 Nozzle box by Gekido
...biqu b1 um2 nozzle box by gekido
thingiverse
simple box for the specific biqu b1 nozzles
thingiverse
free
Biqu - Filament adjustment by Mutar
...biqu - filament adjustment by mutar
thingiverse
adjustment tool
thingiverse
free
BIQU B1 Bowden brace by _Jamesy_
... by _jamesy_
thingiverse
a simple bowden support for the biqu b1... to help prevent the ptfe tube from wiggling in the connector
thingiverse
free
Biqu B1 Filament Guide by Sentshuas04
...ntshuas04
thingiverse
...made this remix of holspeed´s filament guide for the biqu b1.
i had to grind the radius a little bit...
Bx
3d_export
$6

BX 3D Model
...bx 3d model
3dexport
bx citroen old car
bx 3d model pio33d 67454 3dexport
turbosquid
$79
Sword BX
...urbosquid
royalty free 3d model sword bx for download as max on turbosquid: 3d models for games, architecture, videos. (1210910)
3d_export
$30

CITROEN BX 3D Model
...citroen bx 3d model
3dexport
citroen bx
citroen bx 3d model xantiaexclusive98 77503 3dexport
turbosquid
$99

Robot Head BX
...quid
royalty free 3d model robot head bx for download as max on turbosquid: 3d models for games, architecture, videos. (1210227)
3d_ocean
$89

Citroen BX 1984
...y, in real units of measurement, qualitatively and maximally close to the original. model formats: - *.max (3ds max 2008 scanl...
3d_export
$99

Citroen BX 1984 3D Model
...xport
citroen bx 1982 1984 1993 1994 80s 5-door compact hatchback france french
citroen bx 1984 3d model humster3d 78116 3dexport
turbosquid
$60

Citroen BX E14 1983
...id
royalty free 3d model citroen bx e 14 for download as max on turbosquid: 3d models for games, architecture, videos. (1608493)
cg_studio
$99

Citroen BX 19843d model
...o
.3ds .c4d .fbx .lwo .max .mb .obj - citroen bx 1984 3d model, royalty free license available, instant download after purchase.
humster3d
$75

3D model of Citroen BX 1984
...y a detailed 3d model of citroen bx 1984 in various file formats. all our 3d models were created maximally close to the original.
3d_export
free

Download free Citroen Bx with engine and interior 3D Model
...engine and interior 3d model
3dexport
citroen bx car 19 gti 16v
citroen bx with engine and interior 3d model srick 59052 3dexport
Power
turbosquid
$100

power
...ower
turbosquid
royalty free 3d model power for download as on turbosquid: 3d models for games, architecture, videos. (1421990)
3d_export
$5

Power
...power
3dexport
3d_export
$5

power outlets
...power outlets
3dexport
power outlets
3ddd
$1

lion power
...lion power
3ddd
лев , статуя
lion power gold sculpture
3ddd
$1

Sea Power
...
компас , море , часы
часы с компасом sea power
3ddd
free

Meridiani / Power
...power
3ddd
meridiani , круглый
стол power производитель meridiani, диаметр 120,высота 67
3d_export
$5

Power Surge
...power surge
3dexport
the power surge is a all mesh carnival ride to lower in game part count and lag
turbosquid
$8

Airport Ground Power Unit (AXA Power )
... available on turbo squid, the world's leading provider of digital 3d models for visualization, films, television, and games.
turbosquid
$50

Power Houser
...rbosquid
royalty free 3d model power houser for download as on turbosquid: 3d models for games, architecture, videos. (1333800)
3d_export
$5

power outlet
...power outlet
3dexport
power outlet<br>format file maya 2018, 3d max 2017, obj, fbx