Thingiverse
Bed Leveling Tool - Mount Adapter for Many Creality Printers (not all) by BustedChain
by Thingiverse
Last crawled date: 3 years, 4 months ago
UPDATE:
1> I fixed the smaller of the 2 pieces. The mount posts needed to be further out to allow clearance for the screw heads and washers.
WHAT IS THIS?
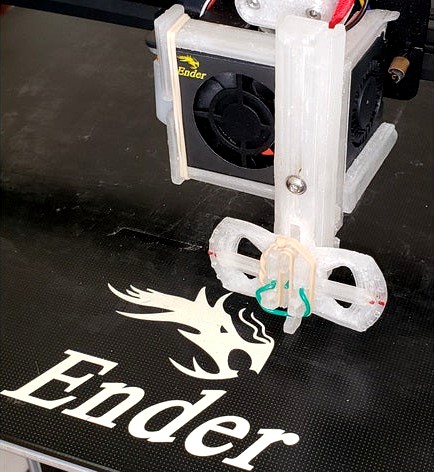
These are 2 adapters that will connect a 3D Printed Bed Leveling Visual Indicator Tool to an Ender 5 Plus (and probably many other Crealirty) 3D Printers that have the same kind of metal cooling fan cover. The bracket that goes around the metal fan cover is specific to the Ender 5 Plus (also used on CR-10, CR-10S, and many of the other Enders) but does not fit all variations (V2, V3, CR-10S Pro models does not fit.) A list of the printers I think this might fit and know that it won't fit without more work is near the bottom of this.
The other part is designed to be universal so that someone could mount it on their fan cover directly if they OR they could design a mount for their printer and use this. The flat mount has 2 holes that are sized for M3 screws and are 26mm apart on center. I have provided more files than you need. There are a couple versions of the bracket that mounts to the Creality Fan Cover depending on how you want to print them. I have provided a 3mf project so you can see how I printed mine. You certainly don't need all these files that I've provided but maybe they help some people or maybe you give me feedback on the settings I'm using and we all learn.
The Bed Leveling Tool by urkansan is a fantastic little tool for visually observing the level of your bed. The post-it note feeler gauge test is great to get your bed level when you have no other way, but once you've gotten your bed level, wouldn't it be nice to be able to SEE that it is still level or see that one of the corners is out of level? That's where urkansan's tool comes in:https://www.thingiverse.com/thing:3007018
ONE TIP: The less "slop" or less play there is on the pins holding the bed leveling tool together, the more accurate that tool is. The looser the pins are, the more slop you'll have. You want the indicator arrows and the bottom most moving feeler foot to be able to move freely with no drag, but the arrows themselves should not wobble in the mount if you can find something that will fit them snugly. I used a heavy gauge paperclip, but it would be nice to find something even tighter than that.
MATERIALS NEEDED / WHAT TO PRINT:
Most of the parts from the link above, but you might want to try my Main that has been modified with Cura to fill the nut hole and puts a 5mm hole for heat set nut insert.. OPTIONAL: The "CFFFP_Bed Leveling Tool Base with HeatSet Nut Insert Hole Fix.3mf" from this project. I used Cura and a cube shape to fill in the nut recess on the Tool Base and then I used a 5mm cylinder shape to make a cut out in the center for a heat set nut insert. If you prefer to use the captured nut from the original design, that is fine too. NOTE: You will want to shrink some parts by 0.1 or 0.2mm and expand other parts by 0.1 or 0.2mm I printed everything at their normal size and had a lot of filing to do to get a smooth fit that wouldn't bind up. My thoughts would be to make the Base 0.1mm bigger, leave the Main Slider size alone, reduce the Rod and Fixed Sliders by 0.1mm. (You might want to reduce the Rod Slider in only the X direction and not the Y direction because of how it attaches to the mount. As of writing this, these resize suggestions are untested. I just know that my fairly well calibrated printer made all these parts without resizing too tight and I had to hand fit most of them. I will be printing a second set of Bed Leveling Tool Parts, so wish me luck. It shouldn't take much to make things fit better.
3 each M3 Screws (2 each 8mm long for the mount, 1 each 10 or 12mm long for the bed leveling tool itself.)
3 each M3 Heat Set Nut Inserts (5mm outer diameter, 4mm mounting depth, M3 Threaded) (2 for the mount, 1 for the bed leveling tool that I provided in the 3mf file)
M3 Washers - Optional but recommended.
Small Rubber Band (Loom Band) - There are a couple of "ear" tabs on the left side of the bracket that goes around the fan to "hug" it. You can hook a rubber band on there to improve the grip if needed. (Get a heavier duty rubber band if you can. You want just enough tension to cause the pin to move freely, not more than that.)
A flat metal file and/or a needle file - Depending on any printing artifacts you encounter, you may need to file the opening. I tried to leave some room for relief in the inside corners of the opening, but I still had a tiny bit of hand-fitting to do in the corners where some build-up still occurred. I used a needle file to clean out the holes a little bit.
For one of the printers that this mount might work with (see list below), you will want both the flat adapter and the creality mount adapter. The creality mount attaches to the metal fan cover. The flat adapter attaches to the creality mount once you've added the heat set nut inserts to the creality mount.
I have included my Cura Project File, but do NOT use it without changing it for your filament, your Flow Rate Compensation Factor, and any other settings. It might have my printer selected, so you would need to change it to your printer and your filament. I only include the project file to give you a head start IF you are willing to take responsibility for adjusting it first to your needs. I have included a couple of custom settings Mesh Modifiers (the little blocks in the air overlapping the part that changes settings for those layers) to try and make the support material easier to remove.
I have included a Creality Fan Mount Adapter that does not have Support Wedges attached to it. The one with SUPPORTED in the file name and the .3mf file have support wedges that you have to carefully cut off and file down for a proper fit. I don't like 90 degree unsupported overhangs with PETG, so that is why I have them there. If you are printing in PLA you might not need them. If you prefer Tree Support or some other kind of support for those small clips at the top, then you can do your own.
FIT THESE PRINTERS MAYBE (PENDING VERIFICATION):
Might fit: CR-10/10S/10Mini/10 S5/(not Pro), CR-20, Ender 3/3X/5/5 Pro/5 Plus/6, ALL pending measurement verification.
MEASUREMENT: The Ender 5 Plus fan cage is approximately 48.7mm wide x 46mm tall, but my printer is moving right now so I can't re-measure it to make sure.
Will NOT fit without work: CR-10 V2 or V3, CR-10S Pro, CR-10 Max, Ender 3 V2, CR-6 SE, CR-10 S4, CR-X. If you can figure out where to put 2 3mm (1/8") holes that are 26mm apart on center vertically, then you might be able to just mount the flat mount directly to the fan cover. It is very light weight.
I printed and am using my second to final draft of this part. I needed to lengthen both clips a little bit more. Since my second to last draft worked, I see no need to print the final one. So, if there are any problems with it, please let me know, but I may need confirmation that it isn't something specific to your printer. I use layer heights that are increments of 0.04mm because of the distance traveled in a full step of the stepper motor. This tends to make z a little more consistent and less noisy than values that aren't divisible by 0.04. This will vary based on your printer, but lots of them can use 0.04 as a starting point. Some can use increments of 0.02. I could have printed this with 0.4mm layer height on my 0.6mm nozzle.
1> I fixed the smaller of the 2 pieces. The mount posts needed to be further out to allow clearance for the screw heads and washers.
WHAT IS THIS?
These are 2 adapters that will connect a 3D Printed Bed Leveling Visual Indicator Tool to an Ender 5 Plus (and probably many other Crealirty) 3D Printers that have the same kind of metal cooling fan cover. The bracket that goes around the metal fan cover is specific to the Ender 5 Plus (also used on CR-10, CR-10S, and many of the other Enders) but does not fit all variations (V2, V3, CR-10S Pro models does not fit.) A list of the printers I think this might fit and know that it won't fit without more work is near the bottom of this.
The other part is designed to be universal so that someone could mount it on their fan cover directly if they OR they could design a mount for their printer and use this. The flat mount has 2 holes that are sized for M3 screws and are 26mm apart on center. I have provided more files than you need. There are a couple versions of the bracket that mounts to the Creality Fan Cover depending on how you want to print them. I have provided a 3mf project so you can see how I printed mine. You certainly don't need all these files that I've provided but maybe they help some people or maybe you give me feedback on the settings I'm using and we all learn.
The Bed Leveling Tool by urkansan is a fantastic little tool for visually observing the level of your bed. The post-it note feeler gauge test is great to get your bed level when you have no other way, but once you've gotten your bed level, wouldn't it be nice to be able to SEE that it is still level or see that one of the corners is out of level? That's where urkansan's tool comes in:https://www.thingiverse.com/thing:3007018
ONE TIP: The less "slop" or less play there is on the pins holding the bed leveling tool together, the more accurate that tool is. The looser the pins are, the more slop you'll have. You want the indicator arrows and the bottom most moving feeler foot to be able to move freely with no drag, but the arrows themselves should not wobble in the mount if you can find something that will fit them snugly. I used a heavy gauge paperclip, but it would be nice to find something even tighter than that.
MATERIALS NEEDED / WHAT TO PRINT:
Most of the parts from the link above, but you might want to try my Main that has been modified with Cura to fill the nut hole and puts a 5mm hole for heat set nut insert.. OPTIONAL: The "CFFFP_Bed Leveling Tool Base with HeatSet Nut Insert Hole Fix.3mf" from this project. I used Cura and a cube shape to fill in the nut recess on the Tool Base and then I used a 5mm cylinder shape to make a cut out in the center for a heat set nut insert. If you prefer to use the captured nut from the original design, that is fine too. NOTE: You will want to shrink some parts by 0.1 or 0.2mm and expand other parts by 0.1 or 0.2mm I printed everything at their normal size and had a lot of filing to do to get a smooth fit that wouldn't bind up. My thoughts would be to make the Base 0.1mm bigger, leave the Main Slider size alone, reduce the Rod and Fixed Sliders by 0.1mm. (You might want to reduce the Rod Slider in only the X direction and not the Y direction because of how it attaches to the mount. As of writing this, these resize suggestions are untested. I just know that my fairly well calibrated printer made all these parts without resizing too tight and I had to hand fit most of them. I will be printing a second set of Bed Leveling Tool Parts, so wish me luck. It shouldn't take much to make things fit better.
3 each M3 Screws (2 each 8mm long for the mount, 1 each 10 or 12mm long for the bed leveling tool itself.)
3 each M3 Heat Set Nut Inserts (5mm outer diameter, 4mm mounting depth, M3 Threaded) (2 for the mount, 1 for the bed leveling tool that I provided in the 3mf file)
M3 Washers - Optional but recommended.
Small Rubber Band (Loom Band) - There are a couple of "ear" tabs on the left side of the bracket that goes around the fan to "hug" it. You can hook a rubber band on there to improve the grip if needed. (Get a heavier duty rubber band if you can. You want just enough tension to cause the pin to move freely, not more than that.)
A flat metal file and/or a needle file - Depending on any printing artifacts you encounter, you may need to file the opening. I tried to leave some room for relief in the inside corners of the opening, but I still had a tiny bit of hand-fitting to do in the corners where some build-up still occurred. I used a needle file to clean out the holes a little bit.
For one of the printers that this mount might work with (see list below), you will want both the flat adapter and the creality mount adapter. The creality mount attaches to the metal fan cover. The flat adapter attaches to the creality mount once you've added the heat set nut inserts to the creality mount.
I have included my Cura Project File, but do NOT use it without changing it for your filament, your Flow Rate Compensation Factor, and any other settings. It might have my printer selected, so you would need to change it to your printer and your filament. I only include the project file to give you a head start IF you are willing to take responsibility for adjusting it first to your needs. I have included a couple of custom settings Mesh Modifiers (the little blocks in the air overlapping the part that changes settings for those layers) to try and make the support material easier to remove.
I have included a Creality Fan Mount Adapter that does not have Support Wedges attached to it. The one with SUPPORTED in the file name and the .3mf file have support wedges that you have to carefully cut off and file down for a proper fit. I don't like 90 degree unsupported overhangs with PETG, so that is why I have them there. If you are printing in PLA you might not need them. If you prefer Tree Support or some other kind of support for those small clips at the top, then you can do your own.
FIT THESE PRINTERS MAYBE (PENDING VERIFICATION):
Might fit: CR-10/10S/10Mini/10 S5/(not Pro), CR-20, Ender 3/3X/5/5 Pro/5 Plus/6, ALL pending measurement verification.
MEASUREMENT: The Ender 5 Plus fan cage is approximately 48.7mm wide x 46mm tall, but my printer is moving right now so I can't re-measure it to make sure.
Will NOT fit without work: CR-10 V2 or V3, CR-10S Pro, CR-10 Max, Ender 3 V2, CR-6 SE, CR-10 S4, CR-X. If you can figure out where to put 2 3mm (1/8") holes that are 26mm apart on center vertically, then you might be able to just mount the flat mount directly to the fan cover. It is very light weight.
I printed and am using my second to final draft of this part. I needed to lengthen both clips a little bit more. Since my second to last draft worked, I see no need to print the final one. So, if there are any problems with it, please let me know, but I may need confirmation that it isn't something specific to your printer. I use layer heights that are increments of 0.04mm because of the distance traveled in a full step of the stepper motor. This tends to make z a little more consistent and less noisy than values that aren't divisible by 0.04. This will vary based on your printer, but lots of them can use 0.04 as a starting point. Some can use increments of 0.02. I could have printed this with 0.4mm layer height on my 0.6mm nozzle.
Similar models
thingiverse
free

Weel for Bed leveling creality CR-10 S by SVIVAR
...eveling creality cr-10 s by svivar
thingiverse
weel for mounting on existing nut . for creality cr-10s . for leveling print bed
thingiverse
free

Rail mount for a dial indicator for the Creality CR-10 printer (Bed leveling) by bebryan
...her printers, especially if they use an extruded aluminum 20x20 rail!.
here's the printer that i have: creality cr-10.
enjoy!
thingiverse
free

Easy printed bed levelling knob with nyloc nut for Ender 5 (and more)
...e bed and the spring and tighten it towards the bed.
hardware needed: 4x m4 nyloc nuts (locking nuts)
might be needed: 4x m4 nuts
thingiverse
free

CR-10 v2 settings for Prusa Slicer by codemer
...r that new setup over the next few days. the cr-10 v3 comes with the titan feeder, so i imagine the settings will be compatible.
thingiverse
free

Ender-2 tool tray extended by Haemophilic
...ou might be able to print it on ender-2 by turning it 45 degree in your slicer. please note, i didn't print this on a ender-2
thingiverse
free

Sunlu Filament Dryer Mount for Creality CR-10S by ShivaSoldier
...you should tape a teflon ring to the bottom front hole of the sunlu like i have pictured to help the filament pull consistently.
thingiverse
free

Creality E3D V6 Compatible Multi-Mount for Ender3 CR-10 by HoganZeng
... the offset information on the appropriate accessory page but do not offer support on how to change the offsets in your firmware.
thingiverse
free

cr10/ creality ender/ tool holder by carlosfernandez
...the cover.
no bolts and nuts are needed.
i am currently working on another support for those who use to print high height prints.
thingiverse
free

Raspicam mount for Ender by snebragd
...s to compensate for screw length issues.
needed:
an m3 bolt and hex nut
an m5 bolt (nut is optional pending fit)
happy printing!
thingiverse
free

Extended length webcam mount links for flexible camera mount (Creality CR-10S Pro)
... rails on the bottom -- they have to print lots of links.
these are extended length links that reduce the number of links needed.
Bustedchain
thingiverse
free

Fan Duct for CR-10S Pro and SKR v1.4 Turbo by BustedChain
...and tell me what you observe, otherwise i recommend you go with the v1 here. the v1 does work and has a couple of imperfections.
thingiverse
free

SiriusXM AMPS XDPIV2 or SXVD1 Adapter Plate for Bully Dog 50mm Gauge Pod A Pillar Housing - 2010-2016 RAM 1500 by BustedChain
...er to pry these caps up with something thin / gentle nearest the handle. don't be like me and start prying at the other end.
Creality
turbosquid
$7

filament roller single print creality
...del filament roller single print creality for download as stl on turbosquid: 3d models for games, architecture, videos. (1619309)
3d_export
free

Creality ender enclosure webcam mount
...e creality enclosure. sure is better than a tripod. change it up if it helps. i printed pla with 50% infill on my dd ender 3 pro.
3d_export
free

ender 3 frame cavity covers
...3 inserts,<br>made these inserts for the framework of the creality ender 3 - makes it look a bit more...
3d_export
$42

excavator
...width is the original size. 0.12 mm printing surface creality ender-5...
3d_export
free

ender 3 3d print bed clips
...glass bed + normal aluminium bed frame of the creality ender 3 = 6mm (b) these clips are designed...
3d_export
free

ender 3 enclosure corners
...that i could build my enclosure frame for my creality ender 3 - so i printed them in a...
thingiverse
free

Toolbox Creality
...ingiverse
this is a toolbox for tools that comes with creality printers, with a guide to cut capricorn ptfe with a cutter blade.
thingiverse
free

Creality Hotend Plate
... from creality themselves as the ender 3 is open source. this means i did not create this design and all credit goes to creality.
thingiverse
free
Creality Cat by alexander125
...creality cat by alexander125
thingiverse
this is the cat that comes on the sd card for all creality 3d printers.
thingiverse
free

Creality Dog by alexander125
...creality dog by alexander125
thingiverse
this is the dog that comes on the sd card for all creality 3d printers.
Adapter
3d_export
$10
Adapter 3D Model
...adapter 3d model
3dexport
adapter
adapter 3d model mur 20260 3dexport
archive3d
free
Adapter socket 3D Model
...dapter socket adapter
adapter socket n090211 - 3d model (*.3ds) for interior 3d visualization.
turbosquid
$400

cell adaptation
...
royalty free 3d model cell adaptation for download as blend on turbosquid: 3d models for games, architecture, videos. (1701655)
archive3d
free
Adapter 3D Model
...ups pc equipment
adapter extron n180813 - 3d model (*.gsm+*.3ds) for interior 3d visualization.
turbosquid
$5

usb adapter
...royalty free 3d model usb adapter for download as ige and stl on turbosquid: 3d models for games, architecture, videos. (1582234)
turbosquid
$15
Power adapter
...free 3d model power adapter for download as max, obj, and fbx on turbosquid: 3d models for games, architecture, videos. (1510024)
turbosquid
$8
USB adapter
...e 3d model usb adapter for download as max, fbx, obj, and dwg on turbosquid: 3d models for games, architecture, videos. (1713542)
turbosquid
$30

adapter.3ds
... available on turbo squid, the world's leading provider of digital 3d models for visualization, films, television, and games.
turbosquid
$15
Nokia Adapter
... available on turbo squid, the world's leading provider of digital 3d models for visualization, films, television, and games.
turbosquid
$15
Universal adapter
... available on turbo squid, the world's leading provider of digital 3d models for visualization, films, television, and games.
Leveling
design_connected
$11

Levels
...levels
designconnected
one nordic levels computer generated 3d model. designed by form us with love.
design_connected
$7
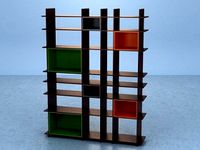
Level
...level
designconnected
zanotta level shelves and storage computer generated 3d model. designed by arik levy.
turbosquid
$29
level
...ty free 3d model level for download as 3ds, obj, c4d, and fbx on turbosquid: 3d models for games, architecture, videos. (1272856)
turbosquid
$1
level
... available on turbo squid, the world's leading provider of digital 3d models for visualization, films, television, and games.
3d_export
$5

Mario level
...mario level
3dexport
mario level low quality for fun videos
3ddd
$1
LEVELS OF DISCOVERY
...етская мебель "levels of discovery". rab10003 princess mini rocker
кресло-качалка (мини) "принцесса навсегда"
3d_export
$19

level design
...level design
3dexport
you can use this design (level design) in your own game.
turbosquid
$60
Desert level
...squid
royalty free 3d model desert level for download as fbx on turbosquid: 3d models for games, architecture, videos. (1208131)
turbosquid
$15
Transit Level
...quid
royalty free 3d model transit level for download as max on turbosquid: 3d models for games, architecture, videos. (1158112)
turbosquid
$14

Districts Level
...id
royalty free 3d model districts level for download as max on turbosquid: 3d models for games, architecture, videos. (1408410)
Tool
turbosquid
$21
Tool box with tools
... available on turbo squid, the world's leading provider of digital 3d models for visualization, films, television, and games.
archibase_planet
free
Tools
...tools
archibase planet
tools instruments implements
tools n070114 - 3d model (*.gsm+*.3ds+*.max) for interior 3d visualization.
3d_ocean
$12
Tools
...tools
3docean
hammer metal old screw tools wrench
maya
turbosquid
$6

Tool Cart / Tool Box
...
royalty free 3d model tool cart / tool box for download as on turbosquid: 3d models for games, architecture, videos. (1241859)
3d_ocean
$15
crimp tool
... tool copper cutter crimp crimp tool electrical electrical tools press tools pressing tool tools wire cutter
created in maya 2013
3d_ocean
$5

Tools
...tools
3docean
3d models paint tools work
3d,models,works,paint,art,create,working,
3d_export
free
tools
...tools
3dexport
coldsteel
turbosquid
$15
Tools
...turbosquid
royalty free 3d model tools for download as blend on turbosquid: 3d models for games, architecture, videos. (1331352)
3ddd
$1
bar tool
...bar tool
3ddd
барный
bar tool
turbosquid
$35

tools
... available on turbo squid, the world's leading provider of digital 3d models for visualization, films, television, and games.
Bed
3ddd
$1

bed
...bed
3ddd
bed , постельное белье
bed
3ddd
$1

bed
...bed
3ddd
bed , постельное белье
bed
3ddd
$1

bed
...bed
3ddd
bed , постельное белье
bed
3ddd
$1

bed
...bed
3ddd
bed , постельное белье
bed
3ddd
$1

bed
...bed
3ddd
bed , постельное белье
bed
3ddd
$1

bed
...bed
3ddd
bed , постельное белье
bed
3ddd
free

bed
...bed
3ddd
bed , постельное белье
bed
3ddd
free

bed
...bed
3ddd
bed , постельное белье
bed
3ddd
$1

Bed
...bed
3ddd
bed , постельное белье , постель
bed
3d_export
$7

bed adairs bed
...rs bed
3dexport
bed adairs bed in modern style. if you want a smoother surface, please turn on turbosmooth in the modifier list.
Printers
archibase_planet
free

Printer
...inter
archibase planet
printer laser printer pc equipment
printer n120614 - 3d model (*.gsm+*.3ds) for interior 3d visualization.
archibase_planet
free

Printer
...rchibase planet
laser printer office equipment computer equipment
printer - 3d model (*.gsm+*.3ds) for interior 3d visualization.
turbosquid
$100

Printer
...er
turbosquid
royalty free 3d model printer for download as on turbosquid: 3d models for games, architecture, videos. (1487819)
turbosquid
$3

Printer
...turbosquid
royalty free 3d model printer for download as max on turbosquid: 3d models for games, architecture, videos. (1670230)
turbosquid
$1

printer
...turbosquid
royalty free 3d model printer for download as max on turbosquid: 3d models for games, architecture, videos. (1595546)
turbosquid
$1

printer
...turbosquid
royalty free 3d model printer for download as max on turbosquid: 3d models for games, architecture, videos. (1595105)
turbosquid
$10

Printer
...id
royalty free 3d model printer for download as max and 3dm on turbosquid: 3d models for games, architecture, videos. (1607146)
turbosquid
$7

Printer
...royalty free 3d model printer for download as ma, ma, and obj on turbosquid: 3d models for games, architecture, videos. (1644580)
turbosquid
$30

Printer
... available on turbo squid, the world's leading provider of digital 3d models for visualization, films, television, and games.
turbosquid
$20

Printer
... available on turbo squid, the world's leading provider of digital 3d models for visualization, films, television, and games.
Many
turbosquid
$39

Many Kitchenware
...ty free 3d model many kitchen kitchenware for download as max on turbosquid: 3d models for games, architecture, videos. (1237891)
turbosquid
free

Chair Manie
... available on turbo squid, the world's leading provider of digital 3d models for visualization, films, television, and games.
design_connected
$9

Mani Wall Lamp
...mani wall lamp
designconnected
ligne roset mani wall lamp computer generated 3d model. designed by numéro111.
design_connected
$9

Many Pendant Lamp
...y pendant lamp
designconnected
atelier areti many pendant lamp computer generated 3d model. designed by kerschbaumer, gwendolyn.
3d_export
$15
Many ordinary stones
...many ordinary stones
3dexport
stones
turbosquid
$4
Desert with many objets
...model desert with many objets for download as blend and blend on turbosquid: 3d models for games, architecture, videos. (1682740)
turbosquid
$14
Lamp with many lightbulbs
...l lamp with many lightbulbs for download as max, obj, and fbx on turbosquid: 3d models for games, architecture, videos. (1369910)
turbosquid
$7

Arrmet Mani Wood
...3d model arrmet mani wood for download as obj, fbx, and blend on turbosquid: 3d models for games, architecture, videos. (1218950)
turbosquid
$3

DNA - Many Types
...ree 3d model dna - many types for download as ma, ma, and fbx on turbosquid: 3d models for games, architecture, videos. (1659457)
turbosquid
$5

Kellex Mani Armchair
...ani armchair for download as max, max, 3ds, dwg, fbx, and obj on turbosquid: 3d models for games, architecture, videos. (1655268)
Mount
3d_export
free

mounting bracket
...mounting plate is the portion of a hinge that attaches to the wood. mounting plates can be used indoors, cabinetry and furniture.
turbosquid
$2

MOUNTING
... available on turbo squid, the world's leading provider of digital 3d models for visualization, films, television, and games.
turbosquid
free

Mounts
... available on turbo squid, the world's leading provider of digital 3d models for visualization, films, television, and games.
turbosquid
free

Mount Fuji
...fuji
turbosquid
free 3d model mount fuji for download as obj on turbosquid: 3d models for games, architecture, videos. (1579977)
3d_export
$5

Headphone mount LR
...headphone mount lr
3dexport
headphone mount l+r
turbosquid
$39

Mount rainier
...quid
royalty free 3d model mount rainier for download as fbx on turbosquid: 3d models for games, architecture, videos. (1492586)
turbosquid
$5

pipe mounting
...quid
royalty free 3d model pipe mounting for download as obj on turbosquid: 3d models for games, architecture, videos. (1293744)
turbosquid
$3

Mounting Tires
...uid
royalty free 3d model mounting tires for download as fbx on turbosquid: 3d models for games, architecture, videos. (1708511)
3d_export
$5

Magnetic GoPro Mount
...pro mount
3dexport
cool magnetic mount for gopro. allows you to mount the camera on flat metal surfaces and get exclusive shots.
turbosquid
$5

Stone Mount
...ty free 3d model stone mount for download as ma, obj, and fbx on turbosquid: 3d models for games, architecture, videos. (1370306)
All
turbosquid
$20

all
... available on turbo squid, the world's leading provider of digital 3d models for visualization, films, television, and games.
turbosquid
$5
all
... available on turbo squid, the world's leading provider of digital 3d models for visualization, films, television, and games.
design_connected
$29

All-Two
...all-two
designconnected
bonaldo all-two computer generated 3d model. designed by bicego, sergio.
design_connected
$29

All-One
...all-one
designconnected
bonaldo all-one computer generated 3d model. designed by bicego, sergio.
design_connected
$16
Holly All
...holly all
designconnected
serralunga holly all computer generated 3d model. designed by starck, philippe.
3d_export
$15

all terrain
...all terrain
3dexport
turbosquid
$29

Holly All
... available on turbo squid, the world's leading provider of digital 3d models for visualization, films, television, and games.
turbosquid
$19

Fireplace (All)
... available on turbo squid, the world's leading provider of digital 3d models for visualization, films, television, and games.
turbosquid
$19

Fireplace (All)
... available on turbo squid, the world's leading provider of digital 3d models for visualization, films, television, and games.
turbosquid
$19

Fireplace (All)
... available on turbo squid, the world's leading provider of digital 3d models for visualization, films, television, and games.