Thingiverse
Bed Leveling Knob Anet A8 by BuildJustForFun
by Thingiverse
Last crawled date: 4 years, 4 months ago
After printing some Bed Leveling Knobs from others, I was dissatisfied. All Bed Leveling Knobs are not fitting the wing nut. I Have make this small helping Thing new with extra space.
If you have a problem or an improvement for this thing please let me now it.
2019-01-23 Update:
Manual for the Knob:
First read the Manual completely because in one installation of the Knob is no way back.
Installation 1
Print the four Knob´s and the Spring Houlder
Take of the wing nut.
Unscrew all of the long Bed Screw´s clockwise bit by bit to prevent that the sping will bend the Screw´s. (Pic 001)
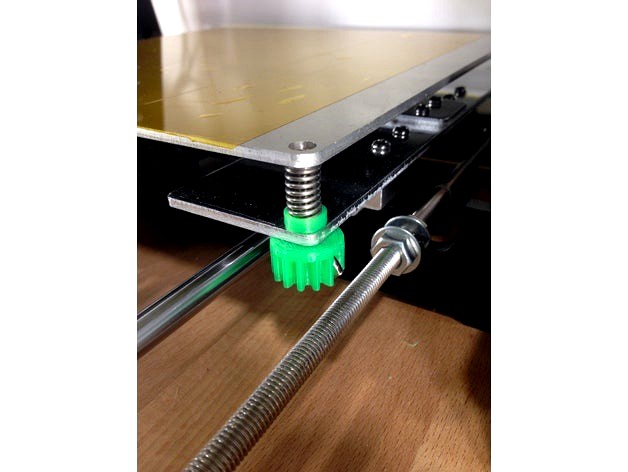
Install the Spring, Spring Houlder (Pic 002) and screw in the Screw´s clockwise bit by bit on the Bed Support (Pic 003), to prevent that the sping will bend the Screw´s.
Install the Knob with the Wing Nut (Pic 004)
Bedleveling with an Screwdriver (like before)
Finish
Installation 2 (No way back)
Print the four Knob´s and the Springhoulder
Take of the wing nut.
Unscrew all of the long Bed Screw´s clockwise bit by bit to prevent that the sping will bend the Screw´s.(Pic 001)
Now you need four nut´s to fix the Screw´s on the Hodbed (usually there are some left)(Pic 005)
Install the Spring, Spring Houlder on the Screw (Pic 006)
With the small Screwdriver (From the Anet Tools) you eleminate the thread on the Bed Support.(Pic 007 till Pic 009)
Install the Hotbed on the Bed Support.(Pic 010)
Squeeze the Hotbed and the Bed support and Install the Knob with the Wing Nut.(Pic 011)
Bedleveling with the Knob´s(no need for tools anymore)
Finish
Nach den Ausdruck von einigen Druckbetteinstellungsknöpfen von anderen war ich enttäuscht. In alle passte die Flügelmutter nicht richtig rein. Also habe ich das kleine Hilfsteil, mit extra Platz, selbst entworfen
Schreibt wenn es noch was zu verbessern gibt.
Update:
Spring support
Federführung
If you have a problem or an improvement for this thing please let me now it.
2019-01-23 Update:
Manual for the Knob:
First read the Manual completely because in one installation of the Knob is no way back.
Installation 1
Print the four Knob´s and the Spring Houlder
Take of the wing nut.
Unscrew all of the long Bed Screw´s clockwise bit by bit to prevent that the sping will bend the Screw´s. (Pic 001)
Install the Spring, Spring Houlder (Pic 002) and screw in the Screw´s clockwise bit by bit on the Bed Support (Pic 003), to prevent that the sping will bend the Screw´s.
Install the Knob with the Wing Nut (Pic 004)
Bedleveling with an Screwdriver (like before)
Finish
Installation 2 (No way back)
Print the four Knob´s and the Springhoulder
Take of the wing nut.
Unscrew all of the long Bed Screw´s clockwise bit by bit to prevent that the sping will bend the Screw´s.(Pic 001)
Now you need four nut´s to fix the Screw´s on the Hodbed (usually there are some left)(Pic 005)
Install the Spring, Spring Houlder on the Screw (Pic 006)
With the small Screwdriver (From the Anet Tools) you eleminate the thread on the Bed Support.(Pic 007 till Pic 009)
Install the Hotbed on the Bed Support.(Pic 010)
Squeeze the Hotbed and the Bed support and Install the Knob with the Wing Nut.(Pic 011)
Bedleveling with the Knob´s(no need for tools anymore)
Finish
Nach den Ausdruck von einigen Druckbetteinstellungsknöpfen von anderen war ich enttäuscht. In alle passte die Flügelmutter nicht richtig rein. Also habe ich das kleine Hilfsteil, mit extra Platz, selbst entworfen
Schreibt wenn es noch was zu verbessern gibt.
Update:
Spring support
Federführung