Thingiverse

Bed Alignment Jig by kmxsoft
by Thingiverse
Last crawled date: 3 years, 1 month ago
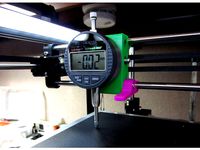
This thing provides simple and very easy-to-use bed levelling. Loosely based upon ideas presented in thing 62553 ('The Calibrator'), this design uses a Digital Dial Indicator such as this:
https://www.amazon.co.uk/gp/product/B01H035DRO/ref=oh_aui_detailpage_o09_s00?ie=UTF8&psc=1
Also available from:
http://www.harborfreight.com/1-inch-sae-metric-digital-indicator-93295.html
Note there are a range of prices for these digital indicators - we don't need supreme accuracy so expect to pay in the region of $20-$30.
You can interface the dial indicator via a USB connection according to the following instgructions:
https://hackaday.io/project/511-digital-dial-indicator-cnc-surface-probe
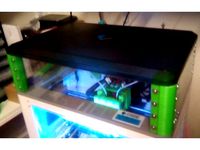
This thing should work on any 3D printer based upon the Makerbot 2 design.
In implementing this thing I now have a very simple means of adjusting bed levelling. No more moving the head around and trying to gauge height by sliding a piece of paper under the nozzle - just set one height point then move this thing around to set the same height across the table. Bed levelling takes just 2 minutes and the result is a bed which is levelled more accurately than using a piece of paper.
In order to create this thing you'll need some extra's:
4x N38 Round Rare Earth Neodymium Magnets 12mm x 3mm With 3mm hole.
20x M3 Flanged Rivnuts (sometimes called 'nutserts').
4x M3 10mm countersunk bolts.
2x M3 20mm bolts.
1x M6 50mm bolt and nut.
If you don't have rivnuts you can print the sled 'with nuts', and use M3 nuts instead. Rivnuts are definitely better though.
ebay is your friend if you need any of the above.
Using the thing is straightforward. Note that we aren't interested in setting a particular height - we just need all points on the bed to be the same height:
1) Set to home position - bed raised, nozzles in north-east corner.
2) Set bed height in one corner using traditional paper-between-nozzle-and-bed method. This gives you the reference height used by all other levellings points.
3) Slide the nozzles to the right (maximum X).
4) Slip this thing onto the rails - it will hold firmly with the rare earth magnets but can be slid on the X axis. Slide indicator over the point set in (2) above.
5) Zero the dial indicator.
6) Move dial indicator over each adjustment screw and wind bed up/down to set zero on the indicator.
That's it! Bed is levelled and you should get perfect prints!
https://www.amazon.co.uk/gp/product/B01H035DRO/ref=oh_aui_detailpage_o09_s00?ie=UTF8&psc=1
Also available from:
http://www.harborfreight.com/1-inch-sae-metric-digital-indicator-93295.html
Note there are a range of prices for these digital indicators - we don't need supreme accuracy so expect to pay in the region of $20-$30.
You can interface the dial indicator via a USB connection according to the following instgructions:
https://hackaday.io/project/511-digital-dial-indicator-cnc-surface-probe
This thing should work on any 3D printer based upon the Makerbot 2 design.
In implementing this thing I now have a very simple means of adjusting bed levelling. No more moving the head around and trying to gauge height by sliding a piece of paper under the nozzle - just set one height point then move this thing around to set the same height across the table. Bed levelling takes just 2 minutes and the result is a bed which is levelled more accurately than using a piece of paper.
In order to create this thing you'll need some extra's:
4x N38 Round Rare Earth Neodymium Magnets 12mm x 3mm With 3mm hole.
20x M3 Flanged Rivnuts (sometimes called 'nutserts').
4x M3 10mm countersunk bolts.
2x M3 20mm bolts.
1x M6 50mm bolt and nut.
If you don't have rivnuts you can print the sled 'with nuts', and use M3 nuts instead. Rivnuts are definitely better though.
ebay is your friend if you need any of the above.
Using the thing is straightforward. Note that we aren't interested in setting a particular height - we just need all points on the bed to be the same height:
1) Set to home position - bed raised, nozzles in north-east corner.
2) Set bed height in one corner using traditional paper-between-nozzle-and-bed method. This gives you the reference height used by all other levellings points.
3) Slide the nozzles to the right (maximum X).
4) Slip this thing onto the rails - it will hold firmly with the rare earth magnets but can be slid on the X axis. Slide indicator over the point set in (2) above.
5) Zero the dial indicator.
6) Move dial indicator over each adjustment screw and wind bed up/down to set zero on the indicator.
That's it! Bed is levelled and you should get perfect prints!
Similar models
thingiverse
free

CreatBot DX Bed Alignment Jig by kmxsoft
...or may not work for printers which use a similar overhead gantry system such as the ultimaker 2 -...
thingiverse
free

Dial Indicator Holder For Bullseye Duct by kurelioglu
...sily level your bed perfectly. for fix this addon holder you need 4x m3 x 8-10mm hexagonal socket head cap screws and 4x m3 nuts.
thingiverse
free

Dial Indicator Mounting Block by PKitz
...lock to mount a dial indicator to be used to level the print bed. it is designed to be used on up to 10mm rods at a 50mm spacing.
thingiverse
free

Anycubic i3 Mega - Dial indicator mounting bracket by Rob5251
...s to flow and temp for the filament you're using. remember your first layer needs a slight amount of squish for bed adhesion.
thingiverse
free

Ender 3 Pro Bed Leveling Dial Indicator Mount - Caliper
...e ii, the bolt used is a 1/4-20 1" length.
it is a really easy print: no supports-60mm/s- .2mm layer height
happy printing!
thingiverse
free

Machinist Dial Holder Bed Levelling 3d Printer Anet ET4+ by TheDoctorMD
...le steppers for move the bed or the nozzle to different points.
required: m10x2.5 bolt + nut + circle to fix the dial indicator.
thingiverse
free

Prusa i3 Dial Indicator Mount by henryarnold
...d and do you normal z height adjustment. all four corners are level so no check should be needed other than the middle of the bed
thingiverse
free
HyperCube Dial Indicator Mount by henryarnold
...dial indicator i used although you can buy a similar unit from harbor freight.https://www.amazon.com and then search for "b01g9k8u5g"...
thingiverse
free

Duplicator v2.1 Dial Indicator Mount by ThatNerdChannel
... the dial indicator to the mount.
if your using a stock fan you should be able to use this mount and your fan at the same time :)
thingiverse
free

Ender 3 v2 Dial indicator mount by StruikRover
...on.
notes
no auto home crash
no need for dissemble the mount
enjoy your flat bed :)
please note this designed for ender 3 v2
Kmxsoft
thingiverse
free

E3D Dual Mount by kmxsoft
...e3d dual mount by kmxsoft
thingiverse
see pdf file.
thingiverse
free
FlashForge Dreamer Hood by kmxsoft
...flashforge dreamer hood by kmxsoft
thingiverse
see pdf file.
thingiverse
free

Metric Nut Spinners by kmxsoft
... printed projects to fasten items together.
these mini nut spinners make it very easy to add nuts and perform initial tightening.
thingiverse
free

Tall Corner Stand by kmxsoft
....
note that these jigs are designed to accomodate m3 pushfit flange rivnuts, making attachment of external accessories very easy.
thingiverse
free

Vacuum Hose Connector by kmxsoft
...e locator for cutting the large hole thru which extract passes - that locator can easily be snipped off to make the airway clear.
thingiverse
free

Prusa I3 Single/Dual E3D Mount by kmxsoft
...ingle or dual mount for e3d nozzle assemblies for the prusa i3 printer.
full details are provided in the encvlosed pdf document.
thingiverse
free

6mm Socket Stand by kmxsoft
...thout these screws the spigots break off too easily.
note that m3 x 16mm grub screws can be replaced by m3 x 16mm cap head bolts.
thingiverse
free

Screw Claws by kmxsoft
...n for building these things - they are designed to bend/warp in use, and if the filament won't warp then breakage will occur.
thingiverse
free

100mm Vacuum Connector by kmxsoft
...-bushes/0505274/
note that the m3 bolts will need to be glued into the m3 rivnuts, which are passed through the 3d printed knobs.
thingiverse
free

Keyboard Retaining Clips by kmxsoft
...ou can fix these corner places to a desk using double-sided tape, so these can be removed without leaving unsightly holes behind.
Jig
turbosquid
$25

jig-saw_mid_SM
...uid
royalty free 3d model jig-saw_mid_sm for download as obj on turbosquid: 3d models for games, architecture, videos. (1244761)
turbosquid
$20
jig-saw_low
...osquid
royalty free 3d model jig-saw_low for download as obj on turbosquid: 3d models for games, architecture, videos. (1244760)
turbosquid
$10

jig-saw_hi
...bosquid
royalty free 3d model jig-saw_hi for download as obj on turbosquid: 3d models for games, architecture, videos. (1244757)
turbosquid
$7

Jig Armchair
...squid
royalty free 3d model jig armchair for download as max on turbosquid: 3d models for games, architecture, videos. (1648936)
turbosquid
$5
Jig Head
... available on turbo squid, the world's leading provider of digital 3d models for visualization, films, television, and games.
turbosquid
$5

Jig Head
... available on turbo squid, the world's leading provider of digital 3d models for visualization, films, television, and games.
turbosquid
$5
Jig Head
... available on turbo squid, the world's leading provider of digital 3d models for visualization, films, television, and games.
turbosquid
$5

Jig Head
... available on turbo squid, the world's leading provider of digital 3d models for visualization, films, television, and games.
turbosquid
$5

Jig Head
... available on turbo squid, the world's leading provider of digital 3d models for visualization, films, television, and games.
turbosquid
$5

Jig Tail
... available on turbo squid, the world's leading provider of digital 3d models for visualization, films, television, and games.
Alignment
3d_export
$5
orthodontic aligners
...aligners are plastic replicas of your teeth. wearing them puts gentle pressure on the teeth, ever-so-slightly repositioning them.
3d_export
$15
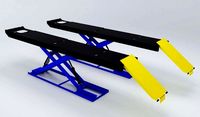
Wheel Alignment Lifts 3D Model
...heel alignment lifts
wheel alignment lifts 3d model download .c4d .max .obj .fbx .ma .lwo .3ds .3dm .stl poothian 108990 3dexport
3d_export
$99

Alignment Systems
...dimensions. -ideal for your auto service project. -scene for 3ds max 2012 and v-ray 2.0 !!!in file only 3d model without light!!!
turbosquid
$85

Film laser alignment cutting machine
...ng machine for download as 3ds, max, ige, obj, fbx, and sldas on turbosquid: 3d models for games, architecture, videos. (1423482)
3d_export
$159
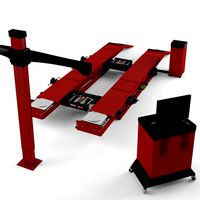
Alignment Systems with Car Lift
...dimensions. -ideal for your auto service project. -scene for 3ds max 2012 and v-ray 2.0 !!!in file only 3d model without light!!!
3d_export
$15

modular rpg game environment - low poly - pbr - gameready
...aligned). textures folder(all pbr textures) other formats modular pieces (dae obj stl fbx ) modular environment (dae obj stl fbx)
3d_export
$5

bookshelf
...g unit a well-thought-out and solid look. the shelves align perfectly with the frame to create a strong and uniform expression.
3d_ocean
$4

The Engineer
... to model: front view back view side view / both left and right with and without arm composite psd file of all views each imag...
3d_ocean
$25

Stationary Presentation Kit
...st to the biggest, all beautifully aligned and positioned and ready to render. here’s what the scene contains: 1. single-fold ...
vizpark
$15

HDRI Skydome 30
...images were manually adjusted and corrected with dust removal, alignment and chromatic abberation...
Bed
3ddd
$1

bed
...bed
3ddd
bed , постельное белье
bed
3ddd
$1

bed
...bed
3ddd
bed , постельное белье
bed
3ddd
$1

bed
...bed
3ddd
bed , постельное белье
bed
3ddd
$1

bed
...bed
3ddd
bed , постельное белье
bed
3ddd
$1

bed
...bed
3ddd
bed , постельное белье
bed
3ddd
$1

bed
...bed
3ddd
bed , постельное белье
bed
3ddd
free

bed
...bed
3ddd
bed , постельное белье
bed
3ddd
free

bed
...bed
3ddd
bed , постельное белье
bed
3ddd
$1

Bed
...bed
3ddd
bed , постельное белье , постель
bed
3d_export
$7

bed adairs bed
...rs bed
3dexport
bed adairs bed in modern style. if you want a smoother surface, please turn on turbosmooth in the modifier list.