Thingiverse
Beat Saber Handle for Vive Tracker - "Cotton Candy Cone" by cottoncandyenby
by Thingiverse
Last crawled date: 3 years ago
Cotton Candy Cone
Lightweight Beat Saber Handle for Vive Tracker
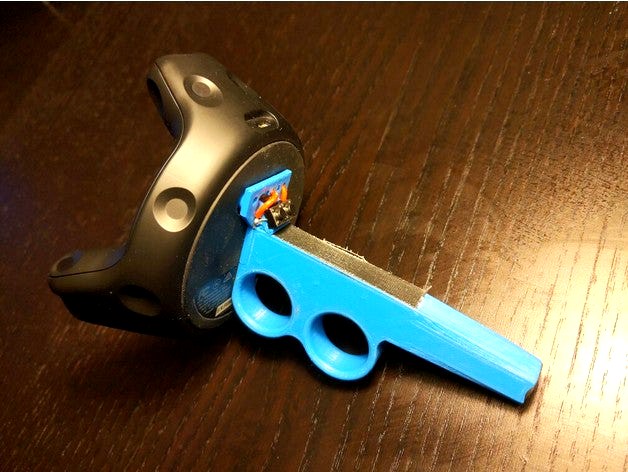
The Cotton Candy Cone is a lightweight handle for using Vive Trackers as controllers in Beat Saber. The finger loops allow faster movement, more range of motion, and less hand and wrist strain than all grips on standard controllers.
The name "Cotton Candy Cone" is because it's light, and because my username is cottoncandy.
Controller
Weight
Notes
Valve Index Knuckles
194g
Vive Tracker with one-hand camera grip (a common setup)
163g
(Vive Tracker: 88g. The grip I bought: 75g)
Cotton Candy Cone
123g
(Tracker: 88g. Bolt: 23g. Plastic as I printed it: 11g)
I made this handle because I wanted to be able to control the sabers with my fingers, instead of moving my wrist and entire hand, but the Index Controller and the Vive Trackers with a simple cylindrical camera grip both required so much grip strength to hold on to that I couldn't. The finger loops on the Cotton Candy Cone allow you to hold on to and control the sabers with only two fingers, increasing range of motion and allowing your hand to relax. This is most noticable on fast up and down sections, which I can do with my palm sideways without even moving my wrist, but is helpful in every direction. You don't even need a wrist strap since it's so secure, even when holding the controller loosely.
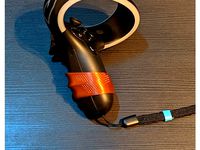
You will need 2 Vive Trackers obviously, and it comes with all the pros and cons of that (cost, battery life, slightly worse but adequate tracking quality). There are guides elsewhere on the internet for how to set up your Vive Trackers for use in Beat Saber. Note that you can connect additional buttons onto a vive tracker (see the POGO Pin Buttons section below), so if you're into that kind of project, the lack of buttons doesn't have to be a downside.
You will also need 4" bolts to attach the handle to the tracker's ¼" camera mount. I used these partially threaded bolts from McMaster-Carr, but I've included bolt-4inch.stl if you want to try to print them.
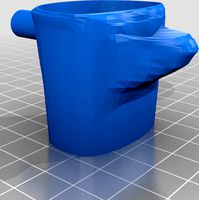
Print the cotton-candy-cone-handle.stl and cotton-candy-cone-spacer.stl files.
Printing
Print the handle on its side. I recommend using support for the stabilizing pin, but not inside the bolt hole. In Cura, "Support Placement: Touching Buildplate" works well. You'll have to cut/sand the support off the fillets on the bottom, but you should sand the finger holes anyway because your fingers will be spinning in there a lot and you want them to be as smooth as possible.
I personally printed with PETG because I like the feel of it more than PLA, and printed with only 3 walls, 4 top/bottom layers, and 10% infill because weight matters more than print quality or strength.
I also added some tape on top to give my thumb a little more grip.
The spacer can be printed flat with no support.
POGO Pin Buttons
The Vive Tracker contains 6 "POGO pins" for connecting to accessories. I used these to wire up a trigger button and menu button, so I could navigate menus without reaching to the button on the front of the tracker. It's nice to have, but is not necessary.
You'll need buttons (I used these because they're small) and a bit of soldering. If you use buttons of the same dimensions as mine, they'll fit nicely into cotton-candy-cone-pogo-adapter.stl, which replaces the spacer. If you use a different size, you may need to change that design to fit your needs.
Sending a button press on the Vive Tracker is as simple as connecting the right pin to ground. Wire Ground (pin 2) to both buttons, Trigger (pin 4) to one button, and Menu (pin 6) to the other. I filled the pocket that makes contact with the POGO pin with solder to prevent the wire from slipping back out of the hole and to ensure a good connection, and then super glued the buttons and wires to the plastic.
To simplify things, you can skip the menu button (you can get the pause menu by hitting the system button on the Vive Tracker twice), or only wire buttons on one hand.
You can read more technical details about the Vive Tracker in the Vive Tracker Developer Guidelines.
Remixing
Please remix this concept, with attribution to this original post. I'd love to see what improvements people can come up with. Some changes I think would be good:
Make it shorter. I chose 4" bolts because I assumed I would need to fit the whole hand, but the index and middle fingers provide so much control on their own that the long tail of the handle just gets in the way, and it even limits range of motion a little bit. I think 3" or 3¼" bolts would probably be the right length, allowing the ring finger to still provide support and stabilization, allowing more range of motion in some directions, and cutting another 7 grams or so off the weight.
Make different sizes. The finger holes are 20mm inner diameter so they can spin freely on my average-sized fingers, but there are a lot of different sizes and shapes of hands out there. Simply scaling the model won't work, so new sizes will require editing the CAD model.
Add a vibrator. I experimented a little with adding a vibrator for the haptic feedback when cutting blocks, but decided that feature wasn't worth the effort. It might be worth it to you. I believe the vibration is powered and controlled by a 3 volt signal on pin 1, but you will need to do your own experimentation.
Support the upcoming Tundra Tracker. It looks like it will be much lighter than the Vive Tracker. It's still being designed, (It'll be released mid to late 2021. This is being written in Feb 2021.) but it will probably have a backwards compatible camera mount, like the Vive Tracker. But the real potential will be to remove the camera mount and heavy bolt, and screw directly into the tracker like another swappable base plate, cutting even more weight.
I've included the FreeCAD .FCStd file in case that makes it easier for you, but I'm new to CAD so I make no promises as to how usable it is.
Tips are accepted.
Lightweight Beat Saber Handle for Vive Tracker
The Cotton Candy Cone is a lightweight handle for using Vive Trackers as controllers in Beat Saber. The finger loops allow faster movement, more range of motion, and less hand and wrist strain than all grips on standard controllers.
The name "Cotton Candy Cone" is because it's light, and because my username is cottoncandy.
Controller
Weight
Notes
Valve Index Knuckles
194g
Vive Tracker with one-hand camera grip (a common setup)
163g
(Vive Tracker: 88g. The grip I bought: 75g)
Cotton Candy Cone
123g
(Tracker: 88g. Bolt: 23g. Plastic as I printed it: 11g)
I made this handle because I wanted to be able to control the sabers with my fingers, instead of moving my wrist and entire hand, but the Index Controller and the Vive Trackers with a simple cylindrical camera grip both required so much grip strength to hold on to that I couldn't. The finger loops on the Cotton Candy Cone allow you to hold on to and control the sabers with only two fingers, increasing range of motion and allowing your hand to relax. This is most noticable on fast up and down sections, which I can do with my palm sideways without even moving my wrist, but is helpful in every direction. You don't even need a wrist strap since it's so secure, even when holding the controller loosely.
You will need 2 Vive Trackers obviously, and it comes with all the pros and cons of that (cost, battery life, slightly worse but adequate tracking quality). There are guides elsewhere on the internet for how to set up your Vive Trackers for use in Beat Saber. Note that you can connect additional buttons onto a vive tracker (see the POGO Pin Buttons section below), so if you're into that kind of project, the lack of buttons doesn't have to be a downside.
You will also need 4" bolts to attach the handle to the tracker's ¼" camera mount. I used these partially threaded bolts from McMaster-Carr, but I've included bolt-4inch.stl if you want to try to print them.
Print the cotton-candy-cone-handle.stl and cotton-candy-cone-spacer.stl files.
Printing
Print the handle on its side. I recommend using support for the stabilizing pin, but not inside the bolt hole. In Cura, "Support Placement: Touching Buildplate" works well. You'll have to cut/sand the support off the fillets on the bottom, but you should sand the finger holes anyway because your fingers will be spinning in there a lot and you want them to be as smooth as possible.
I personally printed with PETG because I like the feel of it more than PLA, and printed with only 3 walls, 4 top/bottom layers, and 10% infill because weight matters more than print quality or strength.
I also added some tape on top to give my thumb a little more grip.
The spacer can be printed flat with no support.
POGO Pin Buttons
The Vive Tracker contains 6 "POGO pins" for connecting to accessories. I used these to wire up a trigger button and menu button, so I could navigate menus without reaching to the button on the front of the tracker. It's nice to have, but is not necessary.
You'll need buttons (I used these because they're small) and a bit of soldering. If you use buttons of the same dimensions as mine, they'll fit nicely into cotton-candy-cone-pogo-adapter.stl, which replaces the spacer. If you use a different size, you may need to change that design to fit your needs.
Sending a button press on the Vive Tracker is as simple as connecting the right pin to ground. Wire Ground (pin 2) to both buttons, Trigger (pin 4) to one button, and Menu (pin 6) to the other. I filled the pocket that makes contact with the POGO pin with solder to prevent the wire from slipping back out of the hole and to ensure a good connection, and then super glued the buttons and wires to the plastic.
To simplify things, you can skip the menu button (you can get the pause menu by hitting the system button on the Vive Tracker twice), or only wire buttons on one hand.
You can read more technical details about the Vive Tracker in the Vive Tracker Developer Guidelines.
Remixing
Please remix this concept, with attribution to this original post. I'd love to see what improvements people can come up with. Some changes I think would be good:
Make it shorter. I chose 4" bolts because I assumed I would need to fit the whole hand, but the index and middle fingers provide so much control on their own that the long tail of the handle just gets in the way, and it even limits range of motion a little bit. I think 3" or 3¼" bolts would probably be the right length, allowing the ring finger to still provide support and stabilization, allowing more range of motion in some directions, and cutting another 7 grams or so off the weight.
Make different sizes. The finger holes are 20mm inner diameter so they can spin freely on my average-sized fingers, but there are a lot of different sizes and shapes of hands out there. Simply scaling the model won't work, so new sizes will require editing the CAD model.
Add a vibrator. I experimented a little with adding a vibrator for the haptic feedback when cutting blocks, but decided that feature wasn't worth the effort. It might be worth it to you. I believe the vibration is powered and controlled by a 3 volt signal on pin 1, but you will need to do your own experimentation.
Support the upcoming Tundra Tracker. It looks like it will be much lighter than the Vive Tracker. It's still being designed, (It'll be released mid to late 2021. This is being written in Feb 2021.) but it will probably have a backwards compatible camera mount, like the Vive Tracker. But the real potential will be to remove the camera mount and heavy bolt, and screw directly into the tracker like another swappable base plate, cutting even more weight.
I've included the FreeCAD .FCStd file in case that makes it easier for you, but I'm new to CAD so I make no promises as to how usable it is.
Tips are accepted.
Similar models
thingiverse
free

HTV Vive - Menu Button Guard by shaztech
...reated a guard.
to install only heat a little to give it the controller curve and apply 2 sided 3m tape (or glue if you want to).
thingiverse
free
Handles for the HTC VIVE COSMOS Controller by KusiJMZ
...troller to ensure a tight fit.
the extra grip version has rather pointy bumps, but offers maximum grip for games like beat saber.
thingiverse
free
HTC Vive - Katana double sided grip (for Beat Saber) by PierreJean01
...fuse the 3 parts together and to add some grip to the... grip, even with sweaty hands. yeah, epoxy is awesome for that purpose :)
thingiverse
free
Vive wand controller beat saber grip by ZellNanashi
...he ability to "flick" on the pivot. add almost no weight. will need either some sanding or a clear coat for smoothness.
thingiverse
free
Retaining Pin for Vive Sword Handle by BManx2000
...the controller will come loose during use (but you should still wear the wrist strap).
update: added pin with larger finger ring.
thingiverse
free

Vive Tracker + Webcam mount by dectoo
... stand if you want.
while printing the handle i paused the printer at layer 264 and dropped in the m3 nut and resumed the print.
thingiverse
free

Beat Saber Vive pommel attachment by Hooi
...ded (to make swinging easier on the hands.)
rubber bands are to stop wiggling. a thin foam insert would be better and less ugly.
thingiverse
free

Vive tracker wrist mount and ring buttons for DCS by kikaku
...bly. the ring/button are my design and the mount is a remix of this excellent remix: [https://www.thingiverse.com/thing:2370136].
thingiverse
free

Beat Saber Handles for Oculus Quest 2 by Guygasm
...y.
intending to cover handle in some form of overgrip tape. may try printing the exterior with "fuzzy skin" texturing.
thingiverse
free
Beat Saber Darth Maul Katana Remix by seawitch4
...s thing is sturdy, but heavy. i've also opted for gluing the ends, as there is a good deal of force exerted on those joints.
Vive
turbosquid
$40

HTC vive headset
...model htc vive headset for download as 3ds, max, obj, and fbx on turbosquid: 3d models for games, architecture, videos. (1174451)
turbosquid
$19
HTC Vive Lighthouse
... available on turbo squid, the world's leading provider of digital 3d models for visualization, films, television, and games.
turbosquid
$19

Natuzzi Re-Vive
... available on turbo squid, the world's leading provider of digital 3d models for visualization, films, television, and games.
turbosquid
$69
HTC Vive VR headset
... 3d model htc vive for download as ma, max, obj, fbx, and dae on turbosquid: 3d models for games, architecture, videos. (1242503)
turbosquid
$23
E3D -HTC Vive Tracker
...model e3d -htc vive tracker for download as max, obj, and c4d on turbosquid: 3d models for games, architecture, videos. (1190728)
turbosquid
$14
HTC Vive Joystick Rose
...htc vive joystick rose for download as max, 3ds, fbx, and obj on turbosquid: 3d models for games, architecture, videos. (1520802)
turbosquid
$14
HTC Vive Joystick Blue
...htc vive joystick blue for download as max, 3ds, fbx, and obj on turbosquid: 3d models for games, architecture, videos. (1520789)
turbosquid
$24

Loreal Elseve Shampoo Color Vive 400ml
...el loreal elseve shampoo color vive 400ml for download as max on turbosquid: 3d models for games, architecture, videos. (1400713)
3d_export
$15

VR HTC VIVE COSMOS GEAR REPAIR
... vive cosmos gear repair mechanical element for restoring the helmet mount stl format: rar archive print nylon or abs layer 0,1mm
3ddd
$1
плитка Vives - Special Pieces Titan
...литки.
ссылка на производителя:http://www.vivesceramica.com/en/products/floor-tiles/porcelain-clay/serie.html?sid=521
Tracker
turbosquid
$8

Tracker Knife
... model tracker knife for download as blend, dae, fbx, and obj on turbosquid: 3d models for games, architecture, videos. (1588741)
turbosquid
$1

Tracker Knife
... available on turbo squid, the world's leading provider of digital 3d models for visualization, films, television, and games.
3d_export
$5

solar tracker
...aterial : -arduino uno -2 step motor with driver -4 ldr sensor -some wires -small photovoltaiic pannel -buzzer -cnc laser machine
turbosquid
$23
E3D -HTC Vive Tracker
...model e3d -htc vive tracker for download as max, obj, and c4d on turbosquid: 3d models for games, architecture, videos. (1190728)
3d_export
$7

sci-fi injector or tracker
... can be tracker, use as you want. pbr 4k contain: blend (includes high poly)/ dae / fbx / obj / stl / glowing injector + box
3d_export
$10
Motion Tracker Aliens
...er out moving objects from stationary background and then displayed them on the monitor as a series of contours of probable loci.
3d_export
$5
single axis solar tracker stand
...single axis solar tracker stand
3dexport
3d_export
$60
grumman s-2 f tracker
...ining in service with other air arms into the 21st century. argentina and brazil are the last countries to still use the tracker.
3d_export
$19

Chevrolet tracker 2021
...pport ticket and request for that. we can convert 3d models to: .stl, .c4d, .obj, .fbx, .ma/.mb, .lwo/.lws, .3ds, .3dm, .dxf/.dwg
3d_export
$25
emergency power with solar tracker
...cker
3dexport
this is a tool used to distribute electricity during an emergency disaster, it is recommended to use sketchup 2019
Saber
3d_export
$5

saber
...saber
3dexport
saber
3d_export
$5

saber
...saber
3dexport
saber from the middle east of the sultans of the 15th century
3ddd
free

Table | Saber
...table | saber
3ddd
saber , трюмо
стол фирмы saber
turbosquid
$10
Saber
... free 3d model saber for download as blend, 3ds, obj, and fbx on turbosquid: 3d models for games, architecture, videos. (1659141)
turbosquid
$23
saber
... available on turbo squid, the world's leading provider of digital 3d models for visualization, films, television, and games.
turbosquid
$5

saber
... available on turbo squid, the world's leading provider of digital 3d models for visualization, films, television, and games.
turbosquid
free
Saber
... available on turbo squid, the world's leading provider of digital 3d models for visualization, films, television, and games.
turbosquid
free

Saber
... available on turbo squid, the world's leading provider of digital 3d models for visualization, films, television, and games.
3d_export
$5
Saber 3D Model
...saber 3d model
3dexport
lightsaber saber light
saber 3d model dimon3ds 50057 3dexport
3d_export
$12

Green fire saber
...green fire saber
3dexport
fantasy green fire saber
Beat
3ddd
$1

beats
...beats
3ddd
наушники
beats headphones
3ddd
$1
Beats Audio
...beats audio
3ddd
наушники
наушники beats audio
3ddd
$1

Beat Floor
...
tom dixon , beat
http://www.tomdixon.net/uk/lighting/beat-floor-black-eu.html
3ddd
$1
Beats Pill Speakers
...beats pill speakers
3ddd
beats pill , колонки
beats pill speakers
design_connected
$16

Beat Lights
...beat lights
designconnected
tom dixon beat lights computer generated 3d model. designed by dixon, tom.
design_connected
$11

Beat Vessels
...beat vessels
designconnected
tom dixon beat vessels computer generated 3d model. designed by dixon, tom.
turbosquid
$30

Beats Pill
...bosquid
royalty free 3d model beats pill for download as max on turbosquid: 3d models for games, architecture, videos. (1481134)
turbosquid
$1

Beating heart
...id
royalty free 3d model beating heart for download as blend on turbosquid: 3d models for games, architecture, videos. (1357586)
turbosquid
$10

beats headphone
...alty free 3d model beats headphone for download as ma and obj on turbosquid: 3d models for games, architecture, videos. (1444888)
turbosquid
$10

Hatria Beat
...y free 3d model hatria beat for download as max, fbx, and obj on turbosquid: 3d models for games, architecture, videos. (1655524)
Cotton
3d_export
$10

cotton
...cotton
3dexport
cotton for bouquets.
3d_export
$15

Cotton Candy
...cotton candy
3dexport
cotton candy made with the hair card workflow, the color are edited in the hyper shade in maya
3d_export
$15
Cotton plantation
...cotton plantation
3dexport
nine low poly cotton bushes. each bush is around 5500 polygons (all quads) , and 6500 vertices
turbosquid
$1

Cotton Mask
...osquid
royalty free 3d model cotton mask for download as c4d on turbosquid: 3d models for games, architecture, videos. (1615033)
3ddd
$1
диван COTTON-CLUB
...диван cotton-club
3ddd
диван cotton-club,с текстурами
turbosquid
$120

cotton candy
...free 3d model cotton candy for download as , sldpr, and sldas on turbosquid: 3d models for games, architecture, videos. (1290830)
3d_ocean
$3

Cotton seamles texture
...cotton seamles texture
3docean
cotton seamles texture for your 3d models.
design_connected
$16
Cotton Canvas Curtains
...cotton canvas curtains
designconnected
cotton canvas curtains computer generated 3d model.
turbosquid
$45

cotton castle
... available on turbo squid, the world's leading provider of digital 3d models for visualization, films, television, and games.
turbosquid
$6

Cotton Buds
... available on turbo squid, the world's leading provider of digital 3d models for visualization, films, television, and games.
Candy
3ddd
$1
Candy
...candy
3ddd
candy , kandi
candy d50xh120
3ddd
$1
Candy
...candy
3ddd
candy , микроволновка
микроволновая печь candy.
3ddd
$1

Candy
...candy
3ddd
candy
d50xh150
3ddd
$1

Candy
...candy
3ddd
candy
d50xh80
archibase_planet
free
Candy
...candy
archibase planet
candy sweet bonbon
candy - 3d model (*.gsm+*.3ds) for interior 3d visualization.
turbosquid
$6

Candies Text with Candy Effect
...es text with candy effect for download as obj, blend, and dae on turbosquid: 3d models for games, architecture, videos. (1512927)
3d_ocean
$25

candy house
...candy house
3docean
candy fantasy house
candy,house,fantasy
3d_ocean
$3

sweet candy
...sweet candy
3docean
candy chocolate glass strawberry
sweet candy
3ddd
$1

Candy bar
...candy bar
3ddd
candy bar , свадебный декор
candy bar
turbosquid
$2

candys
...
turbosquid
royalty free 3d model candys for download as fbx on turbosquid: 3d models for games, architecture, videos. (1670004)
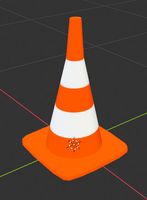
Cone
3d_ocean
$1

Cone
... 2015, compatible with maya 2014. only quads : 128 quads (256 tris) uv layout and texture. 3d model in .fbx, .mb and .obj format.
3d_ocean
$2

Traffic cone
...traffic cone
3docean
cone traffic
a lowpoly traffic cone model .
3d_ocean
$4
Traffic Cone
...vision to increase render detail and to smooth geometry. the object has the materials defined, but no uv map or textures maps....
3d_ocean
$3
Traffic Cones
...cones, great for game enviroments. low poly (224 poly – 212 verts) (cone 1) low poly (259 poly – 230 verts) (cone 2) 1024×1024...
3d_ocean
$2

Underconstruction Cone
...underconstruction cone
3docean
cone construction road traffic
3d construction cone
3ddd
$1
Cone
...cone
3ddd
лепнина
3d_export
$5
cone knob
...cone knob
3dexport
cone knob
3d_export
$5

cone handle
...cone handle
3dexport
cone handle
3d_export
$5

traffic cone
...traffic cone
3dexport
traffic cone
3d_export
$5
road cone
...road cone
3dexport
road cone
Handle
archibase_planet
free
Handle
...handle
archibase planet
handle furniture handle
handle 1 - 3d model (*.gsm+*.3ds) for interior 3d visualization.
archibase_planet
free
Handle
...handle
archibase planet
handle furniture handle
handle 5 - 3d model (*.gsm+*.3ds) for interior 3d visualization.
archibase_planet
free
Handle
...handle
archibase planet
handle furniture handle
handle 3 - 3d model (*.gsm+*.3ds) for interior 3d visualization.
archibase_planet
free
Handle
...handle
archibase planet
handle furniture handle
handle 6 - 3d model (*.gsm+*.3ds) for interior 3d visualization.
archibase_planet
free
Handle
...handle
archibase planet
handle furniture handle
handle 4 - 3d model (*.gsm+*.3ds) for interior 3d visualization.
archibase_planet
free
Handle
...handle
archibase planet
handle furniture handle
handle 2 - 3d model (*.gsm+*.3ds) for interior 3d visualization.
archibase_planet
free
Handle
...handle
archibase planet
handle furniture handle knob
handle 2 n140814 - 3d model (*.gsm+*.3ds) for interior 3d visualization.
archibase_planet
free
Handle
...handle
archibase planet
handle door knob door-handle
handle n110413 - 3d model (*.gsm+*.3ds) for interior 3d visualization.
archibase_planet
free
Handle
...handle
archibase planet
door-handle handle door-knob
handle n070209 - 3d model (*.gsm+*.3ds) for interior 3d visualization.
archibase_planet
free
Handle
...handle
archibase planet
door-handle handle door-knob
handle n270309 - 3d model (*.gsm+*.3ds) for interior 3d visualization.