Thingiverse

BazBot V2 by MrBaz
by Thingiverse
Last crawled date: 4 years ago
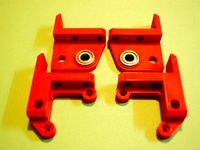
UPDATE (11 Sep 2016): Uploaded some new pictures. I took apart the printer to rebuild it with the new motor brackets, replaced the astrosyn dampers with cork gaskets (the printer is no louder than it was with the astrosyn dampers), integrate the MDF base (also has rubber feet underneath), and clean up the wiring. I also took another quick video:https://youtu.be/67SkcQzqlso
UPDATE (27 Aug 2016): Uploaded the BOM. It is a suggested listing of parts/sources. It is ~98% complete. There are odds and ends you may need to get.
This is Version 2 of the BazBot. I myself am in the middle if replacing all of my old V1 parts with V2 parts. I will upload an updated BOM list and sources soon. Sorry this has taken so long.
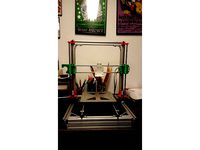
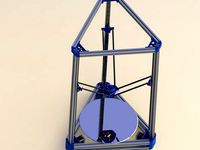
Build volume is same as last:
350mm diameter plate
~400mm max build height (I haven't tested this. At home, effector is at 440mm)
Here is a clip of the V1 printing some V2 parts: https://www.youtube.com/watch?v=n2VkAJE5SZQ
Another video: https://youtu.be/zdjuW7R2pAE
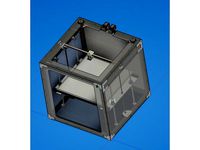
I added some thermal IR pictures demonstrating how heatsinks on the NEMA motors work very well. The MDF lower build plate support does well as an insulator. The aluminum plate under the mirror does a good job of evenly distributing the heat from the Kapton heating element.
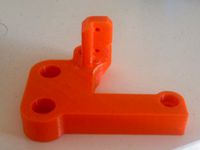
M3 screws are used to assemble the effector, attach the hall effect endstops, bolt the carriages to the linear rail carriages, attached NEMA motors, and bolt the linear rails to the aluminum extrusions. M5 screws are used to bolt aluminum extrusions to printed vertices, hold the plate holders in place, and attach extruder to the aluminum frame.
Future upgrades: 45* carbon fiber top supports that will GREATLY stiffen up the frame and prevent torsion.
UPDATE (27 Aug 2016): Uploaded the BOM. It is a suggested listing of parts/sources. It is ~98% complete. There are odds and ends you may need to get.
This is Version 2 of the BazBot. I myself am in the middle if replacing all of my old V1 parts with V2 parts. I will upload an updated BOM list and sources soon. Sorry this has taken so long.
Build volume is same as last:
350mm diameter plate
~400mm max build height (I haven't tested this. At home, effector is at 440mm)
Here is a clip of the V1 printing some V2 parts: https://www.youtube.com/watch?v=n2VkAJE5SZQ
Another video: https://youtu.be/zdjuW7R2pAE
I added some thermal IR pictures demonstrating how heatsinks on the NEMA motors work very well. The MDF lower build plate support does well as an insulator. The aluminum plate under the mirror does a good job of evenly distributing the heat from the Kapton heating element.
M3 screws are used to assemble the effector, attach the hall effect endstops, bolt the carriages to the linear rail carriages, attached NEMA motors, and bolt the linear rails to the aluminum extrusions. M5 screws are used to bolt aluminum extrusions to printed vertices, hold the plate holders in place, and attach extruder to the aluminum frame.
Future upgrades: 45* carbon fiber top supports that will GREATLY stiffen up the frame and prevent torsion.
Similar models
thingiverse
free
Prusa i3 MK2 Y-motor-holder for Astrosyn damper by Crunch3D
...3 mk2. now you can mount your astrosyn dampener on it -> http://www.ultibots.com/nema-17-damper-astrosyn-my17rmdamp/
have fun!
thingiverse
free
Prusa I3 BOX z-axis top and motor mount with FreeCAD files by omega776
...ance between smooth axis and lead screw. motor mounts designed for nema 17 damper - astrosyn my17rmdamp (only two diagonal holes)
thingiverse
free
10 Series Extrusion Z axis nema 17 motor mount by BDP1988
...xtrusion, but i ended up scoring enough extrusion to build a printer out of a scrap pile, and decided that i would put it to use.
thingiverse
free

Delta Carriage for the Duet3D PCB Smart Effector by quadcells
...ht were not needed.
since i made to be mounted to the gantry plate the carriage didn't need to be as thick. i shaved off 2mm.
thingiverse
free
Aluminum extrusion 2020 nema 17 motor holder by polpetras
...aluminum extrusion 2020 nema 17 motor holder by polpetras
thingiverse
aluminum extrusion 2020 nema 17 motor holder
thingiverse
free

Nema 17 stepper motor bracket by seajai1997
...nema 17 stepper motor bracket by seajai1997
thingiverse
bracket to attach extruder stepper motor to 20mm aluminum extrusion.
thingiverse
free
all metal watercooled 3d printer H type 500mm X 500mm with 3030 extrusions by divyamparmar
...th titan extruder for dual extrusion.
it uses a duet wifi board with tmc2600 drivers
will upload the finished photos of the build
thingiverse
free
Scotts 3D Scanner 8020 NEMA17 Mount Part 2 of 6 by scott90fzr
...inted bracket for attaching a nema 17 motor to 8020 aluminum extrusion.
this is part no 2 of 6 for the diy arduino scanner assy.
thingiverse
free

FlashForge Creator Pro 2016 Astrosyn damper Y axis motor mount by dbavatar
...unt by dbavatar
thingiverse
allows you to use astrosyn dampers on the y axis. should be stronger than the factory piece as well.
thingiverse
free
Motor D Sub - Nema 17 by polykyri
... to mount a motor to a standard makerslide carriage plate. the part has mounting patterns for nema 14 and nema 17 stepper motors.
Bazbot
thingiverse
free
BazBot by MrBaz
...se
update: i'm putting the finishing touches on all the v2 parts.
here is a teaser: https://youtu.be/cm84q_e7kei
stay tuned!
thingiverse
free

BazBot v3 Upgrades - Titan Extruder Mod by MrBaz
...d mount there is only 1 bracket. simply mirror this part in your slicer for the other side. designed to fit reprapdiscount lcd.
Mrbaz
thingiverse
free
BazBot by MrBaz
...se
update: i'm putting the finishing touches on all the v2 parts.
here is a teaser: https://youtu.be/cm84q_e7kei
stay tuned!
thingiverse
free

GUHOR Stick by MrBaz
...guhor stick by mrbaz
thingiverse
these are no longer made, so i have reverse engineered from an original.
***units are inches*
thingiverse
free

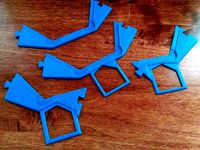
IKEA Lillabo joiner by MrBaz
...ikea lillabo joiner by mrbaz
thingiverse
simple plastic joiner to connect the ikea lillabo train set.
thingiverse
free
RC Plane Wing/Airfoil study #2 by MrBaz
...rc plane wing/airfoil study #2 by mrbaz
thingiverse
next iteration in testing. this one should perform much better.
thingiverse
free

FT Motor Mount by MrBaz
...for the ft blunt nose versa. i designed in 4* of down angle to help level out the plane without needing to dial in so much trim.
thingiverse
free

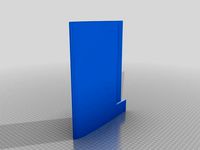
Thing-O-Matic Mirror Supports by MrBaz
...r supports by mrbaz
thingiverse
this is just a quick piece i had whipped together that would hold a mirror for my build surface.
thingiverse
free

IC3D Filament Spool Spacer by MrBaz
...rk well with my filament holder.
ordered some ic3d filament while it was on sale at newegg. trying it out right now as we speak.
thingiverse
free

MakerBot Spool Spacer by MrBaz
... in the picture. it is designed to sit as flush as possible.
note: this is designed for abs. your results may vary with pla.
thingiverse
free
Catan Borders - ABS by MrBaz
... don't fit at all, then feel free to just very slightly trim away little by little until you get the fit you are looking for.
thingiverse
free

YAFSH 31mm Short by MrBaz
...is top bracket is a shorter alternative to the original yafsh top piece that was a little too big to comfortably print on my tom.
V2
3d_export
$5

hammerhead v2
...hammerhead v2
3dexport
razer hammerhead v2 headphones, modeled in cinema 4d, render in corona
3d_export
$5

potato v2
...potato v2
3dexport
3ddd
$1

фонтан V2
...фонтан v2
3ddd
фонтан
фонтан, fantan, fontan
3ddd
$1

ODEA Giro V2
...aeco , кофемашина
габариты (ширина х высота х глубина): 290 x 385 x 370 мм
odea giro v2
3d_export
$5

Chair v2
...plugin. 1:1 scale. unit's centimeters. includes all scene, lighting, materials and textures. many file formats are available.
3d_export
$6
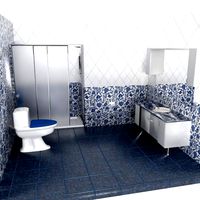
Bathroom v2
...udes the entire scenes, lightings, cameras, materials and textures. many file formats are available. images are in 4k resolution.
cg_studio
$45

As-350 V2 Helicopter3d model
...d model
cgstudio
.3ds .lwo .mb - as-350 v2 helicopter 3d model, royalty free license available, instant download after purchase.
3ddd
free
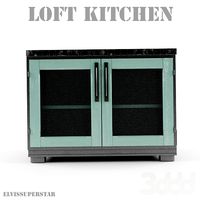
LOFT nightstand kitchen v2
...loft nightstand kitchen v2
3ddd
vray 3.0
3d_export
$8
sliding door vintage v2
...sliding door vintage v2
3dexport
vray+corona+fbx
3d_export
$95

Ambulance truck v2 3D Model
...ambulance truck v2 3d model
3dexport
fire emergency ambulance truck suv
ambulance truck v2 3d model be_fast 3896 3dexport