Thingiverse

Battle Tag Ubisoft by yerbabie27
by Thingiverse
Last crawled date: 3 years, 1 month ago
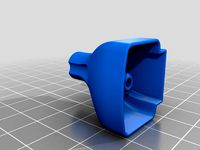
These parts allow for a replacement cable to be made for the Ubisoft Battle TAG gun to the vest.
Required is the 2 printed parts (The vest can use either the side or bottom part).
Plus the following parts: (Suggest eBay Search)
2 x 4 Wires Lead 616E 4P4C RJ9 Female Socket Telephone Connector Adapter
1 x RJ9 4P4C Plug Coiled Stretchy Telephone Handsets Cable Line Bla T3S6 or similar.
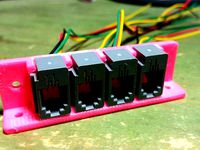
Please see pictures for wiring examples, test prior to sewing to vest, and ensure that all of your upgrades follow the same pattern so they are interchangeable.
VEST:
Cut cord leaving about 10-15 cm dangling outside of the vest, mark and cut a small hole in the vest for the plug, feed the cable end back into the vest and out of the new hole, by making a loop outside of the vest, then pull through. Do not push back into the vest before it is out of the hole. If using the side plug style insert the plug then solder. The bottom type can be wired up, then inserted into part. TEST!!, then push back in and sew to vest.
GUN:
Disassemble gun, desolder the touch pad from the wires when the connector goes in. Insert the new socket into the new 3D part (push IN, then DOWN, then insert the wires through the hole provided). Solder to gun wires and place the part into one side of the gun (There is no push button, it needs to be done prior to reassembly. Part reassemble and check. Finish assembly, including hand grip covers.
I recommend all connectors be soldered using heat shrink covers, in the case of the vest I used 2 layers, one per wire, and one larger tube to cover all.
If you have any questions shoot... no pun intended :)
Required is the 2 printed parts (The vest can use either the side or bottom part).
Plus the following parts: (Suggest eBay Search)
2 x 4 Wires Lead 616E 4P4C RJ9 Female Socket Telephone Connector Adapter
1 x RJ9 4P4C Plug Coiled Stretchy Telephone Handsets Cable Line Bla T3S6 or similar.
Please see pictures for wiring examples, test prior to sewing to vest, and ensure that all of your upgrades follow the same pattern so they are interchangeable.
VEST:
Cut cord leaving about 10-15 cm dangling outside of the vest, mark and cut a small hole in the vest for the plug, feed the cable end back into the vest and out of the new hole, by making a loop outside of the vest, then pull through. Do not push back into the vest before it is out of the hole. If using the side plug style insert the plug then solder. The bottom type can be wired up, then inserted into part. TEST!!, then push back in and sew to vest.
GUN:
Disassemble gun, desolder the touch pad from the wires when the connector goes in. Insert the new socket into the new 3D part (push IN, then DOWN, then insert the wires through the hole provided). Solder to gun wires and place the part into one side of the gun (There is no push button, it needs to be done prior to reassembly. Part reassemble and check. Finish assembly, including hand grip covers.
I recommend all connectors be soldered using heat shrink covers, in the case of the vest I used 2 layers, one per wire, and one larger tube to cover all.
If you have any questions shoot... no pun intended :)
Similar models
thingiverse
free
phone jack mounting tray RJ9 uxcell 616E 4P4C by averypierce
...41bfi8
dimensions come out perfect on my printer, but it's not calibrated perfectly so ymmv. mounting holes are 3mm diameter.
3dwarehouse
free

616E 4P4C Female RJ9 / RJ11
...616e 4p4c female rj9 / rj11
3dwarehouse
616e 4p4c female rj9 / rj11
grabcad
free

RJ9 Male Connector
...nnector
grabcad
1:1 3d model of a 4p4c rj9 male connector.
autodesk fusion 360 == .f3d
autodesk inventor == .zip
other == .step
thingiverse
free

4mm banana plug bullet connector male right angle cover by mc1457
...covers. you may need to tap them in gently.
print negative in black, positive in red. pla or abs is fine. fits a 3mm wire snugly.
thingiverse
free

HP DPS-600 Power supply cable passthrough by RsX
...r and soldered the wires directly onto the pcb.
this is a nice cover to close the big connector hole and pass through the cables.
thingiverse
free

Plug Cover Cable Port by jlambe15
...required, just drill a hole, insert the wires and put the two halves together. screw it into the wall and attach the plug cover.
thingiverse
free

T-Plug wire cover (male and female). by fairymoth
...ожно использовать маленькие кусочки 1.75 филамента для центровки.
половинки склеиваются между собой суперклеем или дихлорметаном.
thingiverse
free
Cover for 8 Pin Way Terminals Waterproof Electrical Wire Connector Plug by Stoyano
...r of the plug may need to be drilled to 2mm so the screw is easy to be screwed.
the cable is fixed to the cover with shrink tube.
thingiverse
free

Dyson charger plug shell by drors01
...shell by drors01 thingiverse dyson chargers for dc34 and similar models tend to develop bad connections near the end...
thingiverse
free

Flashforge wire hole plug by rkweber404
...s, i noticed that my wires and connector were burnt. i replaced the wires and soldered the new ones directly the connector pins.
Yerbabie27
thingiverse
free

iPhone 6 / 7 / 8 Plus Tripod Mount Plate by yerbabie27
...it. if you find it too tight then you can lightly sand. it has a hollow bottom to support mount locking if your head supports it.
thingiverse
free

2.4" TFT LCD WEMOS LOLIN Stand by yerbabie27
... flexable for future use, and it looks better / slimmer.
if you use this model, please buy me a coffee (sent me a tip) :)
thanks.
thingiverse
free

2.4" TFT LCD WEMOS LOLIN Stand by yerbabie27
... it's easy to add sensors and attach the usb cable.
if you use this model, please buy me a coffee (tip designer)
thanks, :)
Ubisoft
3d_export
$10

Hidden Blade 3D Model
...creed weapons armor melee cutting hidden blade knife game ubisoft hidden blade 3d model agent47cz 71970...
thingiverse
free

Ubisoft cup by mayi_ant
...ubisoft cup by mayi_ant
thingiverse
ubisoft cup
thingiverse
free
Ubisoft Coaster by cclp94
...ubisoft coaster by cclp94
thingiverse
a simple coaster with an ubisoft logo in the middle.
thingiverse
free
UBISOFT Inspired Fidget Spinner by Speculus_Services
... are crazy about fast spinning fidget, but this for the ubisoft gamers who are proud to host their favorite gaming company fidget
thingiverse
free

Battle Tag Ubisoft Battery Pack Pin by alexhogendoorn
... a t-blaster for ubisoft's (ill-fated) battle tag laser tag system. the original breaks easily. this is a simple replacement.
thingiverse
free

Battle Tag Ubisoft - TBase Scanner Button by alexhogendoorn
...ut you want to keep the main plate flat (180º to the bed) to maintain integrity. the slope of the button will be stepped...sadly.
thingiverse
free

InMoov Eyeball for Ubisoft Motion Tracking Camera Repaired
...it was solid. i didn't know if it fit into the eye bottom and needed to be fixed differently. but i will update if i print it
thingiverse
free
![[SSB4] Rayman by ThatOneGuyWhoDoesThings](/t/8891027.jpg)
[SSB4] Rayman by ThatOneGuyWhoDoesThings
...have no clue how this will stay together. copyright ubisoft ...
thingiverse
free

BUD from Grow Home by ThaumaturgeParrot
...of the robot from the game grow home by ubisoft ...
Tag
turbosquid
$1

dog tags
...id
royalty free 3d model dog tags for download as ma and obj on turbosquid: 3d models for games, architecture, videos. (1403450)
turbosquid
$19
Label Tag
...lty free 3d model label tag for download as max, 3ds, and obj on turbosquid: 3d models for games, architecture, videos. (1547671)
turbosquid
$2

Name Tag
... available on turbo squid, the world's leading provider of digital 3d models for visualization, films, television, and games.
turbosquid
$1

entrance tag
... available on turbo squid, the world's leading provider of digital 3d models for visualization, films, television, and games.
3ddd
$1
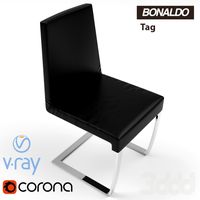
Стул BONALDO TAG
... файле модель с настроенными материалами для corona render.http://www.bonaldo.it/en/products/chairs/tag/mauro-lipparini
3d_ocean
$6
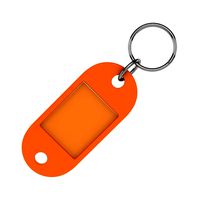
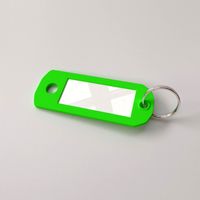
Key Tags
... of key tags. included id mask with png file without background only shadow. in easy way you can put yuor own logo or text on it.
3d_export
$15
Key Tag 3D Model
...older fob keyfob tagging split carabiner label name paper desk office stationery supplies
key tag 3d model firdz3d 88149 3dexport
3ddd
free

TAG stool design Ichiro Iwasaki
... ichiro iwasaki , tag
tag stool design ichiro iwasaki
поликов 72044
turbosquid
$100

TAG sur zone
... available on turbo squid, the world's leading provider of digital 3d models for visualization, films, television, and games.
3d_export
$200
sticker-automatic tagging machine
...
the device is a tagged device with four-axis robots, three-axis robotic arms and different labels. you are welcome to download.
Battle
3d_export
$5

Battle Hammer
...battle hammer
3dexport
battle war hammer, gameready
3d_export
free

Battle ax
...battle ax
3dexport
double-sided battle ax
3d_export
$5

the battle axe
...the battle axe
3dexport
the battle axe is a formidable combat that crushes light and medium armor.
3d_ocean
$5
Battle Axe
...an
army axe battle fight knight low lowpoly melee military poly sword war weapon
3d model battle axe by alexrazum v-ray materials
3d_export
free

battle scythe
...battle scythe
3dexport
turbosquid
free

battle machine
...ine
turbosquid
free 3d model battle machine for download as on turbosquid: 3d models for games, architecture, videos. (1245542)
turbosquid
free

battle axe
... axe
turbosquid
free 3d model battle axe for download as fbx on turbosquid: 3d models for games, architecture, videos. (1504027)
3d_export
$5

battle axe
...battle axe
3dexport
formats
turbosquid
$65

Battle Axe
...bosquid
royalty free 3d model battle axe for download as fbx on turbosquid: 3d models for games, architecture, videos. (1257697)
turbosquid
$65

Battle Sute
...quid
royalty free 3d model battle sute for download as blend on turbosquid: 3d models for games, architecture, videos. (1230145)