Thingiverse
BatteryPack_18650_3S3P by Sableix
by Thingiverse
Last crawled date: 4 years ago
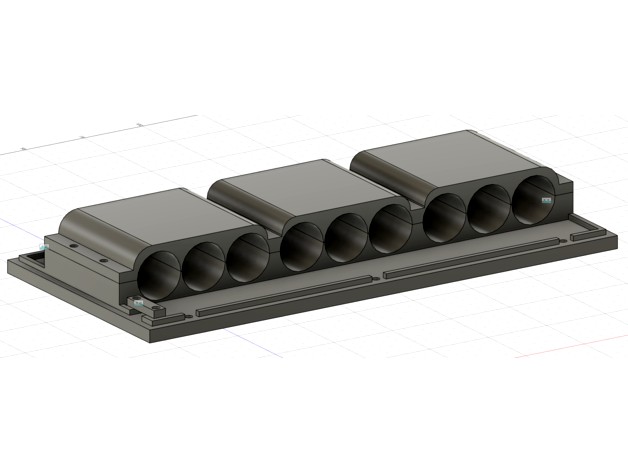
Batterypack 3S3P
This is a 18650 3S3P batterypack for various applications where you need 12V.
I am using it for my 300W DIY bluetooth speaker as a power source for example.
Size: 20cm x 9.5cm x 4cm
Parts
9x 18650
3x 10A BMS
2x WAGO clamps (5 slot)
1x XT60 connector female
0.8mm² wires
2.5mm² wires
ferrules
screws M3x10 (for plastic)
double-sided sticky tape
Instructions
Just print the four parts, put the batteries in place and screw the bridge above them.
Attach the 3 BMS with some two-side sticky tape on top of the bridge and then solder the wires to the BMS's in order, otherwise you might damage it.
For each 3 cell block solder/spot weld:
positive from first cell to negative of second cell
negative from second cell to positive from thrid cell
negative from first cell to 0v BMS
positive from first cell to 4.2v BMS
positive from second cell to 8.4v BMS
positive from third cell to 12.4v BMS
After soldering all three blocks, glue the two WAGO clamps in place with sticky tape also. Then solder wires to all negative outputs of the BMS's and crimp ferrules to their ends. Stick those crimped (negative) ends all into one of the WAGO clamps. The same with the positive output (to the other WAGO clamp!).
Then solder two wires (2.5mm²) to the XT60 female connector, crimp their other ends and attach them to the WAGO clamps.
Screw the pullguard over the outgoing wires and attach the upper case.
Disclaimer
Be carefull with 18650 batterys, they can be dangerous if not handled properly!
If you have any suggestions for design, functionality or safety improvements, feel free and leave a comment.
Hope the thing works for you :)