Thingiverse

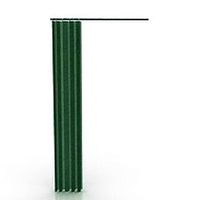
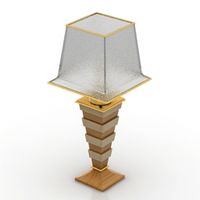
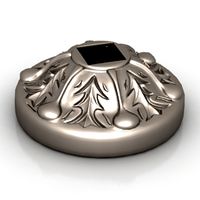
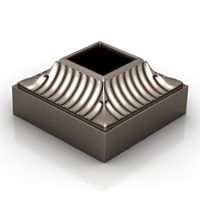
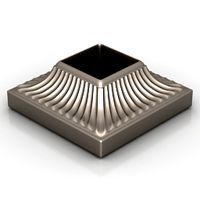
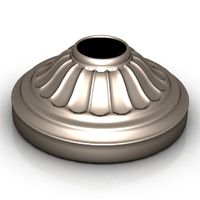
Base for Bemko's Honeycomb Lamp Shade by blacklabel775
by Thingiverse
Last crawled date: 3 years, 1 month ago
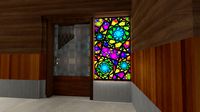
Designed a base for the Honeycomb Lamp Shade by Bemko (https://www.thingiverse.com/thing:4807723).
This is designed to use a Sonoff Mini, an ESP8266-based WiFi Relay, to control the lamp remotely over MQTT of HTTP, but can also be toggled manually via a momentary switch installed through the wall of the base. I flashed the Sonoff Mini w/ Tasmota firmware (https://tasmota.github.io/docs/) (https://acoptex.com/wp/basics-project-109e/), but it could be used with the standard Sonoff Firmware and their eWeLink app, ESP Home, or other ESP8266 projects or custom firmware. The design is made for an E12 bulb socket, but the "Bulb Holder Mount.stl" part could be easily modified in modeling software or simply by drilling new holes to line up with a bulb socket of your choosing. I am considering using an E12 smart bulb to add dimming and color/colortemp control, and would re-configure the sonoff to send commands to the smart bulb rather than toggling the relay that cuts power to the bulb.
Parts List (Amazon Affiliate Links):
The Dimensions of the base were made for the following parts and so are known to fit. Similar products may also work without modification to the design.
Bemko's Honeycomb Lamp Shade (https://www.thingiverse.com/thing:4807723)
Sonoff Mini V2 (V1 should fit fine as well) (https://www.amazon.com/gp/product/B0829V6JKG?ie=UTF8&psc=1&linkCode=sl1&tag=stephenmetzge-20&linkId=4c204c66ebd72829a982d0f811a88ca8&language=en_US&ref_=as_li_ss_tl)
Momentary Push Button Switch (https://www.amazon.com/gp/product/B0829V6JKG?ie=UTF8&psc=1&linkCode=sl1&tag=stephenmetzge-20&linkId=4c204c66ebd72829a982d0f811a88ca8&language=en_US&ref_=as_li_ss_tl)
E12 Mini Bulb (Candelabra Bulb) Holder Socket (https://www.amazon.com/gp/product/B0829V6JKG?ie=UTF8&psc=1&linkCode=sl1&tag=stephenmetzge-20&linkId=4c204c66ebd72829a982d0f811a88ca8&language=en_US&ref_=as_li_ss_tl)
18 AWG, 2 Conductor (18/2) Power Cable (5.5 mm outer diameter) (https://www.amazon.com/gp/product/B0829V6JKG?ie=UTF8&psc=1&linkCode=sl1&tag=stephenmetzge-20&linkId=4c204c66ebd72829a982d0f811a88ca8&language=en_US&ref_=as_li_ss_tl)
Replacement Power Plug (https://www.amazon.com/gp/product/B0829V6JKG?ie=UTF8&psc=1&linkCode=sl1&tag=stephenmetzge-20&linkId=4c204c66ebd72829a982d0f811a88ca8&language=en_US&ref_=as_li_ss_tl)
22 AWG Wire
E12 LED Bulb (https://www.amazon.com/gp/product/B0829V6JKG?ie=UTF8&psc=1&linkCode=sl1&tag=stephenmetzge-20&linkId=4c204c66ebd72829a982d0f811a88ca8&language=en_US&ref_=as_li_ss_tl)
2 x M3 x 6mm counter sunk head screws
2 x M3 x 16mm socket head screws
2 x M3 Nuts
The threads on the base and retaining nut are a nice snug fit coming off of my modified and tuned up Ender 3. If you are having trouble getting the nut to thread on, let me know and I can try to upload a version with more clearance.
The part "Plug Spacer.stl" was made to close the gap between the replacement socket plug and the 18 AWG wire.
The Sonoff Mini is a very snug fit. I printed this in PETG and was able to get it in place with some firm pressure that caused some temporary deformation of the outer shell. You should still be able to get it pushed in if printed in a more brittle material, like PLA, but be careful not to snap the shell.
You definitely wont be able to wire up to Sonoff Mini first, and then install. It's a pretty tight fit when everything is wired up. I recommend the following order for assembly:
1) Fit the sonoff mini into the inner core through the opening in the front of the base.
2) Feed the 18 AWG (18/2) wire in through the port on the back, wrap around the side of the inner core (not through the inner core) and pull towards the front, and wire into the L-in and N-in terminals of Sonoff Mini. Pull extra slack out through the port on the back, leaving enough so that there is no strain on the connections to the Sonoff Mini terminals. Use a zie-tie as a strain-relief device around the wire on the inside well of the outer shell, You should be able to pull on the cable with moderate force without putting strain on the connection. Cut off as much or as little cable running out the back of the base as needed to reach an outlet where you intend to have the lamp.
3) Put the part "Plug Spacer.stl" onto the end of the cord running out the back, and pull through so that you have enough wire to install the replacement power plug. Remove the cover from the plug, connect wires to the terminals, slide the cover back on and then slide the spacer up into the case.
4) Feed some more 18 AWG down though the center of the inner core and out the side opposite of there the first cable is tucked, pull towards the front and connect to the L-out and N-out terminals of the Sonoff Mini. Pull extra slack out though the top of the inner core, leaving enough so that there is no strain on the connections to the Sonoff Mini terminals. Leave yourself 4-6 inches of slack above the top of the inner core, and cut off excess wire.
5) Connect the 4-6 inches of 22 AWG (22/2) to the terminals of the momentary switch, feed the wires and the switch into the port on the front of the base. Screw on the retaining nut that came with switch to fit the switch snugly to the outer shell of the base. Connect the wires from the switch to the S1 and S2 terminals of the Sonoff Mini. Tuck any excess wire in, making sure not to put any strain on the connections.
6) Make sure all the terminal screws on the Sonoff Mini are tightened up and, inspect the wiring. It is a tight fit and there are mains voltages involved. I am not liable for any damage or injury.
7) Place the honeycomb lamp shade over the base. This should cover most of the wires, only the wire coming from the L-out and N-out terminals of the Sonoff Mini will be coming up through the inner core. Screw the part "Retaining Nut.stl" onto the threads at the top of the inner core and tighten down to attach the shade to the base.
8) Attach the bulb socket to the part "Bulb Holder Mount.stl" using two M3 x 16 mm socket head screws and M3 nuts.
9) Connect the wires coming up through the inner core (from L-out and N-out of the Sonoff Mini) to the screw terminals of the bulb socket. (This is where having some extra slack pays off.)
10) Attach the Bulb Holder to the Retaining Nut using two M3 x 6 mm counter sunk head screws. (Helps to have a long allen wrench.)
11) Screw in the E12 LED bulb.
Supports are only needed for the part "Base.stl".
I designed this in Fusion360 and have included the .f3d file and a .obj file if you need to modify. This could be used without the Sonoff Mini as a non-smart lamp, using a dry contact relay instead of the Sonoff Mini, or some kind of different switch capable of handling 120VAC could be used.
Similar models
thingiverse
free
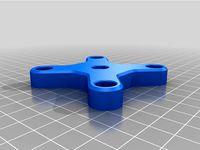
Onefinity Monitor Arm Connector by cyberreefguru
...g=cyberreefgu0c-20&linkid=14415004f4b141eaae9525187bb68eb3&language=en_us&ref_=as_li_ss_tl (for 7" monitor only)
thingiverse
free

Spacecat - Launch pad v2 Case by jneubeck
...amp;psc=1&linkcode=sl1&tag=neubeck-20&linkid=5c1adcf1e26e86d2a2323754efe7a0b7&language=en_us&ref_=as_li_ss_tl
thingiverse
free

Prusa Light Bar Simple Print by wbushee
...c=1&linkcode=sl1&tag=bluemonkeydev-20&linkid=4c12befa75c811732eb310b986c3f297&language=en_us&ref_=as_li_ss_tl
thingiverse
free
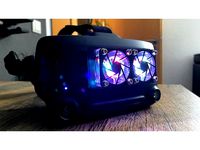
Valve Index Frunk Fan - 40mm with switch by PROPELLA
...amp;psc=1&linkcode=sl1&tag=digi04c-21&linkid=c6fb300596c4e34f89c63c6871ebbe83&language=de_de&ref_=as_li_ss_tl
thingiverse
free

Batbox V1 by Nath042
...ode=sl1&tag=nath0420a-21&linkid=5c1eb5f14c82d8cef6cfb9bb1c3d425a&language=en_gb&ref_=as_li_ss_tl - battery holder
thingiverse
free

Engel Fridge Digital Temperature Controller by 2manytoyz
...ytoyz-20&linkid=0dcb3de269cda7d1567383449e50a585&language=en_us
as an amazon associate i earn from qualifying purchases.
thingiverse
free

Seed organizer by reeseallen
...&psc=1&linkcode=sl1&tag=reeall-20&linkid=cfd0b80d7ba1f7ea99e5eb21ed0fb88f&language=en_us&ref_=as_li_ss_tl
thingiverse
free

Pi Camera Bed Mount by SrgntBallistic
..._ss_tl?ie=utf8&psc=1&linkcode=sl1&tag=srgnballgam08-20&linkid=028bc89a9db7d0b42ea4716749a6c14b&language=en_us
thingiverse
free

RGB Youtube Play Button by KenMakesMistakes
...c=1&linkcode=sl1&tag=kenmakesmista-20&linkid=f2678d6d510fe6336c34cc36e0e6d247&language=en_us&ref_=as_li_ss_tl
thingiverse
free
FANBOY GEN 5 by malencar
...mp;psc=1&linkcode=sl1&tag=fanboy0f-20&linkid=7fea8d9ec65973621b1d461f330cc491&language=en_us&ref_=as_li_ss_tl
Blacklabel775
thingiverse
free

Adjustable Stand for Ubiolabs Wireless Charger (From Costco) by blacklabel775
...countersunk head screws.
i printed the hinge pin in petg after the one i printed in pla broke under tension.
no supports needed.
thingiverse
free

Plug-In Motion Sensing Night Light by blacklabel775
...'ve made a mess of things for those who would like to modify.
some of the links in the part list are amazon affiliate links.
Bemko
thingiverse
free

TPU fidget cube by Bemko
...bemko
thingiverse
a simple fidget cube that utilizes the properties of tpu to make the hinges work.
https://youtu.be/-yabsmtm16y
thingiverse
free

Drybox bar with mount by Bemko
...ica gel on the bottom of the box to keep the filament dry during printing. it is especially important for tpu, abs/asa and nylon.
thingiverse
free

Poker Dealer Chip by Bemko
...ricky, but the result is outstanding.
check out also the small blind / big blind chips: https://www.thingiverse.com/thing:4878728
thingiverse
free

Anti-slide glasses ear-hooks by Bemko
...a strong grip. they are also very easy and quick to print.
inspired by https://www.thingiverse.com/thing:3537584 by hobbyhoarder.
thingiverse
free

Improved bearing-less Xbox One controller mini wheel by Bemko
...asma (https://www.thingiverse.com/thing:4498704) which is based on the pixel2 design (https://www.thingiverse.com/thing:3049220).
thingiverse
free

Decorative christmas tree bauble hooks by Bemko
...l gap left to prevent the bauble from falling out by accident.
print settings
print with 0.5mm line width to get full perimeters.
thingiverse
free

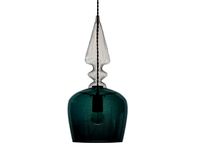
Honeycomb lamp shade by Bemko
... filaments - should be printed with 0.5mm line width
both should print best at 0.204mm layer height to obtain even spacing in z.
thingiverse
free

Spring honeycomb lamp add-ons by Bemko
...rse.com/thing:3175389
print settings:
print the two parts of the tulip separately in colors you like and them glue them together.
thingiverse
free

Xbox One controller paddles by Bemko
... was designed for the third generation (2016) of xbox one controllers but it will probably fit the earlier xbox one versions too.
thingiverse
free

Nespresso® capsule box holder / dispenser by Bemko
...ings
the models are optimized for printing with 0.5mm line width. layer height should be 0.2mm or less.
no supports are required.
Honeycomb
3d_export
$5

honeycomb
... a model of a honeycomb by using blender. preview images were rendered with blender eevee. enjoy the product and leave a comment.
3ddd
$1
Honeycomb Floor
... паркет
parquet with metalic honeycomb floor
demensions 500x500 cm xy
multitexture + floorgenerator
turbosquid
$3

honeycomb lampshade
...free 3d model honeycomb lampshade for download as max and obj on turbosquid: 3d models for games, architecture, videos. (1221234)
turbosquid
$19

Honeycomb Frame
...ree 3d model honeycomb frame for download as ma, obj, and fbx on turbosquid: 3d models for games, architecture, videos. (1490702)
turbosquid
$12

Honeycomb chest
...ee 3d model honeycomb chest for download as 3ds, obj, and fbx on turbosquid: 3d models for games, architecture, videos. (1455008)
turbosquid
$5

Honeycomb 7
...y free 3d model honeycomb 7 for download as max, fbx, and obj on turbosquid: 3d models for games, architecture, videos. (1648362)
turbosquid
$13

Shelf - honeycombs
...del shelf - honeycombs for download as mat, max, obj, and fbx on turbosquid: 3d models for games, architecture, videos. (1193801)
turbosquid
$6
HONEYCOMB FILLING_DOOR
...oneycomb filling_door for download as ma, max, fbx, and blend on turbosquid: 3d models for games, architecture, videos. (1274244)
3d_export
$5
honeycomb vase
...3d model of honeycomb vase designed using solid works. it can easily converted to desire format for 3d printing or cnc machining.
turbosquid
$14

Maps Honeycomb
... available on turbo squid, the world's leading provider of digital 3d models for visualization, films, television, and games.
Shade
design_connected
$16
Light Shade Shade 70
...ht shade shade 70
designconnected
moooi light shade shade 70 pendant lights computer generated 3d model. designed by jurgen bey.
design_connected
$13

Shade
...shade
designconnected
lema shade computer generated 3d model. designed by rota, francesco.
archibase_planet
free
Shade
...shade
archibase planet
peak visor canopy
shade - 3d model for interior 3d visualization.
archibase_planet
free
Shade
...shade
archibase planet
venetian blind jalousie
shade - 3d model for interior 3d visualization.
turbosquid
$5
Shade
...quid
royalty free 3d model shade for download as max and fbx on turbosquid: 3d models for games, architecture, videos. (1657665)
3d_ocean
$7
Lamp Shade
...lamp shade
3docean
interior lamb lamb shade room
lamp shade design for interior… vray; 1.2.6+
turbosquid
$1

Shade
... available on turbo squid, the world's leading provider of digital 3d models for visualization, films, television, and games.
3d_export
$5
Shade - Variant A
...shade - variant a
3dexport
shade model that can be used in hospitals and clinics.
design_connected
$7
Spindle shade
...spindle shade
designconnected
rothschild&bickers spindle shade computer generated 3d model.
design_connected
$13

Shaded Pendant
...shaded pendant
designconnected
another country shaded pendant computer generated 3d model. designed by workstead.
Lamp
archibase_planet
free
Lamp
...lamp
archibase planet
lamp reading lamp table lamp
lamp - 3d model (*.gsm+*.3ds) for interior 3d visualization.
archibase_planet
free
Lamp
...lamp
archibase planet
lamp reading lamp table lamp
lamp - 3d model (*.gsm+*.3ds) for interior 3d visualization.
archibase_planet
free

Lamp
...lamp
archibase planet
lamp table lamp reading lamp
lamp - 3d model (*.gsm+*.3ds) for interior 3d visualization.
archibase_planet
free

Lamp
...lamp
archibase planet
lamp table lamp reading lamp
lamp - 3d model (*.gsm+*.3ds) for interior 3d visualization.
archibase_planet
free

Lamp
...lamp
archibase planet
lamp reading lamp table lamp
lamp - 3d model (*.gsm+*.3ds) for interior 3d visualization.
archibase_planet
free
Lamp
...lamp
archibase planet
lamp reading lamp table lamp
lamp - 3d model (*.gsm+*.3ds) for interior 3d visualization.
archibase_planet
free
Lamp
...lamp
archibase planet
lamp table lamp reading lamp
lamp - 3d model (*.gsm+*.3ds) for interior 3d visualization.
archibase_planet
free

Lamp
...lamp
archibase planet
lamp table lamp reading lamp
lamp - 3d model (*.gsm+*.3ds) for interior 3d visualization.
archibase_planet
free
Lamp
...lamp
archibase planet
lamp reading lamp table lamp lantern
lamp - 3d model (*.3ds) for interior 3d visualization.
3d_ocean
$6
Lamp
...lamp
3docean
lamp
a high quality lamp.
Base
archibase_planet
free
Base
...base
archibase planet
base column column base
base 1 - 3d model (*.gsm+*.3ds) for interior 3d visualization.
archibase_planet
free
Base
...base
archibase planet
base column base column
base 5 - 3d model (*.gsm+*.3ds) for interior 3d visualization.
archibase_planet
free
Base
...base
archibase planet
base column column base
base 7 - 3d model (*.gsm+*.3ds) for interior 3d visualization.
archibase_planet
free
Base
...base
archibase planet
base column column base
base 2 - 3d model (*.gsm+*.3ds) for interior 3d visualization.
archibase_planet
free

Base
...base
archibase planet
base column column base
base 3 - 3d model (*.gsm+*.3ds) for interior 3d visualization.
archibase_planet
free
Base
...base
archibase planet
base column column base
base 4 - 3d model (*.gsm+*.3ds) for interior 3d visualization.
archibase_planet
free
Base
...base
archibase planet
base column base column
base 6 - 3d model (*.gsm+*.3ds) for interior 3d visualization.
archibase_planet
free
Base
...base
archibase planet
foundation base
column base ionic - 3d model (*.gsm+*.3ds) for interior 3d visualization.
archibase_planet
free
Base
...base
archibase planet
foundation base
column base tuscan - 3d model (*.gsm+*.3ds) for interior 3d visualization.
design_connected
$18
Base
...base
designconnected
tom dixon base computer generated 3d model. designed by dixon, tom.