Thingiverse

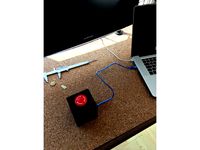
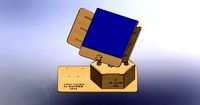
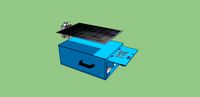
Barn Door Tracker firmware and electronic box by ndupont
by Thingiverse
Last crawled date: 3 years ago
This is an addon for the original Barn Door Tracker by fermunozhttps://www.thingiverse.com/thing:1133193
The box itself is remixed from https://www.thingiverse.com/thing:495087 by bobc896
Make sure you WATCH IT to follow the upgrades that might come soon.
Some actionhttps://www.youtube.com/watch?v=GM6pT-eybtY
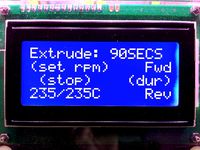
Improved firmware
This version adds fast forward and rewind functions by means of 2 push buttons.
Input 2 and 3 are used for the switches, activating the internal pullup.
Pressing the two buttons at the same time will STOP the tracking.
When paused, the LED blinks faster than usual.
Just press a button to RESUME.
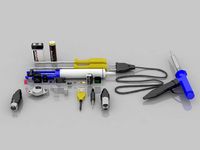
BOM
A DRV8825 A4988 Stepper Driver Board RAMPS Arduino Raspberry Pi ESP8266 3D Printer driver board
A matching DRV8825 driver (POLOLU style).
Two Push buttons. Momentary Blue Pushbutton Switch - Panel Mount - SPST N.O. - 1/4" Mounting Hole
Two M3 screws (or equivalent...)
Electrical tape
Wiring
Pin 8 ------ driver "DIR" input
Pin 9 ------ driver "STEP" input
Pin 10 ---- driver "ENABLE" input
Pin 2 ----- button ----- GND
Pin 3 ----- button ----- GND
Power for the driver board uses GND and +5V from the Arduino PCB.
+12V is taken just after the power connector, BEFORE the diode.
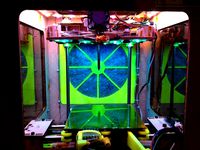
You will need to adjust the vRef of the driver with the small potentiometer. I set mine by holding the motor shaft with my fingers and give it just enough torque while keeping the motor cool.
And also set the 3 microswitches to ON in order to activate the 1/32 microstepping.
Print quality of the printed protoype is not optimal as I was tinkering with a 0.8mm nozzle on a Volcano setup.
I've hot-glued the Arduino board to the box.
There is electrical tape between the Ardunio and driver board.
PRO TIP
The board holes don't line up perfectly, I've had to cut 1mm on the "exterior" side of the PSU, as well as the "top" side of the USB to be able to fit the Arduino in the box.
The box itself is remixed from https://www.thingiverse.com/thing:495087 by bobc896
Make sure you WATCH IT to follow the upgrades that might come soon.
Some actionhttps://www.youtube.com/watch?v=GM6pT-eybtY
Improved firmware
This version adds fast forward and rewind functions by means of 2 push buttons.
Input 2 and 3 are used for the switches, activating the internal pullup.
Pressing the two buttons at the same time will STOP the tracking.
When paused, the LED blinks faster than usual.
Just press a button to RESUME.
BOM
A DRV8825 A4988 Stepper Driver Board RAMPS Arduino Raspberry Pi ESP8266 3D Printer driver board
A matching DRV8825 driver (POLOLU style).
Two Push buttons. Momentary Blue Pushbutton Switch - Panel Mount - SPST N.O. - 1/4" Mounting Hole
Two M3 screws (or equivalent...)
Electrical tape
Wiring
Pin 8 ------ driver "DIR" input
Pin 9 ------ driver "STEP" input
Pin 10 ---- driver "ENABLE" input
Pin 2 ----- button ----- GND
Pin 3 ----- button ----- GND
Power for the driver board uses GND and +5V from the Arduino PCB.
+12V is taken just after the power connector, BEFORE the diode.
You will need to adjust the vRef of the driver with the small potentiometer. I set mine by holding the motor shaft with my fingers and give it just enough torque while keeping the motor cool.
And also set the 3 microswitches to ON in order to activate the 1/32 microstepping.
Print quality of the printed protoype is not optimal as I was tinkering with a 0.8mm nozzle on a Volcano setup.
I've hot-glued the Arduino board to the box.
There is electrical tape between the Ardunio and driver board.
PRO TIP
The board holes don't line up perfectly, I've had to cut 1mm on the "exterior" side of the PSU, as well as the "top" side of the USB to be able to fit the Arduino in the box.
Similar models
thingiverse
free

Push Button Press Switch box by gimle
... by gimle
thingiverse
simple box for e-bay "10a ac 220v 380v plastic on/off waterproof push button press switch kao-5"
grabcad
free

Waterproof Push Button Control Switch Box Elevator
...ol switch box elevator with space for assembling two electronic boards.
design in autodesk inventor software (www.irinventor.com)
thingiverse
free

Weather Button
...uit used in class (as such, i've referenced that schematic).
there is also an accompanying video:https://youtu.be/go-rhavkg9o
grabcad
free

Momentary Push Button Switch
...eally well). this button is great for user input on a pcb or a good, big reset button on a raspberry pi (run pin's on board).
thingiverse
free

Renoir's RepRap Arduino Mega Shield by renoir
.... if you are running any further circuits, use a separate power supply! (all reprap boards have separate 12v psu headers anyway).
thingiverse
free

One Stepper Driver for DRV8825/A4988 -OneStep Board by jasonmrc
... lines
led indicator for power on
decoupling cap next to driver .
2 pin terminal for 12v input
idc 10 pin compatible with ramps !
grabcad
free

Arduino 4x4 push button keypad tact switch
...pad tact switch
grabcad
esta es una placa con micro interruptores para arduino.
this is a board with micro switches for arduino.
thingiverse
free

GPS Tracker TK102B ON/OFF SHELL by spelli
... pressed again.
in different colors you can keep track of different trackers!
the bow has become a bit ugly...
0.2
20%
no support
grabcad
free

Push Button Switch 2-Pin
...push button switch 2-pin
grabcad
push button switch 2-pin
thingiverse
free
Arduino Start Push Button by przybylla_6775
...ess "enter" oder "s".
the diameter of the hole is 25mm. the button is a typical emergency button from amazon.
Ndupont
thingiverse
free

Mickey Mouse in dual extrusion by ndupont
...mickey mouse in dual extrusion by ndupont
thingiverse
a dual extrusion version of this great model.
cut with tinkercad.
thingiverse
free
Tevo Tarantula Stop / Reset button by ndupont
...ple reset / stop button as it's always nice to be able to abort any operation wihtout the need of a tool to press the button.
thingiverse
free

V2 Rocket - dual extrusion by ndupont
...upports as the included ones are too thin for a 0.4mm nozzle.
3 perimeters (1.2mm) and a concentric infill make the print faster.
thingiverse
free

Night lamp hook for IKEA Svärta loft bed by ndupont
...t bed by ndupont
thingiverse
night lamp hook for ikea svärta loft bed
it requires a pair of m3x10mm hex screws and matching nuts
thingiverse
free
Tevo Tarantula MKS cable strain relief by ndupont
...spired by the one by charles_snyder.
this model will fit the original mks acrylic encasing without requiring any post print work.
thingiverse
free

Telescope collimation eyepiece by ndupont
...0, z=3mm
time lapse : https://www.youtube.com/watch?v=2tser6o8x0e
single extrustion : https://www.youtube.com/watch?v=hszm7j8w3b0
thingiverse
free

Telescope eyepiece / focuser cap (male cap) 1.25in / 2in by ndupont
...by ndupont
thingiverse
male cap for 1.25in and 2in focusers/accessories
time lapse : https://www.youtube.com/watch?v=jtayu7eeyse
thingiverse
free

Tevo Tarantula LCD cover / bezel by ndupont
...ne.
it obviously has to be printed in dual extrusion.
the matching reset button is here https://www.thingiverse.com/thing:2377397
thingiverse
free
T2 cap for telescope accessories by ndupont
... well.
print them with a 0.2mm layer height (or finer), no supports brim or raft required
t2 is a 42mm thread with a 0.75mm pitch
thingiverse
free

Tevo Tarantula MKS board offset bracket by ndupont
...ne lets you channel your cables through the opening.
print a pair with a mirrored one, flat side on the bed, no support required.
Tracker
turbosquid
$8

Tracker Knife
... model tracker knife for download as blend, dae, fbx, and obj on turbosquid: 3d models for games, architecture, videos. (1588741)
turbosquid
$1

Tracker Knife
... available on turbo squid, the world's leading provider of digital 3d models for visualization, films, television, and games.
3d_export
$5
solar tracker
...aterial : -arduino uno -2 step motor with driver -4 ldr sensor -some wires -small photovoltaiic pannel -buzzer -cnc laser machine
turbosquid
$23
E3D -HTC Vive Tracker
...model e3d -htc vive tracker for download as max, obj, and c4d on turbosquid: 3d models for games, architecture, videos. (1190728)
3d_export
$7

sci-fi injector or tracker
... can be tracker, use as you want. pbr 4k contain: blend (includes high poly)/ dae / fbx / obj / stl / glowing injector + box
3d_export
$10
Motion Tracker Aliens
...er out moving objects from stationary background and then displayed them on the monitor as a series of contours of probable loci.
3d_export
$5
single axis solar tracker stand
...single axis solar tracker stand
3dexport
3d_export
$60

grumman s-2 f tracker
...ining in service with other air arms into the 21st century. argentina and brazil are the last countries to still use the tracker.
3d_export
$19

Chevrolet tracker 2021
...pport ticket and request for that. we can convert 3d models to: .stl, .c4d, .obj, .fbx, .ma/.mb, .lwo/.lws, .3ds, .3dm, .dxf/.dwg
3d_export
$25
emergency power with solar tracker
...cker
3dexport
this is a tool used to distribute electricity during an emergency disaster, it is recommended to use sketchup 2019
Firmware
3d_export
$5
Pepe stool by Opinion Ciatti Italian
...design provides a special slope. additional decor - manual firmware<br>32 x 48 x h58...
3d_export
$5
LENNY BED by Felis
...removable. an additional decor of the headboard is a firmware that imitates the capitonne technique. the bed can be...
thingiverse
free

sidewider x1 firmware by Xavierart26
...sidewider x1 firmware by xavierart26
thingiverse
firmware for sidewider x1
thingiverse
free
Sailfish Firmware by jetty
... created with omnomnom creator:http://www.thingiverse.com/thing:24639.
note: this is not an official makerbot firmware release.
thingiverse
free
Jetty Accelerated Firmware by jetty
...y-firmware#toc66
any updates will be placed here, so check back often.
note: this is not an official makerbot firmware release.
thingiverse
free
Sigma Türkçe firmware (marlin1.1) by Paarthurnax
...sigma türkçe firmware (marlin1.1) by paarthurnax
thingiverse
sigma türkçe firmware (marlin1.1)
thingiverse
free

firmware for orca 040 by sellemann
...y sellemann
thingiverse
firmware and settings for orca 040 with 025 nozzle
i had trubble getting it to work but now its working.
thingiverse
free
Gen4 Interface Firmware by jetty
...-firmware#toc66
any updates will be placed here, so check back often.
note: this is not an official makerbot firmware release.
thingiverse
free

cl-260 standard firmware (outdated!) by renoisenoir
...re is not for 2018 or higher version of cl-260!
this firmware is for 2016-version of cl-260
it can be used for reference purpose.
thingiverse
free
Firmware Tronxy XY2 Pro Titan by droidlex
...flashed your printer with marlin firmware, this should help restore the factory firmware, including the boot screen and interface
Barn
3d_export
$5

barn
...barn
3dexport
barn
3d_export
$5

barn
...barn
3dexport
normal barn
3d_export
$5
barn
...barn
3dexport
barn with interior decoration
3ddd
$1

Pottery Barn
...pottery barn
3ddd
pottery barn , часы
pottery barn
3ddd
$1

Pottery Barn
...pottery barn
3ddd
pottery barn , декоративный набор
pottery barn
3ddd
free

Pottery barn
...pottery barn
3ddd
pottery barn , декоративный набор
pottery barn
3ddd
free

POTTERY BARN
...pottery barn
3ddd
pottery barn , декоративный набор
pottery barn
3ddd
free
POTTERY BARN
...pottery barn
3ddd
pottery barn , круглое
garden lattice mirror, pottery barn
3ddd
$1

Pottery Barn
...е , декоративный набор , украшение
pottery barn
3ddd
$1

Pottery barn
...е , декоративный набор , украшение
pottery barn
Electronic
turbosquid
$1

electron
...urbosquid
royalty free 3d model electron for download as max on turbosquid: 3d models for games, architecture, videos. (1157488)
turbosquid
$50

electronic
...
royalty free 3d model electronic for download as max and obj on turbosquid: 3d models for games, architecture, videos. (1289427)
turbosquid
$40

Electron
... available on turbo squid, the world's leading provider of digital 3d models for visualization, films, television, and games.
3d_ocean
$8
Electronic game
...electronic game
3docean
electronic games nu pogody wait a minute well
electronic game “well, wait a minute”, “nu pogody”
3ddd
$1
Brilux Electronic
...brilux electronic
3ddd
подвес. brilux electronic. польша. материалы настроены.
3d_export
free

electronic shop
...lectronic shop with high quality interior and exterior. it has tvs smartphone play station printer and many more electronic item.
3ddd
$1

Термостаты OJ Electronics
...ермостаты oj electronics
3ddd
oj electronics , термостат
термостаты фирмы oj electronics
3d_export
$8

electron 714
...electron 714
3dexport
game ready model for export to unreal engine soviet tv electron 714 pbr 4k
3ddd
$1

Термостат OJ Electronics
... oj electronics
3ddd
oj electronics , термостат
термостат occ2-1991 фирмы oj electronics
turbosquid
$60
Electronics Stuff
...
royalty free 3d model electronics stuff for download as max on turbosquid: 3d models for games, architecture, videos. (1624680)
Door
3d_export
$5
door handle of doors
...door handle of doors
3dexport
door handle of doors
3d_ocean
$4

Door
...3docean
architecture door gate gothic door old style door
door, 3d door, gothic door, architecture, old style door, gate, 3d gate
3d_ocean
$10

Door
...door
3docean
design door doors home house indoor interior opening doors
door design
archibase_planet
free
Door
...r
archibase planet
door sliding door interior door rail door
door n250515 - 3d model (*.gsm+*.3ds) for interior 3d visualization.
archibase_planet
free
Door
...door
archibase planet
door sash door sash-door interior door
door 900 - 3d model (*.gsm+*.3ds) for interior 3d visualization.
archibase_planet
free
Door
...door
archibase planet
door sash door sash-door interior door
door 600 - 3d model (*.gsm+*.3ds) for interior 3d visualization.
archibase_planet
free
Door
...door
archibase planet
door sash door sash-door interior door
door 800 - 3d model (*.gsm+*.3ds) for interior 3d visualization.
archibase_planet
free
Door
...door
archibase planet
door sash door sash-door interior door
door 800 - 3d model (*.gsm+*.3ds) for interior 3d visualization.
archibase_planet
free
Door
...door
archibase planet
door sash door sash-door interior door
door 700 - 3d model (*.gsm+*.3ds) for interior 3d visualization.
archibase_planet
free
Door
...door
archibase planet
door sash door sash-door interior door
door 600 - 3d model (*.gsm+*.3ds) for interior 3d visualization.
Box
archibase_planet
free

Box
...box
archibase planet
box carton cardboard box
box 2 - 3d model (*.3ds) for interior 3d visualization.
archibase_planet
free

Box
...box
archibase planet
carton cardboard box box
box 1 - 3d model (*.3ds) for interior 3d visualization.
3d_export
$6

box
...box
3dexport
box
3d_export
$5

Box
...box
3dexport
box
3d_export
$5

box
...box
3dexport
box
3d_export
$5

box
...box
3dexport
box
archibase_planet
free

Box
...box
archibase planet
box box for paper notebook pencil
box - 3d model (*.gsm+*.3ds) for interior 3d visualization.
archibase_planet
free

Box
...box
archibase planet
box carton cardboard box
box n170111 - 3d model (*.gsm+*.3ds) for interior 3d visualization.
archibase_planet
free

Box
...box
archibase planet
box carton cardboard box
box n050411 - 3d model (*.gsm+*.3ds) for interior 3d visualization.
archibase_planet
free

Boxes
...boxes
archibase planet
boxes box case bin
boxes n281213 - 3d model (*.gsm+*.3ds+*.max) for interior 3d visualization.