Thingiverse
Auto off printer module universal. by Planetech3D
by Thingiverse
Last crawled date: 3 years ago
Hello
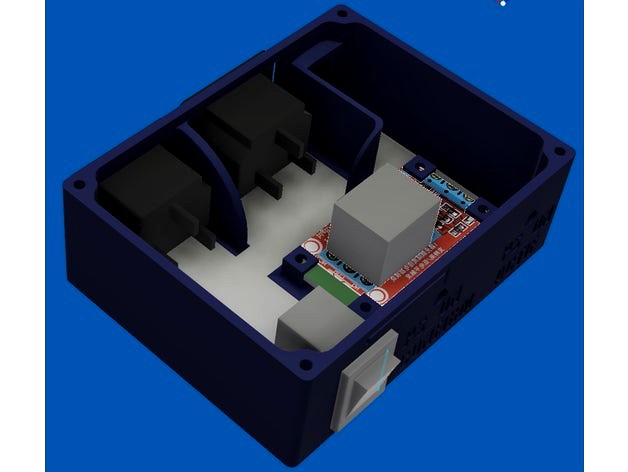
I propose this self-extinguishing printer module universal.
It can be installed on any printer, provided you have a command output declared in the firmware (PS_ON)
A printer that remains in standby consume about 30w, install an auto_off can prove advantageous
I give the procedure for RAISE3D 3D printershttps://youtu.be/RjYfSuyZBmQ
By default on Raise3D motherboards the output control (PS_ON) is declared on the pin 45
By default the commands are:
M80 - Power on: pin 45: 0
M81 - Power off: pin 45: 1
This order order did not allow me to make a functional module
I reversed the levels according to the commands.
It is not possible to invert the Gcode commands, M81 does much more than pass the pin 45 to 1
(the M81 control cuts all heating up)
In this way, it is not possible to operate the stop (PS_ON), when the stop occurs the pin 45 returns to 0, the machine restarts.
So to solve this problem it is necessary to invert the levels of the gcode commands
Like this :
M80 - Power on: pin 45: 1
M81 - Turning off: pin 45: 0
For this you have to go to the source code (MARLIN):
MARLIN is the name of the firmware of many 3D printer including RAISE3D
Raise3D provides the source code MARLIN Adapted for Raise N1 N2, N2 +https://github.com/Raise3D/Marlin-Raise3D-N-Series
In the configuration.h tab visible herehttps://github.com/Raise3D/Marlin-Raise3D-N-Series/blob/master/Marlin/Configuration.h,
We must replace the line:
define POWER_SUPPLY 1
By
define POWER_SUPPLY 2
It is important to take the U8glib library which is with the source code provided by RAISE3Dhttps://github.com/MarlinFirmware/Marlin/archive/1.1.x.zip
I advise you to take the version of arduino 1.0.5 r2 to compile Marlin
It is not necessary to connect to the motherboard to inject the firmware.
On arduino used the button "check" to compile, if the compilation ends without error, it is possible to find the file in .hex. How to do it here youtube.com/watch?v=PEhqzvO3egk"
It will be necessary to rename the .hex in .firm To deposit the file on the USB key or SD card. On your Raise Select the firmware file edit and press "OK" to update.
Another solution: We can manufacture a signal inverter
The plan herehttps://4.bp.blogspot.com/-ceo1ufnsqK0/U1XGiT2PQZI/AAAAAAAABsk/wTUfNQONoh0/s1600/porte+non+transistors.png
Then it will be necessary to add in your slicer
Startup script:
M80;
End script
M109 R50 T0; wait until extruder 0 is at 50 ° C to go to the next line
M81; power off pin to 0
NOMENCLATURE
I used some recovery component, like the USB connector and LEDs that are easily found, I recycled the IEC 320 connectors recovered on old ATX power supply
Switch : https://www.ebay.fr/itm/10pcs-AC-6A-250V-10A-125V-6-Pin-DPDT-ON-ON-2-Position-Snap-in-Boat-Rocker-Switch/272819638847?ssPageName=STRK%3AMEBIDX%3AIT&_trksid=p2057872.m2749.l2649
Socket-Connectors : https://www.ebay.fr/itm/10Pcs-3-Terminals-IEC-320-C13-Female-Plug-Power-Inlet-Socket-Connectors-250V-10A/281773177164?ssPageName=STRK%3AMEBIDX%3AIT&_trksid=p2057872.m2749.l2649
Jack-male https://www.ebay.fr/itm/Lot-de-5-Prise-male-IEC-320-C14-Panneau-Entree-Connecteur-AC-250-V-15-A/391664834333?_trkparms=aid%3D555018%26algo%3DPL.SIM%26ao%3D2%26asc%3D20170831090034%26meid%3D3c898544c5764480a089374284e645cd%26pid%3D100005%26rk%3D4%26rkt%3D6%26sd%3D272503351041%26itm%3D391664834333&_trksid=p2047675.c100005.m1851
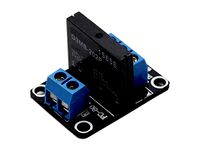
Module-relay-1-channel-with-Optocoupler : http://www.ebay.fr/itm/5V-Module-relais-1-canal-avec-Optocoupleur-H-L-Niveau-Triger-pour-Arduino-GF/292394725182?hash=item4414156f3e:g:GXYAAOSw9KhaTY~b
COUNTERSUNK-FLAT-HEAD : https://www.ebay.fr/itm/SULEVE-M3ASH5-10PCS-M3-HEX-COUNTERSUNK-FLAT-HEAD-SCREWS-ALLOY-STEEL-TITANIUM/182962068887?hash=item2a99639d97:m:mrP7R9UFRyWHSjsuRxxLvFQ
Neon lapms : https://www.ebay.co.uk/itm/Qty5-INS-3-Square-Dot-Miniature-Neon-Bulb-5-pcs-Glow-Lamp-Indicator-/120842256984
I propose this self-extinguishing printer module universal.
It can be installed on any printer, provided you have a command output declared in the firmware (PS_ON)
A printer that remains in standby consume about 30w, install an auto_off can prove advantageous
I give the procedure for RAISE3D 3D printershttps://youtu.be/RjYfSuyZBmQ
By default on Raise3D motherboards the output control (PS_ON) is declared on the pin 45
By default the commands are:
M80 - Power on: pin 45: 0
M81 - Power off: pin 45: 1
This order order did not allow me to make a functional module
I reversed the levels according to the commands.
It is not possible to invert the Gcode commands, M81 does much more than pass the pin 45 to 1
(the M81 control cuts all heating up)
In this way, it is not possible to operate the stop (PS_ON), when the stop occurs the pin 45 returns to 0, the machine restarts.
So to solve this problem it is necessary to invert the levels of the gcode commands
Like this :
M80 - Power on: pin 45: 1
M81 - Turning off: pin 45: 0
For this you have to go to the source code (MARLIN):
MARLIN is the name of the firmware of many 3D printer including RAISE3D
Raise3D provides the source code MARLIN Adapted for Raise N1 N2, N2 +https://github.com/Raise3D/Marlin-Raise3D-N-Series
In the configuration.h tab visible herehttps://github.com/Raise3D/Marlin-Raise3D-N-Series/blob/master/Marlin/Configuration.h,
We must replace the line:
define POWER_SUPPLY 1
By
define POWER_SUPPLY 2
It is important to take the U8glib library which is with the source code provided by RAISE3Dhttps://github.com/MarlinFirmware/Marlin/archive/1.1.x.zip
I advise you to take the version of arduino 1.0.5 r2 to compile Marlin
It is not necessary to connect to the motherboard to inject the firmware.
On arduino used the button "check" to compile, if the compilation ends without error, it is possible to find the file in .hex. How to do it here youtube.com/watch?v=PEhqzvO3egk"
It will be necessary to rename the .hex in .firm To deposit the file on the USB key or SD card. On your Raise Select the firmware file edit and press "OK" to update.
Another solution: We can manufacture a signal inverter
The plan herehttps://4.bp.blogspot.com/-ceo1ufnsqK0/U1XGiT2PQZI/AAAAAAAABsk/wTUfNQONoh0/s1600/porte+non+transistors.png
Then it will be necessary to add in your slicer
Startup script:
M80;
End script
M109 R50 T0; wait until extruder 0 is at 50 ° C to go to the next line
M81; power off pin to 0
NOMENCLATURE
I used some recovery component, like the USB connector and LEDs that are easily found, I recycled the IEC 320 connectors recovered on old ATX power supply
Switch : https://www.ebay.fr/itm/10pcs-AC-6A-250V-10A-125V-6-Pin-DPDT-ON-ON-2-Position-Snap-in-Boat-Rocker-Switch/272819638847?ssPageName=STRK%3AMEBIDX%3AIT&_trksid=p2057872.m2749.l2649
Socket-Connectors : https://www.ebay.fr/itm/10Pcs-3-Terminals-IEC-320-C13-Female-Plug-Power-Inlet-Socket-Connectors-250V-10A/281773177164?ssPageName=STRK%3AMEBIDX%3AIT&_trksid=p2057872.m2749.l2649
Jack-male https://www.ebay.fr/itm/Lot-de-5-Prise-male-IEC-320-C14-Panneau-Entree-Connecteur-AC-250-V-15-A/391664834333?_trkparms=aid%3D555018%26algo%3DPL.SIM%26ao%3D2%26asc%3D20170831090034%26meid%3D3c898544c5764480a089374284e645cd%26pid%3D100005%26rk%3D4%26rkt%3D6%26sd%3D272503351041%26itm%3D391664834333&_trksid=p2047675.c100005.m1851
Module-relay-1-channel-with-Optocoupler : http://www.ebay.fr/itm/5V-Module-relais-1-canal-avec-Optocoupleur-H-L-Niveau-Triger-pour-Arduino-GF/292394725182?hash=item4414156f3e:g:GXYAAOSw9KhaTY~b
COUNTERSUNK-FLAT-HEAD : https://www.ebay.fr/itm/SULEVE-M3ASH5-10PCS-M3-HEX-COUNTERSUNK-FLAT-HEAD-SCREWS-ALLOY-STEEL-TITANIUM/182962068887?hash=item2a99639d97:m:mrP7R9UFRyWHSjsuRxxLvFQ
Neon lapms : https://www.ebay.co.uk/itm/Qty5-INS-3-Square-Dot-Miniature-Neon-Bulb-5-pcs-Glow-Lamp-Indicator-/120842256984
Similar models
thingiverse
free

SSR PS_ON COVER by thomasgobert
...mp;var=571595784259&sspagename=strk%3amebidx%3ait
thanks to 3dms : https://www.thingiverse.com/thing:2193481 for the upgrade.
thingiverse
free

Enclosure for marlin PS_ON (Auto power off your printer) by 3DModularSystems
...ww.3dmodularsystems.com
twitter: https://twitter.com/3dmodularsystem
youtube: http://www.youtube.com/c/3dmodularsystems3dprinters
thingiverse
free

Kossel power supply/usb plate by jnaulet
...:mewnx:it&_trksid=p3984.m1439.l2649http://www.ebay.fr/itm/281381257812?sspagename=strk:mewnx:it&_trksid=p3984.m1439.l2649
thingiverse
free
Gcode Power steering / Pilotage alim par Gcode sur Hictop 3DP17 by Diauguerry93
...r l'alimentation dans le menu du firmware marlin.
cette publication fait suite à : https://www.thingiverse.com/thing:2448359
grabcad
free

Schurter 4304.6071
...schurter 4304.6071
grabcad
power entry connector receptacle, male blades - module iec 320-c14 panel mount, flange
grabcad
free

AC Power Inlet - IEC 320 C14
...ac power inlet - iec 320 c14
grabcad
ac power inlet - iec 320 c14 red light rocker switch inlet male connector plug.stp
thingiverse
free

BlueTooth audio receiver casing + battery powered by trescurieux
...r bank" module
the circuit has very low consumption (~ 20 ma), some circuit will shutdown if the current consumed is too low
grabcad
free

Power Connector IEC C14 3 pins
...power connector iec c14 3 pins
grabcad
male connector iec c14 3 pins for panel mount
thingiverse
free

IEC 320 C14 Panel Mount Plug Adapter Power Connector Socket
...pins inlet power plug socket
where to buy - https://amzn.to/2tmls6g
follow me on instagram - https://www.instagram.com/kasa_tech/
thingiverse
free

Flyingbear P905 Power Relay Box by pbeyl
...e top of the box in parallel which allows to bypass the relay and keep the printer on if so desired.
hope you enjoy this upgrade.
Planetech3D
thingiverse
free

Oscilloscope case DS203 by Planetech3D
...oscilloscope case ds203 by planetech3d
thingiverse
ds203 oscilloscope protection case.
thingiverse
free
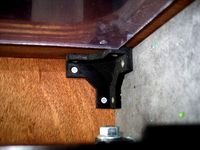
Internal Corner by Planetech3D
... by planetech3d
thingiverse
internal corner for the construction of a wooden box or polycarbonate.
the drilling diameter of 4 mm
thingiverse
free

Holder Deus XP by Planetech3D
...holder deus xp by planetech3d
thingiverse
wall support of deus xp
two versions either by the elbow joint or by the cane
thingiverse
free

Statuette bronze hercule by Planetech3D
...rcule by planetech3d
thingiverse
statuette bronze hercule from the roman era discovered in france in the department of ardèche.
thingiverse
free

Antique Terracotta mask of Apollo by Planetech3D
...antique terracotta mask of apollo by planetech3d
thingiverse
terracotta mask of apollo period antique, modeled by photogrammetry
thingiverse
free
ball pass filament by Planetech3D
...f the printer. passing the filament diameter is 4 mm for the use of the piece of tube ptfe
the hole is made with a stepped drill.
thingiverse
free

Coil Deus Xp by Planetech3D
...hopping cart token.
accessoire gadget pour la communauté d’utilisateur du détecteur xp deus.
un porte clef et un jeton de caddie.
thingiverse
free

Case XL6009 DC Boost Module + Voltmètre by Planetech3D
...009 dc boost module + voltmètre by planetech3d
thingiverse
case module xl6009 boost step-up module + led voltmètre dc-dc boost
thingiverse
free

Case for brushless motor controller by Planetech3D
...s motor controller card.
this motor driver works very well with hard drive engines.
you will need two m3 screws to close the case
thingiverse
free

Roman lion's head in bronze by Planetech3D
...his wall was probably utlise to decorate a piece of furniture, or a beam.
the lion roman times was a sign of strength and wealth.
Auto
3d_export
$5

auto
...auto
3dexport
auto
3ddd
$1

auto
...auto
3ddd
max7
turbosquid
$69
AUTO
...to
turbosquid
royalty free 3d model auto for download as obj on turbosquid: 3d models for games, architecture, videos. (1453538)
3d_export
$10

Auto
...auto
3dexport
3d_export
free

auto
...auto
3dexport
3ddd
$1

Auto posters
...auto posters
3ddd
машина
auto posters
turbosquid
$50

auto
... available on turbo squid, the world's leading provider of digital 3d models for visualization, films, television, and games.
turbosquid
$28

Auto
... available on turbo squid, the world's leading provider of digital 3d models for visualization, films, television, and games.
turbosquid
$20
auto
... available on turbo squid, the world's leading provider of digital 3d models for visualization, films, television, and games.
turbosquid
$5
auto
... available on turbo squid, the world's leading provider of digital 3d models for visualization, films, television, and games.
Module
turbosquid
$4

Module
...
turbosquid
royalty free 3d model module for download as max on turbosquid: 3d models for games, architecture, videos. (1259603)
3d_export
free

Martian module
...martian module
3dexport
martian module objects 18 textures are missing
design_connected
$39

Kennedee Moduls
...kennedee moduls
designconnected
kennedee moduls computer generated 3d model. designed by massaud, jean-marie.
design_connected
$39

Sayonara Moduls
...sayonara moduls
designconnected
bbb emmebonacina sayonara moduls computer generated 3d model. designed by decursu, giorgio.
design_connected
$27

Togo Moduls
...togo moduls
designconnected
ligne roset togo moduls computer generated 3d model. designed by ducaroy, michel.
design_connected
$34
Nuvola Moduls
...nuvola moduls
designconnected
bonaldo nuvola moduls 2-seater computer generated 3d model. designed by giuseppe viganò.
3d_export
free
Hibernation module
...hibernation module
3dexport
design_connected
$27

Sabi moduls
...sabi moduls
designconnected
paola lenti sabi moduls 2-seater computer generated 3d model. designed by francesco rota.
3d_export
$50

pls concrete module
...pls concrete module
3dexport
pls concrete module<br>pls with concrete mobile mixer module m5
turbosquid
free

Hibernation module
...squid
free 3d model hibernation module for download as blend on turbosquid: 3d models for games, architecture, videos. (1667696)
Universal
3d_export
$20
university
...university
3dexport
university model with textures.
3d_export
free

steven universe
...steven universe
3dexport
steven universe
3ddd
free

Quasar Universe
...quasar universe
3ddd
quasar
люстра quasar universe
turbosquid
$65

Universal
... available on turbo squid, the world's leading provider of digital 3d models for visualization, films, television, and games.
turbosquid
$65

University
... available on turbo squid, the world's leading provider of digital 3d models for visualization, films, television, and games.
turbosquid
$5

Universal
... available on turbo squid, the world's leading provider of digital 3d models for visualization, films, television, and games.
3d_export
$40
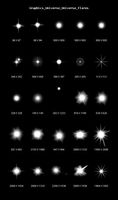
Graphics Universe Universe Flares 3D Model
...graphics universe universe flares 3d model
3dexport
textures
graphics universe universe flares 3d model crashangel 97554 3dexport
3d_export
$65

universe
...universe
3dexport
simple rendering of the scene file
3d_export
$65

university
...university
3dexport
simple rendering of the scene file
3ddd
$1

Gala Universal раковина
...universal раковина
3ddd
gala , universal
раковина
производитель gala
коллекция universal
Printer
archibase_planet
free

Printer
...inter
archibase planet
printer laser printer pc equipment
printer n120614 - 3d model (*.gsm+*.3ds) for interior 3d visualization.
archibase_planet
free

Printer
...rchibase planet
laser printer office equipment computer equipment
printer - 3d model (*.gsm+*.3ds) for interior 3d visualization.
turbosquid
$100

Printer
...er
turbosquid
royalty free 3d model printer for download as on turbosquid: 3d models for games, architecture, videos. (1487819)
turbosquid
$3

Printer
...turbosquid
royalty free 3d model printer for download as max on turbosquid: 3d models for games, architecture, videos. (1670230)
turbosquid
$1

printer
...turbosquid
royalty free 3d model printer for download as max on turbosquid: 3d models for games, architecture, videos. (1595546)
turbosquid
$1

printer
...turbosquid
royalty free 3d model printer for download as max on turbosquid: 3d models for games, architecture, videos. (1595105)
turbosquid
$10

Printer
...id
royalty free 3d model printer for download as max and 3dm on turbosquid: 3d models for games, architecture, videos. (1607146)
turbosquid
$7

Printer
...royalty free 3d model printer for download as ma, ma, and obj on turbosquid: 3d models for games, architecture, videos. (1644580)
turbosquid
$30

Printer
... available on turbo squid, the world's leading provider of digital 3d models for visualization, films, television, and games.
turbosquid
$20

Printer
... available on turbo squid, the world's leading provider of digital 3d models for visualization, films, television, and games.