Thingiverse
AudioMoth Vault v3 by brandonh
by Thingiverse
Last crawled date: 3 years ago
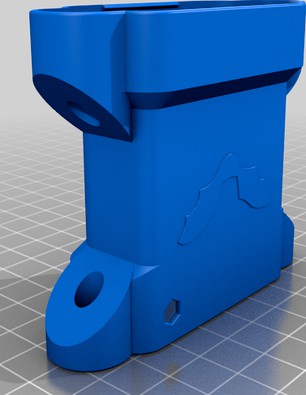
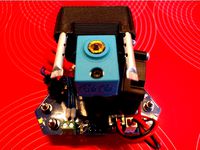
Protect and mount your AudioMoth (a full-spectrum acoustic datalogger) in style.
The AudioMoth Vault v3 is a highly-water-resistant case designed for field usage, which you can make with about $3 in materials, in under 3 hours, on any 3D printer. It provides a lower-cost alternative to the official waterproof case for the AudioMoth. With a little care in printing, it will pass an extended submersion test.
Compared to the v1 Vault, this one is easier to mount, vastly more water resistant, and has fewer parts that are much easier to source. At the desk, magnets are fun, but in the field, durability and mountability matter more.
Thanks to Bat Conservation International and other researchers, prototypes of the AudioMoth vault have been field-tested in the cloud forests of Nyungwe National Park in Rwanda, limestone forests in Jamaica, and near streams in Pennsylvania.
If you find this case useful, please post your Make, throw some love to BCI with a donation, and see what they’re up to lately. If you have comments, share them! I’d love to continue iterating the design based on feedback.
Features include:
Flexible mounting options: Use velcro straps, zip ties, webbing, or rope.
Water Resistance: The O-ring provides water resistance, is held in securely with a lip, and needs no glue. The bottom opening means that even if there is a constant drip above the audiomoth, no water should pool inside. An acoustic membrane keeps the water out, but lets the sound in.
Thumbscrew Closure: Instead of using plastic clips that will inevitably break, the Vault uses printed thumbscrews with easily-available hex bolts and nuts.
Parts you’ll need:
Acoustic membrane: 6mm ID, 10mm OD, adhesive backed. Alibaba link for IP67-rated membranes Specific Alibaba link (SV-021)
O-ring: 44mm ID, 48mm OD, 2mm width. Go for 70A hardness. 50A is a bit too soft. Purchase at a well-stocked Ace or Amazon:qty 10 qty 25 qty 50
Hex Bolts and Nuts: two each of 3”-long, hex-head 1/4-20 or 1/4-28 bolts plus matching nuts. With small tweaks, 70mm-long M6 bolts might be possible. Buy anywhere - Ace, Bolt Depot, Home Depot, etc.
Strap: Two large velcro ties work great to wrap around a tree, as does rope, zip ties, nylon webbing, or neoprene straps. There is one inch and ~3mm of reserved width between the bolts and the plastic body.
Grippy material(optional) Some adhesive-backed neoprene or even a glued rubber strip could help with getting a secure attachment to a tree.
If printed accurately, no finishing should be required, and assembly should take about 2 minutes. Assembly Instructions:
Press thumbscrews into hex heads.
Screw hex bolts through the hole. Yes, hand-threading is good; it holds these in when the case is upside-down.
Press nuts into the lid.
Add the O-ring. Press into one side while slightly stretching the material, then press into the other side. Then press all around so that it holds. You’ll get the hang of it quickly.
Assemble and tighten fully.
If you’re looking for a custom-logo version, reach out.
Note that you can make a little electrical tape “handle” to make it easier to pull out. The glue between the circuit board and battery case for an AudioMoth can vary in size, and for tight-fit ones, this tweak is helpful.
Printing Notes:
Print 2x thumbscrews, 1x lid, 1x body
Look in your Slicer’s 3d view at the main body section and try to get the extrusion width to be consistent for all perimeters, for the best quality.
Align the seam to the back for best aesthetics.
You can also slightly over-extrude when printing, to reduce the chance of any water intrusion outside of the O-ring.
Something temperature-resistant like PETG or ABS is preferred but PLA will probably work too.
Use 0.2mm layers, 5 perims at 0.5 width with 0% or low (<25%) infill for the main body, plus 5 top and 5 bottom layers so the lid is solid. Concentric top infill for the body part is recommended to give a smooth surface for the o-ring, to increase water resistance.
.1mm gap is designed-in for hex heads and nuts, which is a tad sloppy, but should reduce the need for an accurate printer. If the holes are a bit tight, a ¼” bit should open them up.
Can’t find the parts?
The screws & nuts aren’t truly necessary, as a clip in the plastic body holds the lid in.
The O-ring isn’t truly necessary, but is recommended.
Again - if you have comments, share them! I’d love to continue iterating the design based on feedback.
Similar models
thingiverse
free

M8 thumbscrew by RickHuisman
...in m8 hex bolt or nut.
i designed it for my bosch pbd 40 drill press but it is of course, suitable for a wide range of use cases.
thingiverse
free

M4 Hex Nut Thumbscrew for Makergear M2 by Karl_Williams
...x 35mm hex cap screw threaded from the bottom, along with the m4 hex nut with the thumbscrew to make setting the z height easier.
thingiverse
free

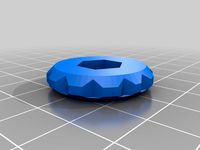
Quarter Inch Thumbscrew 1/4" Knob by CD4017
... 30mm.
no need to use support as a couple of bridging layers should print to cover the hexagon cut out, just drill through after.
thingiverse
free
Waveshare 5 inch HDMI LCD Case with flexible mounts by flajzi
..., qty 2 (used for mounting the bracket to the 3030 extrusion)
m5 t-nuts, qty 2
cad model is available here. any remix is welcome.
thingiverse
free

PanelDue 7i Case with mount arm - Elegant look (Integrated version) by bondy007
... conjunction with the m5x30mm bolts above)
m5x10mm, qty 2 (used for mounting the bracket to the 3030 extrusion)
m5 t-nuts, qty 2.
thingiverse
free

Customizable Thumbscrew by tdeagan
...from slipping out. the utility of the part really comes from turning the hex head, so the fit around the bolt is less important.
thingiverse
free
Thumbscrew for 1/4x20 hex nut by vutooth
... to overload or overtighten.
this design is provided for free to the community. use at your own risk, and at your own reward :)
thingiverse
free

Puzzle of Evil bolt for hinge by Gigante
...
please scale up the nuts if your printer is not diald in to handle 0,2mm gaps.
with too mutch gap, use gloe or melt it in place.
thingiverse
free

M3 Hex Bolt Thumbscrews by hbrandstaetter
... to allow modifications for other screws
edit: v5 uploaded which includes a longer "neck" for use with my east 3d gecko
thingiverse
free

HICTOP Bed Leveling Thumbscrew by Sefrez
... press fit m3 hex nuts. when threading on, the nut should face away from the bed. this ensures the thumb screw does not come off.
Brandonh
thingiverse
free

Maracas for Riley by brandonh
...es a hole at the top to attach some string, like a shoelace.
public link for the fusion 360 source is here:http://a360.co/2pjz1sg
thingiverse
free

Traxxas Rod End Backlash Tester by brandonh
..., and this thing provides an accurate way to measure the backlash of the ball within the ball joint, using a dial test indicator.
thingiverse
free

Tiny Graduate Cap by brandonh
...around the x or y axis before printing.
fusion 360 source model available at http://a360.co/2suk65f
enjoy! and congrats, hannah!
thingiverse
free
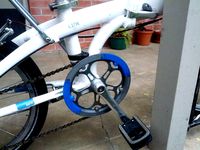
Bicycle Chain Guard by brandonh
...6" diameter bed. includes printed m6 threads.
if you want a single piece, it's an easy change to the inventor source.
thingiverse
free

Binocular Tripod Mount by brandonh
... extrusion width, 0.35 nozzle width on a kossel mini. sliced using slic3r v1.0.0rc1.
inventor 2013 source included (the .ipt).
thingiverse
free

Carriage for Kossel Mini (replaces ball rails) by brandonh
...
note the non-commercial cc license - a requirement, since this part derives from chillance's original integrated version.
thingiverse
free
Tusk cooling for Duet smart effector by brandonh
...ince re-made these to be shorter and have a consistent 1/16" hole size.
fusion360 sources:effector fan mounttusk duct bottom
thingiverse
free

AudioMoth AP9 Adapter by tamberg
...details, see https://github.com/mitwelten/mitwelten-iot-hardware-poc/blob/main/readme.md#audiomoth-audio-logging-microphone-with-lipo-battery membrane found via https://www.thingiverse.com/thing:4546491 - thanks @brandonh ...
thingiverse
free

Kossel Mini Prime Line Roller Carriage by electronhacks
...line roller carriage by electronhacks thingiverse i scaled up brandonh#39;s carriage that was sized for the dual 623 v...
Vault
turbosquid
$150

Vault
... available on turbo squid, the world's leading provider of digital 3d models for visualization, films, television, and games.
turbosquid
$35

Vault
...ree 3d model vault for download as ma, max, c4d, fbx, and obj on turbosquid: 3d models for games, architecture, videos. (1711324)
turbosquid
$2

Vault
... available on turbo squid, the world's leading provider of digital 3d models for visualization, films, television, and games.
3ddd
$1
VAULT-BOY
...vault-boy
3ddd
фигурка
фигурка vault-boy
+10 к выживанию на пустошах
3d_ocean
$20

Vault Door
...ng locking mechanism with spinning handle which is ideal for animation purposes. the model is also low poly so ideal for games...
3d_export
$20

bank vault open
...bank vault open
3dexport
bank vault open
3d_export
$20

bank vault close
...bank vault close
3dexport
bank vault close
turbosquid
$50

Mana Vault
...bosquid
royalty free 3d model mana vault for download as obj on turbosquid: 3d models for games, architecture, videos. (1512841)
turbosquid
$25

Bank vault
...bosquid
royalty free 3d model bank vault for download as max on turbosquid: 3d models for games, architecture, videos. (1265145)
turbosquid
$19

Bank Vault
...bosquid
royalty free 3d model bank vault for download as obj on turbosquid: 3d models for games, architecture, videos. (1147801)
V3
3d_export
$5

Poison-v3
...poison-v3
3dexport
poison-v3
3ddd
$1

Curtain v3
...curtain v3
3ddd
полупрозрачная штора v3
turbosquid
free

v3
... available on turbo squid, the world's leading provider of digital 3d models for visualization, films, television, and games.
3d_export
$5
potato v3
...potato v3
3dexport
turbosquid
$69

Skeletor v3
...royalty free 3d model skeletor v3 for download as ztl and obj on turbosquid: 3d models for games, architecture, videos. (1712713)
turbosquid
$49

Zombie v3
...
royalty free 3d model zombie v3 for download as obj and ztl on turbosquid: 3d models for games, architecture, videos. (1342458)
turbosquid
$2

Bitcoin v3
...
royalty free 3d model bitcoin v3 for download as c4d and prj on turbosquid: 3d models for games, architecture, videos. (1182845)
turbosquid
$29
Turret V3
...alty free 3d model turret v3 for download as ma, obj, and fbx on turbosquid: 3d models for games, architecture, videos. (1217498)
turbosquid
$20
Radiators v3
... free 3d model radiators v3 for download as max, max, and obj on turbosquid: 3d models for games, architecture, videos. (1607437)
turbosquid
$10
Wheel V3S
...e 3d model wheel v3s for download as 3ds, obj, fbx, and blend on turbosquid: 3d models for games, architecture, videos. (1344250)