Thingiverse
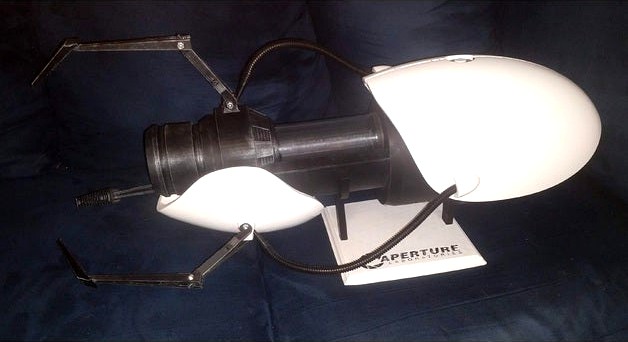
Arduino powered Portal Gun by Lunchbox7985
by Thingiverse
Last crawled date: 3 years, 3 months ago
link to Github for arduino code and stuff.https://github.com/Lunchbox7985/Portal-Gun
This only includes the modified parts, you still need to download the original.https://www.thingiverse.com/thing:3579224
The first 7 pieces replace parts in the original, so obviously dont print the originals of those. 8-11 are in addition to everything else, the 3 pieces to the stand are optional (but you know you want to proudly display this right?)
The changes i made to this are minor compared to the original, and mainly to house the electronics.
1 Generator : added speaker mounts and grills
2Collector : Added holes for the 3 red LEDs at the front of the gun, and widened the hole to use the acrylic rod listed instead of a glue stick
3 Generator Hatch : heavy modification for added switches, include right and left handed version. Left hand version puts the buttons for cancel portal, and the song to the right for easier access via your thumb, and the power switches and volume knob to the left. although i do notice when holding mine, (left handed) that i can hit the buttons with my knuckles fairly easy, so use your discretion when choosing.
4 Handle: heavy modification for large lighted arcade buttons.
5 Pipe Socket : larger hole for acrylic rod instead of glue stick
6 Finger pt. 1 : hole for red LED
7 Front cover pt 2 : holes for red LEDs
8 Neopixel ring mount : This goes in the end of the gun to hold the 16x neopixel LED ring.
9 Indicator Light holder : holds an individual neopixel at in the hole in the "generator top" piece. (may need sanded for a flush fit.
10 Rod neopixel holder : print 2, slips on the end of the acrylic rod to hold 2 7x Neopixel Jewels.
11 Speaker Enclosure : boxes to enclose the back of the speakers, should increase bass response. i did not test this without them so i dont want to say they are optional. even with them, it could sound better, so i would suggest using them. gluing them down, you should aim for air tight (this was difficult)
12 last 3 pieces are the stand to hold and display the gun.
List of parts/README, included in github link as well
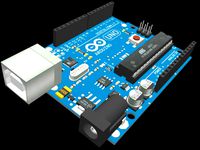
Arduino Nano (or clone) (https://www.amazon.com/ELEGOO-Arduino-ATmega328P-Without-Compatible/dp/B0713XK923/ref=sr_1_4?dchild=1&keywords=arduino+nano&qid=1602026870&sr=8-4)
i used those cheaper arduino clones i linked, should be interchangeable with any arduino nano.
Adafruit sound FX board (https://www.amazon.com/gp/product/B010M8UOR8/ref=ppx_yo_dt_b_asin_title_o07_s00?ie=UTF8&psc=1)
i used the 2mb version, and with the sounds i provided it came in just under 2mb, there is a 16mb version if you want to use your own sound effects, or have them higher quality.
Neopixel Jewel x2 (https://www.amazon.com/gp/product/B0105VMT4S/ref=ppx_yo_dt_b_asin_title_o01_s00?ie=UTF8&psc=1)
again, i got knock offs, but any neopixel compatible clone should do. I hvae had good luck so far with DIYMall brand from amazon.
Neopixel Ring 16 led version (https://www.amazon.com/dp/B08F9HSNSD/?coliid=IWRMIFVUICFMT&colid=3CGBY3S7A1KD5&psc=1&ref_=lv_ov_lig_dp_it)
same as above
Individual Neopixel (https://www.amazon.com/gp/product/B01D1FFVOA/ref=ppx_yo_dt_b_search_asin_title?ie=UTF8&psc=1)
i bought a pack of 100 as they are cheap, if you do other projects they can come in handy, but this only needs one.
2 SPST Switches (https://www.digikey.com/en/products/detail/cw-industries/GRS-4011-0118/4425759)
the modified STL files i provided have cutouts for switches of these dimensions specifically.
2 momentary buttons (i did one red and one black) (https://www.digikey.com/en/products/detail/e-switch/PS1023ARED/81776) (https://www.digikey.com/en/products/detail/e-switch/PS1023ABLK/82862)
same as above
Blue arcade button (https://www.digikey.com/en/products/detail/adafruit-industries-llc/3432/7349494)
same as above
Red arcade button (https://www.digikey.com/en/products/detail/adafruit-industries-llc/3430/7349492)
same as above
2 inch speakers (https://www.amazon.com/gp/product/B01CHYIU26/ref=ppx_yo_dt_b_asin_title_o05_s00?ie=UTF8&psc=1)
same as the switches, i designed the holes around these specific speakers.
5 volt amplifier (https://www.amazon.com/gp/product/B07G4DLM9D/ref=ppx_yo_dt_b_search_asin_title?ie=UTF8&psc=1)
a little less picky as the rest of the parts, this is designed around a usb battery bank, so any 5v amplifier should work. the one i used was about the cheapest available. also the hole in the hatch is designed around this one mounting to give you access to the volume knob.
Micro usb board (https://www.amazon.com/gp/product/B07B5ZDLJY/ref=ppx_yo_dt_b_search_asin_title?ie=UTF8&psc=1)
optional, as you could hardwire power directly too the system. (more on that below)
330 ohm resistors x4
might depend on the LEDs you get, but they should all be relatively the same. these just limit the current to keep the LEDs from burning out
3 Red 5mm LEDs, and another of any color (i used green) for the main power light.
these are for the base of the "fingers". in the game there were 3 red lights at the base as well and another 3 at the first joint. i opted for just the 3 for simplicity.
Misc wires (i used scrap ethernet cable and some dupont jumpers i got on amazon)
this is not exactly a power hog, so any wires should do fine.
USB battery bank (maybe not the smallest cheapest thing you can find, but it doesnt need to be huge)
with the exact parts listed above, minus the neopixel ring (i was originally going to just use 2 jewels), and only a single 8 ohm speaker hooked to the amp, with the amp at full volume i registered a little over an amp of current. i plan on running the 2 4-ohm speakers on each channel which will increase the current draw (i plan on testing it once i get it put together completely.) i have a battery which can supply 2 amps per usb, and a total of 3.2. if i notice power issues, i may hook the amp power to its own usb cord. i will try to remember to update this once i am done.
20mm or .8 inch acrylic rod. (https://www.amazon.com/gp/product/B0832JFR7F/ref=ppx_yo_dt_b_asin_title_o01_s00?ie=UTF8&psc=1)
i used a "bubble rod" so the lights were a little more visable in it. 20mm or .8 inch should work, these seem to come and go. every time i come back to order one again its unavailable and i have to find another seller. check amazon or ebay.
Clear pipe 2.5 inch (https://www.homedepot.com/p/POWERTEC-2-1-2-in-x-36-in-Long-Clear-Pipe-70176/207185612)
i had a hard time finding the metric size the original designer had used as i am in the states, he had used 60mm which is about 2.3 inch. i made the hole big enough to fit the 2.5 inch pipe i found from home depot (and it was a tight fit.)
Power:
notice i ran power directly to the 5v pin of the arduino. i believe this bypasses the voltage regulator and powers it directly. you could power the arduino off the VIN pin with a higher voltage battery and run the lights, fx board, and amp off this pin, but it would be pushing the arduino to the limit. i chose to just power everything separately from the usb battery bank so i don't fry the arduino. be careful though, as if you plug in your usb cable with this hooked up, it will attempt to output 5v on this pin and power everything else. the amplifier i linked can be turned off with the volume knob, so you should be safe that way
Button LEDs:
The LEDs in the blue and red arcade buttons could be powered off either A1 or A2. with the dupont connectors i used, it was more convenient to have 2 separate pins, but you don't have to use both of them if you dont want to. I do however have the 3 red LEDs a little dimmer, so A0 is different than A1 and A2.
The Song:
The song button is programmed to play "Still Alive". i have not included this in the files for copyright purposes. you will have to find a copy yourself. I formatted it to OGG , mono and the lowest quality to get it down to 1.08MB there is a little room on the 2MB board for it to be a little bigger than that. As stated above, you can always get the 16MB FX board for just a couple bucks more. i believe there are 4 models, 2MB and 16MB, both with and without a 3.5mm jack. any of them should work, but i did not use the headphone jack.
2 Power switches:
the reason there are 2 power switches, is one is a true power switch that kills power to the whole circuit (so your battery doesn't drain when you aren't using it). The other switch is a simulated power switch. it powers the gun up and down (with power up and down sound effects). if you have the simulated power switch on when you turn the main power switch on, sometimes it just jumps straight into the idle hum, sometimes a couple of the lights turn green. either way the gun works as expected once you push a button.
If you have any questions, comment on thingiverse, i might not see it immediately, but i will try my best to respond.
This only includes the modified parts, you still need to download the original.https://www.thingiverse.com/thing:3579224
The first 7 pieces replace parts in the original, so obviously dont print the originals of those. 8-11 are in addition to everything else, the 3 pieces to the stand are optional (but you know you want to proudly display this right?)
The changes i made to this are minor compared to the original, and mainly to house the electronics.
1 Generator : added speaker mounts and grills
2Collector : Added holes for the 3 red LEDs at the front of the gun, and widened the hole to use the acrylic rod listed instead of a glue stick
3 Generator Hatch : heavy modification for added switches, include right and left handed version. Left hand version puts the buttons for cancel portal, and the song to the right for easier access via your thumb, and the power switches and volume knob to the left. although i do notice when holding mine, (left handed) that i can hit the buttons with my knuckles fairly easy, so use your discretion when choosing.
4 Handle: heavy modification for large lighted arcade buttons.
5 Pipe Socket : larger hole for acrylic rod instead of glue stick
6 Finger pt. 1 : hole for red LED
7 Front cover pt 2 : holes for red LEDs
8 Neopixel ring mount : This goes in the end of the gun to hold the 16x neopixel LED ring.
9 Indicator Light holder : holds an individual neopixel at in the hole in the "generator top" piece. (may need sanded for a flush fit.
10 Rod neopixel holder : print 2, slips on the end of the acrylic rod to hold 2 7x Neopixel Jewels.
11 Speaker Enclosure : boxes to enclose the back of the speakers, should increase bass response. i did not test this without them so i dont want to say they are optional. even with them, it could sound better, so i would suggest using them. gluing them down, you should aim for air tight (this was difficult)
12 last 3 pieces are the stand to hold and display the gun.
List of parts/README, included in github link as well
Arduino Nano (or clone) (https://www.amazon.com/ELEGOO-Arduino-ATmega328P-Without-Compatible/dp/B0713XK923/ref=sr_1_4?dchild=1&keywords=arduino+nano&qid=1602026870&sr=8-4)
i used those cheaper arduino clones i linked, should be interchangeable with any arduino nano.
Adafruit sound FX board (https://www.amazon.com/gp/product/B010M8UOR8/ref=ppx_yo_dt_b_asin_title_o07_s00?ie=UTF8&psc=1)
i used the 2mb version, and with the sounds i provided it came in just under 2mb, there is a 16mb version if you want to use your own sound effects, or have them higher quality.
Neopixel Jewel x2 (https://www.amazon.com/gp/product/B0105VMT4S/ref=ppx_yo_dt_b_asin_title_o01_s00?ie=UTF8&psc=1)
again, i got knock offs, but any neopixel compatible clone should do. I hvae had good luck so far with DIYMall brand from amazon.
Neopixel Ring 16 led version (https://www.amazon.com/dp/B08F9HSNSD/?coliid=IWRMIFVUICFMT&colid=3CGBY3S7A1KD5&psc=1&ref_=lv_ov_lig_dp_it)
same as above
Individual Neopixel (https://www.amazon.com/gp/product/B01D1FFVOA/ref=ppx_yo_dt_b_search_asin_title?ie=UTF8&psc=1)
i bought a pack of 100 as they are cheap, if you do other projects they can come in handy, but this only needs one.
2 SPST Switches (https://www.digikey.com/en/products/detail/cw-industries/GRS-4011-0118/4425759)
the modified STL files i provided have cutouts for switches of these dimensions specifically.
2 momentary buttons (i did one red and one black) (https://www.digikey.com/en/products/detail/e-switch/PS1023ARED/81776) (https://www.digikey.com/en/products/detail/e-switch/PS1023ABLK/82862)
same as above
Blue arcade button (https://www.digikey.com/en/products/detail/adafruit-industries-llc/3432/7349494)
same as above
Red arcade button (https://www.digikey.com/en/products/detail/adafruit-industries-llc/3430/7349492)
same as above
2 inch speakers (https://www.amazon.com/gp/product/B01CHYIU26/ref=ppx_yo_dt_b_asin_title_o05_s00?ie=UTF8&psc=1)
same as the switches, i designed the holes around these specific speakers.
5 volt amplifier (https://www.amazon.com/gp/product/B07G4DLM9D/ref=ppx_yo_dt_b_search_asin_title?ie=UTF8&psc=1)
a little less picky as the rest of the parts, this is designed around a usb battery bank, so any 5v amplifier should work. the one i used was about the cheapest available. also the hole in the hatch is designed around this one mounting to give you access to the volume knob.
Micro usb board (https://www.amazon.com/gp/product/B07B5ZDLJY/ref=ppx_yo_dt_b_search_asin_title?ie=UTF8&psc=1)
optional, as you could hardwire power directly too the system. (more on that below)
330 ohm resistors x4
might depend on the LEDs you get, but they should all be relatively the same. these just limit the current to keep the LEDs from burning out
3 Red 5mm LEDs, and another of any color (i used green) for the main power light.
these are for the base of the "fingers". in the game there were 3 red lights at the base as well and another 3 at the first joint. i opted for just the 3 for simplicity.
Misc wires (i used scrap ethernet cable and some dupont jumpers i got on amazon)
this is not exactly a power hog, so any wires should do fine.
USB battery bank (maybe not the smallest cheapest thing you can find, but it doesnt need to be huge)
with the exact parts listed above, minus the neopixel ring (i was originally going to just use 2 jewels), and only a single 8 ohm speaker hooked to the amp, with the amp at full volume i registered a little over an amp of current. i plan on running the 2 4-ohm speakers on each channel which will increase the current draw (i plan on testing it once i get it put together completely.) i have a battery which can supply 2 amps per usb, and a total of 3.2. if i notice power issues, i may hook the amp power to its own usb cord. i will try to remember to update this once i am done.
20mm or .8 inch acrylic rod. (https://www.amazon.com/gp/product/B0832JFR7F/ref=ppx_yo_dt_b_asin_title_o01_s00?ie=UTF8&psc=1)
i used a "bubble rod" so the lights were a little more visable in it. 20mm or .8 inch should work, these seem to come and go. every time i come back to order one again its unavailable and i have to find another seller. check amazon or ebay.
Clear pipe 2.5 inch (https://www.homedepot.com/p/POWERTEC-2-1-2-in-x-36-in-Long-Clear-Pipe-70176/207185612)
i had a hard time finding the metric size the original designer had used as i am in the states, he had used 60mm which is about 2.3 inch. i made the hole big enough to fit the 2.5 inch pipe i found from home depot (and it was a tight fit.)
Power:
notice i ran power directly to the 5v pin of the arduino. i believe this bypasses the voltage regulator and powers it directly. you could power the arduino off the VIN pin with a higher voltage battery and run the lights, fx board, and amp off this pin, but it would be pushing the arduino to the limit. i chose to just power everything separately from the usb battery bank so i don't fry the arduino. be careful though, as if you plug in your usb cable with this hooked up, it will attempt to output 5v on this pin and power everything else. the amplifier i linked can be turned off with the volume knob, so you should be safe that way
Button LEDs:
The LEDs in the blue and red arcade buttons could be powered off either A1 or A2. with the dupont connectors i used, it was more convenient to have 2 separate pins, but you don't have to use both of them if you dont want to. I do however have the 3 red LEDs a little dimmer, so A0 is different than A1 and A2.
The Song:
The song button is programmed to play "Still Alive". i have not included this in the files for copyright purposes. you will have to find a copy yourself. I formatted it to OGG , mono and the lowest quality to get it down to 1.08MB there is a little room on the 2MB board for it to be a little bigger than that. As stated above, you can always get the 16MB FX board for just a couple bucks more. i believe there are 4 models, 2MB and 16MB, both with and without a 3.5mm jack. any of them should work, but i did not use the headphone jack.
2 Power switches:
the reason there are 2 power switches, is one is a true power switch that kills power to the whole circuit (so your battery doesn't drain when you aren't using it). The other switch is a simulated power switch. it powers the gun up and down (with power up and down sound effects). if you have the simulated power switch on when you turn the main power switch on, sometimes it just jumps straight into the idle hum, sometimes a couple of the lights turn green. either way the gun works as expected once you push a button.
If you have any questions, comment on thingiverse, i might not see it immediately, but i will try my best to respond.
Similar models
thingiverse
free

Desk Fan by NebNorse
...lpages04?ie=utf8&psc=1
motor control: https://www.amazon.com/gp/product/b01cnl6imc/ref=od_aui_detailpages04?ie=utf8&psc=1
thingiverse
free
12 Function Deep Dish Button Box by coyoteyz13
..._title_o03_s00?ie=utf8&psc=1
https://www.amazon.com/gp/product/b07vhcb1q4/ref=ppx_yo_dt_b_search_asin_title?ie=utf8&psc=1
thingiverse
free

LED base by EUCtech
...ch_asin_image?ie=utf8&psc=1
https://www.amazon.com/gp/product/b07bs75zpp/ref=ppx_yo_dt_b_search_asin_title?ie=utf8&psc=1
thingiverse
free
LED Paracord Dog Collar, Rechargeable by DemonicArchr
...utf8&psc=1
18650 charger board - https://www.amazon.com/gp/product/b01lhd9d7e/ref=oh_aui_detailpage_o02_s00?ie=utf8&psc=1
thingiverse
free

Star Citizen Control Panel 2 by kmobley6030
... to order this twice because i didn't notice that one of the switches in normally closed. you need both to be normally open.
thingiverse
free

PVC Bluetooth Speaker
...qlkkws5a2a&keywords=12v+power+supply&qid=1569933646&s=lawn-garden&sprefix=12v+power%2clawngarden%2c160&sr=1-4
thingiverse
free

Curved Lithophane Holder by vbdcbrenner
..._s00?ie=utf8&psc=1
switch - https://www.amazon.com/gp/product/b07cg2vgwg/ref=ppx_yo_dt_b_asin_title_o01_s00?ie=utf8&psc=1
thingiverse
free

Guitar Pickup Winder
...=utf8&psc=1
speed adjustmenthttps://www.amazon.com/gp/product/b07vpnhs5j/ref=ppx_yo_dt_b_asin_title_o02_s01?ie=utf8&psc=1
thingiverse
free

Light up Miku Leek by deusprogrammer
...ge_o01_s00?ie=utf8&psc=1
magnets:https://www.amazon.com/gp/product/b075p9qh8b/ref=oh_aui_detailpage_o00_s00?ie=utf8&psc=1
thingiverse
free

Tally Light by iotaxiii
...p;psc=1
pcb / solder breadboard: https://www.amazon.com/gp/product/b07zytz48n/ref=ppx_yo_dt_b_search_asin_title?ie=utf8&psc=1
Lunchbox7985
thingiverse
free

Mini Desk Lamp by Lunchbox7985
...ut this is more of a novelty and not exactly meant to be practical.
if you have any questions, feel free to ask in the comments.
thingiverse
free
Leatherman Bit Extender Clip by Lunchbox7985
...n from the top, as this wont stretch it as much.
i suggest printing with a brim, as neither model has very much bed contact area.
thingiverse
free

Spaceballs The Flamethrower by Lunchbox7985
...the trigger after i made the exploded parts diagram, so it looks a little different. i didnt feel like staging the diagram again.
thingiverse
free

Bike Headtube Headlight Mount by Lunchbox7985
...less fork. i made this for my bike specifically, but i thought i would post it here just in case someone else can make use of it.
thingiverse
free
Mini Pi Desktop by Lunchbox7985
...the card slot up enough to make it really easy to access. will update when i get the part printed and teh sd adapter in the mail.
thingiverse
free

Mini Monitor Stand (7" - 10") by Lunchbox7985
... the layer lined to run they way they do for added strength. so i would suggest printing everything as it sits, and use supports.
Arduino
turbosquid
$7
Arduino
...turbosquid
royalty free 3d model arduino for download as max on turbosquid: 3d models for games, architecture, videos. (1197165)
turbosquid
$3
Arduino
...turbosquid
royalty free 3d model arduino for download as c4d on turbosquid: 3d models for games, architecture, videos. (1305484)
3d_export
$5
arduino satellite
...rt
this model is the exact arduino based satellite model with some basic sensors and camera modules and also includes batteries.
turbosquid
$1
Arduino UNO
...alty free 3d model arduino uno for download as , stl, and wrl on turbosquid: 3d models for games, architecture, videos. (1515932)
3d_export
$5
esp8266 box arduino
...esp8266 box arduino
3dexport
box for esp8266 module with wire hole. inside dimensions: 49x26 mm. height 15 mm.
3d_export
$60
Arduino Uno Rev3 Microcontroller 3D Model
...mega328p circuit board spark cable wire 5v 74v 9v 111v
arduino uno rev3 microcontroller 3d model danielgarnier4403 97237 3dexport
3d_export
free
arduino rover kit
...no!!! materials: no!!! rigged: no animated: no uv mapped: no it is not an exact copy of the original! not subject to 3d printing!
3d_ocean
$7
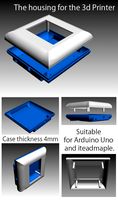
The housing for the 3d Printer
...the housing for the 3d printer 3docean arduino device housing stl the housing consists of two portions:...
3d_export
$5
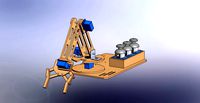
arm 4 axis
...uno -4 servo motor 180° -3 joystick (x,y) for arduino -mdf wood -some wires -cnc laser cut...
3d_export
$5

solar tracker
...machine for the frame . list of material : -arduino uno -2 step motor with driver -4 ldr sensor...
Gun
archibase_planet
free
Gun
...t
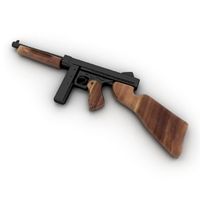
gun tommy gun thompson gun thompson submachine gun
gun thompson n120313 - 3d model (*.gsm+*.3ds) for interior 3d visualization.
archibase_planet
free
Gun
...gun
archibase planet
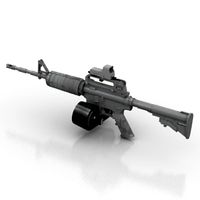
gun machine-gun submachine gun
gun m4a1 n260713 - 3d model (*.gsm+*.3ds+*.max) for 3d visualization.
archibase_planet
free
Gun
...base planet
gun submachine gun sub-machine-gun
gun fn scar mark16 n091210 - 3d model (*.gsm+*.3ds) for interior 3d visualization.
archibase_planet
free
Gun
...gun
archibase planet
gun rifle hand-gun
gun n221010 - 3d model (*.gsm+*.3ds) for interior 3d visualization.
archibase_planet
free
Gun
...gun
archibase planet
gun automatic machine machine gun
gun p90 n020515 - 3d model (*.gsm+*.3ds+*.max) for 3d visualization.
archibase_planet
free
Gun
...gun
archibase planet
gun automatic rifle submachine-gun
gun m4 n221112 - 3d model (*.gsm+*.3ds) for interior 3d visualization.
archibase_planet
free
Gun
...gun
archibase planet
gun m16 machine gun
gun m16 n030613 - 3d model (*.gsm+*.3ds+*.max) for interior 3d visualization.
archibase_planet
free
Gun
...gun
archibase planet
machine-gun gun fire-arms shooter
gun n270211 - 3d model (*.gsm+*.3ds) for interior 3d visualization.
archibase_planet
free
Gun
...hibase planet
gun automatic machine machine gun
gun jackhammer mk3a1 n290415 - 3d model (*.gsm+*.3ds+*.max) for 3d visualization.
archibase_planet
free
Gun
...n
archibase planet
paintball gun gun paintball
gun paintball bt 4 renta n280611 - 3d model (*.3ds) for interior 3d visualization.
Portal
3d_export
$5

portal
...portal
3dexport
old portal
3d_export
$5

portal
...portal
3dexport
magic portal
3d_export
$5

portal
...portal
3dexport
this is a portal to another world
turbosquid
$9

Portal PORTAL black coin
...ty free 3d model portal portal black coin for download as max on turbosquid: 3d models for games, architecture, videos. (1624894)
turbosquid
$9

Portal PORTAL gold coin
...lty free 3d model portal portal gold coin for download as max on turbosquid: 3d models for games, architecture, videos. (1624888)
turbosquid
$10

portal
...
turbosquid
royalty free 3d model portal for download as max on turbosquid: 3d models for games, architecture, videos. (1244476)
3d_export
$5

portal
...portal
3dexport
3d_export
$5

portal
...portal
3dexport
3d_export
$5

portal
...portal
3dexport
3d_export
$5

Portal
...portal
3dexport
Powered
turbosquid
$100

power
...ower
turbosquid
royalty free 3d model power for download as on turbosquid: 3d models for games, architecture, videos. (1421990)
3d_export
$5

Power
...power
3dexport
3d_export
$5

power outlets
...power outlets
3dexport
power outlets
3ddd
$1

lion power
...lion power
3ddd
лев , статуя
lion power gold sculpture
3ddd
$1

Sea Power
...
компас , море , часы
часы с компасом sea power
3ddd
free

Meridiani / Power
...power
3ddd
meridiani , круглый
стол power производитель meridiani, диаметр 120,высота 67
3d_export
$5

Power Surge
...power surge
3dexport
the power surge is a all mesh carnival ride to lower in game part count and lag
turbosquid
$8

Airport Ground Power Unit (AXA Power )
... available on turbo squid, the world's leading provider of digital 3d models for visualization, films, television, and games.
turbosquid
$50

Power Houser
...rbosquid
royalty free 3d model power houser for download as on turbosquid: 3d models for games, architecture, videos. (1333800)
3d_export
$5

power outlet
...power outlet
3dexport
power outlet<br>format file maya 2018, 3d max 2017, obj, fbx