Thingiverse
Arduboy replacement face/back plate by n602
by Thingiverse
Last crawled date: 3 years ago
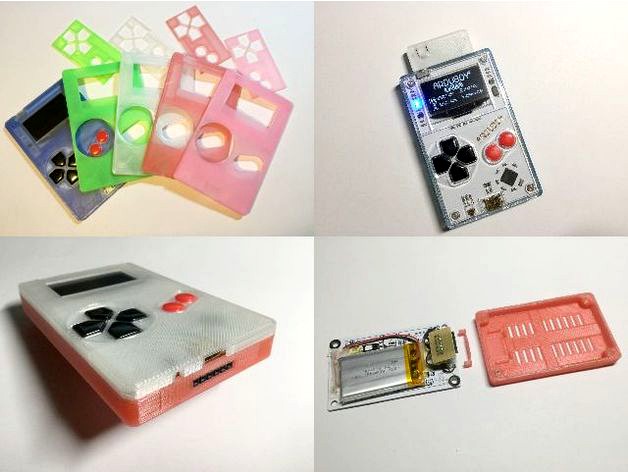
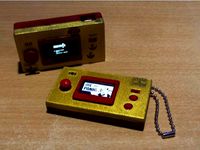
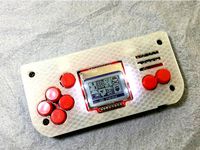
Arduboy replacement face plate
-This is a replacement part of Arduboy's Face-Plate.
Arduboy : https://arduboy.com/
-Please make it with the original back plate, screws, and buttons.
-Transparent/translucent filaments are recommended.
Examples of output shown in the attached picture are "t-glase" and "PLA".
( t-glase blue / PLA-translucent-green / PLA-transparent / PLA-translucent-red / PLA-translucent-pink )
-The screw assembled to Arduboy is not a tap screw.
Please try so that it can be screwed into the hole as shown in the attached picture.
And be careful not to overtighten it.
9/06/2018 : Update
-addition of casing parts for Mr. Blinky's Flash Cart system.
? Flash Cart for ARDUBOY ?
For Flash Cart, please refer to Mr. Blinky's Github.
This thing is related to the following thread of Arduboy 's community,
-Flash cart(ridge)https://community.arduboy.com/t/flash-cart-ridge/5840
-Arduboy replacement face/back platehttps://community.arduboy.com/t/arduboy-replacement-face-back-plate/5619
-Arduboy custom bootloaderhttps://community.arduboy.com/t/arduboy-custom-bootloader/4160
I deeply appreciate Mr. Blinky and all the people of the Arduboy community.
Thanks for much advice and suggestions.
-CAD and STL file;
FlashCart20180820.stp / .123dx
cart20180820_cfr.stl
cart20180820_cbk.stl
cart20180820_prp.stl
[ Regarding the above three STLs, 0.2 mm resolution is strongly recommended for output with 3Dprinter.]
FlashCart20180820_backplate.stp / .123dx
cart20180820_bkp.stl
cart20180820_cnc.stl
FlashCart20180820_backplate_M1p6x5mm.stp / .123dx
cart20180820_bkp-m1p6x5.stl
-For detailed information
Please find a readme pdf file,
readme-CasingPartsForFLASHCART_20180909.pdf
4/15/2018 : Update
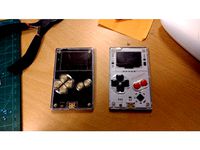
-Improvement of details and addition of Back-Plate parts.
-notice:
When replacing the backplate, 4pcs. of M2, 5 mm tapping screws are required.
Please refer to the photo.
If you just replace face-plate, there is no change in the process and you do not need a tapping screw.
Please properly select Lipo batteries based on correct knowledge. It is very dangerous to misuse the Lipo battery and damage it.
-CAD file;
case113.stp (case_113.123dx)
-STL file;
case113_frt.stl --> face plate
case113_btn.stl --> button plate
case113_bk2mm.stl --> back plate(Depth=2mm), for replacing the backplate only without replacing the battery.
case113_bk7mm.stl --> back plate(Depth=7mm), for replacing with a large capacity battery.
case113_b9mm.stl --> back plate(Depth=9mm), for replacing with a huge capacity battery.
4/20/2018 : Update
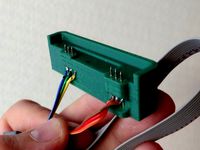
-addition of Back-Plate for large battery with Arduino-ISP (SPI) I/F.
-CAD file;
case_113_btcn015.stp (case_113_btcn015.123dx)
-STL file;
case113_015_bk7spi.stl
case113_015_cnc.stl
-requirement;
piece of universal board(t=1.5 or 1.6 mm) --> for 15 x 22 mm universal board.
female header --> 6 pin, width=15 mm.
cut end of flat cable or 6 wires, about 35 mm long.
4 pcs. of M 2 , 5 mm tapping screws .
The attached photo shows a 860mAh LiPo-battery of size "603048", 30 x 48 x (t=6)mm.
The maximum size of the LiPo-battery that can be stored is about 40 x 50 x (t=6)mm.
5/3/2018 : Update
-addition of Back-Plate for large battery with SPI, I2C, TX & RX connector
-CAD file;
case_113_btcn019.stp (case_113_btcn019.123dx)
-STL file;
case113_btcn019_bkp.stl
case113_btcn019_cnc.stl
case113_btcn019_prp.stl
-requirement;
piece of universal board(t=1.5 or 1.6mm) --> for 15x32mm universal board.
female header --> 12 pin, width=31.5mm.
cut end of flat cable or 10 wires, about 35mm long.
4pcs. of "M2, 5 mm tapping screws" are required.
-The attached photo shows a LiPo-battery of size "603048", 30 x 48 x (t=6)mm.
The maximum size of the LiPo-battery that can be stored is about 40 x 50 x (t=6)mm.
However, if it is a little smaller battery, wiring etc. becomes easy.
-The arrangement of signal lines of the pin header shown in the picture is under consideration.
-This thing is related to the following thread of Arduboy 's community, "Development".https://community.arduboy.com/t/arduboy-replacement-face-back-plate/5619
-I am very grateful to Mr.Blinky, crait, MLXXXp, Keyboard_Camper, filmote, Pharap, eried, Pygasm, bateske and all of Arduboy's community.
Thanks for much advice and suggestions.
5/4/2018 : Update
-Improvement of details of button-plate parts.
case113_btn.stl ==> [update] ==> case113_btn02.stl
-CAD file;
case_113_btn02.stp (case_113_btn02.123dx)
-STL file;
case_113_btn02.stl
-The gap between "case113_btn02.stl" and the Arduboy's up/down/left/right buttons was slightly narrower than that of "case113_btn.stl".
Since the position of the button is stable and the swinging motion of the button is reduced, please use "case113_btn02.stl".
-This is a replacement part of Arduboy's Face-Plate.
Arduboy : https://arduboy.com/
-Please make it with the original back plate, screws, and buttons.
-Transparent/translucent filaments are recommended.
Examples of output shown in the attached picture are "t-glase" and "PLA".
( t-glase blue / PLA-translucent-green / PLA-transparent / PLA-translucent-red / PLA-translucent-pink )
-The screw assembled to Arduboy is not a tap screw.
Please try so that it can be screwed into the hole as shown in the attached picture.
And be careful not to overtighten it.
9/06/2018 : Update
-addition of casing parts for Mr. Blinky's Flash Cart system.
? Flash Cart for ARDUBOY ?
For Flash Cart, please refer to Mr. Blinky's Github.
This thing is related to the following thread of Arduboy 's community,
-Flash cart(ridge)https://community.arduboy.com/t/flash-cart-ridge/5840
-Arduboy replacement face/back platehttps://community.arduboy.com/t/arduboy-replacement-face-back-plate/5619
-Arduboy custom bootloaderhttps://community.arduboy.com/t/arduboy-custom-bootloader/4160
I deeply appreciate Mr. Blinky and all the people of the Arduboy community.
Thanks for much advice and suggestions.
-CAD and STL file;
FlashCart20180820.stp / .123dx
cart20180820_cfr.stl
cart20180820_cbk.stl
cart20180820_prp.stl
[ Regarding the above three STLs, 0.2 mm resolution is strongly recommended for output with 3Dprinter.]
FlashCart20180820_backplate.stp / .123dx
cart20180820_bkp.stl
cart20180820_cnc.stl
FlashCart20180820_backplate_M1p6x5mm.stp / .123dx
cart20180820_bkp-m1p6x5.stl
-For detailed information
Please find a readme pdf file,
readme-CasingPartsForFLASHCART_20180909.pdf
4/15/2018 : Update
-Improvement of details and addition of Back-Plate parts.
-notice:
When replacing the backplate, 4pcs. of M2, 5 mm tapping screws are required.
Please refer to the photo.
If you just replace face-plate, there is no change in the process and you do not need a tapping screw.
Please properly select Lipo batteries based on correct knowledge. It is very dangerous to misuse the Lipo battery and damage it.
-CAD file;
case113.stp (case_113.123dx)
-STL file;
case113_frt.stl --> face plate
case113_btn.stl --> button plate
case113_bk2mm.stl --> back plate(Depth=2mm), for replacing the backplate only without replacing the battery.
case113_bk7mm.stl --> back plate(Depth=7mm), for replacing with a large capacity battery.
case113_b9mm.stl --> back plate(Depth=9mm), for replacing with a huge capacity battery.
4/20/2018 : Update
-addition of Back-Plate for large battery with Arduino-ISP (SPI) I/F.
-CAD file;
case_113_btcn015.stp (case_113_btcn015.123dx)
-STL file;
case113_015_bk7spi.stl
case113_015_cnc.stl
-requirement;
piece of universal board(t=1.5 or 1.6 mm) --> for 15 x 22 mm universal board.
female header --> 6 pin, width=15 mm.
cut end of flat cable or 6 wires, about 35 mm long.
4 pcs. of M 2 , 5 mm tapping screws .
The attached photo shows a 860mAh LiPo-battery of size "603048", 30 x 48 x (t=6)mm.
The maximum size of the LiPo-battery that can be stored is about 40 x 50 x (t=6)mm.
5/3/2018 : Update
-addition of Back-Plate for large battery with SPI, I2C, TX & RX connector
-CAD file;
case_113_btcn019.stp (case_113_btcn019.123dx)
-STL file;
case113_btcn019_bkp.stl
case113_btcn019_cnc.stl
case113_btcn019_prp.stl
-requirement;
piece of universal board(t=1.5 or 1.6mm) --> for 15x32mm universal board.
female header --> 12 pin, width=31.5mm.
cut end of flat cable or 10 wires, about 35mm long.
4pcs. of "M2, 5 mm tapping screws" are required.
-The attached photo shows a LiPo-battery of size "603048", 30 x 48 x (t=6)mm.
The maximum size of the LiPo-battery that can be stored is about 40 x 50 x (t=6)mm.
However, if it is a little smaller battery, wiring etc. becomes easy.
-The arrangement of signal lines of the pin header shown in the picture is under consideration.
-This thing is related to the following thread of Arduboy 's community, "Development".https://community.arduboy.com/t/arduboy-replacement-face-back-plate/5619
-I am very grateful to Mr.Blinky, crait, MLXXXp, Keyboard_Camper, filmote, Pharap, eried, Pygasm, bateske and all of Arduboy's community.
Thanks for much advice and suggestions.
5/4/2018 : Update
-Improvement of details of button-plate parts.
case113_btn.stl ==> [update] ==> case113_btn02.stl
-CAD file;
case_113_btn02.stp (case_113_btn02.123dx)
-STL file;
case_113_btn02.stl
-The gap between "case113_btn02.stl" and the Arduboy's up/down/left/right buttons was slightly narrower than that of "case113_btn.stl".
Since the position of the button is stable and the swinging motion of the button is reduced, please use "case113_btn02.stl".
Similar models
thingiverse
free
Arduboy ISP Pogo Programmer by eried
...unity.arduboy.com/t/bring-your-arduboy-back-from-the-dead-burn-bootloader/3422
pogo pins:https://s.click.aliexpress.com/e/_98uysf
thingiverse
free
Arduboy buttons by eried
...arduboy buttons by eried
thingiverse
print replacement buttons for your arduboy.
thingiverse
free
gamebuino shell case v0.42 by n602
...op.stl
<update-10/12/2017>
i improved top plate.
gmbn_shell_052_top.123dx and gmbn_shell_052_top.stp
gmbn_shell_052_top.stl
thingiverse
free
Arduboy Dock by eried
...o here:https://community.arduboy.com/t/wip-arduboy-dock-3d-printed-dock-rpi/3809
demo:https://www.youtube.com/watch?v=zswhooepzko
thingiverse
free

Arduino handheld arcade cabinet by Mehozavr
...uzzers
power switch
3 aa battery holder
50*70 solder board
6x 12*12 tact buttons with caps
m3 and m2 screws
wires and other stuff
thingiverse
free

Cover for a Blinky- prototype by JayJo
...ayjo
thingiverse
test stl file to see how deflectors and translucency appear over an active blinky grid
with silly robot bling
thingiverse
free

Dual 16850 Battery Holder Mounting Plate by ctheroux
... for the screws are 90 mm apart. the plate is 40 mm x 75 mm. the screw holes are 3.25 mm in diameter. the plate is 1 mm thick.
thingiverse
free

Foreo Battery Plate by JosephSeph
... metal plate that will have contact with the batteries and just super glue to the space provided in the model. works like a charm
thingiverse
free
Lipo Battery Base Protector Plate by mp3d
...protector base plate protects lipo during crash
include rounded edges to save lipo stripe
thickness: 3 mm
weight 5 g
length 85 mm
thingiverse
free

Pull Tab for LiPo Battery JST-PH connector (pigtail) by reed
...ases the life of your components.
update oct 25, 2014:
uploaded an improved stronger version ("battery grabber2.stl")
Arduboy
thingiverse
free
Arduboy buttons by eried
...arduboy buttons by eried
thingiverse
print replacement buttons for your arduboy.
thingiverse
free

Arduboy case
... for the arduboy handheld arduino-based game thingy.
i've included the step files to make it (hopefully) easier to customise.
thingiverse
free
Arduboy mini shell by zdanee
...arduboy mini shell by zdanee
thingiverse
this is a custom shell for a tiny arduboy compatible system.
thingiverse
free

Arduboy mock-up by ace_dent
...oy mock-up by ace_dent
thingiverse
an openscad model of an arduboy unit. based on early technical spec's - nothing official!
thingiverse
free
Arduboy Dock by eried
...o here:https://community.arduboy.com/t/wip-arduboy-dock-3d-printed-dock-rpi/3809
demo:https://www.youtube.com/watch?v=zswhooepzko
thingiverse
free
Arduboy ISP Pogo Programmer by eried
...unity.arduboy.com/t/bring-your-arduboy-back-from-the-dead-burn-bootloader/3422
pogo pins:https://s.click.aliexpress.com/e/_98uysf
thingiverse
free

Arduboy Dev Kit 3D Printable Case by Pteraghost
...l, will have tweaks and cooler looking ones completed in time, just wanted a basic model out there available for people to use :)
thingiverse
free
Solar charging case for Arduboy by eried
...ap solar panel. print, place the solar panel inside and join the 2 pieces.
solar panel: https://s.click.aliexpress.com/e/_dxyvvg1
thingiverse
free
Arduboy Game and Watch by Nochii
...press.com/item/4000317848483.html
copper soldering solder wire: (motor wire)https://www.aliexpress.com/item/1005001375168317.html
N602
thingiverse
free

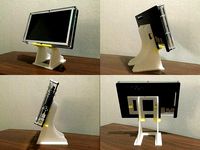
Case & Stand for SHARP 5.5" 1080x1920 LCD unit by n602
...tmlhttp://n-2750.cocolog-nifty.com/n602/2017/06/cg5522-3-782d.htmlhttp://n-2750.cocolog-nifty.com/n602/2017/06/cg5522-4-6f0a.html
thingiverse
free

ORANGE-Python bumper by n602
...m3 6mm bolt x 4pcs.
-please refer to the pictures for how to assemble.
cad files
opcf0f26s.stp [step file]
stl files
opcf026.stl
thingiverse
free
Replacement case for “MAKERbuino” by n602
...ntcaseformakerbuino_ver_087.pdf
[notice]
in the case of revisions or parts changes, this item may be not suitable for makerbuino.
thingiverse
free

Simple case for Raspberry Pi model B+/Pi2/Pi3 by n602
...y n602
thingiverse
simple case for raspberry pi model b+/pi2
[10/22/2016]-update for raspberry pi3.
[6/13/2017]-123dx files fix.
thingiverse
free

ORANGE-RISC bumper by n602
...efer to the pictures for how to assemble.
cad files
orangerisc_028_3.stp
stl files
or_028base.stl
or_028_3top.stl
or_028cover.stl
thingiverse
free
Raspberry Pi portable case by n602
...berry pi, adafruit's pitft, gpio cable, m2.6(2.5) bolt(8mm long) & nut and mobile battery (& cable) 're required.
thingiverse
free
Simple case for Raspberry Pi model A/B by n602
...ointed out.
when "show sketch" is done, a lot of unnecessary sketches appear.
-those unnecessary sketches were deleted.
thingiverse
free
gamebuino shell case v0.42 by n602
...op.stl
<update-10/12/2017>
i improved top plate.
gmbn_shell_052_top.123dx and gmbn_shell_052_top.stp
gmbn_shell_052_top.stl
thingiverse
free
Display Stand for HDMIPi by n602
...tter may be wrong or something will be changed.
please verify the connector shape, pin assigns and specification of audio amp ic.
thingiverse
free

Raspberry Pi ZERO "FRISK" size case by n602
...zero.http://www.frisk.jp/lineup.html
-perhaps this form of "frisk" case may only be sold in some countries and regions.
Plate
archibase_planet
free

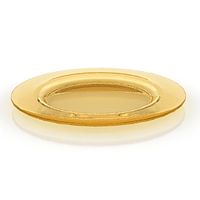
Plates
...plates
archibase planet
plates and dishes plate
plates - 3d model (*.gsm+*.3ds) for interior 3d visualization.
3d_export
$5

plate
...plate
3dexport
plate
archibase_planet
free
Plates
...plates
archibase planet
plates and dishes plate kitchen ware
plates - 3d model (*.gsm+*.3ds) for interior 3d visualization.
archibase_planet
free
Plates
...plates
archibase planet
plate plates and dishes crockery
plates 2 - 3d model (*.gsm+*.3ds) for interior 3d visualization.
archibase_planet
free

Plate
...plate
archibase planet
dinner-plate plate kitchen ware
plate n070808 - 3d model (*.gsm+*.3ds) for interior 3d visualization.
3d_export
$6

plate
...plate
3dexport
design of plate
3d_export
$5

plate
...plate
3dexport
plate lowpoly
archibase_planet
free
Plates
...plates
archibase planet
plate dish kitchen-ware
plate - 3d model for interior 3d visualization.
3ddd
$1
Plates
...plates
3ddd
полка , тарелка
african plates
archibase_planet
free
Plate
...plate
archibase planet
plate kitchen ware
plate - 3d model (*.gsm+*.3ds) for interior 3d visualization.
Replacement
3d_export
$12

replaceable bristle
...replaceable bristle
3dexport
this is 3d printable replaceable bristle toothbrush.
3d_export
$34
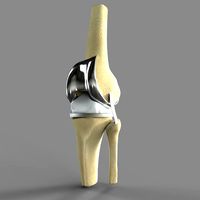
Knee Replacement
...h meets the lower leg. ... during a total knee replacement, the end of the femur bone is removed and replaced with a metal shell.
3d_export
$44
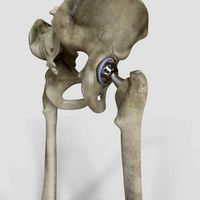
Hip Replacement
...omponents. the damaged femoral head is removed and replaced with a metal stem that is placed into the hollow center of the femur.
turbosquid
$59

Hip replacement
...el hip replacement for download as ma, c4d, lwo, lxo, and obj on turbosquid: 3d models for games, architecture, videos. (1520195)
turbosquid
$10

Module replacment station
...alty free 3d model module replacment station for download as on turbosquid: 3d models for games, architecture, videos. (1271271)
3d_export
$8
tool replacement gearbox
...tool replacement gearbox
3dexport
eccentric lifting mechanism, you can process according to available drawings.
turbosquid
$7

Globe Oil Atomizer Replacement Housing
... oil atomizer replacement housing for download as ige and stl on turbosquid: 3d models for games, architecture, videos. (1253839)
turbosquid
free

SLICE Ceramic Scapel (Replaceable Blade)
... (replaceable blade) for download as obj, fbx, blend, and dae on turbosquid: 3d models for games, architecture, videos. (1363525)
3d_export
$19
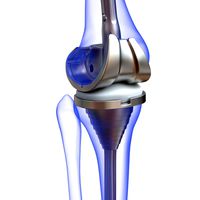
Knee Replacement Implant
...ntimeter<br>__________________________<br>poly count :<br>polygon count - 217440<br>vertex count - 108776
turbosquid
$19

(Project) Bad odor filtering sytem with support rail and pulley that assure a comfortable gel filter element replacement.
... available on turbo squid, the world's leading provider of digital 3d models for visualization, films, television, and games.
Face
turbosquid
$100
face a face
... available on turbo squid, the world's leading provider of digital 3d models for visualization, films, television, and games.
turbosquid
$6
Face To Face Swing
... available on turbo squid, the world's leading provider of digital 3d models for visualization, films, television, and games.
3ddd
$1
Almerich Face to Face
... гибкостью материала, прозрачностью и тактом, чтобы создавать игры со светом и тенью.
размеры: 48 x 48 x 155 см
полигоны: 39 376
design_connected
$11
Face
...face
designconnected
montis face chairs computer generated 3d model. designed by gerard van den berg.
turbosquid
$15

Face
...ce
turbosquid
royalty free 3d model face for download as mud on turbosquid: 3d models for games, architecture, videos. (1178369)
turbosquid
$6
Face
...ce
turbosquid
royalty free 3d model face for download as max on turbosquid: 3d models for games, architecture, videos. (1409756)
turbosquid
$1
Face
...uid
royalty free 3d model face for download as obj and blend on turbosquid: 3d models for games, architecture, videos. (1288500)
turbosquid
$150

Face
... available on turbo squid, the world's leading provider of digital 3d models for visualization, films, television, and games.
turbosquid
$50

face
... available on turbo squid, the world's leading provider of digital 3d models for visualization, films, television, and games.
turbosquid
$15

Face
... available on turbo squid, the world's leading provider of digital 3d models for visualization, films, television, and games.
Back
turbosquid
$20

Man and woman back to back 0688
...back to back 0688 for download as max, obj, fbx, wrl, and stl on turbosquid: 3d models for games, architecture, videos. (1706347)
3d_export
free
Back yard
...back yard
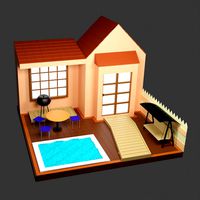
3dexport
back yard 3d model in isometric art style
design_connected
$27
Get Back
...get back
designconnected
erba italia get back computer generated 3d model. designed by soressi, giorgio.
turbosquid
$1

Back Pack
...osquid
royalty free 3d model back pack for download as blend on turbosquid: 3d models for games, architecture, videos. (1463340)
3d_export
$40

delorean back to the future
...delorean back to the future
3dexport
delorean back to the future
3ddd
$1
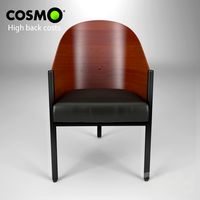
Chair High back
... офисный стул , cosmo
офисный стул high back от cosmo
3d_export
$10

Back Stage
...back stage
3dexport
3d_export
$5

back of the chair
...back of the chair
3dexport
3ddd
$1
cross back chairs
...cross back chairs
3ddd
flexform
cross back chairs
turbosquid
$5

BACK CARRIAGE
...3d model back carriage for download as c4d, 3ds, fbx, and obj on turbosquid: 3d models for games, architecture, videos. (1560468)